background image

69

novatelwireless.com

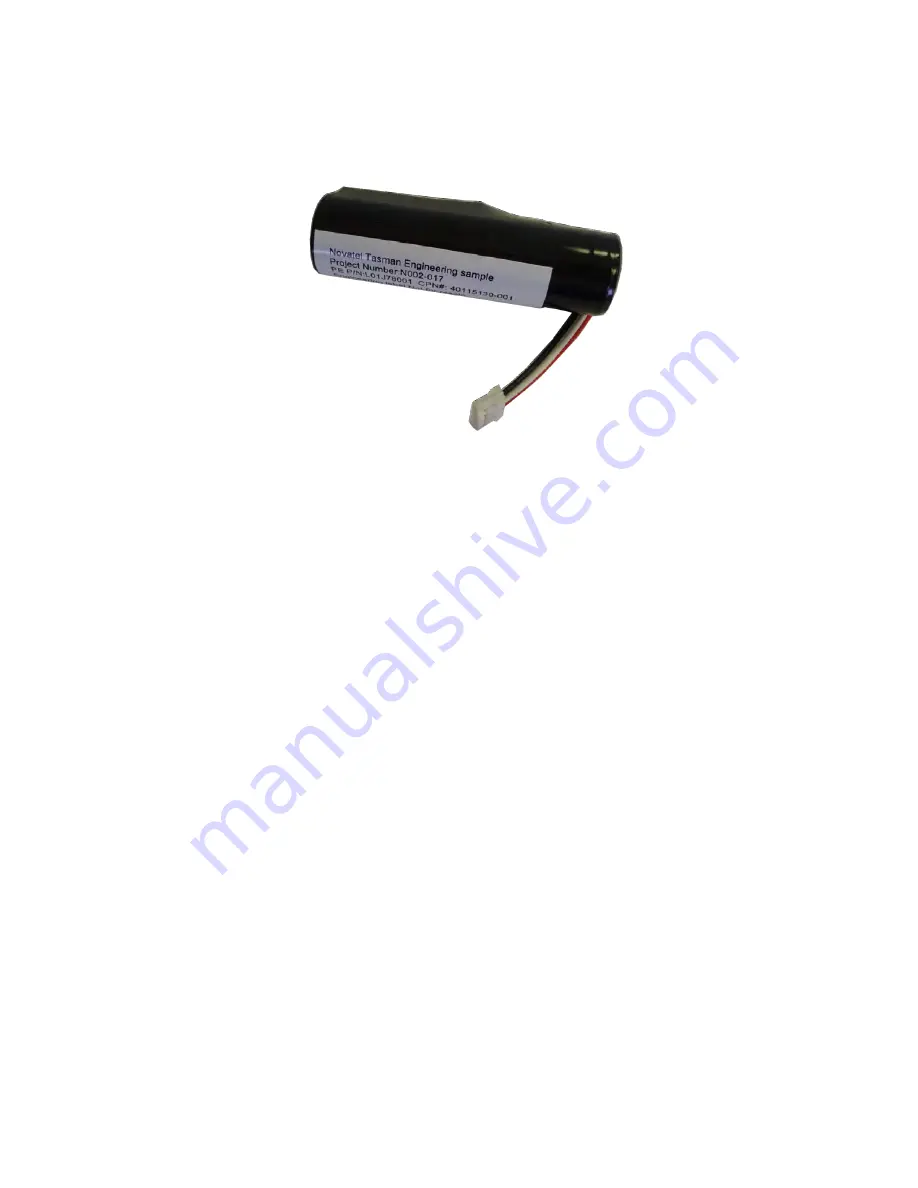
Backup Battery

The Backup Battery is a rechargeable 3.7V 2900 mAh 1073Wh Li-ion Battery.

Figure 4-3 Backup Battery

The backup battery is charged when the power adapter is connected to the device. The
backup battery does not charge via USB cable.

Power Cable

The Power Cable has an 8 pin Molex connector that supplies power to the SA 2100.

The Black Wire goes to the chassis ground.

The Red Wire goes to a 12V or 24V vehicle ready power supply.

Содержание SA2100

Страница 1: ...SA2100UG001 SA 2100 User Guide Version Draft 29 October 2013 ...

Страница 2: ...rranty or representation with respect to the merchantability suitability functionality accuracy or completeness of any such New Materials The user of such New Materials assumes all risk known or unknown of such use Novatel Wireless reserves all rights in such New Materials The user shall have only a revocable and limited license to use such New Materials in connection with the products for which t...

Страница 3: ...ed into a retrieval system or transmitted in any form or by any means electronic mechanical photocopying recording or otherwise or for any purpose without the express written permission of Novatel Wireless Novatel Wireless and the Novatel Wireless logo are either registered trademarks or trademarks of Novatel Wireless Inc in the United States 251 Renner Pkwy Richardson TX 75080 USA Phone 972 633 4...

Страница 4: ...ireless M2M does not warrant that a the product hardware or firmware will meet the purchaser s requirements b the operation of the product hardware or firmware will be uninterrupted or error free or c the product when integrated in or combined with other products or software not supplied by Novatel Wireless M2M will continue to perform substantially in accordance with the product documentation Thi...

Страница 5: ...M2M from time to time and in its sole discretion may make available for download on its website www novatelwireless com or may provide via email certain firmware bug fixes upgrades or new releases for the product Download and use of any such bug fixes upgrades or new releases is subject to all of the applicable terms and conditions of Novatel Wireless M2M s technical support policy as posted and u...

Страница 6: ...F NOVATEL WIRELESS HAS BEEN ADVISED OF THE POSSIBILITY OR LIKELIHOOD OF SUCH DAMAGES Some jurisdictions may require a longer warranty period than specified above and accordingly for products sold in those jurisdictions the applicable warranty period shall be extended as required under the laws of those jurisdictions Furthermore some jurisdictions may not allow the disclaimer of implied warranties ...

Страница 7: ...the equipment is operated in a residential environment This equipment generates radio frequency energy and is designed for use in accordance with the manufacturer s user manual However there is no guarantee that interference will not occur in any particular installation If this equipment causes harmful interference to radio or television reception which can be determined by turning the equipment o...

Страница 8: ...this device that are not expressly approved by Novatel Wireless may void your authority to operate the equipment NOTE The Radio Frequency RF emitter installed in your modem must not be located or operated in conjunction with any other antenna or transmitter unless specifically authorized by Novatel Wireless Technologies This device is not for consumer use RF EXPOSURE CONTENT This device is authori...

Страница 9: ... least 20 cm 8 in from all persons regardless of how the antenna is mounted stand assembly or wall mount l Connect the antennae to the modem using the supplied cable only do not use a different cable Use the full length of the cable to position the antenna as far from the modem and generally populated areas as possible l For wall or pole mount installations position the antennae as far away from t...

Страница 10: ...oss will not exceed the following Frequency Maximum Antenna Gain dBi 704 716 3 5 824 849 4 0 1710 1755 3 5 1850 1910 2 0 l The antenna is shipped with both a suction cup and clip for mounting l Use only the supporting cable to connect the antenna to the SA 2100 l Never use an antenna from another vendor or another source l For any questions regarding the safe operation of this device please contac...

Страница 11: ...ts l Do not connect two or more of the contacts l Do not disassemble destroy or attempt reassembly of the battery l Do not place or leave the battery in a damp or wet environment l Do not allow water to touch the battery l Do not wrap the battery with conductive material l Properly dispose of the battery l Do not incinerate or burn the battery l Do not leave or discard the battery where it could g...

Страница 12: ...onal injury Hyperlinks Blue text indicates an active clickable link e g http www novatelwireless com Monospace Font Indicates source code command line entries and code embedded in text Example Monospace Boldface Indicates an on screen menu option window title or other element that you should locate select or click Enter Indicates an instruction to press the Enter key Maybe labeled as Enter Return ...

Страница 13: ...ton 6 Caring For Your Device 6 Technical Specifications 8 General 8 Radio Technology WWAN 8 Environmental 9 Components 9 Device Management 9 Document References 10 Certifications 10 Accessories 10 2 Using The Device 11 SIM Card 12 Positioning Your Router 12 Powering The Device 13 Connecting To The SA 2100 Router 13 Connecting Via USB 13 Connecting Via Wi Fi 13 ...

Страница 14: ...onnected Devices List 25 Blocking And Unblocking Devices 26 Data Usage 27 Data Usage Settings 27 Settings 28 Settings Page Hotspot Settings Tab 29 Wi Fi 29 Basic Settings 30 Advanced Settings 30 Settings Page Device Settings Tab 31 Settings Page Device Settings Tab Preferences 31 Settings Page Device Settings Admin Password 32 Settings Page Device Settings Backup And Restore 33 Settings Page Mobil...

Страница 15: ... Settings Page Advanced Settings LAN 45 Settings Page Advanced Settings Port Filtering 47 Settings Page Advanced Settings Port Forwarding 48 Messages 50 GPS 51 Using GPS 52 Current Location 53 GPS Over Wi Fi NMEA 53 Customer Support 53 About 54 About Page Current Status Tab 55 Internet Status 55 Wi Fi Hotspot 56 Operations 56 About Page Device Info Tab 56 About Page Diagnostics Tab 59 Modem 60 HSP...

Страница 16: ...eless com About Page Software Update Tab 64 Current Software 64 Last Update 65 Update History 65 4 Accessories 66 Antenna 67 Backup Battery 69 Power Cable 69 Power Supply 70 USB Cable Part 71 Ordering Accessories 71 ...

Страница 17: ...1 novatelwireless com 1 Getting Started Device Overview LEDs Connectors Reset Button Caring For Your Device Technical Specifications ...

Страница 18: ...wireless connectivity This device is intended for professional installation and not for consumer use System Requirements l A computer or computing device supporting Wi Fi 802 11 b g n l Internet browser software i e Microsoft Internet Explorer 8 0 or higher Firefox Safari Opera Chrome etc Components Router Figure 1 1 SA 2100 ...

Страница 19: ...nique to each device LEDs The SA 2100 router has LEDs that verify status signal and connectivity Figure 1 3 The following table describes each LED Symbol LED Color State Description Power Green On Normal operation External or Battery Power Note When operating on Battery power all other LEDs are OFF The LED blinks slowly once every 5 secs when running on the battery Blinking 1 sec On 2 sec Off Duri...

Страница 20: ...ng 1 sec On 1 sec Off PDP Activity WAN 4G 3G HSPA WCDMA Blue ON Attached 4G 3G no traffic Blinking 1 sec On 1 sec Off PDP Activity WAN 2G Orange ON Attached 2G no traffic Blinking 1 sec On 1 sec Off PDP Activity Cellular 5 bar signal strength Green Off No SIM No Signal Operating from battery Green On Active only when external power is present Note that while the SA 2100 is operating on battery pow...

Страница 21: ...llular antenna connector RF1 Primary Micro USB Port Graceful shutdown button Ethernet port 8 Pin IO connector Includes power Cellular antenna connector RF2 Diversity Figure 1 5 8 Pin IO connector For Pin Out descriptions refer to the Power Cable on page 69 ...

Страница 22: ...ur Device You must handle the SA 2100 router carefully to ensure it functions properly We recommend the following guidelines l Place the router in an area free from liquids dust and extreme temperatures l Store the router back in its box when not in use l Do not block any ventilation openings by applying adhesives or labels to the router as this might cause the device to overheat or it might inter...

Страница 23: ...sitting on or against it l Route the cord so that it is not easily damaged by someone walking on it or by items sitting on or against it l Avoid dropping or shaking the router l Avoid moving the router when it is powered on ...

Страница 24: ...Power Range 9 32 VDC Molex Connector 12V or 24V vehicle ready Radio Technology WWAN FREQUENCY 4G LTE 750 850 AWS 1900 MHz 3G UMTS HSPA HSPA 850 900 AWS 1900 2100MHz 2G GPRS EDGE 850 900 1800 1900 MHz BANDS LTE B2 B4 B5 B17 WCDMA B1 B2 B4 B5 B8 GSM B8 B9 B13 B14 DATA SPEED LTE 100 Mbps DC DSPA 42 Mbps HSPA 21 Mbps ROUTING DHCP server DNS static or dynamic IP address port filtering port forwarding S...

Страница 25: ...sity External Cellular Antenna primary diversity Automatically switches between internal and external SMA Connector Internal Wi Fi Antenna 2 4 GHz Internal GPS Antenna 1575 MHz Micro USB on the go latched Digital Outputs 2 Digital output latched 1 User controlled I O 2 1 Wire Interface Yes LEDs Power Green Wi Fi Green Network Indicator for 4G 3G 2G Multi Color 5 bar Signal Strength Green Device Ma...

Страница 26: ...ns FCC Yes CE Yes IC Yes PTCRB Yes GCF Yes Wi Fi Alliance Yes eMark Yes Safety Yes AT T Yes Accessories Lithium Battery Rechargeable 3 7 V 2900 mAh 1073 Wh Li ion battery Mounting Accessories Mounting bracket Velcro tape tie wrap bolts adhesive Mounting Bracket Mounting Bracket in vehicle Mounting Options Wall ceiling floor vehicle existing structure flat surface Power Adapter Molex AC Power Cable...

Страница 27: ...11 novatelwireless com 2 Using The Device SIM Card Positioning Your Router Powering the Device Connecting to the SA 2100 Router Driver Installation Cable Installation Mounting the Device ...

Страница 28: ...sults place your router l Away from interference such as microwaves ceiling fans security systems or cordless phones l Away from large containers of glass or concrete fish tanks mirrors brick or concrete walls l Away from large metal surfaces cook tops metal doors aluminum studs appliances l Close to a window but out of the way of direct sunlight great for 4G reception l Close to an AC outlet and ...

Страница 29: ...ling these drivers are provided in the Driver Installation section of this document 2 Ensure the SA 2100 router is powered on 3 Connect the router to a USB port on the computer using a micro USB cable Connecting Via Wi Fi To connect via Wi Fi perform the following steps 1 Ensure the SA 2100 router is powered on 2 Connect to the router using the SSID and WPA key information provided on the label Dr...

Страница 30: ...14 novatelwireless com Figure 2 2 Factory Driver Installer for LTE Products Figure 2 3 Driver Installer Welcome Screen 2 Click Next ...

Страница 31: ...aller License Agreement Window opens Figure 2 4 Driver Installer License Agreement 3 Once you have read and if you agree to the terms select the I accept the terms in the license agreement radio button 4 Click Next The Ready to Install the Program window will open ...

Страница 32: ...16 novatelwireless com Figure 2 5 Driver Installer Ready to Install screen 5 Click Install The Installation Progress window will open Figure 2 6 Installing screen ...

Страница 33: ...ure 2 7 Installation Completed screen 6 Click Finish Cable Installation Installing The Antenna Connect the antennas to the device before mounting the device At least 20 cm 8 in of separation between the router and the user s body must be maintained at all times Connect the antennae to the modem using the recommended cable only ...

Страница 34: ...racket use the accessory SKU 21915042 While performing these steps do not apply excessive force to the retention legs or snap feature prior to inserting the device as this may deform the mounting bracket Figure 2 8 SA 2100 Mounting Bracket 1 Secure the mounting bracket to the desired mounting surface using one of the following methods l Two 2 6 screws l Double sided tape 2 Insert the device into t...

Страница 35: ...ing downward Ground should be connected first Failure to connect ground to the SA 2100 before connecting auxiliary devices may result in damage to the attached I O device To ensure proper accelerometer operation you must securely mount the SA 2100 Mounting the device to cable runs or other structures that may allow the device s orientation to shift may cause inaccurate results to be reported by th...

Страница 36: ...20 novatelwireless com 3 Using The Web User Interface Logging In Home Connected Devices Data Usage Settings Messages GPS Customer Support About ...

Страница 37: ...wireless com Logging In To log in to your SA 2100 Web Interface open your Internet browser and navigate to 192 168 1 1 or http my sa2100 The browser will display the SA 2100 Home Page Figure 3 1 SA 2100 Home Page ...

Страница 38: ... or simply click any of the quick links or navigation tabs and the SA 2100 Sign In page will be displayed as shown in the following figure Figure 3 2 SA 2100 Sign In Page Enter your Administrator password and click Sign in The default Administrator password is admin without the quotation marks Home The Home Page of the SA 2100 Web User Interface can be found by selecting the Home tab ...

Страница 39: ...23 novatelwireless com Figure 3 3 Home Page The left side of the screen displays navigation tabs for Home Connected Devices Data Usage Settings Messages GPS Customer Support and About ...

Страница 40: ... used settings Details of these settings are discussed in the Settings section of this document Connected Devices The Connected Devices page displays details of each device connected to or blocked from this SA 2100 device including any computer connected via a USB connection You can also edit the name and type for connected devices and add or remove connected devices from the Blocked Devices list ...

Страница 41: ...lowing information is displayed for each connected device Type The first column indicates the type of connected device You can use the Edit option to set or change the type If the type has not been set no icon is displayed Once you set the device type an appropriate icon is displayed Name ...

Страница 42: ...ocal address of the connected device is displayed Blocking And Unblocking Devices Block Button Clicking the Block button disconnects the connected device and prevents it from reconnecting The blocked device then appears in the Blocked list This option is available for use with each connected device except for your own device and any device connected via USB Blocked Devices This is a list of device...

Страница 43: ...ct the desired data usage monthly limit Alerts will be generated to warn you that data usage is approaching or has reached the alert level specified on this page Figure 3 5 Data Usage Page Reset You can use the Reset Data Counter button to restart the data counter and set the last reset date to today s date Data Usage Settings Usage Counter Monthly Limit ...

Страница 44: ...e recorded and displayed but cannot be compared to a monthly limit Cycle Start Date Select the day of the month when you wish the data counter to reset to zero Settings The settings of your SA 2100 can be found on the Settings page There are four settings tabs Hotspot Settings Device Settings Mobile Settings and Advanced Settings ...

Страница 45: ...tings Page Hotspot Settings Tab Figure 3 6 Settings Page Hotspot Settings Advanced Settings Shown The Hotspot Settings Tab contains the following information Wi Fi Click this ON OFF control to enable or disable the Wi Fi hotspot ...

Страница 46: ... Hide Advanced Settings link to hide them Channel This should be left on Automatic unless you need to choose a particular channel for your environment 802 11 Mode Use this setting to change the Wi Fi mode if required If all of your connected devices support 802 11n selecting the option 802 11n only will provide the best performance In other cases it is recommended that you leave this setting at it...

Страница 47: ... setting should normally be enabled to assist throughput It must be enabled if you are using 802 11n Settings Page Device Settings Tab Under Device Settings you have three categories of settings l Preferences l Web Interface Password l Backup and Restore Settings Page Device Settings Tab Preferences Figure 3 7 Settings Page Device Settings Preferences ...

Страница 48: ...nguage option l Date Format Specify the format in which the date is displayed on this Web based interface l Time Specify the format in which the time is displayed on this Web based interface l Distance Select the option used for the GPS altitude and accuracy l Number Format Specify how decimal numbers are displayed Period or Comma can be selected for use as the decimal point Settings Page Device S...

Страница 49: ...u will be locked out of this Web Interface l Enter new admin password Enter the new password using only letters numbers and standard punctuation symbols The password must be at least 6 characters long l Confirm new admin password Re enter the new password in this field Settings Page Device Settings Backup And Restore Figure 3 9 Settings Page Device Settings Backup and Restore ...

Страница 50: ... the current password in this field to restore the settings from a previously saved backup file Select a file Select the configuration file you previously downloaded from this SA 2100 device to your computer Restore Now After selecting a configuration file click this button to begin the file upload After uploading the configuration file is immediately applied and the device is restarted Uploading ...

Страница 51: ...Settings Mobile Cellular Data You can use this setting when necessary to turn off cellular data and prevent access to the mobile network This prevents connected devices from connecting to the Internet and using your mobile data plan For normal operation this setting must be left on Roaming You can enable this setting as necessary to access roaming networks Additional data usage charges may apply w...

Страница 52: ...e Settings APN The APN settings should be configured when installing the SIM The device will not be able to establish a WAN cellular internet connection until the APN settings have been configured Some devices ship with a preconfigured SIM installed If a preconfigured SIM is installed you should not change the APN unless you have a corporate account with your own APN or if you change the SIM Figur...

Страница 53: ...ur network service provider APN The APN associated with the selected profile Authentication Select the option specified by your service provider l None l PAP l CHAP Username If the Authentication is None this can be left blank Otherwise enter the username specified by your service provider Password If the Authentication is None this can be left blank Otherwise enter the password specified by your ...

Страница 54: ... available Click this button if you wish to manually select a network The modem then scans for all available networks This scan may take up to two minutes If this button is not displayed then Manual Network Selection is not available in your current location using your current network Network List All available networks are displayed in the Network List once a network scan has been completed You c...

Страница 55: ...ually specify a DNS if required Settings Enable Manual DNS Use this setting to enable or disable the Manual DNS feature If enabled provide the following data DNS 1 address Enter the IP address of the desired primary DNS This address is required if the Manual DNS feature is enabled DNS 2 address Enter the IP address of the desired secondary backup DNS This address is optional and may be left blank ...

Страница 56: ...ked using a PIN If the SIM card is locked you must enter the PIN before connecting to the mobile network Once entered the PIN is remembered until the next shutdown In addition to enabling you to enter the SIM PIN when needed this page also allows you to unlock your SIM or change the SIM PIN Generally you need to provide the existing PIN in order to change the SIM ...

Страница 57: ...r the PIN Note that if an incorrect PIN is entered too many times the SIM becomes PUK locked An on page counter indicates how many incorrect entries will cause PUK lock Once PUK locked the PUK must then be obtained from your service provider PUK Lock If the SIM is currently PUK locked the only operation possible is to enter the PUK Note that if an incorrect PUK is entered too many times the SIM be...

Страница 58: ...ed Settings Firewall A firewall protects your connected devices against malicious incoming traffic from the Internet The firewall cannot be disabled but the following settings are available Settings VPN Passthrough This feature allows VPN client software on connected devices to connect through this device to remote VPN servers Normally this option should be left enabled IPv6 Transparent Mode If yo...

Страница 59: ...traffic which would otherwise be blocked by the firewall This may assist some troublesome network applications to function properly but the DMZ device should have its own firewall to protect itself against malicious traffic DMZ checkbox Use this to enable and disable this feature as needed Generally DMZ should be disabled unless absolutely necessary DMZ IP Address Enter the IP address of the conne...

Страница 60: ...computer Wi Fi and Enternet interfaces are listed separately so one interface could be allowed while the other is not ON OFF Use this control to enable or disable the MAC Filter as needed Before enabling it you need to ensure the Allowed Devices list is not empty Note that when enabling the MAC Filter any Connected Device which is not in the Allowed Devices list will immediately be disconnected Al...

Страница 61: ...l devices from the Allowed Devices list leaving it empty This will disconnect all current devices and prevent re connection if the MAC Filter is enabled this operation is only possible while the MAC Filter is OFF Settings Page Advanced Settings LAN Figure 3 17 Settings Page Advanced Settings LAN IPv4 shown These settings apply to your local network or LAN For this device the LAN consists of this d...

Страница 62: ... address range used by the DHCP server you can do so by changing this value This option is for expert users only DHCP address range This indicates the range of IP addresses which may be allocated to connected devices If using a fixed IP address on a connected device you should use an IP address that is outside this range DHCP lease time This field determines how often connected devices must renew ...

Страница 63: ...access the Internet Traffic is identified by port numbers Some applications are pre defined You can define additional applications but you need to know details of the traffic used and generated by the applications you wish to define Applications Enable Disable Checkbox Use these check boxes to enable access to the Internet for each application While the Port Filtering feature is enabled traffic fr...

Страница 64: ... the Internet to be forwarded to a particular computer or device on your Wi Fi network Normally the built in firewall blocks incoming traffic from the Internet Use Port Forwarding to allow Internet users to access any server you are running on your computer such as a Web FTP or E mail server For some online games Port Forwarding must be used in order for the games to function correctly ...

Страница 65: ...by selecting its checkbox 5 Save your changes 6 On the Current Status screen make a note of the Internet IP address of this device 7 Ask users on the Internet to connect to the Internet IP address of this device These connection requests will be forwarded to the IP address specified in step 3 Custom Applications This feature allows you to define your own applications Once defined these application...

Страница 66: ... Protocol For each port range select the protocol TCP or UDP used by that port range Connected Device IP Address Enter the IP address of the connected device which will receive this traffic Delete Use this checkbox to delete a custom application Messages These SMS messages are normally from your service provider You should not attempt to reply and therefore no reply feature is provided Figure 3 20...

Страница 67: ... an icon Messages are automatically marked as read once they are displayed on this page so the next time the page is accessed they will no longer be shown as unread Delete Button Each message has an individual Delete icon Click to delete individual messages Delete All Messages This button is at the end of the message list Use it as needed to delete all messages GPS This device incorporates a GPS r...

Страница 68: ...s ON OFF control to enable or disable the GPS feature GPS Status If the GPS receiver has not yet obtained a fix location a Searching status appears Once a fix has been obtained the following Current Location information is displayed and a Google map appears to visually indicate the current location ...

Страница 69: ...s available to applications that can use a NMEA stream To use this feature drivers must be installed on your computer Use the Download link at the bottom of the page to download and install these drivers Port Number This is the port number used by the driver software on your computer to establish a connection to this device and obtain the GPS data Unless there is a good reason to do so you should ...

Страница 70: ...vice The support staff may ask for this number Support Use this information to access the user guide to obtain additional information or support About The About page contains information about your SA 2100 router The information is presented on 5 tabs Current Status Device Info Diagnostics Logs and Software Update ...

Страница 71: ... Tab The Current Status Tab displays status information for the device Internet Status Connection Status This displays the connection status for the Internet connection and indicates if an error condition exists Network Name The name of the network to which this device is currently connected ...

Страница 72: ...e Domain Name Server currently used by this device Wi Fi Hotspot Wi Fi Network Name SSID The name of the Wi Fi network Wi Fi Security The current setting for Wi Fi security Wi Fi Password Key The current password value Channel The Wi Fi channel currently in use If the channel setting is Automatic this displays the automatically selected channel Wi Fi Mode The 802 11 mode in use Connected Devices T...

Страница 73: ...ternational Mobile Equipment Identity for this device The IMEI is a 15 or 17 digit code used to uniquely identify an individual mobile station on a LTE network The IMEI does not change when the SIM is changed MDN This is the phone number assigned to this device It will change when the SIM is changed Software Version The version of currently installed software This is the main version number the fo...

Страница 74: ...n of the firmware software currently installed Wi Fi FW version For the Wi Fi component this is the version of the firmware software currently installed Web UI version The version number for the SA 2100 Web Interface PRI version The configuration version currently applied to this device ...

Страница 75: ...om About Page Diagnostics Tab This page contains information about the SA 2100 and the available networks Use it as needed for troubleshooting it is not required for normal operation Figure 3 25 About Page Diagnostics Tab ...

Страница 76: ... card If the SIM card is missing or this field indicates some form of SIM error connection to the mobile network is not possible ICCID This unique ID number is assigned to the SIM card It does not display if there is no SIM card or if a SIM error condition exists HSPA Status Status HSPA GSM refers to 4G HSPA and all preceding technologies For the HSPA network the following states are supported l D...

Страница 77: ...tus For the LTE network the possible status values are l Disabled access to LTE networks is disabled l Not available no LTE network has been detected l Available LTE is enabled and a LTE network has been detected The following data items are only provided if the 4G LTE network is available Signal strength This indicates the strength of the LTE signal measured in dBm Higher values indicate a strong...

Страница 78: ...vatelwireless com About Page Logs Tab The Log information is useful for troubleshooting but is not required for normal operation Figure 3 26 About Page Logs Tab Settings Enable logs Enable the Logs as needed ...

Страница 79: ...g Data The provided tabs allow you to select the type of Log Data to view Mobile Network Log This log contains data regarding connections to the mobile network System Log This log records events other than mobile data connections which occurred on this device Buttons Refresh Click to update the log data that is displayed Clear Logs Clicking this button will delete all existing log data This makes ...

Страница 80: ... updates Figure 3 27 About Page Software Update Tab The following information is provided on the Software Update tab Current Software Current Software Version This field indicates the version of the software currently installed on this device Checked for update This device automatically checks for updates this field indicates when the last check was performed ...

Страница 81: ...alled Last Update This panel displays the details of the last update installed on this SA 2100 device If no updates have been installed this panel is blank Update History The Update History panel displays the details of all updates that have been downloaded and installed to this SA 2100 device If no updates have been installed this panel is blank ...

Страница 82: ...66 novatelwireless com 4 Accessories Antenna Backup Battery Power Cable Power Supply USB Cable Part Ordering Accessories ...

Страница 83: ...in from all persons regardless of how the antenna is mounted stand assembly or wall mount Connect the antennae to the modem using the supplied cable only do not use a different cable Use the full length of the cable to position the antenna as far from the modem and generally populated areas as possible Figure 4 1 Connected Antenna l For wall or pole mount installations position the antennae as far...

Страница 84: ...uding cable loss will not exceed the following Frequency Maximum Antenna Gain dBi 704 716 3 5 824 849 4 0 1710 1755 3 5 1850 1910 2 0 l The antenna is shipped with both a suction cup and clip for mounting l Use only the supporting cable to connect the antenna to the SA 2100 l Never use an antenna from another vendor or another source l For any questions regarding the safe operation of this device ...

Страница 85: ...Battery The backup battery is charged when the power adapter is connected to the device The backup battery does not charge via USB cable Power Cable The Power Cable has an 8 pin Molex connector that supplies power to the SA 2100 The Black Wire goes to the chassis ground The Red Wire goes to a 12V or 24V vehicle ready power supply ...

Страница 86: ...deployment this pin is intended for igni tion sense Pin 2 User Controlled Input2 Pin 3 1 Wire Pin 4 GND Pin 5 Supply Voltage Pin 6 User Controlled IO1 Pin 7 User Controlled IO2 Pin 8 User Controlled Output Power Supply The Power Adapter has an 8 pin Molex connector that supplies power to the SA 2100 Input l 100 240v l 50 60 Hz 0 45A Output ...

Страница 87: ...rd Micro USB not included is required only if communication through the Com port is required Figure 4 6 Micro USB Cable Ordering Accessories The following table shows the available accessories and their SKU for the SA 2100 To order an accessory contact your Novatel Wireless sales representative ...

Страница 88: ...ss com Accessoy SKU USB 01019886 USB latched 60715094 mounting 21915041 mounting vehicle 21915042 power cable 60715093 power adapter NA 30 TO 70C 40123113 01 power adapter EU 30 TO 70C 40123113 01 battery 40115130 001 ...

Отзывы: