NOVA3D ELFIN Скачать руководство пользователя страница 45

深圳市诺瓦机器人技术有限公司

Shenzhen Nova Robot Technology Co., Ltd.

44

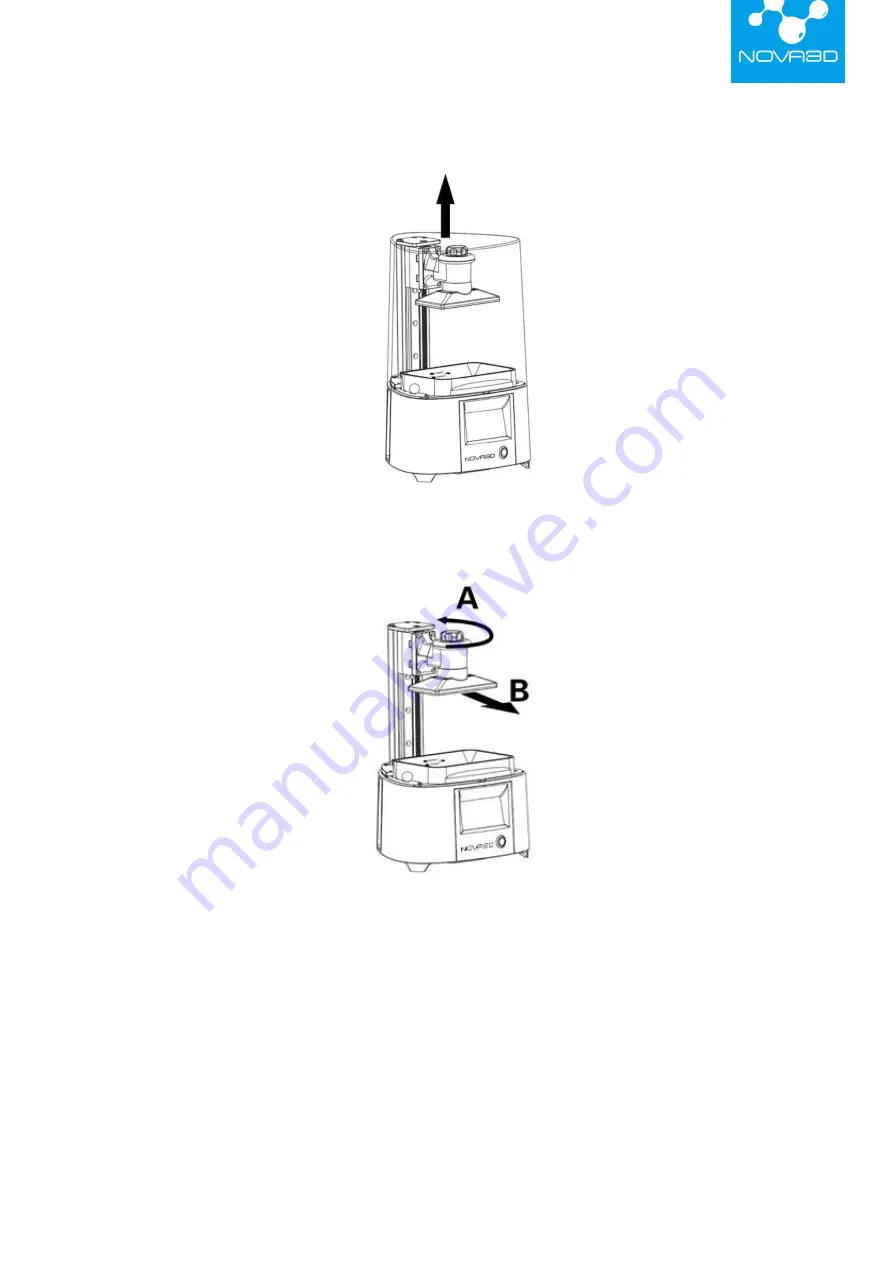
4. Wipe the top and edges of the platform with a paper towel and unscrew the platform screw.

Remove the platform. Be careful not to spill the liquid resin on the printer and its surroundings.

5. Install the UV cover on the printer to prevent the UV light from curing the resin in the vat.

Содержание ELFIN

Страница 1: ...ELFIN User Manual...

Страница 2: ...re Update 20 8 Navigating Through the Menu 21 9 NovaMaker Software 24 1 User Interface 27 2 Import Model File 33 3 Adding Support 34 4 Slice Configuration 36 5 Connectivity 38 6 Uploading Slice File 3...

Страница 3: ...ge storage and disposal Furthermore the users should take into consideration the risk of possible damage of the device resulting from defects in external resins The users are responsible for qualifyin...

Страница 4: ...uld cause damage or injuries Always read the safety data sheets available at http www nova3dprinter com material html There are a source of basic information and safety procedures for the materials yo...

Страница 5: ...ghtly closed and kept in a dark place The device should be configured according to its intended purpose Improper configuration may cause defective operation which may lead to damage of the device Food...

Страница 6: ...with special care Improper use may cause serious injuries While following post processing procedures wear safety gloves and glasses to avoid injuries that may be cause by sharp edges and fragile eleme...

Страница 7: ...hat may cause undesired operation The printer generates uses and can radiate radio frequency energy and if not installed and used in accordance with the following User Manual may cause harmful interfe...

Страница 8: ...rial type to be used for the model and to adjust the necessary print settings such as layer thickness layer exposure time exposure off time or how many support structures should be generated The file...

Страница 9: ...8 2 What s in the Box...

Страница 10: ...aker software User Manual e manual model file etc Spatula Use to check if there are residues of cured resin in the vat before each printing process Pliers Use to cut off the model support Spray Bottle...

Страница 11: ...10 3 Main Components Front View Schematic diagram of the front of the device...

Страница 12: ...11 Back view Schematic diagram of the back of the device...

Страница 13: ...ch as the size of the model layer thickness or how many support structures will be generated The last step is to transfer the file to the printer s storage over Wi Fi Ethernet cable or by using a USB...

Страница 14: ...Vat The container in which liquid resin is kept throughout the entire printing process It consists of ABS glass fiber frame and a rack with FEP film The resin vat is secured to the printer s housing d...

Страница 15: ...de the printing chamber Support Structure Special 3D printed structures in the form of pillars which ensure that the whole model adheres to the platform and doesn t fall into the resin vat during the...

Страница 16: ...reparations 1 Open the box and remove the upper cushioning 2 Remove the UV cover 3 Take the printer out of the box 4 Place the printer on a flat and stable desktop and ensure that the desktop is flat...

Страница 17: ...t Go to Settings and configure the connection using options from the menu 7 Select the Network Settings menu in Settings of the machine control menu and set WiFi connection according to the network se...

Страница 18: ...inter with an Ethernet cable Plug the cable to the port of the device and plug the other end of the cable to the network interface of the computer or network adapter Open NovaMaker software click the...

Страница 19: ...the second item the printer has been configured with WiFi as shown in the figure next input the current IP address and then until the wireless addition is successful Once your printer is connected to...

Страница 20: ...sily be managed in NovaMaker You can start stop and pause the printing process see the printer s current state Ready to Print Printing Paused Offline change the name of your printer or preview basic i...

Страница 21: ...atically checks for available firmware updates and starts the installation process You can also manually check whether there is an updated firmware version After opening the NovaMaker software select...

Страница 22: ...trol and Settings Task 1 Print details layer thickness of model slices current layers of printing and total layers of slices estimated amount of resin consumed for printing file name printing progress...

Страница 23: ...lect files here and then print and delete them Control 1 Platform lift manually control the platform up and down 2 SLC Settings Printing settings for SLC files output including bottom layers bottom la...

Страница 24: ...D screen check check the LCD screen for proper operation 2 Language setting set language of the device 3 Network Settings set up the printer to the network connections including WIFI and the wired net...

Страница 25: ...page of Support as shown in the figure download the version installation package with corresponding digits of the computer and then install NovaMaker For details of software operation please refer to...

Страница 26: ...25...

Страница 27: ...Shenzhen Nova Robot Technology Co Ltd 26...

Страница 28: ...on is to manage the printing devices modify the connected device parameters upload the slice file etc The views control function can check the view of each direction of the model and the internal view...

Страница 29: ...e the model at a proper platform position Info View the size and volume of the model Support Add support to the model Slice Slice the model file and upload it for printing 1 2 Printer Control Printer...

Страница 30: ...Robot Technology Co Ltd 29 1 2 2 Printables 1 Print to print current selected cws file 2 Delete to delete the cws file stored in the printer 3 Upload to upload the file to print 4 List of files stored...

Страница 31: ...0 1 2 3 Printers 1 Printer Control controls the lift and decrease as well as reset of the platform The platform can be moved at a distance of 0 05 1 10 50mm the user can adjust the position of the pla...

Страница 32: ...s for technical support Exposure Time ms set the exposure time of each layer Bottom Layers set the number of bottom layers Bottom Time ms set the exposure time of bottom layers Lift Distance cm contro...

Страница 33: ...Technology Co Ltd 32 1 3 Views Control The views control menu at the upper right corner of the software corresponds to the switching and scaling of the view Including left view right view bottom view...

Страница 34: ...k on the upper right corner of the software and select Open to import the 3D model you want to print You can also drag and drop the file directly into the software printing platform area The supported...

Страница 35: ...mplicated the auto support can be applied the auto generated support can meet most printing needs To ensure the success of printing you can also increase the support density for the lowest point part...

Страница 36: ...range 0 2 0 6mm Here you can delete all the generated supports select a support and press the DEL key to delete the specific support Support shape Set the support radius and height which can be adjust...

Страница 37: ...yout model can be successfully printed by adding support Theory two Choose the optimal layout direction and angle Theory three In some cases there is no need to add support Theory four Support to the...

Страница 38: ...ameters are grayed out and cannot be changed Click on clone The cloned data can be modified corresponding to the material used Setting steps as shown below 4 2 Parameter Setting Considerations 1 When...

Страница 39: ...resin The default value is the optimum value after testing the user can adjust according to the actual effect Note The maximum exposure time is 150 seconds Click the Slice icon select a file director...

Страница 40: ...t interface then click on the upper right side to display a pop up box for Printers Add Guidelines select the second item the printer has been configured WIFI as showed below next enter the current IP...

Страница 41: ...Shenzhen Nova Robot Technology Co Ltd 40...

Страница 42: ...rce of UV light before disposal Uncured resin has to be disposed of in accordance with national and local regulations concerning hazardous waste a Preparation for Printing Check the LCD screen for pro...

Страница 43: ...ker to the printer via Wi Fi Ethernet or using the USB drive and start the printing process Transfer files from NovaMaker to the printer via WIFI or Ethernet Enter the device management interface and...

Страница 44: ...ice Operate File on the printer touch screen to browse files in the USB flash drive or the device memory click the upload icon on the left and the device will start printing after copying files to the...

Страница 45: ...dges of the platform with a paper towel and unscrew the platform screw Remove the platform Be careful not to spill the liquid resin on the printer and its surroundings 5 Install the UV cover on the pr...

Страница 46: ...ily Otherwise follow the steps above to continue cleaning and blow drying Be careful not to expose the model to the UV light before cleaning 2 Put the model in the Curing box or in any source of UV li...

Страница 47: ...lean the resin vat with a paper towel You can also use resin detergent and alcohol for that purpose 5 Clean the platform LCD screen and the resin vat After that reinstall the resin vat into the printe...

Страница 48: ...y Co Ltd 47 6 Install the UV cover back on the printer d Changing the Resin 1 Remove UV cover from bottom to top 2 Refer to the following diagram move the spherical button on both sides of the resin v...

Страница 49: ...alcohol NOTE It is advisable to filter the already used resin after each print Mix it with the fresh resin to make sure that there are no cured remains in the liquid as they could have a negative inf...

Страница 50: ...plete offer of materials is available at http www nova3dprinter com material html Material Technical Data Sheets and Safety Data Sheets can be found at the same website When 3D printing with the Nova3...

Страница 51: ...Printing process Remove dust and drops of resin from the machine with paper towels If it s necessary use alcohol Dust free cloth rubber gloves detergent alcohol Cleaning the LCD Screen Every time the...

Страница 52: ...Check if the platform properly adheres to the LCD screen Calibrate to be parallel to the platform After each failed print After remove the resin vat put a piece of A4 paper on the LCD screen and sele...

Страница 53: ...in If the profile is correct increase the Layer Exposure Time in NovaMaker or in the printer s menu during the printing process 2 Make sure that both the platform and the FEP film are clean that is th...

Страница 54: ...be parallel to the platform proper support size not too small to ensure successful printing 4 Make sure that while preparing the file in NovaMaker you chose an appropriate printing profile that is th...

Страница 55: ...t source UV integrated light wavelength 405 nm Connectivity Wi Fi Ethernet USB flash drive Operating system Android Processor Quad core Cortex A7 1 5G RAM 1 00GB Storage capacity 8 00GB including syst...

Страница 56: ...le NovaMaker Supported 3D file types stl obj nmk Supported formats cws slc Supported operating systems Mac OS X Windows 7 and newer versions Additional information All information contained in this Us...

Страница 57: ...in the UV Station or in any source of UV light before disposal Uncured resin has to be disposed of in accordance with national and local regulations concerning hazardous waste Waste electrical and ele...

Отзывы: