background image

16


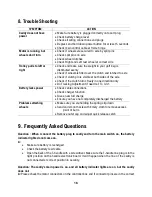
8. Trouble Shooting


SYMPTOM


ACTION


Caddy does not have 
power


Make Sure battery is plugged correctly onto cart plug


Check battery charge level


Check all wiring connections and plugs


Depress and hold down power button for at least 5 seconds


Check main control cable at frame hinge 


Motor is running, but 
wheels don’t turn


Check if wheels are secured to axle by split pins


Check split pins on axle


Check wheel clutches


Check Right and Left rear wheel at correct side


Trolley pulls to left or 
right


Check and make sure the weight in your golf bag is 
distributed evenly


Check if wheels is fitted over the clutch and latched to axle


Check if clutch pin is visible at both sides of the axle


Check if the clutch turns freely in one direction only


Do Tracking Adjustment if need ref. To 3.3.1.


Battery lacks power


Check cable connections 


Check charger function


Give a new full charge


Ensure you have not completely discharged the battery


Problems attaching 
wheels


Make sure you are holding the spring clip down


Sand and smooth axle with Emery cloth to remove excess 

paint or burrs


Remove outer cap and adjust quick release catch


9. Frequently Asked Questions


Question : When I connect the battery plug to caddy and turn the main switch on, the battery 
indicator lights do not come on.


A:


Make sure battery is recharged.


Check the battery lead cable


Open the back of the T-handle with a screwdriver. Make sure the T-handle line plug is in the 
right position on the handle electronic board. It will happen when the line of the caddy is 
not connected at correct position in security.


Question: The caddy’s main power is on, and all battery indicator lights are on, but the caddy 
does not.


A:

 Please check the motor connectors on the controller box and if connector pins are in the correct 

Содержание P1D3

Страница 1: ...P1D3 Electric Golf Trolley Model P1D3 User Manual Nova Caddy Golf Products www novacaddy com Tel 1 905 209 9937...

Страница 2: ...2 Assembly Instructions 4 3 Operating Instructions 8 4 Important Safety Instructions 13 5 Electronic System 14 6 General Maintenance 14 7 Technical Specifications 15 8 Trouble Shooting 16 9 Frequently...

Страница 3: ...battery life To ensure operate the golf trolley properly please read this instruction before using your P1D3 1 Packing List and Parts Glossary Standard Parts 1 x Caddy 2 x Rear Wheels 1 x Battery Pack...

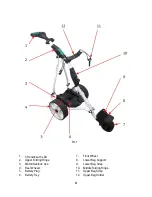
Страница 4: ...ndle with LCD 7 Front Wheel 2 Upper Folding Hinge 8 Lower Bag Support 3 Motor Gearbox Ass 9 Lower Bag Strap 4 Rear Wheels 10 Middle Folding Hinge 5 Battery Plug 11 Upper Bag Strap 6 Battery Tray 12 Up...

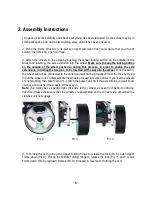
Страница 5: ...nto the wheel If not locked in the wheel will not be connected to the clutch and will not be propelled Test the lock by trying to pull the wheel out To disassemble the wheels proceed in reverse order...

Страница 6: ...tray and fasten Velcro strap around battery tightly Insert battery plug into caddy outlet Pic 10 Pic 10 6 Install clamp style Accessories Station on frame and attach Scorecard Holder Umbrella Holder t...

Страница 7: ...7 Pic 11 Pic 12 Pic 13 Pic 14 Pic 15...

Страница 8: ...tor will lite up when power is ON 3 1 2 Power Level H High power Green Color MID Mid power Yellow Color LOW Low power Red Color 3 1 3 Timer Function Distance function The A B Timer button works as 10...

Страница 9: ...ostat Speed Control knob lets you choose your preferred speed to suit your space perfectly and the digital display will show the preferred speed The speed level is from 1 to 9 3 2 Additional Function...

Страница 10: ...n handle The caddy movement is controlled through the rheostat control knob on the middle bottom of the handle Turn the knob clockwise will control the forward movement of the caddy In order to slow d...

Страница 11: ...n hot areas car trunks garages etc Lithium batteries do not like high temperatures 3 5 2 3 Do not leave the battery on the charger for extended periods of time Do not overcharge the battery Overchargi...

Страница 12: ...l of discharge 3 5 3 5 Normally the battery will hold its charge for several months and it does not have a memory effect and therefore can be recharged at any discharge level It is recommended to not...

Страница 13: ...ds of time you must fully charge it DO NOT store an empty battery or else it might become unusable Replacement batteries are available from your authorized NovaCaddy dealer or from NovaCaddy directly...

Страница 14: ...he controller case Battery Operation and Care Follow battery charge and maintenance instructions at section 3 5 Note NovaCaddy reserves the right to modify upgrade any components during a model year s...

Страница 15: ...rd Freewheeling mode as regular pull cart Timed advance function 10 20 and 30 meter yard Automatic forward cruise Motor 250W 12V DC motor Drive Train Rear Wheel Drive Dual Stainless Steel Gears Gear b...

Страница 16: ...1 Battery lacks power Check cable connections Check charger function Give a new full charge Ensure you have not completely discharged the battery Problems attaching wheels Make sure you are holding t...

Страница 17: ...ag weight balance Make sure that the weight distribution of your golf bag is balanced on the caddy Slope deep or wet grass may make different friction on different wheel to cause caddy run to one side...

Страница 18: ...er this warranty must be accompanied by the items listed below 1 Contact us to get an RMA Return Material Authorization number before send it back 2 Name and address for product return 3 An explain of...

Отзывы:

Похожие инструкции для P1D3