Page 2
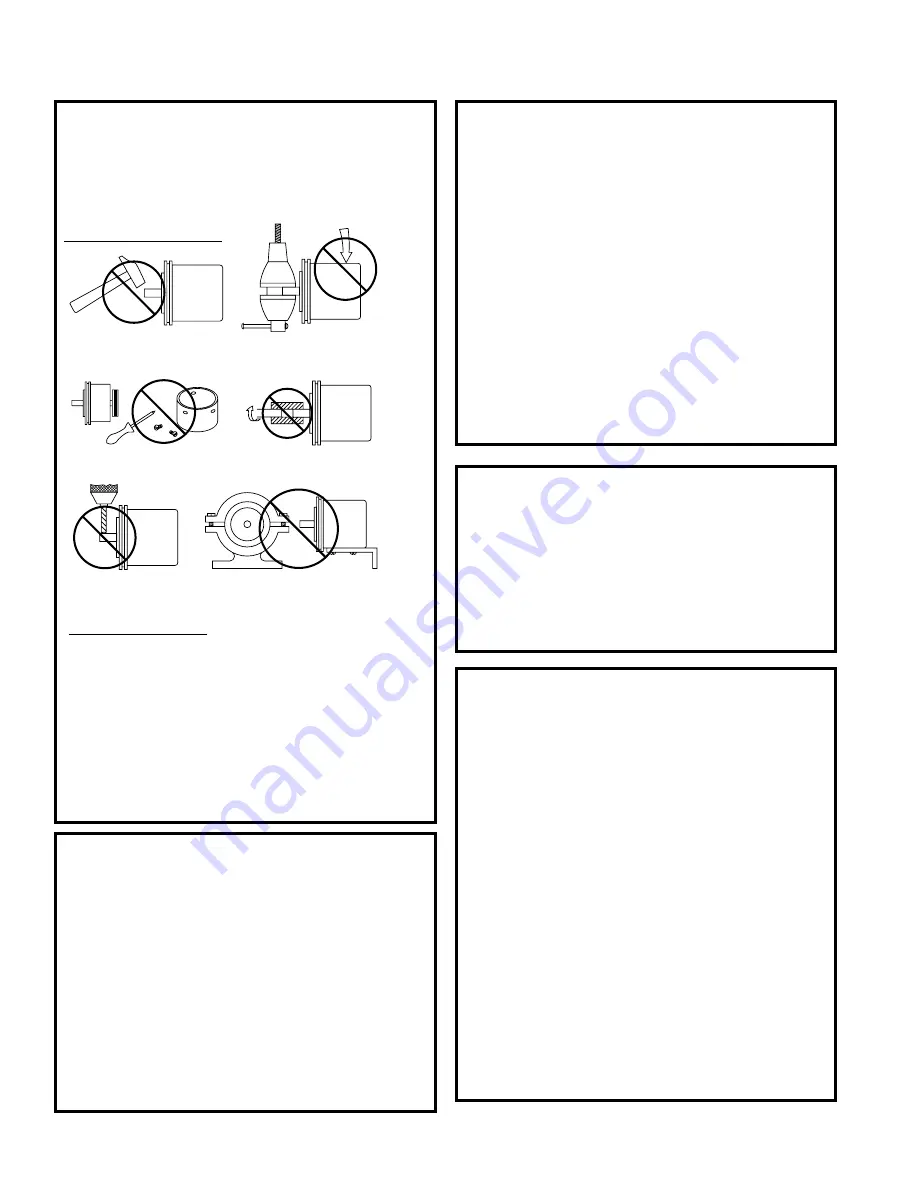
Do not shock the encoder.
Do not subject the encoder to
axial or radial shaft stresses.
Do not tool the encoder
or its shaft.
Do not use makeshift techniques
to mount the encoder.
Do not use a rigid coupling.
Do not disassemble the encoder.
IMPORTANT INSTALLATION INFORMATION
FEATuRES
All encoders have the following electrical features:
• Power (+DC)
• Common
• Output Signal(s)
Power (also referred to as supply, power source, and
power +V/VCC) is DC for encoders.
There
-
fore, power should always be connected to the
positive (+) side of DC power.
In addition, encoder
power should be regulated to within ±5% at the en
-
coder and should be free of induced transients. Com
-
mon (also referred to as Com, supply common, and
ground) is generally a black wire (verify via Electrical
Connections table). Common should always be con
-
nected to the negative (-) side of DC power.
All encoders have at least one output signal (A); how
-
ever, it is common for encoders to have three signals
A, B, Z (may also be referred to as C, X, or index).
The outputs should each be connected to the receiv
-
ing device at the appropriate terminal. NOTE: Never
connect A, B, or Z to the + or - side of DC power.
ELECTRICAL CONNECTIONS
Cable -
The use of shielded cable is recommended
for all encoder installations. When a Dynapar brand
encoder is ordered, the type of termination is gener
-
ally defined (usually the last selectable code in Order
-
ing Information). If a code for a cable was indicated,
the encoder was manufactured to include a shielded
cable. If any other type of termination was selected or
if selection of termi-nation type was not requested, a
cable assembly must be ordered. (The cable assem
-
bly easily hooks onto the encoder’s connector making
it ready for wiring).
To determine which cable assembly to order, refer
to the Electrical Connections table (in the encoder’s
manual).
GENERAL GuIDELINES
Encoders provide quality measurements and long
life when common sense, care, and accurate align
-
ments are provided during installation. The following
general guide-lines will help to ensure a trouble-free
installation.
Mounting the Encoder
Wiring the Encoder
• Never connect or disconnect the encoder con
-
nector or wiring while power is ON. Doing so may
damage the encoder.
• Power should always be connected to the + side
of DC power.
• Common should always be connected to the -
side of DC power.
• Never connect A, B, or Z to the + or - side of DC
power.
In some cases, there may be more than one table or
the table may be broken into sections due to different
output types. If so, refer to the information listed for
the output type selected for the encoder (in Ordering
Information).
Wiring should be run through dedicated conduits or
harnesses (not shared with any other wiring) which
are spaced at least 12 inches apart. This protects the
cable from physical damage while providing a degree
of electrical isolation. Also, do not run cable in close
proximity to other conductors which carry current to
heavy loads such as motors, motor starters, contac
-
tors, or solenoids. Doing so could result in electrical
transients in the encoder cable which cause unde
-
sired signal pulses.
NOTE: Never connect or disconnect the encoder
connector or wiring while power is ON. Doing so
may damage the encoder.
Grounding -
DO NOT ground the encoder through
both the machine and the cable wiring. Connect the
shield at the input device only.
NOTE: If the shield
is connected at both ends, grounding problems
that degrade system performance may result.
For European-based applications requiring CE com
-
pliance, cable length must not exceed 30m. Connect
the shield to building ground on either the Encoder
or Controls end. CE compliant products are tested to
EN61326 EMC.
ELECTRICAL CONNECTIONS
(cont.)


