Chapter 4 - Understanding Depth Settings
Page 4-4
490 Echo Sounder Operations Manual Rev. B2
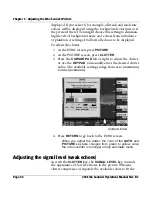
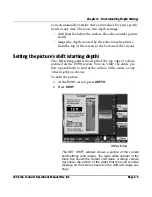
In the large rectangle on the right, the blue area at the top
(with waves) represents the surface of the water, and the
brown area below represents the seabed.
The number at the bottom is the depth of the picture, and
the seabed depth is also labelled.
The smaller rectangle inside the larger one represents the
echo sounder’s picture. As you move the shift (and range)
settings, this rectangle adjusts to show what you will see
on the echo screen.
A horizontal black arrow points to the value that this win-
dow adjusts: the depth at which the echo sounder picture
starts, relative to the surface of the water.
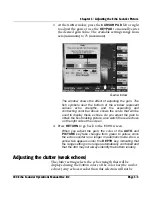
3. Press the
CURSOR PAD
up or down to shift the picture,
or use the
KEYPAD
to enter the digits of the desired
depth. If you type the number on the keypad, wait a
moment for the system to enter the number.
4. Press
RETURN
to go back to the
ECHO
screen.
Adjusting shift changes the
AUTO
and
DEPTH
key tabs
from green to yellow, since the echo sounder is no longer
in automatic mode.
Setting the picture’s range
The
range
setting adjusts the overall depth covered by the
echo sounder picture, from the top of its display to the bottom.
The range can be set automatically (by pressing
AUTO
), or
manually on the
SET RANGE
window.
To set the range:
1. At the
ECHO
screen, press
DEPTH
.
2. Press
RANGE
.
Содержание 490 Echosounder
Страница 1: ...Northstar 490 Echo Sounder Operations Manual ...
Страница 38: ...Chapter 3 Adjusting the Echo Sounder Picture Page 3 8 490 Echo Sounder Operations Manual Rev B2 ...
Страница 44: ...Chapter 4 Understanding Depth Settings Page 4 6 490 Echo Sounder Operations Manual Rev B2 ...
Страница 54: ...Chapter 5 Other Functions Using the MORE key Page 5 10 490 Echo Sounder Operations Manual Rev B2 ...
Страница 74: ...Appendix A Specifications Page A 4 490 Echo Sounder Operations Manual Rev B2 ...


