background image

1.  Bi-metal band saw blade is suitable for metal workpiece such as carbon steel, alloy steel, and 

stainless steel. 

ces and hard 

3. 

n band saw blades are suitable for wood, fiber glass and plastic.   

4.  Carbide grit edge band saw blades are suit

ago, carbon product and alveolate 

material, etc.   

 vertical position and open the blade guards. Loosen tension screw knob to 

he new blade with teeth slanting toward 

pulley (bottom) with the left hand and hold in position.   

d the pulley using the thumb, index and little finger as guides. 

knob clockwise until no blade slippage occurs, Do not tighten 

7. Replace the blade guards.   

8. Place 2-3 drops of oil on the blade. 


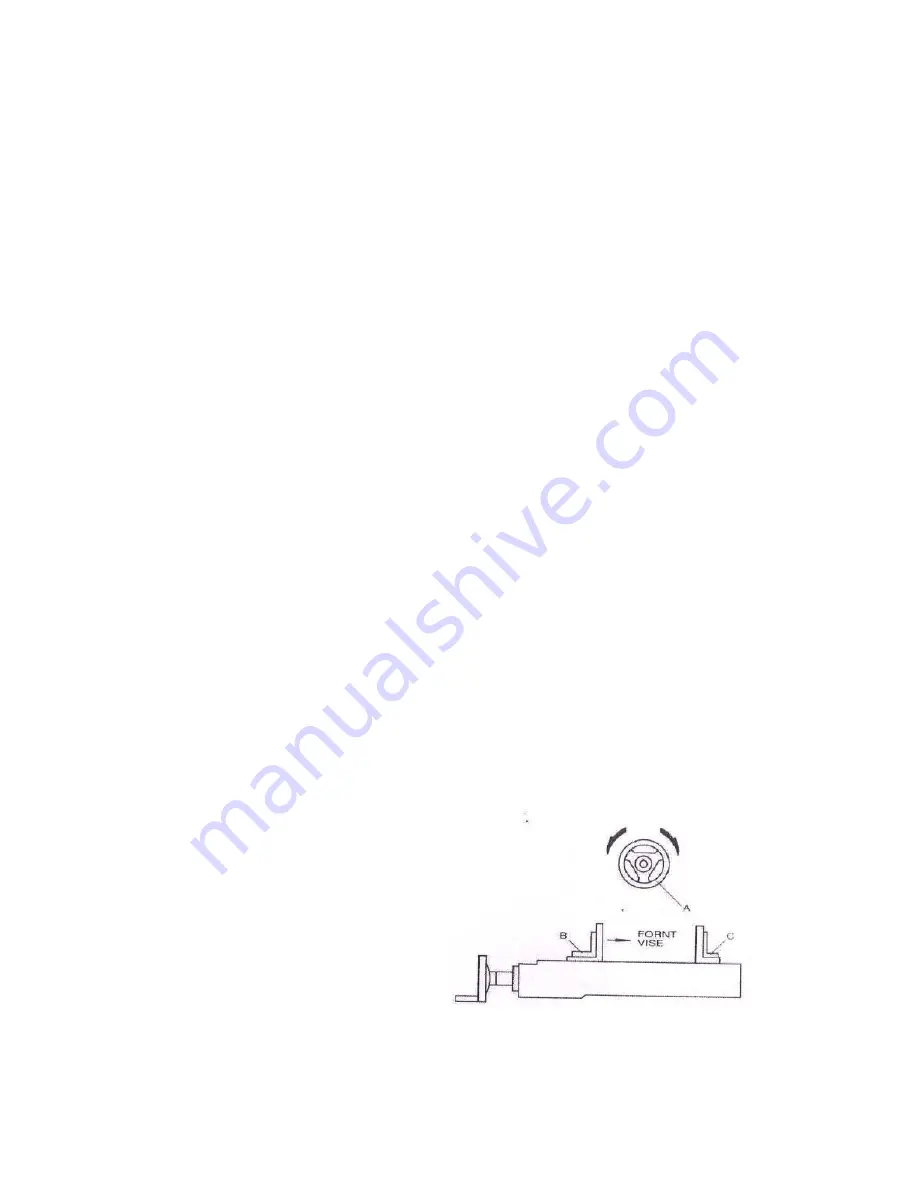
turn hand-wheel (A) counterclockwise 1/2 turn and move the vise 

jaw (B) to the desired position. Then tighten the vise jaw (B) against the workpiece by turning hand- 
wheel clockwise.   


2.  Hardback carbon band saw blade is suitable for low-rigidity small metal workpie

plastic. 

Flexback carbo

able for plumb


CHANGING THE BLADE 

Raise the saw arch to
sufficiently allow the saw blade to slip off the wheels. Install t
the motor as follows:   

1. Place the blade in between each of the guide bearings.   

2. Slip the blade around the motor 

3. Hold the blade taut against the motor pulley by pulling the blade upward with the right hand which 
is placed at the top of the blade.   

4. Remove left hand from bottom pulley and place it at the top side of the blade to continue the 
application on the upward pull on the blade.   

5. Remove right hand from blade and adjust the position of the top pulley to permit left hand to slip 
the blade aroun

6. Adjust the blade tension 
excessively.  


USAGE OF THE QUICK VISE


The workpiece is placed between the vise jaws with the amount to be cut off extending out past the 
blade. Your machine is equipped with a “quick-action” vise jaw which allows you to instantly position 
the moveable vise jaw (B). Simply 


Page 7 of 15 

Содержание 145765

Страница 1: ...Item 145765 Automatic Metal Cutting Band Saw User s Manual Assembly and Operation Instructions MADE IN CHINA...

Страница 2: ...connecting parts of the locking device 3 of Fig A then the saw arch can be raised ASSEMBLY Step 1 Assemble the front rear wheels 5 6 of Fig B Step 2 By removing the locking device 3 of Fig A the saw...

Страница 3: ...AND OR USED FOR ANY APPLICATION OTHER THAN FOR WHICH IT WAS DESIGNED IF YOU HAVE ANY QUESTIONS RELATIVE TO ITS APPLICATION DO NOT USE THE MACHINE UNTIL YOU HAVE HAD DETAIL INSTRUCTION FROM YOUR DEALER...

Страница 4: ...that is damaged should be properly repaired or replaced 20 Note direction of feed Feed work into a blade or cutter against the direction of rotation of the blade or cutter only 21 Never leave the tool...

Страница 5: ...ine before removing chips 15 Make all adjustments with the power off 16 Disconnect machine from power source when making repairs 17 Shut off power and clean the Band Saw and work area before leaving t...

Страница 6: ...to cut off the source of the electricity then you may check if the motor stops running completely After remove the saw blade from the piece of work 2 h OPERATION WORK SET UP 1 Raise the saw arch to a...

Страница 7: ...e blade is assembled to the pulleys fi STARTING SAW CAUTION NEVER OPERATE SAW WITHOUT BLADE GUARDS IN PLACE Be sure the blade is not in contact with the work when the motor is started Start the motor...

Страница 8: ...arbon band saw blade is suitable for low rigidity small metal workpie plastic Flexback carbo able for plumb CHANGING THE BLADE Raise the saw arch to sufficiently allow the saw blade to slip off the wh...

Страница 9: ...try a new blade to see if this corrects poor cutting before beginning to adjust If a blade becomes dull on one side sooner than the other for example it will begin cutting crooked A blade change will...

Страница 10: ...blade guide assemblies it may be necessary to loosen the blade tension slightly 8 Adjust the vertical position of just touches the ball bearing 9 Make a final run to check track 1 MAINTENANCE CAUTION...

Страница 11: ...s to 001 grea thickness including weld of the saw 4 Inadequate blade tension ension a little at a time 4 Increase blade t 5 Blade guides spaced out too much 5 Move guides as close to work as possible...

Страница 12: ...ASSEMBLY DRAWING Page 11 of 15 Page 11 of 15...

Страница 13: ...2 S Washer M8 11 Bolt M5x8 3 Set Screw Soc Hd M8x30mrn 12 B lade Cover Front 4 Nut 3 8NF 13 Water Nozzle 5 S Washer 3 8 x2 2mm 14 Valve 1 4 6 Blade AK justable Front 15 Bolt 3 16 x1 4 7 Pin 16 Hose Bu...

Страница 14: ...5 16X23X3 74 Plate Washer 3 8x24x3 36 Deflector Plate 75 Free Vise 37 Bolt 1 4x1 2 76 Table 38 Vertical Cutting Plate 77 Acme Screw 39 Plate Washer M8x2x18 78 Screw Servile 40 S Washer M8 x2 79 C Ring...

Страница 15: ...Steet Balls 156 Bolt M6x30mm 118 Sheel Fragment 160 Nut M6 119 Bolt M5x8 161 Cylinder Support 120 Bolt 3 8x1 1 2 162 Plate Washer M10 121 Support 163 CAP M10x50mm 122 Nut 3 8x23x3 164 Cylinder 123 Pl...

Страница 16: ...Lead from lead based paints Crystalline silica from bricks cement and other masonry products Arsenic and chromium from chemically treated lumber Your risk from these exposures varies depending on how...

Отзывы: