background image

7

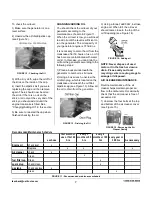
To check the oil level:

1) Make sure the generator is on a
level surface.

2) Unscrew the oil filler/dipstick cap
(see Figure 12).

3) With a dry cloth, wipe the oil off of
the stick on the inside of the cap.

4) Insert the dipstick as if you were
replacing the cap and then remove
again. There should now be oil on
the stick. If there is no oil on the
stick, or oil only at the very end of the
stick, you should add oil until the
engine crankcase is filled. See
“Changing/Adding Oil” in this section.

5) Be sure to reinstall the cap when
finished checking the oil.

CHANGING/ADDING OIL

You should check the oil level of your
generator according to the
maintenance schedule in Figure 11.
When the oil level is low, you will need
to add oil until the level is sufficient to
run the generator. The oil capacity of
your generator engine is 37 fluid oz.

It is necessary to drain the oil from the
crankcase after 50 hours of use, or if it
has become contaminated with water
or dirt. In this case, you can drain the
oil from the generator according to the
following steps:

1) Place a bucket underneath the
generator to catch oil as it drains.

2) Using a box wrench, unscrew the
oil drain plug, which is located on the
crankcase underneath the oil filler/
dipstick cap (see Figure 13). Allow all
the oil to drain from the generator.

3) Using a funnel, add 30W, 4-stroke
engine oil. When full, the oil level
should come close to the top of the
oil fill opening (see Figure 14).

NOTE: Never dispose of used
motor oil in the trash or down a
drain. Please call your local
recycling center or auto garage to
arrange oil disposed.

AIR CLEANER MAINTENANCE

Routine maintenance of the air
cleaner helps maintain proper air
flow to the carburetor. Occasionally
check that the air cleaner is free of
excessive dirt.

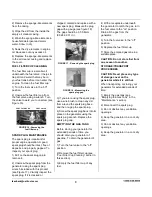
1) Unscrew the four bolts at the top
and bottom of the air cleaner cover
(see Figure 15).

[email protected]

each use

first month of 

use or first 20 

hrs

every 3 

months or 50 

hrs

every 6 

months or 100 

hrs

every year or 

300 hrs

As necessary

Engine oil

check level

x

Replace

x

x

Air cleaner

check 

x

Clean

x

fuel filter cup

Clean

x

spark plug

check/ clean

x

gas tank

check gas level

x

Clean

x

Recommended Maintenance Schedule

FIGURE 11 - Recommended maintenance schedule

FIGURE 12 - Checking the Oil

FIGURE 13 - Draining the Oil


FIGURE 14 - Adding oil

FIGURE 15 - Removing the Air

Cleaner Casing

Содержание 6800

Страница 1: ...eceptacles 6 Fuel Unleaded 5 6 Gallons Start Type Recoil Displacement 389cc DC Output 12V 10A No Load Speed 3000 RPMs Breaker 47 Amps Low Oil Sensor CAUTION FOR YOUR OWN SAFETY READ INSTRUCTION MANUAL COMPLETELY AND CAREFULLY BEFORE OPERATING THIS GENERATOR Any failures made in following the safety regulations and and instructions may result in an electric shock fire and or serious injury SAFETY I...

Страница 2: ...w generator fresh from the package contains no oil in the crankcase The user must add the proper amount of oil before operating the generator for the first time The oil capacity of this engine crankcase is 37 fluid oz For general use we recommend 30W 4 stroke engine oil to fill the engine crankcase To add oil follow these steps 1 Make sure the generator is on a level surface 2 Unscrew the oil fill...

Страница 3: ...ator for the First Time If you have not yet read this section go back and read it now STEP 1 Check the oil This generator is equipped with an automatic low oil shutoff to protect it from damage Nonetheless the user should check the oil level of the engine before each use to ensure that the engine crankcase contains sufficient lubricant To check the oil level 1 Make sure the generator is on a level...

Страница 4: ...r end to a copper or brass grounding rod that is driven into the earth Grounding codes can vary by location Please contact a local electrician to check the grounding regulations for your area STARTING THE GENERATOR DANGER POISONOUS GAS Generators give off carbon monoxide a poisonous gas that can kill you quickly You CANNOT smell it see it or taste it Only run the generator outdoors and away from a...

Страница 5: ...u wish to draw from the generator If this number exceeds the rated wattage of the generator DO NOT connect all these devices Select a combination of electrical devices which has a total rated wattage lower than or equal to the rated wattage of the generator CAUTION The generator can run at its surge wattage capacity for only a short time Connect electrical devices requiring a rated running wattage...

Страница 6: ...e generator tank for long periods of time without use can make it difficult to start the generator in the future Never store the generator for extended periods of time with fuel in the tank MAINTENANCE CARE Proper routine maintenance of your generator will help prolong the life of your machine Please perform maintenance checks and operations according to the schedule in Figure 11 on page 6 CAUTION...

Страница 7: ...h the generator to catch oil as it drains 2 Using a box wrench unscrew the oil drain plug which is located on the crankcase underneath the oil filler dipstick cap see Figure 13 Allow all the oil to drain from the generator 3 Using a funnel add 30W 4 stroke engine oil When full the oil level should come close to the top of the oil fill opening see Figure 14 NOTE Never dispose of used motor oil in t...

Страница 8: ...k plug use a wire brush to clean any dirt from around the spark plug base and then re gap the spark plug 4 Screw the spark plug back into its place on the generator using the spark plug wrench Replace the spark plug cap EMPTYING THE GAS TANK Before storing your generator for extended periods of time you should drain your generator of gasoline To drain the generator of gas 1 Turn the fuel valve to ...

Страница 9: ... for 2 minutes and push the circuit reset button to the on position Bad connecting wires cables If you are using an extension cord try a different one Bad electrical device connected to generator Try connecting a different device Generator is overloaded Perform these steps 1 Turn off all electrical devices 2 Unplug all electrical devices 3 Turn off generator 4 Wait several minutes 5 Restart genera...

Страница 10: ...use abuse negligence or accidents repairs or alterations or a lack of maintenance NATI shall in no event be liable for death injuries to persons or property or for incidental special or consequential damages arising from the use of our products To receive service under warranty the original manufacturer part must be returned for examination by an authorized service center Shipping and handling cha...

Страница 11: ...uel in the tank 11 Access to the fuel tank for adding fuel 10 Reset buttons that protect the generator from electrical overload 9 To protect the generator from short current 8 To switch between 120 and 240 Volt output 7 Location for checking and filling engine oil 6 Red lights that turn on to indicate the output of power to each receptacle 5 To start stop engine 4 Pull cord for starting engine 3 A...

Страница 12: ...8806800 06 13 12 For customer service call 1 800 348 5004 or e mail feedback natitools com Parts List ...

Страница 13: ...3 Crankcase Gasket 1 24 Oil Plug 5 74 Oil Lever Switch 1 25 Bolt 9 75 Bearing 2 26 Bolt 2 76 Camshaft 1 27 Oil Seal 1 77 Balance Shaft 1 28 Crankshaft Cover 1 78 Key Special Woodruff 1 29 Oil Stick 1 79 Crankshaft 1 30 Head Cover Gasket 1 80 Governor Gear 1 31 Head Cover 1 81 Cylinder Head 1 32 Head Cover Bolt 1 82 Exhaust Stud Bolt 2 33 Breather Tube 1 83 Bolt 4 34 Muffler Gasket 1 84 Pushing Rod...

Страница 14: ...8000 XL GAS GENERATOR Model 6800 6836 For Customer Service please call 1 800 348 5004 or email feedback natitools com 14 8806800 06 13 Wiring Diagram without idle control system ...

Отзывы: