To add gasoline:
1) Make sure the generator is on a
level surface.
2) Unscrew the gas cap and set
aside (NOTE: The gas cap may be
tight and hard to unscrew).
3) Slowly add unleaded gasoline to
the fuel tank. Be careful not to
overfill. The capacity of the gas tank
is 8.5 gallons (32L - 8000E) or 12
gallons (46L - 10000E). NOTE: Gas
can expand. Do not fill the tank to the
very top.
4) Replace the fuel cap and wipe up
any spilled gasoline with a dry cloth.
IMPORTANT:
1) Never use an oil/gasoline mixture.
2) Never use old gas.
3) Avoid getting dirt or water in the
fuel tank.
4) Gas can age in the tank and make
it hard to start up the generator in the
future. Never store the generator for
extended periods of time with fuel in
the tank.
STEP 3 - Ground the Generator
WARNING: Failure to properly
ground the generator can result in
electrocution.
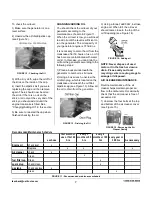
Ground the generator by tightening
the grounding nut against a
grounding wire (see Figure 3).
A generally acceptable grounding
wire is a No. 12 AWG (American
Wire Gauge) stranded copper wire.
This grounding wire should be
connected at the other end to a
copper or brass grounding rod that
is driven into the earth.
Grounding code can vary by
location. Please contact a local
electrician to check the grounding
regulations for your area.
SUBSEQUENT USE OF THE
GENERATOR
If this is not your first time using the
generator, there are still a few steps
you should take to prepare it for
operation.
IMPORTANT: At this point you
should be familiar with the
procedures described in the first
portion of this section entitled
“Using the Generator for the First
Time”. If you have not yet read
this section, go back and read it
now.
STEP 1 - Check the oil
This generator is equipped with an
automatic low oil shutoff to protect it
from damage. Nonetheless, the user
should check the oil level of the
engine before each use to ensure
that the engine crankcase contains
sufficient lubricant.
To check the oil level:
1) Make sure the generator is on a
level surface.
2) Unscrew the oil filler/dipstick cap.
3) With a dry cloth, wipe the oil off of
the stick inside the cap.
4) Insert the dipstick as if you were
replacing the cap and then remove
again. There should now be oil on
the stick. If there is no oil on the
stick, or oil only at the very end of
the stick, you should add oil until the
3
engine crankcase is filled (see the
“Changing/Adding Oil” portion of
the “Maintenance” section).
5) Be sure to replace the cap when
finished checking oil.
NOTE: The oil capacity for this
generator is 37 fluid oz.
STEP 2 - Check the Gas Level
Before starting the generator,
check to see that there is sufficient
gasoline in the gas tank. The fuel
gauge on top of the generator will
indicate the gas level in the tank.
Add gas if necessary,
WARNING: Gasoline and
gasoline fumes are highly
flammable.
1) Do not fill tank near an open
flame.
2) Always allow engine to cool for
several minutes before refueling.
3) Do not overfill (check the
“Specifications” section for the tank
capacity of the generator). Always
check for spills.
IMPORTANT
1) Use only UNLEADED gasoline
with an octane rating of 87 or
higher.
2) Do not use old gas.
3) Never use oil/gasoline mixture.
4) Avoid getting dirt or water in the
fuel tank.
5) Never store generator for
extended periods of time with fuel
in the tank.
FIGURE 3 - Grounding Nut Location


