background image


CJP 

Issue 1 

14/6/17 

1.2 Fitting the Sim Card 


The Tracker requires a FULL SIZE sim card, which is fitted inside the Tracker, just under the waterproof top cover. 
Carefully, undo the two screws and nuts which hold the top cover to the main body, and gently remove it, being 
careful not to damage the rubber sealing gasket fitted between the cover and body or put any strain on the power 
wires which pass through the cover. Once the cover is removed you will see the top of the Circuit board, which 
contains two small status LED indicators and under the board, you will also see the edge of the Sim card holder. 

Gently, but firmly slide the sim card into the sim holder, noting the position of the flat ‘orientation’  notch printed on 
the case label. The Sim has to be pushed all of the way into the holder, where it will lock into place. Note that the 
Sim Card Holder is also fitted with a switch, which powers up the tracker, only when a card is inserted, so if the 
Tracker fails to power up in the next section, then you should double check that the Sim has correctly locked itself 
into position. 

The Network Sim that you use will come with a mobile phone number, issued by your provider. It is important 
that you note this number, as it will be used to set up and communicate with your tracker. 


1.3 Testing GPRS and GPS Signals 


Like all Trackers, the “Track Bro” relies on having access to both GPRS and GPS signals, so before replacing the top 
cover, it is important to check that the Tracker has good access to both signals in the location where it has been 
mounted. There are two small LEDS fitted on the circuit board, close to the Sim Card holder, the Blue LED indicates 
GPS signal status and the Yellow led indicates GPRS (2G Mobile phone signal) status. 

Switch on the Tracker, and both LED’s should begin to flash. After a few minutes the Tracker should find GPS 
information and access the Mobile Phone network and both lights should stop flashing and remain solid. If neither 
LED begins to flash, then please check power connections, and ensure that the sim card is pushed firmly into its 
holder. 

1.3.1 LED Indicators 


Yellow Light Flashing   =  

Scanning for Mobile Phone Network 

Yellow Light Solid (ON)   =  

Mobile Phone Network Found and Connected. 

Blue Light Flashing  

=  

Searching for GPS Signal 

Blue Light Solid (ON)  

=  

GPS Locked and Connected 

If either LED fails to stop flashing after five minutes then you may need reposition the Tracker and try again. Once 
connection is established, refit the rubber sealing gasket and top cover. 


1.4 Water Resistance 


The “Track Bro” is water resistant in normal use, in relation to rain and road spray, and is suitable for external use. 
However if the Tracker is exposed to power washing, or salt water spray (i.e Marine use or being used in Coastal 
Locations) then it is advisable to add a small amount of silicone sealant around the wire access grommet on the top 
cover to protect the rubber gasket. Under no circumstances should the Tracker be submerged in water. 


Содержание Track Bro

Страница 1: ...ion Mode 5 2 4 Set Control Numbers 5 3 0 PROGRAMMING THE TRACKER 6 3 1 Setting the Geofence Boundary Option 6 3 2 Over speed Alarm Option 6 3 3 Send Current Location SMS at Same Time Each Day option 7 3 4 Shock Alarm Option 7 3 5 External Alarm Trigger by ACC Wire Option 8 3 6 Low Internal Battery Warning 8 3 7 Sleep Mode Power Data Saving 9 3 8 GPRS Position Upload Interval 9 4 0 USING THE TRACK ...

Страница 2: ...In the UK Giff Gaff is one example and loading it with a small credit balance Most PAYG networks require you to make at least one paid for activity every so often Usually 3 6 months in order to keep the Sim active so this should also be established from the Network prior to choosing a sim If you use the tracker in GPRS mode the Sim should never be at risk of expiry however if you use the Tracker i...

Страница 3: ...S and GPS signals so before replacing the top cover it is important to check that the Tracker has good access to both signals in the location where it has been mounted There are two small LEDS fitted on the circuit board close to the Sim Card holder the Blue LED indicates GPS signal status and the Yellow led indicates GPRS 2G Mobile phone signal status Switch on the Tracker and both LED s should b...

Страница 4: ... is command and 0000 is the password If you wish to change the default password contact Nortek for more details 2 1 Programming the Mobile Phone Network APN In order to connect successfully to the Online Tracking Portal and use the APP you will need to program the tracker with the network APN information so that it can send receive data from your chosen network First you will need to find out the ...

Страница 5: ...erent Mobile Phone numbers and these are referred to as control numbers Each number is given a priority of 1 2 and 3 and the number of the main owner operator should always be given a priority of 1 So to program the control numbers use the following format phone number password space priority number So to program a mobile phone number of 0778451207 using the default user password of 0000 and give ...

Страница 6: ...hould already be located within the area where it is to be protected The protected area boundary can be programmed numerically in Metres First to turn on the Geofence protection text 2110000 To set the Geofence Boundary In metres text 0050000 space Boundary in metres So to set the Geofence Boundary for 500 metres would look like 0050000 space 500 To turn off the Geofence Protection Text 2100000 Be...

Страница 7: ...arm in the event that shock is sensed over a duration of 0 instant to 120 seconds This feature can be used to protect against heavy sustained vandalism or theft by towing away Command 1810000Txx Replace the xx with a number representing the Shock duration time of between 0 to 120 seconds Example to set a Shock Duration time of 10 seconds you would text 1810000T10 To turn off the Shock Alarm Functi...

Страница 8: ...it on the vehicle to warn against unauthorised use To Switch ON the ACC function text 8860000 To Switch OFF the ACC function text 8870000 3 6 Low Internal Battery Warning The Track Bro is fitted with a small internal Lithium Battery which is charged from the host power supply In the event that power is cut to the Vehicle or the Battery removed then the internal battery will take over and continue ...

Страница 9: ...nsed Whilst Sleep Mode is active all GPRS data uploads to the Server App are stopped thus also conserving needless Data use from the network whilst parked To turn on sleep mode use the following command SLEEP0000 space time in minutes So to turn on Sleep Mode after 15 minutes of inactivity text SLEEP0000 15 To Turn OFF the Sleep Mode function text SLEEP0000 0 3 8 GPRS Position Upload Interval This...

Страница 10: ...ked will show the current location of the Vehicle and its heading 4 2 Device location by Texting To get current location text 6690000 The Tracker will then send a Text Message back to the phone which texted it containing the vehicle speed and a link to Google Maps which when clicked will show the current location of the Vehicle and its heading 4 3 Device location Online The Track Bro can also be u...

Страница 11: ...u wish to identify the tracker such as Paul s Tracker or a Registration Number In the Identifier field you need to enter the unique ID number which is printed on the Tracker Label Do not confuse this with the IMEI number Once this information has been completed save the changes by clicking the Tick symbol box in the bottom right corner Assuming that the Track Bro is connected and operating it shou...

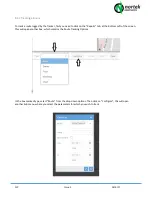
Страница 12: ...screen then select Account from the drop down menu You can now customise your own preferences from within the Distance and Speed and Time zone options We recommend using the default Open Street Map option for the Map Layer Don t forget to save any changes that you make by clicking the Tick icon on the bottom right of the screen In the next few pages we move onto actually reading back the Tracking ...

Страница 13: ...ick on the Reports tab at the Bottom Left of the screen This will open another box which contains the Route Tracking Options In the box marked type select Route from the drop down options Then click on Configure this will open another Sub menu where you select the parameters for which you wish to track ...

Страница 14: ...ing the Tick icon in the Bottom Right Corner You will then be taken back to the Main Map Screen From here click on the Show box This will now load all of the Co Ordinates for that date period and produce a Route on the Map Pane You can also export this GPS Data in an Excel spreadsheet format by clicking the Export box Note If there is no tracking information for the period that you have entered on...

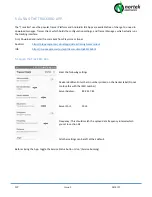
Страница 15: ...s Android https play google com store apps details id org traccar client IOS https itunes apple com us app traccar client id843156974 5 1 Open the Track Bro App Enter the following settings Device Identifier Enter the ID number printed on the tracker label Do not confuse this with the IMEI number Server Address 89 242 7 83 Server Port 5013 Frequency This should match the upload data frequency inte...

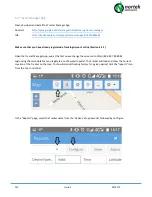
Страница 16: ...ing Account online Section 4 3 1 Open the Traccar Manager App and at the first screen change the server url to http 89 242 7 83 8082 Login using the same details as you registered on the website portal The Tracker will load and show the Current Location of the Tracker on the map To show historical tracking history for a given period click the reports icon from the Top control Bar In the Reports pa...

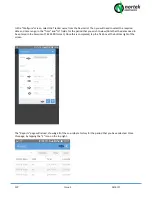
Страница 17: ...rom and to fields for the period that you wish to view Note that the dates need to be entered in the American YY MM DD format Once this is completed tap the Tick box at the bottom right of the screen The Reports page will reload showing all of the co ordinate history for the period that you have selected Close this page by tapping the X icon on the top right ...

Страница 18: ...zoom in out and move the Map around using normal app based screen gestures Note If there is no tracking information for the period that you have entered on the previous configure screen then there will be route data or Map plotting information displayed and you should go back and enter in a different time date period END OF DOCUMENT ...

Отзывы: