Indoor Unit Installation
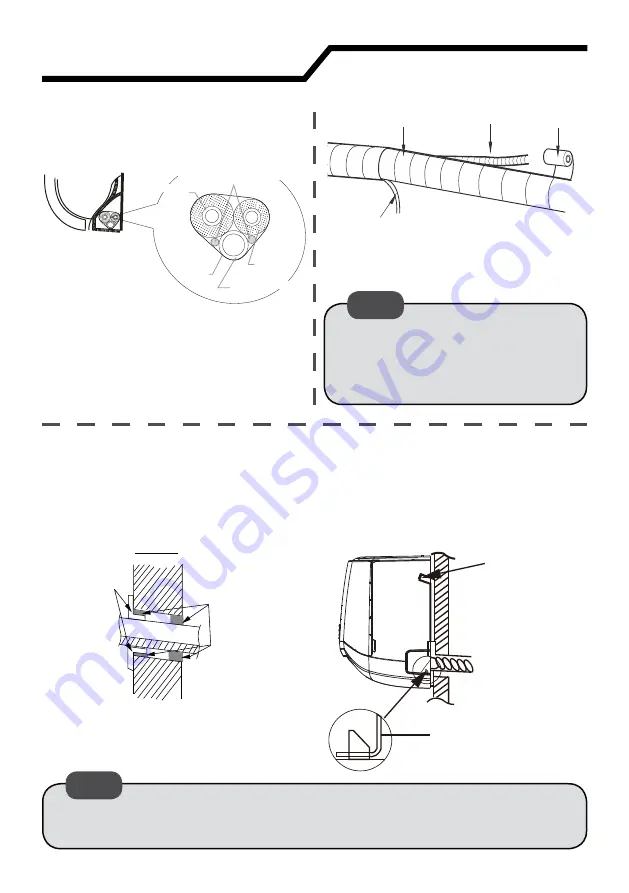
Step eight: bind up pipe
1. Bind the connection pipe, power
cord and drain hose with tape.
Step nine: hang the indoor unit
1.
3XWWKHERXQGSLSHVLQWKHZDOOSLSHDQGOHDGWKURXJKWKHZDOOKROH
2.
+DQJWKHLQGRRUXQLWRQWKHZDOOPRXQWLQJIUDPH
3.
)LOOWKHJDSEHWZHHQSLSHVDQGZDOOKROHZLWKVHDOHUWRSUHYHQWGUDIWV
4. Secure the wall pipe.
5.
&KHFNWKDWWKHLQGRRUXQLWLVVHFXUHO\LQVWDOOHGDJDLQVWWKHZDOO
The power cord and control wire
FDQ¶WEHFURVVHGRUZLQGLQJ
The drain hose should be bound
at the bottom.
Note:
.HHSEHQGVLQGUDLQOLQHWRDPLQLPXPQXPEHUDQGGHJUHHWRSUHYHQW
EORFNDJH
Note:
2.
5HVHUYHDFHUWDLQOHQJWKRIGUDLQ
hose and power cord for installation
ZKHQELQGLQJWKHP:KHQELQGLQJ
WRDFHUWDLQGHJUHHVHSDUDWHWKH
indoor power and then separate the
drain hose.
3. Bind them evenly.
4.
7KHOLTXLGSLSHDQGJDVSLSHVKRXOG
be bound separately at the end.
Indoor
Unit
Indoor and Outdoor
Power Cord
Gas Pipe
Drain Hose
Liquid
Pipe
Band
Drain Hose
Indoor Power Cord
Connection Pipe
Tape
Indoor
Outdoor
Wall Pipe
Sealant
Upper Hook
Lower Hook of
:DOOPRXQWLQJ
Frame
3DJH
Содержание GHH092.6KSK4DH
Страница 50: ...3DJH ...
Страница 51: ...3DJH ...


