background image

17

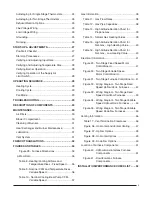
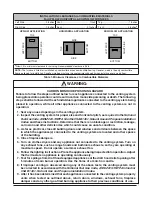
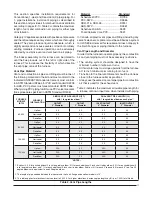
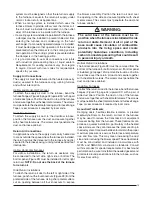
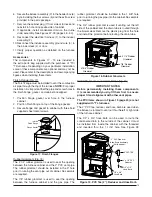
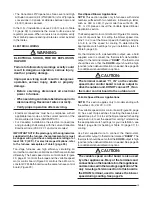
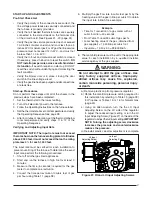
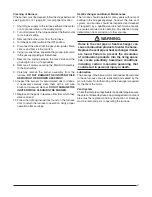
Figure 11. Furnace on a Concrete Slab

Concrete 

Floor

Furnace 

Sheet 

Metal 

Plenum

Horizontal Installation

 WARNING:

The furnace must not be installed directly on 
carpeting, tile, or any combustible material other 
than wood fl ooring.

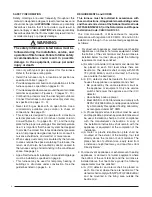
The *TC series gas furnace can be installed horizontally 
(Figure 12) in an attic, basement, crawl space or alcove. 
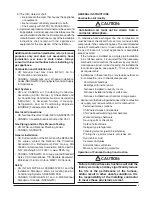
It can also be suspended from a ceiling in a basement 
or utility room in either a right to left airfl ow or left to right 
airfl ow as shown in Figure 13.

*TC series furnaces are shipped with the bottom panel 
installed. If furnace is installed horizontally, remove the 
bottom panel from the furnace before attaching the duct 
system. See Bottom Panel Removal section.

If installing the furnace in an attic, it is required that a drip 
pan be placed under the furnace. If the installation is on 
a combustible platform (Figure 12), it is recommended 
that the drip pan extend at least 12 inches past the top 
and front of the furnace.

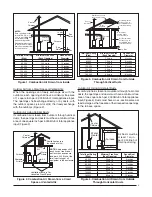
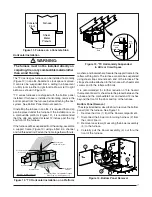
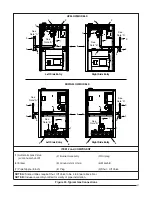
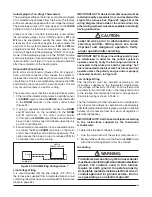
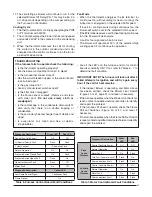
If the furnace will be suspended from the ceiling, assemble 
a support frame (Figure 13) using slotted iron channel 
and full threaded rod. Fasten the frame together with nuts, 

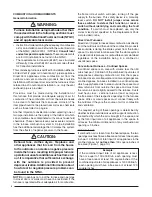
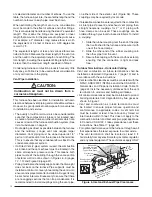
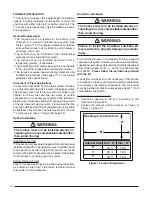
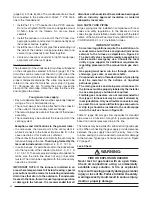
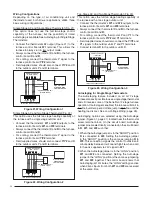
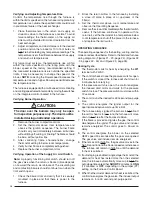
Figure 12. *TC Horizontal installation on a Platform

Exhaust Pipe

Vented to Outside

Combustible

Platform

Coil Plenum

Combustion Air 

Condensate Drain Lines 

Must Be Trapped

 With J-Trap or Field Supplied Loop.

One-Pipe Installation Shown

Airflow

Electrical Supply

Connection

washers, and lockwashers. Secure the support frame to the 
rafters with lag bolts. The furnace can also be suspended 
using steel straps around each end of the furnace. The 
straps should be attached to the furnace with sheet metal 
screws and to the rafters with bolts.

It is recommended for further reduction of fi re  hazard 
that cement board or sheet metal be placed between the 
furnace and the combustible fl oor and extend 12 inches 
beyond the front of the door and top of the furnace.

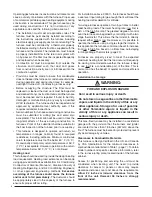
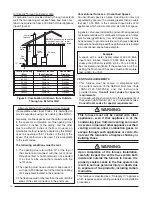
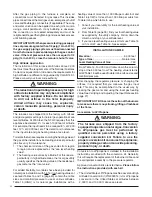
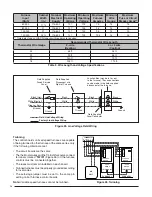
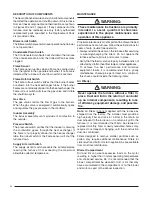
Bottom Panel Removal

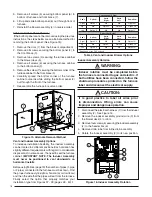
The steps listed below describe how to remove the bottom 

panel from the furnace. See Figure 14.

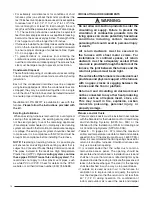
1.  Remove the door (1) from the blower compartment.

2.  Disconnect the blower motor wiring harness (2) from 

the control board.

3.  Remove two screws (3) securing the blower assembly 

(4) to the furnace.

4.  Carefully pull the blower assembly (4) out thru the 

front of the furnace.

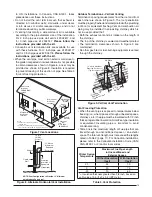
Figure 13. *TC Horizontally Suspended 

in Attic or Crawl Space

Lag
Bolt

Nuts (x2)

Washer 

and 

Lockwasher

Nuts (x2)

Threaded 

Rod

6

7

5

1

2

3

4

Figure 14. Bottom Panel Removal

Содержание TC Upflow/Horizontal

Страница 1: ...ad all instructions carefully before starting the installation Return these instructions to the customer s package for future reference PROPOSITION 65 WARNING This product contains chemicals known to...

Страница 2: ...and Air Ducts 14 Supply Air Connections 15 Upflow Horizontal Furnaces 15 Downflow Furnaces 15 Return Air Connections 15 Upflow Horizontal Furnaces 15 Side Return Installations 15 Bottom Return Instal...

Страница 3: ...37 Gas Information 38 Table 11 Gas Flow Rates 38 Table 12 Gas Pipe Capacities 38 Table 13 High Altitude Deration Chart for Propane Gas 39 Table 14 Natural Gas Heating Values 39 Table 15 High Altitude...

Страница 4: ...tor and alarm shall be placed on each floor level where there are bedrooms The detector shall comply with NFPA 720 2005 Edition and be mounted in the living area outside the bedroom s SAFETY INFORMATI...

Страница 5: ...NFPA 54 1999 ANSI Z223 1 and the Installation Standards Warm Air Heating and Air Conditioning Systems ANSI NFPA 90B CANADA CAN CGA B149 1 and 2 M00 National Standard of Canada NSCNGPIC GENERAL INSTRUC...

Страница 6: ...ds available from Air Conditioning Contractors of America Manual J American Society of Heating Refrigerating and Air Conditioning Engineers or other approved engineering methods Excessive oversizing o...

Страница 7: ...ctions Place the appliance being inspected into operation Adjust the thermostat so appliance is operating continuously 7 Test for spillage from draft hood equipped appliances at the draft hood relief...

Страница 8: ...d If the furnace is operated without adequate air for combustion the flame roll out switch will open turning off the gas supply to the burners This safety device is a manually reset switch DO NOT inst...

Страница 9: ...freely exchange with the outdoors Figure 2 Outdoor Air Using Vertical Ducts If combustion air is taken from outdoors through vertical ducts the openings and ducts must have a minimum free area of one...

Страница 10: ...An unconfined space is an area including all rooms not separated by doors with a volume greater than 50 cubic feet per 1 000 Btuh of the combined input rates of all appliances which draw combustion a...

Страница 11: ...hly sealed They also produce liquid condensate which is slightly acidic and can cause severe corrosion of ordinary venting materials Furnace operation can be adversely affected by restrictive vent and...

Страница 12: ...ressure zone This means both pipes must exit the building through the same portion of exterior wall or roof as shown in Figures 6 9 pages 12 13 and Figure 36 page 47 Pipingmustbemechanicallysupporteds...

Страница 13: ...kit When the vent pipe must exit an exterior wall close to the grade or expected snow level where it is not possible to obtain clearances shown in Figure 6 a riser may be provided as shown in Figure...

Страница 14: ...DO NOT reuse this venting system This recall does not apply to other plastic vent pipes such as white PVC or CPVC Check for details on the CPSC website or call their toll free number 800 758 3688 CIR...

Страница 15: ...left or right return air NOTE Do not use the back of the furnace for return air Side Return Installations To attach the return air duct to the left or right side of the furnace punchoutthefourknockout...

Страница 16: ...rances needed to move the furnace to its installation point hallways doorways stairs etc The furnace must be installed so that all electrical components are protected from water The furnace must be in...

Страница 17: ...together with nuts Figure 12 TC Horizontal installation on a Platform Exhaust Pipe Vented to Outside Combustible Platform Coil Plenum Combustion Air Condensate Drain Lines Must Be Trapped With J Trap...

Страница 18: ...et to the blower deck 5 4 Remove all screws 6 securing the furnace cabinet to the bottom panel 2 5 Remove the screw 7 securing the bottom corner of the furnace cabinet to the front brace 3 6 Carefully...

Страница 19: ...sealants are required The 3 4 rubber grommet is used if venting out the left side of the cabinet and the drain tube is routed through the blower deck Remove the plastic plug from the hole and install...

Страница 20: ...outed out the left or right side of the furnace but must maintain a downward slope to ensure proper condensate drainage The J trap may need to be rotated to the side that matches your setup in Figures...

Страница 21: ...ire Shut Off Valve to be 4 to 5 feet above floor NOTE B Inducer assembly omitted for clarity of pipe installation Figure 20 Typical Gas Connections 6 4 2 UPFLOW MODELS DOWNFLOW MODELS 1 See Note B See...

Страница 22: ...the residence s gas meter as the local value For added flexibility two tables have been provided for natural gas installations with high or low heating values at sea level Tables 15 and 16 page 40 co...

Страница 23: ...ction applies only to furnaces with model numbers suffixed with two numbers followed by a letter such as 35C or 45D If your model has suffix VA VB VC or VD please consult the Variable Speed Blower App...

Страница 24: ...mostat Y and Y1 to the furnace control board s Y Y2 and Y1 terminal s Field supplied wires should also connect the Y Y2 and Y1 signals to the outdoor unit s Y and Y1 terminals Connect terminal C to th...

Страница 25: ...CFM for 10 minutes after a call for cooling IMPORTANT NOTE An electrical disconnect must be installed readily accessible from and located within sight of the furnace See Figure 25 page 26 or the wiri...

Страница 26: ...or Bare Ground Black White Black White Black White Field Line Voltage Wiring Factory Line Voltage Wiring Ground Ground Junction Box may be int or ext to the furnace These connections can be made in th...

Страница 27: ...ee page 28 5 After 5 minutes of operation set the thermostat below room temperature and verify steps 11 12 of the Operating Sequence Verifying and Adjusting Input Rate IMPORTANT NOTE The input rate mu...

Страница 28: ...Check the blower door and verify that it is securely mounted in place and that there is power to the furnace OPERATING SEQUENCE The operating sequences for the heating cooling and fan modes are descri...

Страница 29: ...ator coil clean and free of debris If applicable Are all the LED s on the furnace and motor control boards constantly ON If not refer to Tables 6 7 to determine fault condition IMPORTANT NOTE The furn...

Страница 30: ...res and shortened service life It is recommended that the blower compartment be cleaned of dirt or lint that may have accumulated in the compartment or on the blower and motor as part of the annual in...

Страница 31: ...they were removed 12 Follow the lighting instructions found on the furnace door to return the furnace to operation Verify proper operation after servicing Heat Exchanger and Burner Maintenance The fu...

Страница 32: ...registres des foyers 5 Mettre en service les s cheuses et tout autre appareil qui n est pas raccord la syst me d vacuation Faire fonctionner r gime maximal tout ventilateur d vacuation tel que les ho...

Страница 33: ...stallateur qualifi un organisme de service ou le fournisseur de gazstaller service agency or the gas supplier Ne pas entreposer ni utiliser de l essence ni d autres vapeurs ou liquides inflammables da...

Страница 34: ...B Dim C B Cabinet 17 15 16 C Cabinet 21 19 19 D Cabinet 24 22 23 NOTES Dimensions shown in inches 19 B TOP VIEW 3 7 1 2 FLUE INLET AIR FLANGES 34 1 2 28 16 1 2 10 1 4 22 1 4 24 1 8 2 3 4 22 1 2 7 8 H...

Страница 35: ...0 1 0 1 525 58 1 450 61 1 375 64 1 300 68 1 225 72 1 150 76 1 075 82 1 000 88 1 0 1 0 1 620 54 1 540 57 1 465 60 1 390 63 1 315 67 1 240 71 1 165 76 1 090 81 0 1 1 0 1 695 52 1 620 54 1 545 57 1 465 6...

Страница 36: ...52 1 345 65 1 0 0 1 460 48 1 460 60 1 0 1 1 575 45 1 575 56 1 1 0 1 690 42 1 690 52 1 1 1 1 805 39 1 805 49 D CABINET Switch Settings For Heat 0 OFF 1 ON TC TL 120D D Input BTU 120 000 1 2 3 4 CFM Te...

Страница 37: ...ON CFM Nominal A C and HP Capacity HEAT COOL HEAT COOL 1 4 5 6 7 8 LOW HIGH 1 4 5 6 7 8 LOW HIGH 0 0 0 0 705 1 025 2 5 TON 0 0 0 0 965 1 400 3 5 TON 0 0 0 1 750 1 090 3 TON 0 0 0 1 995 1 440 4 TON 0 0...

Страница 38: ...176 353 48 75 375 750 104 35 173 346 50 72 360 720 106 34 170 340 52 69 346 692 108 33 167 333 54 67 333 667 110 33 164 327 56 64 321 643 112 32 161 321 58 62 310 621 114 32 158 316 60 60 300 600 116...

Страница 39: ...Heating Values Table 13 High Altitude Deration Chart for Propane Gas PROPANE GAS ALTITUDE ABOVE SEA LEVEL INPUT BTU and STAGE 60 000 80 000 100 000 120 000 1st 2nd 1st 2nd 1st 2nd 1st 2nd 0 to 1 999 F...

Страница 40: ...PRESSURE 9 000 to 9 999 FT 48 48 48 48 ORIFICE SIZE 1 7 2 8 1 7 2 8 1 7 2 8 1 7 2 8 MANIFOLD PRESSURE Table 16 High Altitude Deration Chart for Natural Gas Low heating Value NATURAL GAS LOW HEATING V...

Страница 41: ..._IN H_OUT L2 OUT L2 IN L1 IN L1 OUT Y1_OUT Y Y2_OUT W_OUT C EXPANSION PORT R RED GREEN NOT FOR FIELD USE CONNECTION TO FURNACE CONTROL BOARD CONNECTION TO IQ THERMOSTAT IF APPLICABLE MOTOR WIRING HARN...

Страница 42: ...REEN BROWN BROWN YELLOW VIOLET VIOLET VIOLET ORANGE ORANGE ORANGE VENT LIMIT ON SELECT MODELS BLACK 120V WHITE NEUTRAL GROUND 710916 CONDENSATE ON SELECT MODELS Refer to the Installation Instructions...

Страница 43: ...END 0409 LOW VOLTAGE HIGH VOLTAGE BLUE BLUE BLUE BLUE BLACK BLACK 120V WHITE BLACK BLACK BLACK BLACK BLACK BLACK WHITE WHITE NEUTRAL BLACK WHITE WHITE RED RED GREEN GROUND GREEN BROWN BROWN YELLOW VIO...

Страница 44: ...AL GROUND CONDENSATE ON SELECT MODELS BLACK VIOLET For 80 and 90 2 Stage Variable Speed Upflow Furnaces WIRING DIAGRAM 7109180 FIELD WIRING LEGEND LOW VOLTAGE HIGH VOLTAGE Refer to the Installation In...

Страница 45: ...t Flash Off Low Flame Sensor Signal Flame Present Diagnostic Description FAULT CONDITIONS Diagnostic Description Yellow LED Continuous Flash On Alternating Flash Motor Fault On Off 0409 FLAME ROLL OUT...

Страница 46: ...lator vent outlet 3 feet 1 83m J Clearance to non mechanical air supply inlet to building or the combustion air inlet to any other appliance 6 inches 15cm for appliances 10 000 Btuh 3kW 6 inches 15cm...

Страница 47: ...Optional Straps or Other Suitable Supports at minimum of 5 ft Intervals Upward Pitch 1 4 per foot Outlet Exhaust Vent First Support Placed as Close to Furnace Connection as Possible Wall Normal Snow...

Страница 48: ...ion 1 Header Box Drain Inline Drain Tubing is routed thru the blower deck and side of cabinet X See View B This drain not needed if X is less than 6 Drain Line Attached to 3 4 x 1 2 Hose Barb PVC TEE...

Страница 49: ...ption 7 Option 8 All drain lines must be trapped with J Trap or field supplied loop Inline Drain Header Box Drain Header Box Drain VIEW C VIEW D See View C See View C See View D See View D See View D...

Страница 50: ...side the cabinet NOTES X Inline Drain This drain not needed if X is less than 6 X Exhaust Vent Exhaust Vent Exhaust Vent Exhaust Vent Inlet Air Inlet Air Option 12 See Table 2 for 2 PVC Pipe Length Fi...

Страница 51: ...Transformer Figure 40 Upflow Horizontal Gas Furnace Components 9 2 10 3 6 5 17 11 12 14 8 16 4 13 AIR FLOW 7 18 1 15 17 ITEM COMPONENT NAME 1 Blower Assembly 2 Blower Door Switch behind blower panel 3...

Страница 52: ...or combustion and ventilation YES NO Installation Altitude ____________________ FT Deration Percentage ___________________ Furnace Input _______________________ Btuh Supply Air Temperature ___________...

Отзывы: