background image

12

OPERATION AND ADJUSTMENT

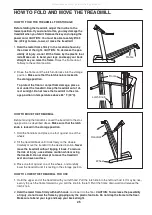
THE PRE-LUBRICATED WALKING BELT

Your treadmill features a walking belt coated with high-

performance lubricant.

IMPORTANT: Never apply sil-

icone spray or other substances to the walking

belt or the walking platform. Such substances will

deteriorate the walking belt and cause excessive

wear.

HOW TO PLUG IN THE POWER CORD

Your treadmill, like any other type of sophisticated

electronic equipment, can be seriously damaged by

sudden voltage changes in your homeʼs power.

Voltage surges, spikes, and noise interference can

result from weather conditions or from other appliances

being turned on or off.

To decrease the possibility of

your treadmill being damaged, always use a surge

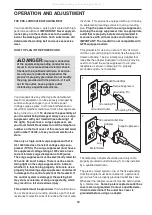
suppressor with your treadmill (see drawing 1 at

the right). To purchase a surge suppressor, see

your local NordicTrack dealer or call the telephone

number on the front cover of this manual and order

part number 146148, or see your local electronics

store.

Use only a single-outlet surge suppressor that is

UL 1449 listed as a transient voltage surge sup-

pressor (TVSS). The surge suppressor must have a

UL suppressed voltage rating of 400 volts or less

and a minimum surge dissipation of 450 joules.

The surge suppressor must be electrically rated for

120 volts AC and 15 amps. There must be a moni-

toring light on the surge suppressor to indicate

whether it is functioning properly. Failure to use a

properly functioning surge suppressor could result

in damage to the control system of the treadmill. If

the control system is damaged, the walking belt

may slow, accelerate, or stop unexpectedly, which

may result in a fall and serious injury.

This product must be grounded.

If it should malfunc-

tion or break down, grounding provides a path of least

resistance for electric current to reduce the risk of elec-

tric shock. This product is equipped with a cord having

an equipment-grounding conductor and a grounding

plug.

Plug the power cord into a surge suppressor,

and plug the surge suppressor into an appropriate

outlet that is properly installed and grounded in

accordance with all local codes and ordinances.

IMPORTANT: The treadmill is not compatible with

GFCI-equipped outlets.

This product is for use on a nominal 120-volt circuit,

and has a grounding plug that looks like the plug illus-

trated in drawing 1 below. A temporary adapter that

looks like the adapter illustrated in drawing 2 may be

used to connect the surge suppressor to a 2-pole

receptacle as shown in drawing 2 if a properly

grounded outlet is not available.

The temporary adapter should be used only until a

properly grounded outlet (drawing 1) can be installed

by a qualified electrician.

The green-colored rigid ear, lug, or the like extending

from the adapter must be connected to a permanent

ground such as a properly grounded outlet box cover.

Whenever the adapter is used it must be held in place

by a metal screw.

Some 2-pole receptacle outlet box

covers are not grounded. Contact a qualified elec-

trician to determine if the outlet box cover is

grounded before using an adapter.

DANGER:

Improper connection

of the equipment-grounding conductor can

result in an increased risk of electric shock.

Check with a qualified electrician or service-

man if you are in doubt as to whether the

product is properly grounded. Do not modify

the plug provided with the product—if it will

not fit the outlet, have a proper outlet

installed by a qualified electrician.

1

2

Grounded Outlet Box

Grounded Outlet Box

Grounding Plug

Surge Suppressor

Surge Suppressor

Grounding Pin

Adapter

Lug

Metal Screw

Grounded Outlet

Grounding Pin

All manuals and user guides at all-guides.com

Содержание NTL17009.0

Страница 1: ...for reference QUESTIONS If you have questions or if parts are missing DO NOT CONTACT THE STORE please contact Customer Care IMPORTANT You must note the product model number and serial number see the...

Страница 2: ...NG 32 ORDERING REPLACEMENT PARTS Back Cover LIMITED WARRANTY Back Cover NordicTrack is a registered trademark of ICON IP Inc 2 This drawing shows the locations of the warning decals If a decal is miss...

Страница 3: ...only a single outlet surge suppressor that meets all of the specifications described on page 12 To purchase a surge suppressor see your local NordicTrack dealer or call the tele phone number on the fr...

Страница 4: ...s instructed to do so by an authorized service representative Servicing other than the procedures in this manual should be performed by an authorized service representative only 27 The treadmill is in...

Страница 5: ...TIONS Power Lines Ground Clamps 75 Ohm Terminal Service Entrance Equipment Power Service Grounding Electrode System e g Interior Metal Water Pipe Service Entrance Conductors All manuals and user guide...

Страница 6: ...please see the front cover of this man ual To help us assist you note the product model number and serial number before contacting us The model number and the location of the serial number decal are s...

Страница 7: ...see if it is preattached to one of the parts to be assembled To avoid damaging plastic parts do not use power tools for assem bly Extra hardware may be included 1 Tek Screw 82 4 3 8 Star Washer 71 4...

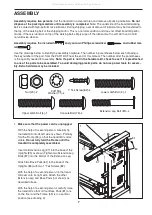
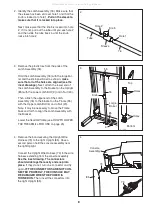
Страница 8: ...ed see the inset drawings Next attach the lower end of the Latch Assembly to the bracket on the Upright 85 with the Lower Latch Bolt 3 and a Nut 20 Then attach the upper end of the Latch Assembly 76 t...

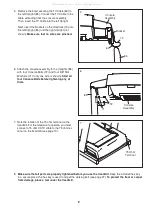
Страница 9: ...y tightened before you use the treadmill Keep the included hex key in a secure place the hex key is used to adjust the walking belt see page 27 To protect the floor or carpet from damage place a mat u...

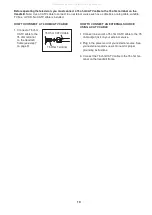
Страница 10: ...your external source See your external source s user s manual for proper grounding instructions 3 Connect the 75 ohm CATV cable to the 75 ohm ter minal on the treadmill frame 10 75 Ohm Terminal 75 Ohm...

Страница 11: ...trap moisture Do not expose the chest pulse sensor to direct sun light for extended periods of time do not expose it to temperatures above 120 F 50 C or below 15 F 10 C Do not excessively bend or stre...

Страница 12: ...nding provides a path of least resistance for electric current to reduce the risk of elec tric shock This product is equipped with a cord having an equipment grounding conductor and a grounding plug P...

Страница 13: ...ou complete an endurance run The console also offers four Pulse programs that con trol the speed and incline of the treadmill to help you keep your heart rate near target heart rate settings Note The...

Страница 14: ...al mode will be selected If you have selected a program press any of the program buttons repeatedly until a track appears in the display 4 Start the walking belt and adjust the speed To start the walk...

Страница 15: ...eft or right corner of the display Note The console can display speed and distance in either miles or kilometers A Km H will appear in the right side of the display when the console is displaying spee...

Страница 16: ...he Weight Loss Programs WT LOSS PGMS button the Fitness Programs FITNESS PGMS button or the Incline Programs INCLINE PGMS button repeatedly When a preset program is selected the display will show the...

Страница 17: ...he highest indicators appear in the matrix The program will continue in this way until the speed setting for the last segment is shown in the Current Segment column and the last segment ends The walki...

Страница 18: ...umber of kilome ters still to be run When you have almost reached the distance goal the lower right corner of the dis play will flash and a series of tones will sound To stop the program at any time p...

Страница 19: ...n to move Hold the handrails and begin walking 4 Program the desired speed and incline settings To program a speed setting and an incline setting for the first one minute segment of the program simply...

Страница 20: ...rammed previously Hold the handrails and begin walking 4 Follow your progress with the displays and the Workout Intensity bar The Custom program will function in the same way as a preset program see s...

Страница 21: ...t segment will be shown in the flashing Current Segment col umn of the matrix The target heart rate settings for the next several segments will be shown in the columns to the right When only three sec...

Страница 22: ...ease button The walking belt will begin to move at 1 mph When the console compares your heart rate to the target heart rate setting the speed and or incline of the treadmill may automatically change t...

Страница 23: ...l show the last cable channel that was selected To select a different channel press the Channel but tons The selected cable channel number will ap pear on the screen for a few seconds Note The televis...

Страница 24: ...3 Press the On Off button again and add or delete channels Note Complete this step only if you are using ana log cable After all valid cable channels available in your area have been saved into the t...

Страница 25: ...nvert the treadmill to the stor age position as described above Make sure that the latch knob is locked in the storage position 1 Hold the handrails and place one foot against one of the wheels 2 Tilt...

Страница 26: ...tes and then press the switch to the reset position PROBLEM The power turns off during use SOLUTION a Check the reset off circuit breaker see the drawing above If the circuit breaker has tripped wait...

Страница 27: ...rt the key and run the treadmill for a few minutes Repeat until the walking belt is properly tightened c If the walking belt still slows when walked on see the front cover of this manual PROBLEM The w...

Страница 28: ...and the other is reflected from tall buildings hills or other objects Blue Screen If the cable channel signal is weak the picture may be of poor quality or a blue screen may appear Note If one of thes...

Страница 29: ...engthen your cardiovascular system you must perform aerobic exer cise which is activity that requires large amounts of oxygen for prolonged periods of time For aerobic ex ercise adjust the intensity o...

Страница 30: ...1 Transformer 43 1 Controller 44 1 Reset Off Circuit Breaker 45 1 Belly Pan 46 1 Static Decal 47 1 Power Cord 48 1 Incline Wire Harness 49 1 Hex Key 50 1 Tie Holder 51 1 Releasable Tie 52 9 Plastic T...

Страница 31: ...se Receiver 108 1 Latch Knob 109 1 Idler Pulley Nut 110 1 Idler Pulley Washer 111 1 LCD TV Screen 112 1 Console Lens 113 6 Belly Pan Screw 114 1 Latch Endcap 115 1 TV Lens 12 Blue Wire 2F 8 Blue Wire...

Страница 32: ...11 17 14 10 13 12 60 49 62 57 57 64 23 56 104 104 28 6 27 39 29 39 27 61 61 104 1 2 2 2 2 104 2 54 2 2 2 2 102 102 8 32 76 3 20 4 20 2 108 114 32 EXPLODED DRAWING A Model No NTL17009 0 R0209A All man...

Страница 33: ...42 38 20 19 37 40 41 113 45 9 43 51 23 50 52 23 47 94 48 65 53 96 23 24 21 22 58 69 74 75 20 59 66 68 35 44 20 109 110 113 113 113 113 113 9 33 EXPLODED DRAWING B Model No NTL17009 0 R0209A All manual...

Страница 34: ...82 81 82 30 80 72 97 79 80 81 82 30 73 97 83 83 81 82 87 92 92 89 4 20 77 71 71 72 92 92 81 82 63 93 63 84 84 87 101 101 105 93 34 EXPLODED DRAWING C Model No NTL17009 0 R0209A All manuals and user gu...

Страница 35: ...03 98 67 78 70 90 78 95 99 7 99 99 99 99 99 99 99 99 99 86 46 90 7 7 7 7 107 106 91 115 112 105 88 111 105 105 35 EXPLODED DRAWING D Model No NTL17009 0 R0209A All manuals and user guides at all guide...

Страница 36: ...me service the customer will be responsible for a minimal trip charge This warranty does not extend to any damage to a product caused by or attributable to freight damage abuse misuse improper or abno...

Отзывы: