background image

7

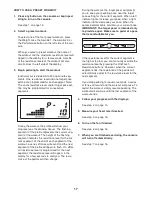
4.

Tip: Avoid pinching the Wire Harnesses

(64, 65).

While another person holds the Upright (10)

near the Frame (1), connect the Upper Wire

Harness (65) to the Lower Wire Harness (64).

Then, insert the Upright (10) into the Frame (1).

Attach the Upright with four M8 x 19mm Patch

Screws (86) and four M8 Split Washers (97).

Do not tighten the Patch Screws yet.

10

1

97

97

97

97

86

86

64

65

4

Avoid pinching the

Wire Harnesses (64, 65)

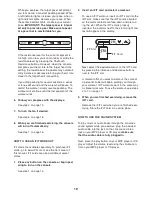
5. Orient the Left and Right Upright Covers (19,

20) as shown. Then, attach the Upright Covers

around the Upright (10) with five M4 x 16mm

Round Head Screws (92).

5

19

20

10

92

92

Содержание 831.23855.0

Страница 1: ...stions or if parts are damaged or missing PLEASE DO NOT CONTACT THE STORE please contact Customer Care IMPORTANT You must note the product model number and serial number see the drawing above before c...

Страница 2: ...26 ORDERING REPLACEMENT PARTS Back Cover LIMITED WARRANTY Back Cover 2 NordicTrack is a registered trademark of ICON IP Inc WARNING DECAL PLACEMENT This drawing shows the location s of the warning de...

Страница 3: ...ugh clearance around your elliptical exerciser to mount dismount and use it 5 Inspect and properly tighten all parts regu larly Replace any worn parts immediately 6 Keep children under age 12 and pets...

Страница 4: ...before you use the elliptical exerciser If you have ques tions after reading this manual please see the front cover of this manual To help us assist you note the product model number and serial number...

Страница 5: ...drawing is the key number of the part from the PART LIST near the end of this manual The number following the parentheses is the quantity needed for assembly Note Some small parts may have been pre a...

Страница 6: ...ews 92 92 37 36 92 1 2 To make assembly easier read the information on page 5 before you begin assembling the elliptical exerciser 3 With the help of another person carefully tip the elliptical exerci...

Страница 7: ...pright 10 into the Frame 1 Attach the Upright with four M8 x 19mm Patch Screws 86 and four M8 Split Washers 97 Do not tighten the Patch Screws yet 10 1 97 97 97 97 86 86 64 65 4 Avoid pinching the Wir...

Страница 8: ...t Upper Body Leg 24 which is marked with an L sticker and orient it as shown Slide the Left Upper Body Leg onto the left side of the Upper Body Axle 71 Attach the Left Upper Body Leg 24 to the Upper B...

Страница 9: ...perature before inserting batteries Otherwise you may dam age the console displays or other electronic components Remove the battery cover insert the batteries into the Console and reattach the batter...

Страница 10: ...ee M8 x 23mm Washers 31 Repeat this step for the Left Pedal not shown and the Left Link Arm not shown 11 35 31 31 97 97 90 98 10 Tip Avoid pinching the wire harnesses While another person holds the Co...

Страница 11: ...ep on the other side of the elliptical exerciser 12 89 55 9 89 72 Grease Grease Grease 13 Gradually work the right Pedal Arm 32 onto the Right Upper Body Leg 72 while at the same time working the Righ...

Страница 12: ...exerciser hold the handle press the latch button and then lower the frame to the floor HOW TO MOVE THE ELLIPTICAL EXERCISER To move the elliptical exerciser first fold it as described at the left Next...

Страница 13: ...direction It is recommended that you turn the crank arms in the direction shown by the arrow below however for variety you can turn the crank arms in the opposite direction To dismount the elliptical...

Страница 14: ...e The console also features the iFIT Interactive Workout System which enables the console to accept iFIT cards containing workouts designed to help you achieve specific fitness goals For example lose...

Страница 15: ...display will change modes every few seconds The lower right display can show your pedaling pace in revo lutions per minute and the resistance level of the pedals The display will change modes every fe...

Страница 16: ...n the metal contacts using a soft cloth never use alcohol abrasives or chemi cals to clean the contacts 6 Turn on the fan if desired To turn on the fan at high speed press the Fan button To turn on th...

Страница 17: ...flash If a differ ent resistance level is programmed for the next segment the resistance level will appear in the display for a few seconds to alert you The resis tance of the pedals will then change...

Страница 18: ...ou should hold the handgrip pulse sen sor frequently for the workouts to operate properly Each time you hold the handgrip pulse sensor keep your hands on the metal contacts for at least 30 seconds 5 B...

Страница 19: ...iFit cards go to www iFit com or see the front cover of this manual iFit cards are also available at select stores 1 Press any button on the console or begin ped aling to turn on the console See step...

Страница 20: ...ciser Adjust the position of the Shields 14 15 until the Discs 12 no longer rub against them and then tight en the Bolt Sets 88 and the M4 x 19mm Screws 81 HOW TO ADJUST THE BELT If the pedals slip wh...

Страница 21: ...ur goal is to strengthen your cardiovascular system you must perform aerobic exercise which is activity that requires large amounts of oxygen for prolonged periods of time For aerobic exercise adjust...

Страница 22: ...lles Stretch With one leg in front of the other reach forward and place your hands against a wall Keep your back leg straight and your back foot flat on the floor Bend your front leg lean forward and...

Страница 23: ...23 NOTES...

Страница 24: ...Spring 39 4 M8 Washer 40 1 Center Foot 41 1 Latch Button 42 4 Link Bearing 43 2 Link Arm Pad 44 1 Eddy Mechanism 45 4 M8 x 23mm Shoulder Screw 46 1 Shield Fastener 47 1 Idler 48 1 Idler Pulley 49 1 R...

Страница 25: ...ts These parts are not illustrated Key No Qty Description Key No Qty Description 91 2 M10 x 60mm Button Bolt 92 19 M4 x 16mm Round Head Screw 93 4 M10 x 80mm Button Screw 94 4 M8 Locknut 95 2 M10 Wash...

Страница 26: ...5 37 36 65 66 66 67 67 67 67 68 68 69 71 7 7 7 7 8 8 9 9 70 25 21 21 38 40 41 16 16 93 91 82 92 86 31 80 92 33 92 84 97 97 92 83 92 45 89 73 73 77 77 92 92 92 86 31 80 92 84 97 84 97 97 86 97 97 86 92...

Страница 27: ...87 87 94 94 78 8 8 8 8 88 88 81 81 99 99 81 76 93 46 12 13 13 98 30 12 52 52 53 53 53 53 55 55 18 18 42 42 42 42 43 43 54 54 54 54 63 63 85 85 33 33 79 89 45 85 85 33 89 45 79 96 96 58 59 60 61 62 39...

Страница 28: ...minimal handling charge For in home service the customer will be responsible for a minimal trip charge This warranty does not extend to any damage to a product caused by or attributable to freight dam...

Отзывы: