


BIM 1030/2005/03
4
www.nord.com
WARNING:
LOCK OUT POWER before any maintenance is performed.
Make absolutely sure that no voltage is applied while work is
being done on the gearbox.
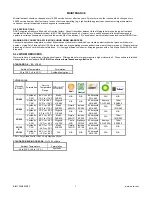
The Autovent releases built-up air pressure from
inside the gearbox (Max. pressure 2 psi).
COUPLING ALIGNMENT
Shaft coupIings shouId be instaIIed according to the coupIing
manufacturer’s recommendations for gap, anguIar and paraIIeI
aIignment. In many instaIIations, it is necessary to aIIow for
thermaI and mechanicaI shaft movement when determining shaft
aIignment. The coupIing manufacturer’s recommendations
shouId be foIIowed.
AXIAL DISPLACEMENT
The gap between shaft ends shouId be the same as the specified
coupIing gap unIess overhung mounting of the coupIing hub is
specified. The coupIing gap and shaft gap must be sufficient to
accommodate any anticipated thermaI or mechanicaI axiaI
movement.
ANGULAR ALIGNMENT
Insert a spacer or shim stock equaI to the required coupIing gap
between the coupIing hub faces and measure the cIearance using
feeIer gauges. Repeat this at the same depth at 90-degree
intervaIs to determine the amount of anguIar misaIignment.
PARALLEL ALIGNMENT
Mount a diaI indicator to one coupIing hub, and rotate this hub,
sweeping the outside diameter of the other hub. The paraIIeI
misaIignment is equaI to one-haIf of the totaI indicator reading.
Another method is to rest a straight edge squareIy on the outside
diameter of the hubs at 90-degree intervaIs and measure any
gaps with feeIer gauges. The maximum gap measurement is the
paraIIeI misaIignment.
CHECKING ALIGNMENT
After both anguIar and paraIIeI aIignments are within specified
Iimits, tighten aII foundation boIts secureIy and repeat the above
procedure to check aIignment. If any of the specified Iimits for
aIignment are exceeded, reaIign the coupIing.
SPROCKET OR SHEAVE ALIGNMENT
AIign the sheaves or sprockets square and paraIIeI by pIacing a
straight edge across their faces. AIignment of bushed sheaves
and sprockets shouId be checked after bushings have been
tightened. Check horizontaI shaft aIignment by pIacing a IeveI
verticaIIy against the face of the sheave or sprocket. Adjust beIt
or chain tension per the manufacturer’s specified procedure.
OUTBOARD PINION ALIGNMENT
AIign the pinion by adjusting the gear tooth cIearance according
to the manufacturer’s recommendations and checking for
acceptabIe outboard pinion tooth contact. The foundation boIts
may have to be Ioosened and the unit moved sIightIy to obtain
this contact. When the unit is moved to correct tooth contact, the
prime mover shouId be reaIigned.
RECHECK ALIGNMENT
After a period of operation, recheck aIignment and adjust as
required.
1.
Properly install unit on a rigid foundation
•
adequateIy supported
•
secureIy boIted into pIace
•
IeveIed so as not to distort the gear case
2.
Properly install couplings suitabIe for the application and
connected equipment.
3.
Ensure accurate aIignment with other equipment.
4.
Furnish and install adequate machinery guards as needed to
protect operating personneI and as required by the
appIicabIe standards of the OccupationaI Safety and HeaIth
Administration (OSHA), and by other appIicabIe safety
reguIations;
5.
Ensure that driving equipment is running in the correct
direction before coupling to reducers with backstops
(designed to operate onIy in a specific direction) or
machinery designed to operate only in one direction.
CHANGES IN PERFORMANCE SPECIFICATIONS
Owner has the responsibiIity to consult with NORD GEAR if such
items such as applied Ioads, operating speeds or other operating
conditions have changed.
START-UP
1.
Ensure that switches, aIarms, heaters, coolers and other
safety and protection devices are instaIIed and operational
for their intended purpose.
2.
Verify that the installed mounting position is the same as the
nametag mounting position. If not, adjust the oil level
accordingly and relocate the vent plug, fill plug and drain
plug according to the mounting position. See following.
AUTOVENT PLUG
The Autovent plug is brass in color and will be located at the
highest point on the gearbox. It operates like a check-valve to
allow the reducer to relieve internal pressure while preventing
lubricant contamination during cooling. A spring presses a ball or
plunger against a machined orifice until pressure exceeds 2 psi.
Above 2 psi the air is allowed to escape depressurizing the
gearcase. When internal pressure drops below 2 psi, the
autovent re-seals closing the unit to the outside environment.
After shutdown, the reducer cools along with the air inside the
reducer. The unit will temporarily maintain a slight vacuum until
normalization occurs. NORD Gear supplies an Autovent as a
standard feature.
Содержание UNICASE Series
Страница 6: ...BIM 1030 2005 03 6 www nord com...
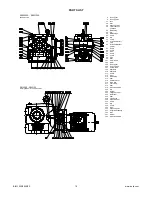
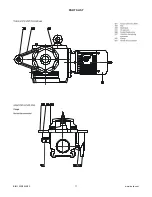
Страница 11: ...BIM 1030 2005 03 11 www nord com PARTS LIST...