Norcool CAVE 45 BI DZ Скачать руководство пользователя страница 9

9

3. Installation

Before using your appliance

•  Remove the exterior and interior packaging.

•  Before connecting the appliance to the power source, let it stand upright for 

approximately 4 hours. This will reduce the possibility of a malfunction in the cooling 

system from improper handling during transportation.

•  Clean the interior surface with lukewarm water using a soft cloth.

Installation

Locate the appliance away from direct sunlight and sources of heat (stove, heater, radiator, 

etc.). Direct sunlight may affect the acrylic coating and heat sources may increase electrical 

consumption. Ambient temperature below 60.8 F (16 C) or above 100.4 F (38 C) will 

hinder the performance of this appliance.

This unit is not designed for use in a garage or any other outside installation.

Avoid locating the appliance in moist areas.

Plug the appliance into dedicated, properly installed-grounded wall outlet. Do not under 

any circumstances cut or remove the third (ground) prong from the power cord. Any 

questions concerning power and/or grounding should be directed toward a certified 

electrician or an authorized service center. 

This unit is not designed to be installed in an 

RV or used with an inverter.

After plugging the appliance into a wall outlet, allow the unit to cool down for 3 ~ 4 hours 

before placing wine bottles or beverage cans in the appliance.

Ventilation

The air at the back panel of the appliance will warm up. This warm air must be able 

to escape. Your appliance is designed to provide this ventilation. Air inlets and outlets 

must not be covered or blocked in any way. This will reduce the appliance’s capacity and 

increase power consumption.
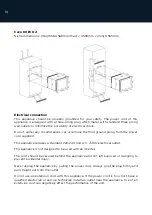
Cave 45 BI DZ

Niche dimensions: (min) W562-568mm (max) x H445mm x (min) D555mm

Содержание CAVE 45 BI DZ

Страница 1: ...CAVE 45 BI DZ CAVE 60 BI DZ English OPERATING INSTALLATION INSTRUCTIONS...

Страница 2: ...2...

Страница 3: ...3 Please visit www norcool no for operating installation instructions in other languages...

Страница 4: ...nings 5 2 Components and parts 8 3 Installation 9 4 Appliance features and wine storage 11 5 Operating your appliance 13 6 Care and maintenance 15 7 Troubleshooting guide 16 8 Technical specifications...

Страница 5: ...ct from the mains Air the room in which the appliance is located for at least an hour Contact the manufacturer for further advice According to the EN378standard the room must be at least 1m3 per 8g of...

Страница 6: ...been given supervision or instruction concerning use of the appliance by a person responsible for their safety Children should be supervised to ensure that they do not play with the appliance Read al...

Страница 7: ...roducts contain refrigerants which under the guidelines of federal law must be removed before disposal of product It is the consumer s responsibility to comply with federal and local regulations when...

Страница 8: ...1 Temperature control and display 2 Circulation fan 3 Interior light 4 Cabinet 5 Wooden shelves 1 2 4 3 5 Parts Upper zone controller display Lower zone controller display Warmer Warmer Light Light C...

Страница 9: ...installation Avoid locating the appliance in moist areas Plug the appliance into dedicated properly installed grounded wall outlet Do not under any circumstances cut or remove the third ground prong...

Страница 10: ...upplied This appliance requires a standard 220 240 Volt A C 50Hz electrical outlet This appliance is not designed to be used with an inverter The cord should be secured behind the appliance and not le...

Страница 11: ...y pressing the pad light on the control panel Long life and high efficiency LEDs are installed for durability and energy saving Engaged wine shelves All the shelves have tabs to engage the cabinet on...

Страница 12: ...r zone 11 Lower zone 6 pull out wooden shelves x1 11 Storage volume 50 liters Pull out shelf dimension 466 x 340 mm CAVE 45 Bi DZ Capacity CAVE 45 BI DZ 750 ml bottle 22 Upper zone 11 Lower zone 11 St...

Страница 13: ...ontrolled and displayed 3 The temperature in either zone can be controlled between 5 C to 20 C The zone temperature may have a tolerance of 3 C from setting depending on different loading and ambient...

Страница 14: ...elsius and Fahrenheit by pressing the K5 key K6 key upper interior light Interior light control switch of the upper zone To turn on or turn off the interior light by pressing the K6 key once for each...

Страница 15: ...and exterior with a soft cloth Dust or anything else blocking the vent may hinder the cooling efficiency of the appliance Vacuum the vent if necessary Vacation Time Unplug the unit from the wall outle...

Страница 16: ...oor gasket does not seal properly The appliance has recently been disconnected for a period of time 4 hours are required for the appliance to cool down completely Temperature inside the appliance is t...

Страница 17: ...ildren as they are a potential source of danger Please ask your dealer or your local authority about relevant means of safe disposal Disposal of the appliance This appliance is subject to European Dir...

Страница 18: ...18 Notes...

Страница 19: ...19 Notes...

Страница 20: ...an Appliances AS Postboks 61 1740 Borgenhaugen Norway T 47 815 69 117 post norcool no Please visit out website for operating installation instructions in other languages www norcool no Version 1 0 Nov...

Отзывы: