Norco KVM-15C08 Скачать руководство пользователя страница 2


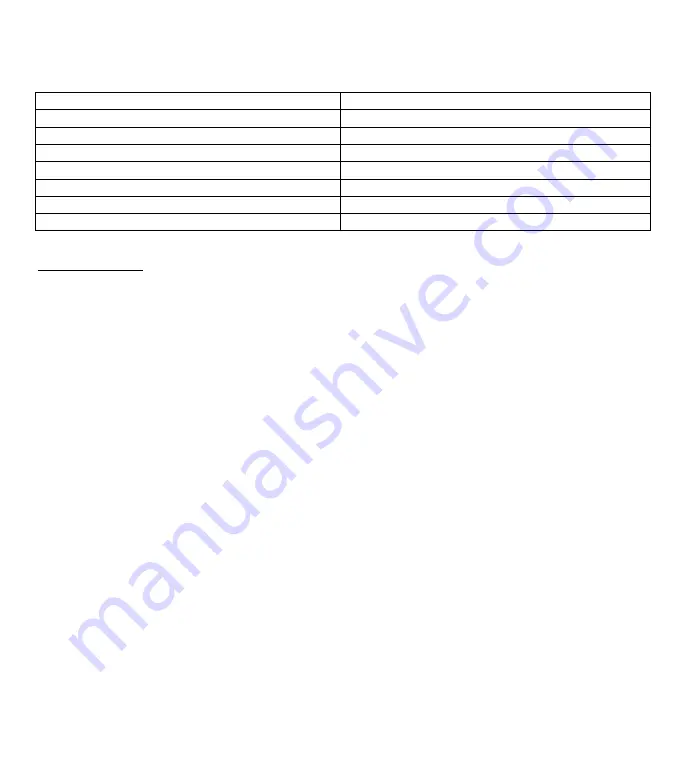
LCD MONITOR SPECIFICATINS 

Size 

15 inch 

Screen Type 

TFT 

Contrast 

500:1 

Brightness 

250 cd/m² 

View Angle 

110º 

Resolution 

1024x768@75Hz 

Response Time 

16 ms 

Display 

16.7 M 

 
OPERATION 
Keypad Define 

Power key : Use this key to turn on or off the LCD monitor. 

Menu key : Use this key to open the OSD menu or return to a previous menu or exit the OSD menu. 

UP key : Use this key to highlight an item in the menu , move a highlighted function up , or increase the numeric 

value (parameter) in certain menu . 

Down key : Use this key to highlight an item in the menu, move a highlighted function down , or decrease the 

numeric value (parameter) in certain menu . 

Enter key : Use this key to enter next menu or highlight a confirmed function . 

If the screen is not in a full screen graphic mode (such as in a DOS ) or is connected with an allocator , the 

position of the appeared image may be adjusted automatically and then deviated . By then , it is necessary to enter 

into the OSD menu to manually adjust the level or vertical position and phase .


OSD Control Function List 

1.Contrast 

2.Brightness 

3.Display adjust : V-Position , H-Position , Phase , Clock , Auto Adjust , Return . 

4.Color Control : 9300K , 6500K , User , Auto Color, Return . 

5.Language : English , Deutsch , Français , Italiano , Español , Chinese , Return . 

6.OSD Adjust : OSD V-Position , OSD H-Postion , OSD Timeout , Return. 

7.Audio Control : Mute , Volume , Return . 

8.Reset 

9.Exit . 


Содержание KVM-15C08

Страница 1: ...LCD CONSOLE KVM 15C08 KVM 15C16 User Manual...

Страница 2: ...crease the numeric value parameter in certain menu Enter key Use this key to enter next menu or highlight a confirmed function If the screen is not in a full screen graphic mode such as in a DOS or is...

Страница 3: ...You can install a cascade to facilitate expansions or transportation without requiring a cascade cable or changing the KVM configurations On Screen Display OSD Menu The embedded OSD control module le...

Страница 4: ...Buttons and LED lamps for easy switch and identification l Complies with the height of the IU chassis specification And installable with a hanging stand Into a 19 chassis system l Requires no additio...

Страница 5: ...Touch pad module Console Connector Keyboard Standard 104 key Port Selection Keys on Front Panel 8 16 Port 8 16 LEDs Power 1 1 OSD Built in Video Resolution 1024x768 75Hz Dimensions 600x447x48 mm Weig...

Страница 6: ...onfirmed and the keyboard and mouse will be reconnected and the EDID in the screen will be read again 2 Port LEDs These Port LEDs are built in the Port Selection Switches Online A green light indicate...

Страница 7: ...KVM 1508 Rear VIEW KVM 1516 Rear VIEW 1 CPU Port Install the cable connected to a PC here 2 Audio in optional 3 AC Power Jack DC 12V Input 4 Power Switch Power On Off the LCD KVM 1 1 4 3 3 2 2...

Страница 8: ...urned off we recommendyou to reinstall the whole system Connection in Series 1 Make sure that the power switch at the rear panel of the Master KVM is OFF Plug one end of the AC power cord to the KVM a...

Страница 9: ...then power on the PC 2 Slave KVM Make sure the power switch at the rear panel of the KVM is OFF Use the AC power cord 3 in 1 cable to connect the console port of the slave KVM to the CPU port of the...

Страница 10: ...irect switch For example if you want to switch a PC to the Slave KVM port 04 underThe Master KVM port 03 then you can start the OSD and then directly enter 0304 If you are using a standalone machine t...

Страница 11: ...digits If a User has not given a name for the PC the name field will be blank 03 04 Mail Ser 4 LIST MASTER PWR C KVM NAME SVS l l l l l l 01 02 03 04 05 06 07 08 04 08 16 Admin Mail Group Peter Web Gr...

Страница 12: ...tting use to open and to close The SVS I blank and not clickable if the KVM is connected In parallel If this option is set to open then you can make the switch By operating the Hot Key Switch or Mouse...

Страница 13: ...el Information and mode selection Full Number Name Channel Display Time It shows the time for displaying Channel information 5 Sec 10Sec Always None Auto Scan Time For Auto Scan it shows the Residing...

Страница 14: ...s the model name and F W version information Which is helpful for users to understand the updated version F4 OSD Position You can enter the OSD position to make adjustments We recommend you to unify t...

Отзывы: