background image

GB 18

Installation

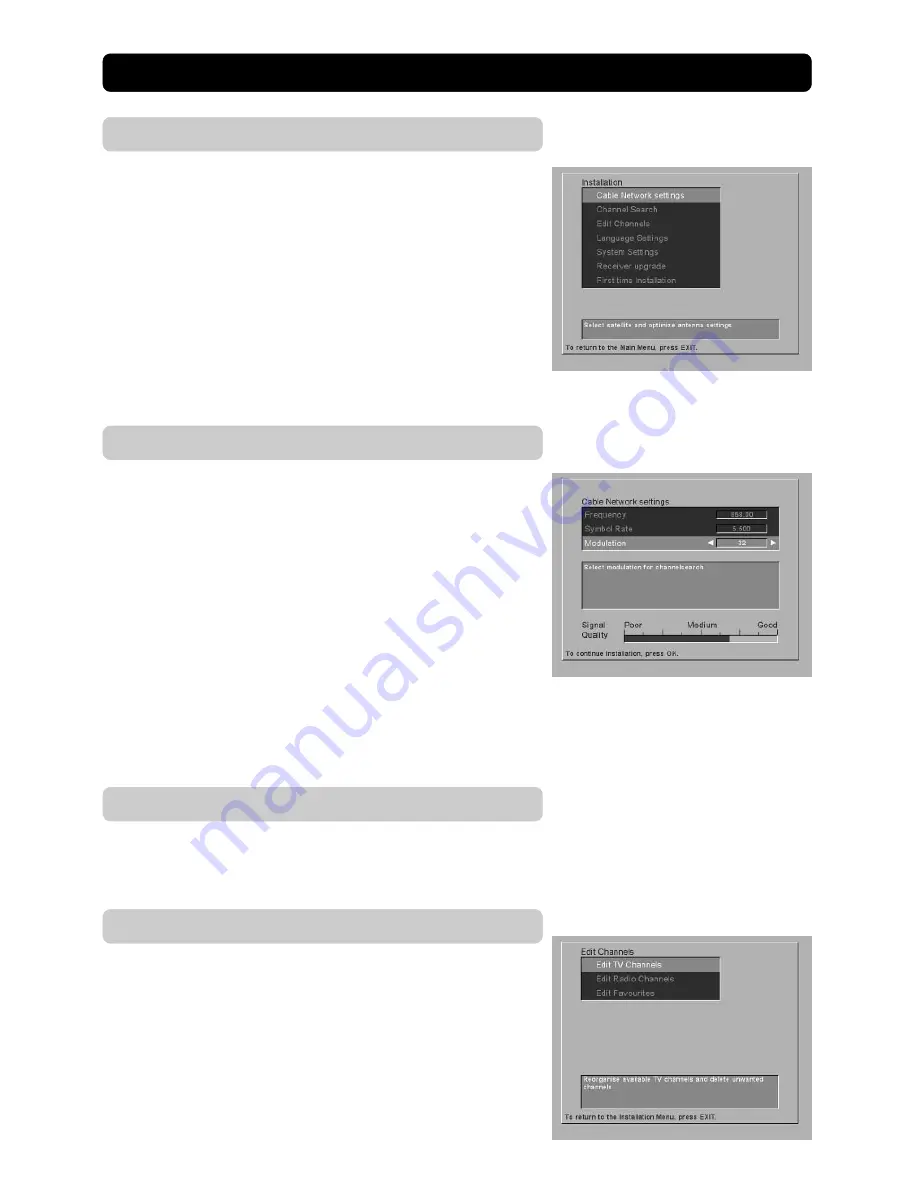
Select this Menu from the line “Installation” in the Main Menu.

The submenu will give you the opportunity to change the prefer-
ences performed during first time installation. You can also add
features that were not included from the first time installation.

Please note that helpful information for every line is given at the
end of the menu.

Installation Submenus

Cable Network settings

From here you can add more channels (if available) from the Ca-
ble Net by entering the necessary settings.

You use the number buttons on the remote control to enter the
frequence with 5 digits, and the Symbol Rate with 4 digits.
The “

.

” (point) will be automatically set.

Select Modulation with the Left/Right buttons.

The information you have to enter here you can get from the ca-
ble network contractor or from your landlord.

Frequency

: Enter the specified frequence.

Symbol Rate

: Enter the Symbol Rate.

Modulation

: Select Modulation.

When this is done, press the 

OK

 button to proceed with the Chan-

nel Search procedure.

Channel Search

From here you can now and then make an extra search through
the whole Cable Net in order to find new added channels.

Edit Channels

From “Edit TV channels” and “Edit Radio channels” you can
change the order of the TV and Radio channels to your needs by
simply selecting and moving a channel to a new position.

You may also delete unwanted channels. Follow the instructions
in the menu.

Содержание Mediamaster 9600C

Страница 1: ...GB 1 Owner s Manual MEDIAMASTER 9600 C ...

Страница 2: ... the possible shock hazard should be inserted into a 13A socket elsewhere If you need to replace the mains plug then follow the instruction given below The wires in the mains lead are coloured in accordance with the following code BLUE Neutral N BROWN Live L As these colours may not correspond with the coloured markings identifying the ter minals in your plug proceed as follows The wire coloured B...

Страница 3: ...master It s easy to use always at your command and adaptable for future advances To begin with you will find it necessary to read these instructions but you will soon find yourself com petent without them Contents For your safety 3 Rear panel Front panel 4 Installation 5 Connecting the Mediamaster to the TV set 5 Preparing the remote control 7 Remote control 8 About the Smart Card and CA Module 9 ...

Страница 4: ... used Mains lead 230 V AC 15 50 Hz Rear panel RS232 for a printer PC or a high speed modem to turn the receiver on off standby Select channel number up down Display shows programme information At start up it displays software and boot loader number Front panel SCSI For a CD ROM player or other high speed data equipment Slot for the CA Module and Smart Card ANTENNA Connection to the cable network s...

Страница 5: ...et 5 6 1 2 3 4 7 8 9 0 EXIT MENU GUIDE OK TV TEXT As most local cable networks are distributing TV programmes from both digital and analogue sources the signals from the wall outlet will be of two different kind 1 Digital signal information to be handled by the Mediamaster These signals are sent to the TV through the SCART cable 2 Analogue signals which are bypassed to the TV through a RF cable Du...

Страница 6: ... receiver and a video recorder Connect one SCART cable between the TV and the TV SCART socket on the Mediamaster Connect one SCART cable between the TV SCART socket on the analogue satellite receiver and the AUX SCART socket on the Mediamaster Connect one SCART cable between the video recorder and the VCR SCART socket on the Mediamaster Connect a RF cable from the RF output on the video recorder t...

Страница 7: ...cket Switch on your TV set When the Mediamaster is connected to the TV set you will now see a welcome message on the screen You may now proceed to page 10 Basic Settings However we recomend that you read the other information on the preceding pages first Switching on for the first time Before you continue please read this concerning menus A menu is a field of text shown on the TV screen These menu...

Страница 8: ...ended information if transmit ted about the current next programme LEFT RIGHT To move in left right direction within the menus BUTTONS UP DOWN To move in an up down direction in the menus BUTTONS To select TV and audio channels DOUBLE To step pages or change channels up or down in the ARROWS menus In blocks of 10 OK To confirm choices etc Select TV Radio channel list To increase or decrease the vo...

Страница 9: ...y into the slot behind the lid in the front panel of the Mediamaster so that the arrow on the module faces upwards and inwards Insert your card fully into the slot on the CA module so that the microchip the yellow spot faces upwards and inwards After inserting the card leave it in the slot permanently Do not remove it again unless your Service Provider asks you to do so This is important because i...

Страница 10: ...Channel Search From the Channel Search menu the Mediamaster will automati cally search for TV and Radio channels digitally transmitted from the Cable Network The search will be performed in a predetermined way and all channels found will be listed in two columns on the screen TV channels will be listed in one column Radio channels in the other Please note that the search procedure may take a few m...

Страница 11: ...diamaster you must use the TV button on the Mediamaster remote control Both digital and analogue signals are sent to the Mediamaster in the antenna cable During watching analogue programmes the Mediamaster display will show the word TV In this mode you select channels on the TV the same way as before you installed the Mediamaster Viewing TV Start stop watching TV To start the Mediamaster from stan...

Страница 12: ...me line and press OK you will set a Reminder This means during watching TV you will be reminded when the Reminder marked programme starts If you press the i button once more you will get extended in formation if transmitted for the current or next programme To exit the menu press the TV or i button TV Guide By pressing the GUIDE button you obtain access to the TV Guide which will give the titles o...

Страница 13: ...mation if transmitted about the audio programme Return to TV mode by pressing the TV button or again Volume level Increase or decrease the sound level by pressing the and buttons A control bar will be displayed on the screen during level adjust ment The max level for volume is the current volume setting on the TV set Please note that the volume adjustments also change the vol ume level to your VCR...

Страница 14: ...ecorded Record playback is possible if the Video Recorder is connected to the VCR SCART on the Mediamaster Only playback is pos sible if you connect the Video Recorder to the AUX SCART List of TV channels and Radio channels During viewing TV or listening to Radio channels you get a pro gramme list onto the screen by pressing the OK button If you have made yourself a favourite list of frequently vi...

Страница 15: ...ess OK on a selected number and the page will show up Analogue Receiver If you have an Analogue Receiver connected and turn it ON the programmes from that receiver will be shown With the TV but ton on the Mediamaster s remote control you can toggle between channels from the analogue receiver and terrestrial TV channels The display on the Mediamaster indicates TV during the watch ing of terrestrial...

Страница 16: ...ns If you stop on a line and press OK you will exit the menu and enter the channel marked on the line Select information about the next programme with the RIGHT button Use the i button to get extended information about a marked programme Please note that information will only be shown if it is included in the transmission TV Channels and Radio channels TV Radio Channels will show a list with the n...

Страница 17: ...Lock Receiver If you select Yes you will have to enter your PIN code to get access to channels from the Mediamaster Lock Installation Menu Select Yes if you want to lock access to the Installation Menu Lock Channel First to go to the channel you want to lock than enter this Parental Control menu and select Yes from this line Everytime someone tries to enter locked functions the message Please ente...

Страница 18: ...he Symbol Rate with 4 digits The point will be automatically set Select Modulation with the Left Right buttons The information you have to enter here you can get from the ca ble network contractor or from your landlord Frequency Enter the specified frequence Symbol Rate Enter the Symbol Rate Modulation Select Modulation When this is done press the OK button to proceed with the Chan nel Search proc...

Страница 19: ...ave to press the next button Type of connected TV 4 3 is for TV sets with normal screen 16 9 is for wide screen TV sets Display Volume Indicator Possibility to turn on off the Volume Indicator on screen Create a Favourite List When you enter the line Edit favourite list in the Edit Channels menu you will get a submenu from where you can create a fa vourite list containing e g the channels you most...

Страница 20: ...us channels and settings will be erased Press the EXIT button to leave the menu without making any changes Receiver upgrade If your Service Provider has a new software version available for the Mediamaster you can enter this menu and obtain informa tion If no software is available you will get the message No new software available During downloading periods you are prevented from changing any sett...

Страница 21: ...ssary of terms Access Authorisation to use the coding system to purshase order TV programmes Audio system With digital satellite reception the sound is transmitted in packages and is selected either in a special audio mode or pre selected by using instal lation set up This gives the opportunity to select be tween several different languages to a movie Amount of choices is dependent on what is avai...

Страница 22: ...e The model code variant and serial number are located on a label on the underside of the housing Software Software version V x xxx and Boot version Bx xx or Boot x xx are displayed in the matrix display when the Mediamaster is powered up Supply voltage 230 V AC 15 50 60 Hz Power consumption max 40 W Power consumption in standby 2 W Working temperature 5 C to 40 Storage temperature 40 C to 65 C Op...

Страница 23: ...GB 23 Nokia is a registered trademark of Nokia Corporation 66 76939 10 98 26 Mediamaster 9600 C ...

Отзывы: