noken giro 100063485 Скачать руководство пользователя страница 6

6

INSTALACIÓN - INSTALLATION - INSTALLATION 

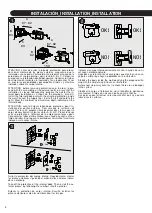
INSTALACIÓN - CALIBRACIÓN DE LOS CARTUCHO

Después de quitar la parte frontal de la protección de plastico, 
atornillar las prolongadores roscados (1), poner los casquillos (2), 
averiguar que la parte final del cartucho termostatico esta en la
posición correcta (abajo, con el signo (X) en correspondencia 
con el plan (Y) como en la Fig.A).éé Poner el embellecedor (4) y 
fijar con los tornillos (5) (donde necesario), instalar la maneta (6), 
poner el tornillo de fijación (7) y poner la tapa (8). 
Desmontar al reves.

After removing the front of the protection, screw the threaded 
extension (1), place the bushes (2), make sure that the end of the 
thermostatic cartridge in the correct position (usually downward, 
with the sign (X) that corresponds with the plane (Y) as in Fig.A). if 
the water temperature is warmer or cooler than 38°C, place a 
thermometer under running water in order to keep an eye on the 
temperature and rotate the knob (J) until reaching 38°, make sure 
to insert the temperature limit control (3) as shown in FIG. A on the 
assembly instructions. Place the decor plate (4) and secure it with 
screws (5) (where present), install the handle (6), secure it with the 
fixing screw (7) and put the cover cap (8). Disassemble in reverse.

INSTALLATION - CALIBRATION OF THE CARTRIDGE

INSTALLATION - REGLACE DE LA CARTOUCHE

Après avoir enlevé la partie frontale des protections en plastique
visser  les  rallonges 

  (1),  placer  les  bagues  (2), s’assurer

que l’extrémité de la cartouche thermostatique soit en position
correcte  (normalement  vers  le  bas,  avec  le  signe (X) qu’il
correspond avec le plan (Y) comme en Fig.A).
Placer la plaque mural (4) et la 

avec les vis (5) (où présents),

poser la poignée (6), en la 

 avec la vis (7) et mettre le bouchon

 (8). Démonter au contraire.

LIMPIEZA DE LOS FILTROS_CLEANIN OF THE FILTERS_NETTOYAGE DES FILTRES

- Los 

filtros

 se deben limpiar periódicamente.

- Desmontar la maneta reguladora de la temperatura.

- Extraer la montura térmica y limpiarla con agua.

- Periodically clean the 

filters.

- Remove the temperature regulation handle.

- Take out the cartridge and clean it very well with water.

- Nettoyer périodiquement les 

filters.

- Dévisser la manette de régulation de la température.

- Extraire la cartouche thermostatique et nettoyer à l’eau 
  courante.

2

3

4

5

2mm

6

7

2,5mm

1

9

8

32mm

10mm

Содержание giro 100063485

Страница 1: ...Box 372 12540 Villarreal Castellón Spain Tel 34 964 50 64 50 _ Fax 34 964 50 67 90 _ www noken com _ noken noken com Termostática encastre 1 salida Concealed thermostatic 1 way 3 4 Thermostatique à encastrer 3 4 1 sortie 100063485 Llave de paso con conexiones de 3 4 Wall mounted stop valve 3 4 Robinet d arrêt 3 4 à encastrer 100063492 ...

Страница 2: ... will invalidate the guarantee We strongly recommend the use of a qualified and registered plumber In new buildings it is recommended to water fill the traps to ensure toxic gases do not corrode the surface of the taps It is recommended that the room is well ventilated Thoroughly flush through all pipe work prior to the installation of terminal appliances e g Shower heads taps inlet valves etc Per...

Страница 3: ...85 100063492 1 2 3 4 acabado CÓDIGO cromo cromo cromo 5 100117411 100084677 100117400 100065050 100117412 1 2 3 4 acabado CÓDIGO cromo cromo cromo 5 100117401 100117399 100084677 100117400 100065049 100117402 100117406 100117405 100117407 6 7 8 9 ...

Страница 4: ...encastrement selon les cotes A B et C Placer le corps avec sa protection à l intérieur de lá emplacement prévu pour Connecter les tubes d alimentation eau chaude à gauche et eau froide à droite Envisager à la profondeur minimale et maximale indiquée sur le corps interne Quitar la protección del cuerpo interno Seguidamente montar las piezas exteriores siguiendo el orden de los números indica Take o...

Страница 5: ...Ensemblar de nuevo la maneta regula dora de la temperatura de manera que el botón se encuentre alineado con la marca Re assemble the temperature regulation handle in such a way that the safety pu shbutton is aligned with the mark Remonter la manette de manière à ce qu elle se trouve alignée avec la marque de référence 2 5mm 5 3 2 1 4 6 17mm 2 3 4 5 2mm 6 7 2 5mm 1 8 9 32mm 10mm Antes de comenzar l...

Страница 6: ... the assembly instructions Place the decor plate 4 and secure it with screws 5 where present install the handle 6 secure it with the fixing screw 7 and put the cover cap 8 Disassemble in reverse INSTALLATION CALIBRATION OF THE CARTRIDGE INSTALLATION REGLACE DE LA CARTOUCHE Après avoir enlevé la partie frontale des protections en plastique visser les rallonges 1 placer les bagues 2 s assurer que l ...

Страница 7: ... recomendamosinstalar válvulasreductorasde presión para presionessuperiores We recommend the installation of the pressure valveswhere the high pressure ispresent Nousrecommandonsl installation de valvesréductricesde pression pour despressionssupérieures 0 36 97 51 28 71 76 87 53 94 11 100 0 0 5 1 2 3 4 5 presión pressure pression bar caudal flow rate débit l min 100063492 0 20 40 60 80 100 120 0 0 ...

Страница 8: ...oductos de limpieza acentúan el deterioro en caso de que las superficies ya se encuentren dañadas No mezcle limpiadores las reacciones químicas pueden emitir gases tóxicos No use estropajos agresivos ni limpiadores abrasivos Bajo ningún concepto se debe utilizar para la limpieza de estas superficies lejías de blanquear con cloro Únicamente deben utilizarse los productos de limpieza expresamente indi...

Страница 9: ...9 MAINTENANCE ...

Страница 10: ... surfaces se trouvent déjà endom magées Ne pas mélanger les produits d entretien ensemble Les réactions chimiques peuvent émettre des gaz toxiques Ne pas utiliser d éponges métalliques agressives ni de produits d entretien abrasifs Sous aucun prétexte il ne faut utiliser d eau de javel à blanchir avec du chlore pour nettoyer ces superficies Il faut vous seulement utiliser les produits d entretien e...

Страница 11: ...11 NOTE ...

Страница 12: ...12 NOTE ...

Отзывы: