1
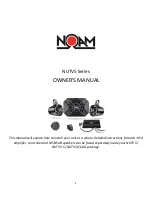
NUTV5 Series
OWNER'S MANUAL
This manual will explain how to install your unit as a whole. Detailed instructions for each : HS4
amplifier, controller and N5/NSUB speakers can be found separately inside your NUTV5 /
NUTV5-S/ NUTV5 QUAD package.
Страница 1: ...OWNER S MANUAL This manualwill explain how to install your unitas a whole Detailed instructions for each HS4 amplifier controller and N5 NSUBspeakerscan be found separately inside your NUTV5 NUTV5 S NUTV5 QUAD package ...
Страница 2: ...2 Table of Contents READ BEFORE INSTALLATION 4 NUTV5 NUTV5 S INSTALLATION 7 NUTV5 QUAD INSTALLATION 10 NUTV5 S QUAD INSTALLATION 13 WIRING DIAGRAM 17 TROUBLSHOOTING 18 ...
Страница 3: ...allation requirements and setup procedures If you have any questions regarding the instructions in any of the manuals or any aspect of your system s operation please contact your authorized NOAM dealer for assistance or contact us at support noamaudio com Both NUTV5 NUTV5 S were built as a system All included components of the unit Speakers amplifier controller were designed and tuned to match one...
Страница 4: ...VOICE COILES ARE NOT COVERED BY THE PRODUCT S WARRANTY We desgined our amplifier to be very powerful If its gains are set too high clockwise it may cause irreversible damage to the speaker s voice coils Exactly for that reason we pre tuned each and every amplifier to optimaly power the various NUTV5 series audio systems Under or overpowering your speakers might cause them thermal burnt voice coil ...
Страница 5: ...er riding having an amplifier sealed to the elements at IPX6 level means that heat generated from the amp has nowhere to escape Playing hard with your HS4 might get it hot That s fine and normal But avoid touching the amplifier s surface during or right after use Do not mount the amplifier in the engine compartment or in any areas of extreme heat Securely mount the amplifier so that it does not co...
Страница 6: ...e electrical system has enough capacity to handle the increased load of your stereo system Stock batteries which are in good condition should be able to handle the extra load of the HS4 amplifier without problems although the life can be reduced slightly To maximize the performance of your amplifier we suggest the use of a heavy duty battery or a second battery dedicated to your NUTV5 system ...
Страница 7: ...Connect the red power cable to the positive 12V battery post C Connect the black Ground power cable to the negative 12V battery post D See wiring diagram on page 17 2 Connecting your amplifier toyourhead unit A Please refer to the user manual included in your head unit box 3 Connecting your speakers to the amplifier A Each speaker has 2 terminals i A positive red terminal ii A negative black termi...
Страница 8: ... your ride Same goes for the right channel NUTV5 NUTV5 S 4 Now that everything is hooked up as it should let s test your system Turn your controller on the amplifier s power indicator light will first turn RED and If all connections are OK within 2 5 seconds the light will turn BLUE In case the light remains red it means that the amplifier is in protection mode due to a short circuit or inadequate...
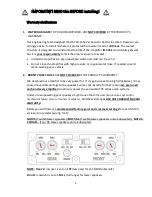
Страница 9: ...ur NUTV5 NUTV5 S system Rear s crossover is set on LPF low pass for the NSUB subwoofer should you choose to add one in the future Front s crossover is set on FULL full range for tower speakers In case you decide that you do need to change any of these settings please make sure you know what you are doing or have a professional set them for you The amplifier s settings and controls are located on t...
Страница 10: ...r therefore it should be connected straight to the battery Do not be tempted to connect it to your bus bar if you have one B Connect the RED power cable to the positive 12V battery post C Connect the Black Ground power cable to the negative 12V battery post D See wiring diagram on page 17 2 Connecting your amplifier toyourhead unit A Please refer to the user manual included in your head unit box 3...
Страница 11: ... the light will turn BLUE In case the light remains red it means that the amplifier is in protection mode due to a short circuit or inadequate voltage either too high or too low In this case see page 18 for troubleshooting 5 Play some tunes to make sure all is working as it should 6 Now you can go ahead and mount the amplifier in a dry and well ventilated location where it will remain dry at all t...
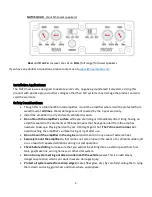
Страница 12: ...sional set them for you The amplifier s settings and controls are located on the front panel beneath a protective gasket cover Remove the six screws from the center panel to access the controls and make the adjustments Make sure you replace the cover back exactly how it was otherwise you might compromise the amplifier s waterproof ratings We remind you that water damages are not covered by your wa...
Страница 13: ... source A This amplifier requires a quite a lot of power therefore it should be connected straight to the battery Do not be tempted to connect it to your bus bar if you have one B Connect the RED power cable to the positive 12V battery post C Connect the Black Ground power cable to the negative 12V battery post D See wiring diagram on page 17 2 Connecting your amplifier toyourhead unit A Please re...
Страница 14: ...akers in accordance with the amplifier s channel they are connected to If the speakers are connected to the left channel make sure you position them on the left hand side of your ride Same goes for the right channel B Connecting your NSUB subwoofer In order for the 2 rear channels to power the subwoofer you will now need to bridge them the following way i Please connect the NSUB s red wire to the ...
Страница 15: ... you can go ahead and mount the amplifier in a dry and well ventilated location where it will remain dry at all times NUTV5 S QUAD Amplifier s gainsand crossover settings Your HS4 amplifier s control panel was already preset to optimally power the N5 Full range speakers and NSUB subwoofer you have purchased Since the HS4 is a very powerful amplifier we suggest keeping these factory settings as is ...
Страница 16: ...r s settings and controls are located on the front panel beneath a protective gasket cover Remove the six screws from the center panel to access the controls and make the adjustments Make sure you replace the cover back exactly how it was otherwise you might compromise the amplifier s waterproof ratings We remind you that water damages are not covered by your warranty ...
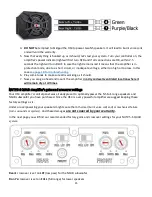
Страница 17: ...Color Function 1 Red 12V 2 Black Ground 3 Blue Remote 4 Solid Green Rear left Sub 5 Green Black Rear left 6 Solid Purple Rear Right 7 Purple Black Rear Right Sub 8 Solid White Front Left 9 White Black Front Left 10 Solid Grey Front Right 11 Grey Black Front Right ...
Страница 18: ...nected to If the speakers are connected to the left channel make sure you position them on the left hand side of your ride Same goes for the right channel Output Distorted Head unit Audio player Volume Set Too High Lower head unit Audio player Volume Amplifier Gain Set Too High Lower Amplifier Gain SENS counter clock Output shuts off after a while Overheating condition Thermal Protection Make sure...
Страница 19: ...ce please do not hesitate to contact us at support noamaudio com for any technical issue service noamaudio com for any non technical related issue Furthermore we encourage you to register for our 1 year warranty here https www noamaudio com pages warranty registration Sincerely NOAM Audio team www noamaudio com ...