background image

EXPLODED VIEW

13

12

11

9

10

5

7

6

14

8

3

1

2

4

2

ITEM 

NO.

PART NAME

DRG NUMBER

LENGTH

Default/QT

Y.

1

S1 Frame

S1

Default

9

2

CB1 Bracket

CB1

Default

8

3

JF1 Bracket

JF1

Default

12

4

ST3 Roof Tie

ST3

Default

1

5

P1 Post

P1

Default

1

6

FT1 Bracket

FT1

Default

3

7

FT3 Bracket

FT3

Default

8

8

RB1 Bracket

RB1

Default

16

9

R2 Rafter

R2

Default

5

10 Sealing Strip -  2195mm

Sealing Strip

Default

8

11

PCE2 - Roof Sheet

PCE2

Default

2

12

PCC2 - Roof Sheet

PCE1

Default

2

13

RC2 - Roof Strip

RC1

Default

5

14

2MD Roof Edging

B1

2110

4

15

40x40 End cap

BOUGHT IN ITEM

40 x 40 x 20

13

Содержание SR1556

Страница 1: ...Assembly Instructions Shelter type SR1556 SR1556 02 100119 USA...

Страница 2: ...EXPLODED VIEW 13 12 11 9 10 5 7 6 14 8 3 1 2 4 2...

Страница 3: ...0 55 1 6 FT1 Foot Bracket 109 x 110 x 40 4 29 x 3 93 x 1 57 3 7 FT3 Foot Bracket 109 x 100 x 80 4 29 x 3 93 x 3 27 8 8 RB1 Bracket 110 x 46 4 33 x 1 81 16 9 R2 Rafter 2200 x 40 x 40 87 40 x 1 57 x 1 5...

Страница 4: ...Mallet Hack saw Spanner Torx bit Bolt set M10 Nut Washer Black Cap T25 T38 AB1210 M10 x 60 mm 25 mm Tech screw 38 mm Tech screw M10 12 x 100mm Concrete Bolt Pack A B 40 40 80 80 136 66 13 Required 21...

Страница 5: ...CB1 CB1 CB1 Ensure correct alignment on corners Step 1 Assemble S1 frames to make up the main structure using CB1 brackets for the corners and JF1 brackets for the straight joints 5 MEASUREMENTS IN BL...

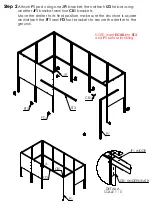
Страница 6: ...post using one JF1 bracket then attach ST3 tie bar using another JF1 bracket and two CB1 brackets Move the shelter to its final position make sure the structure is square and attach the FT1 and FT3 fo...

Страница 7: ...R2 RB2 R2 RB2 40 75 40 75 40 75 40 75 1035 1035 1035 1035 FRONT VIEW Step 3 Use RB1 brackets to secure the R2 roof rafters 7...

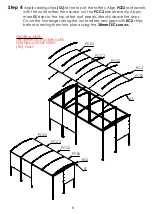
Страница 8: ...sealing strips SS to the top of the rafters Align PCE2 roof panels with the outer rafters then space out the PCC2 panels evenly Apply more SS strips to the top of the roof panels directly above first...

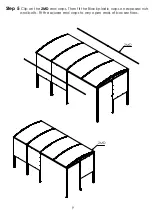
Страница 9: ...2MD 2MD Step 5 Clip on the 2MD end caps Then fit the Black plastic caps on exposed nuts and bolts Fit the square end caps to any open ends of box sections 9...

Страница 10: ...035 1035 985 50 985 50 995 2048 50 1035 985 50 1035 1035 2180 33 40 75 40 75 80 65 39 17 38 80 40 75 38 80 40 75 40 75 40 75 38 80 161 04 85 84 164 57 10 Plan view Suggested size for concrete base 200...

Страница 11: ...11 NOTES...
Страница 12: ...anels regularly with soapy water Ensure all fittings are tight for example after a big storm Touch up any exposed metal should it get scratched CONTACT DETAILS Email Sales nobutts com Web www nobutts...

Отзывы: