


63
5 Using CONTROL
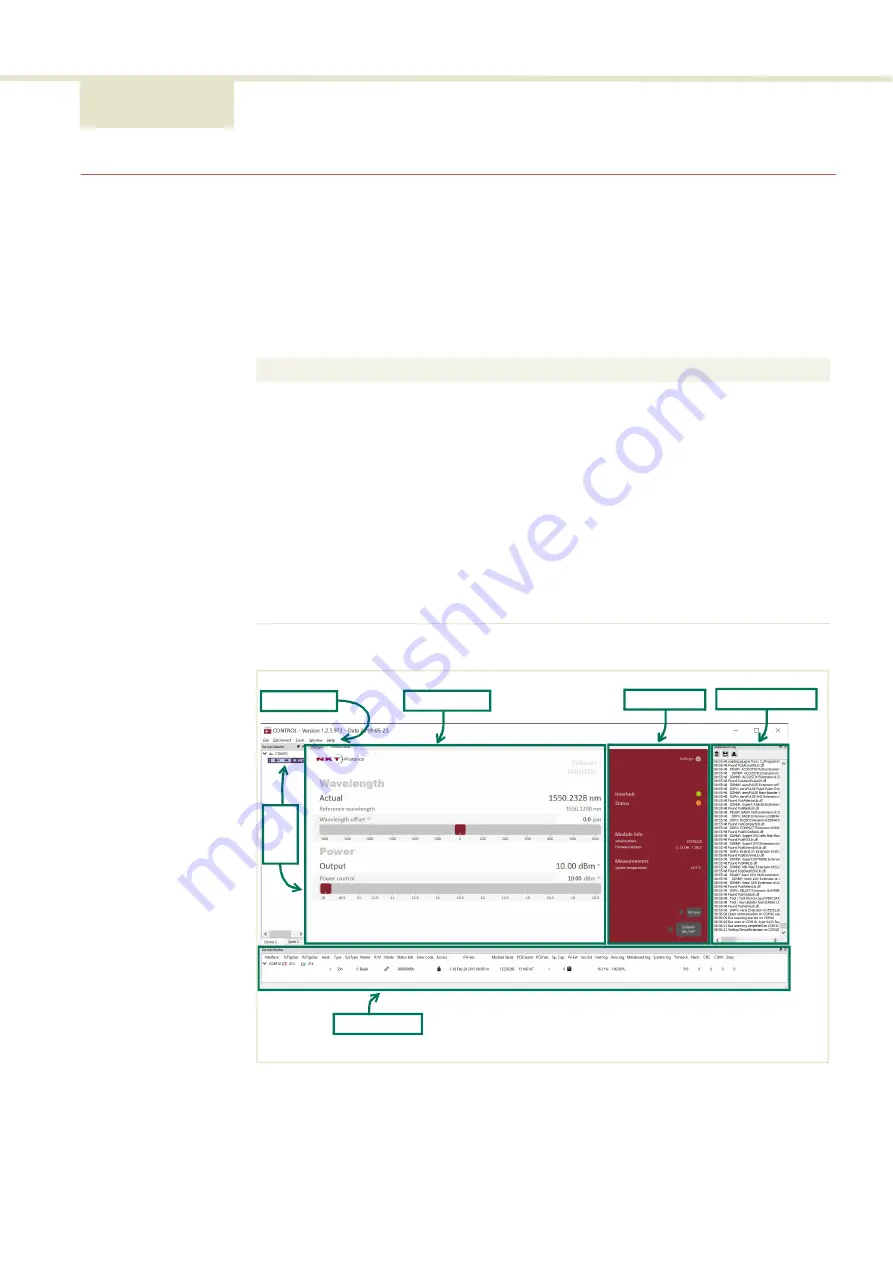
CONTROL overview
The CONTROL interface includes multiple panels and a selection of menu drop
down items in the upper left corner. Using the Window drop down menu, you can
add or remove the displayed panels and panels can be dragged within the main
window or into separate windows. The panels and menu shown in
with links to more details descriptions.
Table 10
CONTROL panels and menu items
Figure 32
GUI panel navigation
Panel
Function
See
Status Panel
This panel displays the selected device status,
emission control and a CONTROL settings menu.
Menu Items
Four drop down menus with multiple functions.
Quick Connect Provides a button when clicked, scans all
available PC ports for connected NKTP products.
Control Panel
The control panel provides controls for the laser.
For example, It provides configuration controls
such as the wavelength and power.
Application
Log
This panel displays a debugging log that can be
saved to a file.
Serial Monitor To also help debugging issues, this panel
displays multiple port and device parameters.
Menu Items
Control Panel
Status Panel Application Log
Serial Monitor
Q
uic
k
Co
nn
ec
t
Содержание Koheras ADJUSTIK
Страница 1: ...Koheras ADJUSTIK PRODUCT GUIDE Low Noise Single Frequency Laser System ...
Страница 10: ...10 ...
Страница 12: ...12 ...
Страница 16: ...16 ...
Страница 18: ...18 ...
Страница 32: ...Chassis labels 32 ...
Страница 44: ...44 ...
Страница 52: ...Overview 52 ...
Страница 78: ...78 ...
Страница 82: ...Placing the laser on a table or shelf 82 ...
Страница 88: ...Connecting the optical output 88 ...
Страница 90: ...90 ...
Страница 93: ...93 Table 17 Mechanical dimensions ...
Страница 94: ...94 ...
Страница 104: ...Installing CONTROL 104 ...
Страница 105: ...Koheras ADJUSTIK Product Description Revision 1 0 01 2020 W 10456 ...


