Nivel System NL301 Скачать руководство пользователя страница 6


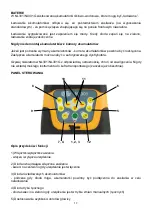
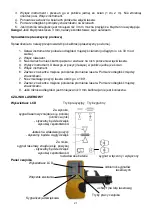
5) Adjusting the speed of head rotation 
- available Head spin speeds: 0-60-120-300-600 rpm. Each press switches rotation speed.  
  
6) Scan function button 
- available angles of beam display: 0-10°-45°-90°-180°. Each press will switch the beam display 
angle.  
  
7) Manual / Automatic mode button 
- Changes the instrument leveling from automatic to manual mode  
  
8) clockwise head rotation switch button 
- When the head does not rotate, press the button to scan in desired direction  
  
9) Counter-clockwise head rotation switch button 
- When the head does not rotate, press the button to scan in desired direction  
  
10) The adjustment of slope towards the X axis  
- When leveling of instrument  is switched to manual mode, use keys to enter a inclination in the 
X axis direction  
 
11) The adjustment of slope towards the Y axis  
- When leveling of instrument  is switched to manual mode, use keys to enter a inclination in the 
Y axis direction  
  
12) ASD System (when ADS system is switched on - the LED flashes slowly)  
-  Too  large  inclination  of  the  instrument  or unwanted movement  /  strike  of  the  instrument  will 
cause the LED will blink quickly - warning the user about disleveling of instrument 


WORKING WITH LASER LEVEL 
 
Turning on the power 
 

On the front panel  press             . The instrument will level by itself and the power LED lights up. 
Press the button again to turn off the power.  
Once leveled up, the laser LED stops blinking and the laser head rotates at a speed of 600 rpm. 
If instrument will be is set inclined more than ± 5 °, manual mode LED will start to blink.  
  

Warning:

 If the unit will not level-up in time longer than 5 minutes, turn off and turn on the laser 

level again.  

 
Rotating laser head mode 
 

         button allows you to adjust the speed of laser head rotation. Switching the speed is carried 
out by pressing again this button. It is possible to rotate the head in the clockwise and counter-
clockwise.  
 

Scan mode 
 

Adjust the rotating speed of the head. Press             which will cause the device goes into scan 
mode, the laser will begin to "draw" a line at set distance. Each time when you press this button 
you will cause increase the range of "drawn" line. Depending on your needs, switch the direction 
of rotation of the head (clockwise or counter-clockwise).  

Содержание NL301

Страница 1: ...NL301G Thank you for purchasing a Nivel System NL301 NL301G laser level To best use the purchased instrument please read the instructions carefully and put in a convenient spot so that in the future y...

Страница 2: ...2 WARNING The device contains a rechargeable nickel hydrogen batteries which must be recycled and should be disposed in accordance with the requirements WEEE Reg DE23874031...

Страница 3: ...ontrol Laser level is waterproof and can be used outdoors even in the rain However these devices can t be submerged in water The laser plummet top Slope s direction Rotating head Windows which securit...

Страница 4: ...alling out of the box and damage the laser The collapse of laser level to the ground can lead to damage Shaky unstable site of laser level can lead to collapse and damage the laser Always make sure th...

Страница 5: ...compartment should be unscrewed with a screwdriver Replacement batteries can be purchased from an authorized distributor Use levelers NL301 NL300G with care protect from moisture Never put a wet inst...

Страница 6: ...the instrument or unwanted movement strike of the instrument will cause the LED will blink quickly warning the user about disleveling of instrument WORKING WITH LASER LEVEL Turning on the power On the...

Страница 7: ...point which height you want to measure adjust the height of the sensor to place it in the field of the laser beam move it up or down on the laser staff The difference of sensor positions on the staff...

Страница 8: ...tomatically 3 Place a sheet of paper on the wall Mark the position of the laser beam Ma on the sheet Turn off the instrument 4 Loosen the tripod fixing screw and rotate the instrument 180 WARNING Be c...

Страница 9: ...between the markers 7 Do not change the position of the laser and spin it 180 8 Mark the position of the laser beam on the paper sheet Measure the distance between the markers 9 If the distance betwe...

Страница 10: ...sensor digital option NL BR laser bracket Tripod adapter 0 90 Rechargeable battery pack CH 1 charger YR laser shelf TR R TR G laer targets GL R GL G laser glasses Laser case Remote controller SJJ1 tri...

Страница 11: ...ipment shall not be considered a warranty repair The user shall be charged for unjustified complaints in accordance with the effective price lists Warranty repairs shall be carried out only and exclus...

Страница 12: ...ecification Range of reception 50 mm Accuracy operation modes precise 1mm coarse 2mm display LCD power DC 9 V alkaline battery auto turning off The sensor is automatically turn off in 30min if it will...

Страница 13: ...i kujemy za zakupienie niwelatora laserowego firmy Nivel System model NL301 ML301G Aby m c jak najlepiej wykorzysta zakupiony instrument prosimy uwa nie przeczyta instrukcj i po o y w dogodnym miejscu...

Страница 14: ...14 UWAGA Urz dzenie zawiera baterie niklowo wodorowe baterie te musz by poddane recyklingowi lub powinny by utylizowane zgodnie z wymogami WEEE Reg DE23874031...

Страница 15: ...terowane zar wno z panela kontrolnego urz dzenia jak i zdalnie z pilota Niwelator jest wodoszczelny i mo e pracowa na zewn trz tak e podczas deszczu Jakkolwiek urz dze tych nie mo na zanurza w wodzie...

Страница 16: ...uj si z lekarzem Po amane pud o lub uszkodzone zatrzaski kufra transportowego mog doprowadzi do wypadni cia i uszkodzenia lasera Upadek niwelatora na ziemi mo e doprowadzi do jego uszkodzenia Chwiejne...

Страница 17: ...cze akumulatorki mo na naby u autoryzowanego dystrybutora U ywaj niwelator w NL301 NL301G z odpowiedni ostro no ci chro od zawilgocenia Nigdy nie wk adaj mokrego instrumentu do kufra transportowego za...

Страница 18: ...ny dioda miga powoli zbyt du e nachylenie instrumentu lub niepo dane przestawienie uderzenie spowoduje e dioda zacznie szybko miga ostrzegaj c u ytkownika o rozpoziomowaniu PRACA Z NIWELATOREM W czani...

Страница 19: ...nie si kr ci wyznaczaj c p aszczyzn laserow Umocuj czujnik laserowy na acie laserowej za pomoc uchwytu Na reperze punkcie zerowym ustaw at z czujnikiem wyzeruj po o enie dostosuj wysoko po o enia czuj...

Страница 20: ...i kszo ci przypadk w mo e by wykonana przez u ytkownika Sprawdzenie b du sto ka mo e by wykonane przez u ytkownika ale b d ten mo e zosta usuni ty tylko przez autoryzowany serwis Sprawdzenie p aszczyz...

Страница 21: ...go w pozycji le cej w pobli u jednej ze cian 5 W cz instrument 6 Zaznacz na kartce miejsce po o enia promienia lasera Pomierz odleg o mi dzy znacznikami 7 Nie zmieniaj c pozycji lasera obr go o 180 8...

Страница 22: ...ie NL BR uchwyt czujnika Adapter na statyw 0 90 Komplet akumulatork w CH 1 adowarka YR p ka laserowa TR R TR G tarczki laserowe GL R GL G okulary laserowe Waliza transportowa Pilot zdalnego sterowania...

Страница 23: ...nie z obowi zuj cymi cenami Naprawa gwarancyjna dokonana b dzie wy cznie na podstawie dokumentu zakupu W ramach gwarancji Gwarant nie ponosi odpowiedzialno ci z tytu u skutk w usterek tj szk d wyrz dz...

Страница 24: ...ikacja czujnika laserowego Zakres odbioru sygna u 50 mm Tryby dok adno ci pracy precyzyjny 1mm zgrubny 2mm Wy wietlacz LCD Zasilanie DC 9 V bateria alkaliczna Automatyczne wy czanie Czujnik wy czy si...

Отзывы: