


5
5. ATTACH ABRASIVE PAPER
WARNING
Always turn off the air supply and disconnect the
air supply hose beforehand whenever replacing
Abrasive Papers.
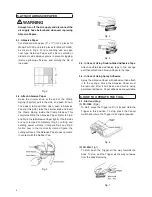
5-1. Abrasive Paper
Cut standard size paper (9" x 11") into 4 pieces for
Model FS-100C and into 8 pieces for Model FS-50A,
as shown in Fig.2. For dry sanding, use an open
cost type Abrasive Paper with silicon carbide or
aluminum oxide abrasive grains to prevent clogging,
improve grinding efficiency, and prolong the life of
the paper.
Fig. 2
5-2. Attach Abrasive Paper
Raise the circular knob at the end of the Clamp
Spring (2 points), pull to the side, and push it down.
The paper clamp will then open, push in Abrasive
Paper at this point, raise the circular knob and insert
the Clamp Spring inside the Clamp Stopper. This
completes fitting the Abrasive Paper. Refer to Fig.3
and Fig.4. Install Abrasive Paper tightly. If both sides
are not clamped completely (Fig.5), cutting and
sanding power will drop. Compare Fig.4 and Fig.5.
Notice how in the incorrectly clamed figure, the
cutting surface of the Abrasive Paper does not come
in contact with the Rubber Pad.
Fig. 3
Fig. 4
Fig. 5
5-3. In Case of Using Double-Sided Adhesive Tape
Attach double-sided adhesive tape to the sponge
part then attach the Abrasive Paper to the tape.
5-4. In Case of Using Spray Adhesive
Spray the Abrasive Paper with adhesive then attach
it to the sponge. Since the Abrasive Paper must
be removed after it has been used. Avoid using
permanent adhesive. Paper adhesives are available.
6. HOW TO OPERATE THE TOOL
6-1. Start and Stop
(1) FS-100C
(Fig.6)
To start, press the Trigger until it is locked. Hold the
Trigger in this position. To stop, press the Cancel
Switch and return the Trigger to its original position.
Fig. 6
(2) FS-50A
(Fig.7)
To start, push the Trigger all the way towards the
body. To stop, pull the Trigger all the way out away
from the body.Removing
Fig. 7
Содержание FS-100C
Страница 11: ......


