background image

14

EN

7  Appendix

Troubleshooting

Symptoms

Location to investigate

Solution

Controller power won't 
turn on.

Is the power plug inserted into an 
outlet?
Is the power cord slipped out of the 
inlet?
Has the rated voltage been input?
Is the power switch set to OFF (


side)?

Check the power supply.
Firmly insert the power cord, and set the power 
switch to ON ( I side).

Has the fuse blown?

If the power lamp does not light up, check the fuse 
in the power cord inlet.
If it is blown out, replace it with a fuse provided with 
your electric tool.

The electric screwdriver 
does not operate.

Is the power plug inserted into an 
outlet?
Is power supplied to the outlet?

Properly insert the power plug into the outlet.
Check the power supply.

Is the changeover switch set to 
neutral?

Slide the changeover switch to the 

 or 


side.

The output torque is low
Screws cannot be 
tightened.

Are you using a combination of 
NITTO KOHKI measuring devices for 
measurement?

Use a combination of NITTO KOHKI's measuring 
devices for measurement. (p. 5)

Are you turning the torque adjustment 
ring clockwise?
Has the output torque dropped?

The output torque decreases as the tool is used.
Turn the torque adjustment ring clockwise. (p. 11)

Did you check the correlation between 
the output torque occurred on screws 
and the output torque measured using 
a measurement device?

The output torque occurred on screws and the 
output torque measured by the measurement device 
are different.
Adjust the output torque according to the screw 
fastening conditions. (p. 5)

Is the bit worn out?

When the bit is worn out, it becomes difficult to 
transmit torque to screws.
Replace the bit. (p. 7)

Are you tightening while crushing a 
part between the screws.
Has regression loosening occurred?

Torque may not be transmitted. Crush the part once 
and then tighten the screw.

Has axial force occurred to the screw?

Without axial force, even though the output torque 
is increased, screws are not tightened. Review the 
screw fastening conditions.
Also, by tightening at low speed, it becomes easier 
to transmit torque.

Has initial loosening occurred?

Initial loosening occurs as a result of permanent set 
in fatigue when fine irregularities such as surface 
roughness are lost over time after the screw is 
tightened or outside force is applied. Tighten the 
screw again.

Has the permanent set in fatigue 
occurred due to permanent 
deformation of sealing material such 
as the gasket?

Carefully check the screw fastening conditions and 
set the output torque.
Depending on the material, torque may not be 
transmitted.

Is the area surrounding the screw at a 
high temperature?

Screws could be extended or loosened by 
temperature changes.
Review the screw fastening conditions and process.

Have you considered the occurrence 
of vibration or outside force?

Loosening of screw occurs if no measures are taken 
for vibration or outside force.
Take appropriate loosening prevention measures.

TV06941-2̲DLV5800̲en.indb   14

TV06941-2̲DLV5800̲en.indb   14

2019/08/19   11:04:22

2019/08/19   11:04:22

Содержание delvo DLC0350

Страница 1: ...unten genannten URL heruntergeladen werden IT Il presente manuale di istruzioni redatto in lingua inglese I manuali di istruzioni in altre lingue possono essere scaricati dal seguente URL ES Este man...

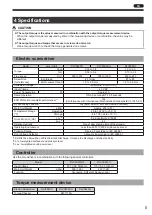
Страница 2: ...wdriver 3 Controller 4 4 Specifications 5 Electric screwdriver 5 Controller 5 Torque measurement device 5 Torque and speed graph 6 5 Preparation 7 Attaching a bit 7 Attaching the suspension bail 7 Rep...

Страница 3: ...g conditions screws may become loose Improper impacts could decrease product life or cause product failure Do not use the tool for anything other than screw tightening It should not be used for tasks...

Страница 4: ...ories Quantity Quantity Electric screwdriver main unit 1 1 Bit NK4D No 0 1 8 44 1 Bit NK4D No 0 2 5 44 1 1 Bit NK4D No 1 4 44 1 Suspension Bail 1 1 Connection Cord 60 1 5 m DLW9081 1 1 Low Torque Spri...

Страница 5: ...0 1 Receptacle the connection cord is used to connect the controller 2 Warning Plate 3 Serial No 4 Rating Plate 5 Lever Switch 6 Frame Handle exterior resin part of main unit 7 Coupling 8 Torque Scal...

Страница 6: ...EN Controller 9 1 5 6 4 7 8 2 3 1 Receptacle 2 Speed Adjustment Volume 3 Soft Start Adjustment Volume 4 Power Lamp 5 Power Switch 6 Signal Output Terminal 7 Inlet 8 Fuse Holder 9 Rating Plate Part Nam...

Страница 7: ...rnational Electrostatics Standards IEC 61340 5 1 Bit Grounding Function Yes safe resistor 1 M bond within controller Main Unit Weight g lbs Approx 230 0 51 Temperature Range F Operating 23 to 122 5 to...

Страница 8: ...l within the specified range When the torque decreases increase the torque based on the measured value 1 2 3 4 5 6 7 8 9 1 2 3 4 5 6 7 8 9 High Torque Spring Low Torque Spring Torque Nm Torque Scale D...

Страница 9: ...leeve and make sure the bit does not come off When removing the bit pull the bit while the sleeve is in pressed status Attaching the suspension bail CAUTION If the suspension bail is pulled forcefully...

Страница 10: ...when the torque adjustment ring is turned there will be no clicking sound Recommended grease separately sold Idemitsu Kosan Co Ltd Daphne Eponex SR No 2 Showa Shell Sekiyu K K Alvania Grease S2 Cosmo...

Страница 11: ...ion of the electric screwdriver is connected to the ground via a 1 M safety resistor inside the controller Also when the tool is used for a long time the rotation part of the electric screwdriver beco...

Страница 12: ...rotation direction of the electric screwdriver means neutral The electric screwdriver does not rotate Rotates counterclockwise Rotates clockwise Start and stop WARNING Never touch the bit while it is...

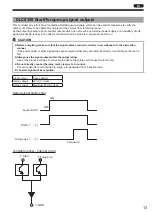
Страница 13: ...ue always turn OFF the power CAUTION The torque scale is a standard The output torque range is not guaranteed 1 Turn the lock nut and adjust it according to the torque scale To increase the output tor...

Страница 14: ...justing the soft start 1 Select QUICK or SLOW for the soft start adjustment volume of the controller Setting it to QUICK will cause the bit speed from startup to a specified speed in a short time Sett...

Страница 15: ...y in accordance with the instruction manual If the power cable or other signal wires are energized while they are wired incorrectly it could cause the tool to fail Always use the signal output within...

Страница 16: ...rred on screws and the output torque measured by the measurement device are different Adjust the output torque according to the screw fastening conditions p 5 Is the bit worn out When the bit is worn...

Страница 17: ...the output torque becomes higher the electric screwdriver becomes hot If it gets hot to a level where you cannot touch even with the specification lower limit value a failure is suspected The rotatio...

Страница 18: ...lue has decreased turn the torque adjustment ring to adjust the torque Care If the main unit is stained use a cloth soaked in soapy water and wrung out well to wipe off the stain The tool does not hav...

Страница 19: ...17 EN External dimensions DLV5820U DLV5820HU DLV5840U Front view 165 5 6 52 32 DIA 1 26 36 DIA 1 42 Side view DLC0350GG DLC0350LU Front view 91 3 58 150 5 91 17 0 67 17 0 67 52 2 05 Side view...

Отзывы: