background image

4. Installation

.23.

.22.

During normal operation, the display alternately shows the power and the operation 

status with each screen lasting for 10 seconds (see Figure 6.1). Screens can also be 

scrolled manually by pressing the UP and DOWN keys. Press the ENTER key to 

access to the Main Menu.

5.1 Start the Inverter

To start up the Inverter, it is important that the following steps are strictly followed:

1.  Switch the grid supply main Switch (AC) ON first.

2.  Switch the DC switch ON. If the voltage of PV arrays are higher than start up voltage, 

    the inverter will turn on. The red LED power will light.

3.  When both the DC and the AC sides supply to the inverter, it will be ready to generate 

    power. Initially, the inverter will check both its internal parameters and the parameters 

    of the AC grid, to ensure that they are within the acceptable limits.  At the same time, 

    the green LED will flash and the LCD displays the information of INITIALIZING.

4.  After 30-300 seconds (depending on local requirement), the inverter will start to 

    generate power. The green LED will be on continually and the LCD displays 

    GENERATING.

WARNING: 

Do not touch the surface when the inverter is operating. It may be 
hot and cause burns.

5.2 Stop the Inverter

To stop the Inverter, the following steps must be strictly followed:

1.  Switch the Supply Main Switch (AC) OFF.

2.  Wait 30 seconds. Switch the DC Switch OFF. All the LEDs of the inverter will be off in one 

    minute.

5. Start & Stop

5.1.1 Inverter working status

Generating:Inverter is working normally

LimByTemp: Inverter power limited by over ambient temperature.

LimByFreq: Inverter power limited by over grid frequency

LimByVg: Inverter power limited by over grid voltage

LimByVar: Inverter power limited by generating reactive power.

When inverter  working  normally,there would be 5 status : 

NOTE: 

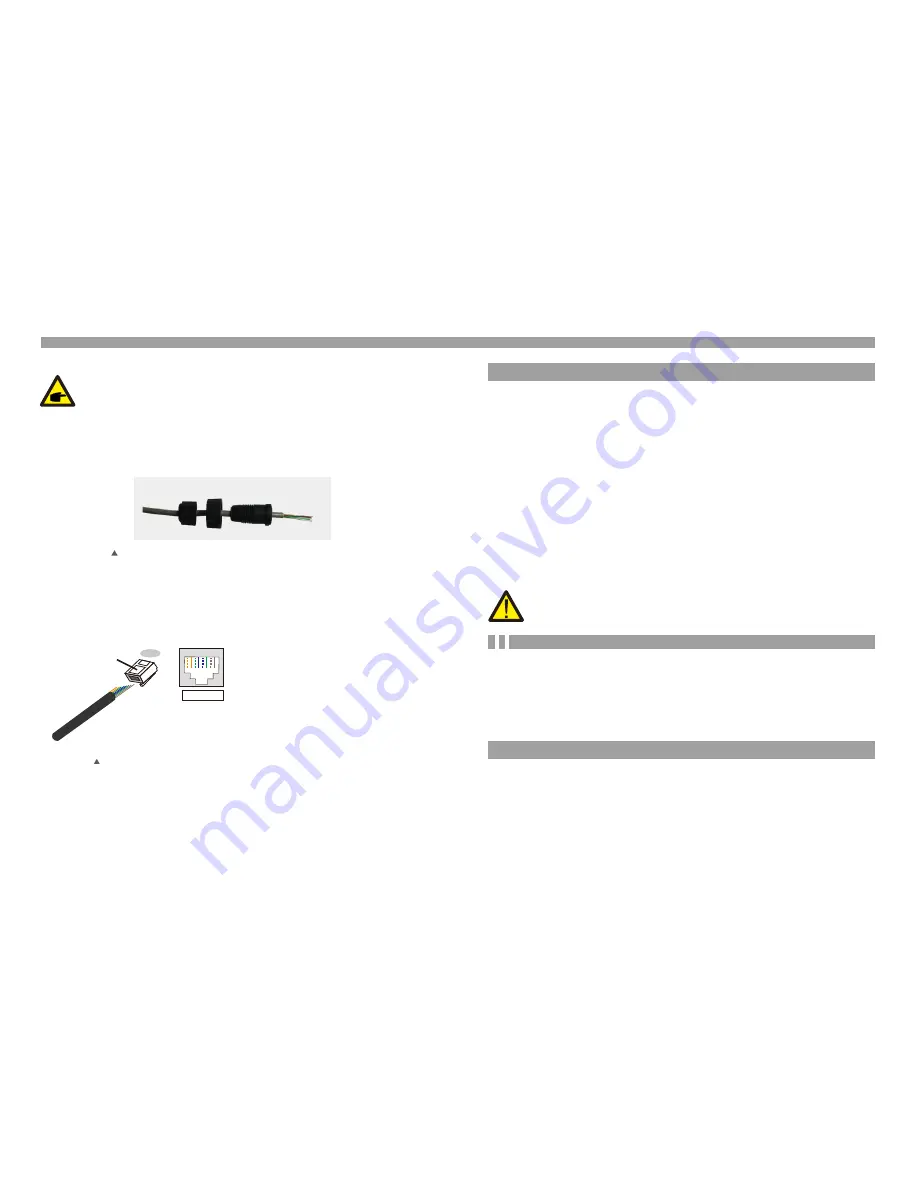
Solis 4G inverter is designed to provide 12V power for DRED.  

Please follow below steps to assemble RJ45 connector. 

1. Insert the network cable into the communication connection terminal of RJ45. 

(As shown in figure 4.25)

Figure 4.25 RJ45 communication connection terminals

3. Connect RJ45 to DRM port. 

Figure 4.26 Strip the insulation layer and connect to RJ45 plug

Correspondence between the 
cables and the stitches of plug

Pin 1: white and orange

 ;  

Pin 2: orange

Pin

 3: white and green; 

Pin 4: blue

Pin 5: white and blue

;  

Pin 6: green

Pin 7: white and brown

;  

Pin 8: brown

1--8

Rj45

 plug 

Rj45

terminal

1 2 3 4 5 6 7 8

1 2 3 4 5 6 7 8

2. Use the network wire stripper to strip the insulation layer of the communication cable. 

According to the standard line sequence of figure 4.26 connect the wire to the plug of 

RJ45, and then use a network cable crimping tool to make it tight. 

Содержание Solis 4G Mini

Страница 1: ...Industrial Park Xiangshan Ningbo Zhejiang 315712 P R China Tel 86 0 574 6578 1806 Fax 86 0 574 6578 1606 If you encounter any problem on the inverter please find out the inverter S N and contact us we...

Страница 2: ...6 Operation 24 5 Start Stop 5 1 Start the Inverter 5 2 Stop the Inverter 23 23 23 1 1 Product Description 3 1 2 Packaging 4 4 3 1 Connect PV side of inverter 13 4 3 2 Connect grid side of inverter 16...

Страница 3: ...6 4 2 Running Message 28 32 6 5 3 Clear Energy 6 5 4 Reset Password 31 31 6 4 6 Daily Record 6 4 7 Communication Data 29 29 6 5 5 Power Control 6 5 6 Calibrate Energy 31 32 6 5 7 Special Settings 6 5...

Страница 4: ...ety Symbols Safety symbols used in this manual which highlight potential safety risks and important safety information are listed as follows WARNING WARNING symbol indicates important safety instructi...

Страница 5: ...Main Switch AC must be switched off before the solar panel s DC isolator shall be switched off 6 CAUTION The PV array Solar panels supplies a DC voltage when they are exposed to sunlight CAUTION Risk...

Страница 6: ...t indications 8 Figure 4 1 Recommended Installation locations To select a location for the inverter the following criteria should be considered To avoid over heating ambient air temperature must be co...

Страница 7: ...nverters are installed in one location a minimum 12inchs clearance should be kept between each inverter or other object The bottom of the inverter should be 20inchs clearance to the ground Visibility...

Страница 8: ...0 4G Solis mini 3600 4G Solis mini 1000 4G LV Please don t connect PV array positive or negative pole to the ground it could cause serious damages to the inverter Figure 4 6 DC Connector Figure 4 7 DC...

Страница 9: ...nnector cap nut and contact pin Figure 4 8 Disassemble the Connector Cap nut Figure 4 9 Insert the Wire into the Connector Cap nut and contact pin iii Crimp the contact pin to the wire using a proper...

Страница 10: ...semble the AC grid terminal connectors are listed as follows a Disassemble the AC connector Strip the AC wires about 6mm Figure 4 15 Stripped AC Wires c Tighten up the cap on the terminal see Figure 4...

Страница 11: ...l connector to the inverter Small click will confirm connection Figure 4 18 Connect the AC Connector to the Inverter The inverter can be monitored via Wi Fi or GPRS All Solis communication devices are...

Страница 12: ...lease set the corresponding configuration as sections 6 5 11 1 2 and 6 5 11 1 3 1 5 6 7 8 MENU 1600 imp kWh 220V 10 60 A T1 T2 T3 DDSD1352 L N L N Communication Figure 4 22 Meter in Load Grid Load A B...

Страница 13: ...Inverter the following steps must be strictly followed 1 Switch the Supply Main Switch AC OFF 2 Wait 30 seconds Switch the DC Switch OFF All the LEDs of the inverter will be off in one minute 5 Start...

Страница 14: ...ormation list Inverter SN 00000000000000 Export_P 0000W Export_I 00 0A 10 sec 10 sec Display series number of the inverter Power of ERM Current of EPM 10 sec Work Mode The work mode of inverter DRM Nu...

Страница 15: ...word the Main Menu will display a screen and be able to access to the following information 1 Alarm Message 2 Running Message 3 Version 4 Daily Energy 5 Monthly Energy 6 Yearly Energy 7 Daily Record 8...

Страница 16: ...reen shows the internal data of the Inverter see Figure 6 14 which is for service technicians only 01 05 01 25 E4 9D AA 06 10 C2 B5 E4 9D 55 Figure 6 14 Communication Data Press DOWN key to move the c...

Страница 17: ...OTE This function is for technicians use only Press the UP DOWN keys to select the standard AS4777 02 AS4777 15 VDE4105 VDE0126 UL 240V A UL 208V A UL 240V UL 208V MEX CFE G83 2 for 1 3 6kW models G59...

Страница 18: ...u 1 NULL 2 Volt watt 3 Volt var 4 Fixed PF 5 Reac power 6 Power PF There are 5 setting under STD Mode settings 1 Working mode 2 Power Rate limit 3 Freq Derate set 4 10mins OV G V set 5 Initial Setting...

Страница 19: ...o default 6 5 10 HMI Update This function is used for update the LCD program This function is applicable by maintenance personnel only wrong operation will prevent the inverter from reaching maximum p...

Страница 20: ...ore than 500W Correct means CT has been connected correctly Before pressing the CT Link Test menu please check as follow 1 Load power 500W 2 Inverter should be set Grid Off 3 CT should be connected 4...

Страница 21: ...igned in accordance with the most important international grid tied standards and safety and electromagnetic compatibility requirements Before delivering to the customer the inverter has been subjecte...

Страница 22: ...staller UN G V01 02 DC INTF DC input overcurrent 1 Restart inverter 2 Identify and remove the string to the fault MPPT 2 Change power board IGFOL F Grid current tracking fail OV G I Over grid current...

Страница 23: ...t rated output power 1 5 42 43 50 550 Start up voltage Volts 60 Max short circuit input current Amps 47 52 or 57 62 Max DC input voltage Volts MPPT voltage range Volts Max input current Amps MPPT numb...

Страница 24: ...voltage Volts 60 Max short circuit input current Amps 47 52 or 57 62 Max DC input voltage Volts MPPT voltage range Volts Max input current Amps MPPT number Max input strings number Rated grid voltage...

Страница 25: ...voltage Volts 90 Max short circuit input current Amps 47 52 or 57 62 Max DC input voltage Volts MPPT voltage range Volts Max input current Amps MPPT number Max input strings number Rated grid voltage...

Страница 26: ...Volts 90 Max short circuit input current Amps Rated DC voltage Volts Rated grid frequency Hertz 47 52 or 57 62 Max DC input voltage Volts MPPT voltage range Volts Max input current Amps MPPT number M...

Страница 27: ......

Отзывы: