background image


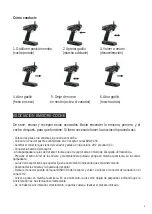
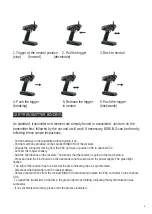
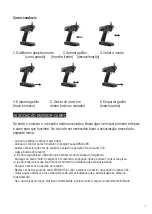
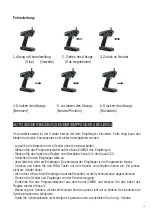
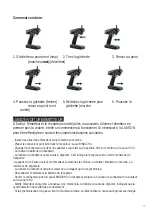
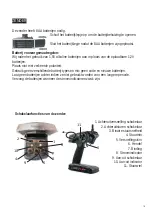
1. Trigger at the neutral position 

2. Pull the trigger  

3. Back to neutral 

( s t op) 

(forward)  

(decelerate) 


4. Push the trigger 


5. Release the trigger 

6. Push the trigger 

(breaking)              


to neutral 


(backwards) 


CAR-TRANSMITTER BINDING:


As standard, transmitter and receiver are already bound or associated. Just turn on the 
transmitter first, followed by the car and it will work. If necessary, BINDING can be done by 
following these simple instructions. 

 
- Put the batteries in the transmitter without turning it on. 
- Put the match line provided on the channel BIND/CH3 of the receiver. 
- Change the connector coming from the ESC and was in position CH2 to channel VCC. 
- Connect the receiver battery. 
- Now the light flashes on the receiver. That means  that the receiver is going to the match status. 
- Press and hold the ‘bind’ button on the transmitter and then switch on the power supply. The green light 
flashes. 
- The light of the receiver has to be fixed at the time, indicating that it is synchronized. 
- Disconnect the transmitter and the receiver battery. 
- Remove the match line from the receiver BIND/CH3 channel and replace the ESC connector on the channel 
CH2. 
- To launch the transmitter. At that time, the green li ght stops blinking, indicating that synchronization was 
successful. 
- If no synchronized correctly, please redo the process indicated.


8

Содержание NH93043

Страница 1: ...4WD RC ELECTRIC CARS PREDATOR MT 10 RTR 2 4Ghz MANUAL DEL USUARIO USER HANDBOOK MANUAL DO USUARIO HANDBUCH MANUEL DE L UTILISATEUR HANDBOEK www ninco com ...

Страница 2: ...2 ...
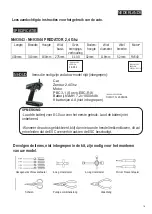
Страница 3: ...rante 8 o 10 horas antes de su primer uso Cuando el coche está bloqueado no continuar activando el gatillo Puede sobrecalentar y dañar el variador Coche Emisora 2 4Ghz Motor PBC 3 1 Servo ESC RX Bateria Ni MH 7 2v 1800mAh Requiere 8 pilas AA No dejarla desatendida durante el proceso de carga Los siguientes artículos no incluidos en el set son necesarios para la manipulación y montaje del vehículo ...

Страница 4: ...cta colocación de la polaridad No usar baterías de diferentes tipos ni mezclar nuevas y usadas Retirar las pilas si no va a usar la emisora en un largo periodo de tiempo Sustituya las pilas según marque el indicador de nivel Funciones de la emisora 1 Inversor acelerador 2 Inversor dirección 3 Dual rate dirección 4 Trim dirección 5 Trim acelerador 6 Gatillo acelerador 7 Botón asociación 8 Indicador...

Страница 5: ...ador y estaba en la posición CH2 al canal VCC Conectar la batería del receptor Ahora parpadeará la luz del receptor Indica que el receptor está en modo de búsqueda de frecuencia Presione el botón bind de la emisora y manteniéndolo pulsado ponga en marcha la emisora La luz verde parpadeará La luz del receptor tiene que quedar fija en ese momento indicando que está sincronizado Desconectar la emisor...

Страница 6: ...all with wrong polarities Do not use batteries of different types and do not mix old and new batteries Do not leave batteries if not in use for a long period Please replace batteries when power indicators are weak Function switches of the transmitter 1 Throttle reverse switch 2 Steering reverse switch 3 Steering dual rate 4 Steering trim 5 Throttle trim 6 Trigger 7 Biding 8 Power indicator 9 Switc...

Страница 7: ...igger this will cause the ESC to overheat and damage the ESC Transmitter 2 4Ghz The following items not included in the kit are required for assembling your model Hexagonal screwdriver 4 way cross wrench 4 way cross wrench mini screwdriver Scissors needle nose cutter Wire cutter Car Transmitter 2 4Ghz Motor PBC 3 1 Servo ESC RX Battery Ni MH 7 2v 1800mAh 8 AA batteries required 400mm 310mm 160mm 2...

Страница 8: ...er Change the connector coming from the ESC and was in position CH2 to channel VCC Connect the receiver battery Now the light flashes on the receiver That means that the receiver is going to the match status Press and hold the bind button on the transmitter and then switch on the power supply The green light flashes The light of the receiver has to be fixed at the time indicating that it is synchr...

Страница 9: ...iro uso Durante o proceso de carga supervisione a batería Quando o carro está bloqueado não continuar activando o gatillo Pode sobreaquecer e danificar o variador Coche Emisora 2 4Ghz Motor PBC 3 1 Servo ESC RX Bateria Ni MH 7 2v 1800mAh Requiere 8 pilas AA Os seguintes artigos não incluidos no set são necessários para a manipulação e montagem do vehículo Nh93043 NH93044 PREDATOR 2 4 Ghz 400mm 310...

Страница 10: ...Verifique a correcta colocação da polaridade Não usar baterías de diferentes tipos nem misturar novas e usadas Retirar as pilhas se não vai usar o emisor por um longo periodo de tempo Substitua as pilhas quando o nivel indicar Funções do emisor 1 Inversor acelerador 2 Inversor direcção 3 Direcção dual rate 4 Direcção trim 5 Acelerador trim 6 Gatilho 7 Biding 8 Indicadores potencia 9 Interruptor pa...

Страница 11: ...ceptor canal BIND CH3 Mudar o conector que vem do variador e estava na posição CH2 ao canal VCC Ligar a bateria do receptor A luz do receptor pisca indicando que está em modo de busca de frequência Carregue no botão bind do emissor e mantendo o carregado ligue o emissor A luz verde pisca A luz do receptor tem que ficar fixa neste momento indicando que está sincronizado Desligar o emissor e a bater...

Страница 12: ...gt Wenn etwas das Modell blockiert geben Sie kein Gas mehr dieses kann den Fahrregler überhitzen und zerstören Farzeugh Sender 2 4Ghz Motor PBC 3 1 Servo ESC RX Batterie Ni MH 7 2v 1800mAh 8 pilas AA nitch enthalten Die folgenden Teile nicht enthalten werden benötigt Inbus Schraubendreher 4 Wege Schraubenschlüssel 4 Wege Schraubenschlüssel Mini Schraubendreher Schere Cutter Messer Seitenschneider ...

Страница 13: ...htige Polarität Verwenden Sie keine unterschiedlichen Batterien gleichzeitig Nehmen Sie die Batterien aus dem Sender wenn Sie ihn länger nicht benutzen Tauschen Sie die Batterien aus wenn diese nicht mehr die volle Leistung haben Funktionen des Senders 1 Gas Bremse Umkehrschalter 2 Steuerung Umkehrschalter 3 Ausschlagsbegrenzung für Steuerung 4 Steuerungs Feineinstellung 5 Gas Bremse Feineinstellu...

Страница 14: ...des Reglers vom Steckplatz Kanal 2 in den Kanal VCC Schließen Sie den Empfänger Akku an Jetzt blinkt ein Licht am Empfänger Das bedeutet der Empfänger ist im Programmier Modus Drücken und halten Sie den BIND Taster auf dem Sender und schalten diesen ein Ein grünes Licht am Sender blinkt Wenn das Licht auf dem Empfänger dauerhaft leuchtet ist die Synchronisation abgeschlossen Trennen Sie Sender und...

Страница 15: ... pendant la charge Lorsque la voiture est bloquée n appuyez pas sur la gâchette car l ESC risque de surchauffer et de s endommager Voiture Emetteur 2 4Ghz Motor PBC 3 1 Servo ESC RX Batterie Ni MH 7 2v 1800mAh 8 piles AA non incluées Les éléments suivants non inclus dans le kit sont nécessaires au montage de votre voiture Tournevis hexagonal Clé en croix Clé en croix Tournevis miniature Ciseaux Pi...

Страница 16: ... Ne mélangez pas différents types de piles ou des piles neuves avec des piles usagées Enlevez les piles en cas de non utilisation prolongée Remplacez les piles lorsque les indicateurs de puissance sont faibles Commandes des fonctions de l émetteur 1 Interrupteur d inversion d accélération 2 Interrupteur d inversion de direction 3 Dual rate de direction 4 Trim de direction 5 Trim d accélération 6 G...

Страница 17: ... du variateur et qui était sur la position CH2 et le mettre sur le canal VCC Connecter la batterie du récepteur La lumière du récepteur se met alors à clignoter Ceci indique le récepteur est en mode recherche de fréquence Appuyez sur le bouton bind de l émetteur maintenez le enfoncé et mettez l émetteur en marche La lumière verte clignotera La lumière du récepteur doit alors rester fixe indiquant ...

Страница 18: ... de hendel trekken duwen dit zal ertoe leiden dat de ESC oververhit raakt en de ESC beschadigt Car Zender 2 4Ghz Motor PBC 3 1 Servo ESC RX Batterij Ni MH 7 2v 1800mAh 8 batterijen AA niet inbegrepen De volgende items niet inbegrepen in de kit zijn nodig voor het monteren van uw model Hexagonale schroevendraaier 4 weg moersleutel 4 weg moersleutel Mini schroevendraaier Scharen Puntige combinatieta...

Страница 19: ...t verkeerde polariteit Gebruik geen verschillende batterij types en mix geen oude en nieuwe batterijen Laat geen batterijen achter indien ze niet gebruikt worden voor een langere periode Vervang de batterijen wanneer de stroomindicatoren zwak zijn Schakelaarfuncties van de zender 1 Achteruitversnelling schakelaar 2 Achteruitsturen schakelaar 3 Binaire stuursnelheid 4 Stuurtrim 5 Versnellingstrim 6...

Страница 20: ...t en die in positie CH2 stond naar kanaal VCC Schakel de batterij van de ontvanger in Nu zal het lampje van de ontvanger beginnen knipperen Dit betekent dat de ontvanger de frequentie aan het zoeken is Houd de knop Bind op de zender ingedrukt en schakel tegelijkertijd de zender in Het groene lampje knippert nu Het lampje van de ontvanger stopt nu met knipperen en blijft branden wat betekent dat de...

Страница 21: ... recomendado para crianças sem a supervisão de um adulto O manual do producto contem instruções de segurança uso e manutenção E importante ler o manual e seguir as instruções e avisos que explica antes de o manipular preparando o para usar poder pilota lo correctamente e evitar danos ou lesões DEUTSCH Dieses Modell ist ein hochentwickeltes Hobbygerät kein Spielzeug Es ist für Kinder unter 14 Jahre...

Страница 22: ...t product of andere eigendommen Dit product is niet bedoeld voor gebruik door kinderen zonder direct toezicht van volwassenen De producthandleiding bevat instructies voor veiligheid bediening en onderhoud Het is essentieel om alle instructies en waarschuwingen in de handleiding op te volgen voorafgaand aan de montage de installatie of het gebruik om te zorgen voor een juiste werking en de voorkomi...

Отзывы: