7
42445 Avenida Alavardo, Temecula, CA 92590
(800) 451-9343, www.nimbuswater.com
5
Faucet Installation
ascade
C
Determine the most practical under-the-sink location for
placement of the Cascade system. Ensure that the location
allows adequate access for cartridge re placement.
The faucet installation instructions below are for a standard
non-airgap faucet with a quick-connection fitting. Your faucet
installation may vary.
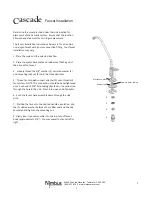
1. Place the system in the selected location.
2. Place the metal base plate and rubber seal flush against
the base of the faucet.
3. Loosely thread the 3/8" washer (2), serrated washer (3)
and mounting lock nut (4) onto the threaded stem.
5. Thread faucet quick-connect adapter (5) onto threads of
faucet stem. NOTE: This connection should be hand-tightened
only. Push end of 3/8" blue tubing (located on the system) up
through the hole in the sink. Press into open end of adapter.
6. Push the faucet base assembly down through the sink
hole.
7. Position the faucet to the desired handle orientation. Slip
the (1) slotted washer between the rubber seal and the sink.
Securely hand tighten the mounting nut.
8. Firmly insert spout assembly into the top hole of faucet
body (approximately 1/4"). You may swivel the faucet left or
right.
Product water tubing
Metal base plate
Rubber seal
1
2
3
5
4


