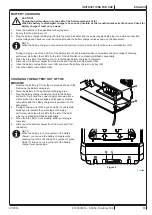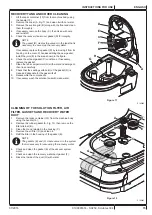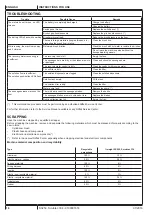
background image

ENGLISH

INSTRUCTIONS FOR USE

4

SC250, Scrubtec 334 - 9100001614

07/2016

GENERAL INSTRUCTIONS

Specific warnings and cautions to inform about potential damages to people and machine are shown below.

DANGER!


Before performing any maintenance, repair, cleaning or replacement procedure disconnect the battery.


This machine must be used by properly trained operators only.


Do not wear jewels when working near electrical components.


Do not operate the machine near toxic, dangerous, flammable and/or explosive powders, liquids or vapours. 

This machine is not suitable for collecting dangerous powders.

DANGER! (for battery and battery charger)


Read all safety warnings and all instructions. Failure to follow the warnings and instructions may result in 

electrical shock, fire and/or serious injury.

WARNING! (for battery and battery charger)


This machine is equipped with a lithium ion battery.


Do not use any other type of batteries; only use the one supplied with the machine or its original spare part. 


Before each used, check if it’s damaged.


Do not soak in liquids.


Under abusive conditions, liquid may be ejected from the battery; avoid contact. If contact accidentally 

occurs, flush with water. lf liquid contacts eyes, additionally seek medical help. Liquid ejected from the 

battery may cause irritation or burns.


Do not use a battery pack or appliance that is damaged or modified. Damaged or modified batteries may 

exhibit unpredictable behavior resulting in fire, explosion or risk of injury.


Do not expose a battery pack or appliance to fire or excessive temperature. Exposure to fire or temperature 

above 130 °C may cause explosion.


Do not store, use or recharge in environments with a temperature higher than 45 °C.


Do not recharge with temperatures lower than 0 °C.


Due to the risk of short-circuit, do not store the battery with metal objects. 


If the battery is damages, take it to a Nilfisk Service Centre.


Before decommissioning the machine, remove the battery.


Store the battery charger in a dry place. 


If the battery charger or the cable are wet, do not use it. 


Before using the battery charger, make sure that the frequency and voltage values, marked on the plate, 

correspond to the mains voltage values.


Do not use the battery charger in environments where there are flammable powders and/or explosive 

materials.


Do not handle the battery charger by its main cable.


Do not pull or carry the machine by the battery charger cable and never use the battery charger cable as 

a handle. Do not close a door on the battery charger cable, or pull the battery charger cable around sharp 

edges or corners. Do not run the machine on the battery charger cable.


Keep the battery charger cable away from heated surfaces.


Do not charge the battery if the battery charger cable or the plug are damaged.


Do not cover the battery charger.


Always use the battery charger supplied with the machine or the original spare part. Any other battery 

charger must have the same specifications indicated in the chapter Technical Characteristics and must 

supply a Safety Extra Low Voltage (SELV).

WARNING!


Carefully read all the instructions before performing any maintenance/repair procedure.


To reduce the risk of fire, electric shock, or injury, do not leave the machine unattended when it is plugged 

in. Before performing any maintenance procedure, disconnect the battery charger cable from the electrical 

mains.


Do not smoke while charging the battery.


Always protect the machine against the sun, rain and bad weather, both under operation and inactivity 

condition. This machine must be used indoors in dry conditions, it must not be used or kept outdoors in wet 

conditions.


Before using the machine, close all doors and/or covers as shown in the Instructions for Use Manual.

Содержание SC250

Страница 1: ...0 Scrubtec 334 Instructions for use Model 9087380020 9087382020 07 2016 1 9100001614 Deutsch Français English Nederlands Bedienungshandbuch Instructions d utilisation Instructions for use Gebruiksaanwijzing ...

Страница 2: ...sa sljedećim direktivama i standardima Tehničku dokumentaciju sastavlja proizvođač Il sottoscritto dichiara che i modelli sopra menzionati sono prodotti in accordo con le seguenti direttive e standard Il fascicolo tecnico è redatto dal costruttore Toliau pateiktu dokumentu patvirtinama kad minėtas modelis yra pagamintas laikantis nurodytų direktyvų bei standartų Techninę bylą sudarė gamintojas Ar ...

Страница 3: ...NDERAUSSTATTUNG 8 SCHALTPLAN 8 EINSATZ FUNKTIONSWEISE 8 PRÜFUNG VORBEREITUNG AN EINEM NEUEN GERÄT 8 ABSTELLPEDAL 9 REINIGUNGSLÖSUNGSTANK BEFÜLLEN 9 ANLASSEN DER MASCHINE WISCHEN TROCKNEN 10 LADEZUSTAND DER BATTERIE 11 GERÄT ABSTELLEN 11 TANKS ENTLEEREN 11 TRANSPORT PARKEN DES GERÄTS 11 NACH DER GERÄTEBENUTZUNG 12 LANGE STILLLEGUNG DES GERÄTS 12 AUSBAU DER BATTERIE 12 WARTUNG 12 ÜBERSICHTSTABELLE P...

Страница 4: ...250 Scrubtec 334 ist eine Scheuersaugmaschine für die gewerbliche Nutzung Seriennummer und Gerätemodell sind auf dem Typenschild 30 angegeben Auf demselben Schild sind das Baujahr Datencode A16 bedeutet Januar 2016 und die Produktkennnummer angegeben Diese Auskünfte braucht man bei der Bestellung von Ersatzteilen Bitte notieren Sie hier die Gerätedaten GERÄTEMODELL PRODUKTCODE GERÄTESERIENNUMMER A...

Страница 5: ...tielle Gefahrbedingungen anzuzeigen Lesen Sie diese Informationen stets aufmerksam und ergreifen Sie die zum Schutz von Personen und Gegenständen erforderlichen Vorsichtsmaßnahmen Die Mitarbeit des Bedieners ist zur Unfallverhütung wesentlich Unfallverhütungsmaßnahmen können nicht greifen wenn die Bedienperson nicht bereit ist ihren Beitrag voll zu leisten Die meisten Unfälle werden durch die Nich...

Страница 6: ...aturen über 45 C aufbewahren verwenden oder aufladen Nicht bei Temperaturen unter 0 C aufladen Aufgrund der Kurzschlussgefahr nicht zusammen mit Gegenständen aus Metall aufbewahren Im Falle einer schadhaften Batterie den Nilfisk Kundendienst aufsuchen Vor der Verschrottung des Geräts die Batterie entfernen Das Ladegerät schützen und an einem trockenen Ort aufbewahren Keinesfalls ein nasses Ladeger...

Страница 7: ...einigungsmitteln geeignete Schutzhandschuhe anziehen Das Gerät nicht als Transportmittel verwenden Bei stehendem Gerät die Bürste nicht arbeiten lassen sonst könnte der Fußboden beschädigt werden Im Brandfall möglichst einen Pulverlöscher und keinen Wasserlöscher verwenden Die Schutzvorrichtungen des Geräts keinesfalls beschädigen Alle Anweisungen zur ordentlichen Wartung sind gewissenhaft zu befo...

Страница 8: ...dienpult und Bedienelementen 2 Taste zum Ein und Ausschalten 3 Taste Reinigungslösung 1 LED leuchtet für normale Reinigung mit minimalem Reinigungslösungsfluss 2 LEDs leuchten für Reinigung mit maximalem Reinigungslösungsfluss 2 LEDs blinken leerer Reinigungslösungstank LEDs ausgeschaltet Reinigungslösung deaktiviert 4 Taste Ansauganlage LED leuchtet Ansauganlage eingeschaltet 5 Ladesymbol der Bat...

Страница 9: ...BEDIENUNGSHANDBUCH DEUTSCH 9100001614 SC250 Scrubtec 334 7 07 2016 GERÄTEAUFBAU Fortsetzung 26 29 30 25 10 12 15 13 14 1 21 18 20 19 17 11 16 23 4 6 8 9B 7 9A 6 2 5 3 22 24 27 28 P100930 ...

Страница 10: ...verbinder CH Ladegerät EB1 Platine Funktionen EB2 Platine Display M1 Bürstenmotor M2 Saugmotor PM Pumpe Reinigungslösung S1 Griffsensor rechts S2 Griffsensor links S3 Sensor für Vorhandensein Reinigungslösung Farbcodes BK Schwarz BU Hellblau BN Braun GN Grün GY Grau OG Orange PK Rosa RD Rot VT Violett WH Weiß YE Gelb P100931 EINSATZ FUNKTIONSWEISE PRÜFUNG VORBEREITUNG AN EINEM NEUEN GERÄT ACHTUNG ...

Страница 11: ...setzte Gerät geeignete flüssige schaumarme und nicht brennbare Reinigungsmittel verwenden ACHTUNG Bei der Verwendung von Bodenreinigungsmitteln Anweisungen und Hinweise auf der jeweiligen Verpackung beachten Vor dem Umgang mit Bodenreinigungsmitteln geeignete Schutzhandschuhe anziehen 1 Den Tankdeckel 12 abnehmen 2 Den Verschluss A Abb 2 des Reinigungslösungstanks B abnehmen 3 Den Tank B bis einig...

Страница 12: ...reie Neigungseinstellung beizubehalten den Hebel 8 drücken und mit der Taste 9B blockieren HINWEIS Um die Funktion der Tasten 9A 9B aufzuheben und wieder die vordere Sauglippe abzusenken oder den Schubbügel in eine feststehende Position zu bringen den Hebel der Sauglippe 7 oder den Hebel für die Schubbügelneigung 8 kurz drücken 10 Im Falle besonders hartnäckiger Verschmutzung kann der Bürstenanpre...

Страница 13: ...ganlage und daran zu erkennen dass der Fußboden nicht mehr getrocknet wird Ist der Schmutzwassertank voll wie folgt entleeren Entleerung des Sammelwassertanks 1 Das Gerät ausschalten und das Abstellpedal niederdrücken 2 Das Gerät in den Entsorgungsbereich schieben 3 Den Griff A Abb 6 drehen und in der Hand halten um das Tankfach B aus dem Gerät zu heben 4 Den Deckel C abnehmen und den Schmutzwasse...

Страница 14: ...des Geräts und der höchsten Funktionssicherheit Hier wird die Übersichtstabelle der planmäßigen Wartung gezeigt Je nach Arbeitsbedingungen können die Wartungsintervalle variieren ACHTUNG Wartungsarbeiten sind bei ausgeschaltetem Gerät und abgeschlossener Batterie durchzuführen Außerdem sind die Sicherheitshinweise im entsprechenden Abschnitt aufmerksam zu lesen Alle planmäßigen und außerordentlich...

Страница 15: ...en Batterieladung A B C D Abbildung 8 P100939 BATTERIE LADEN HINWEIS Die Batterie aufladen wenn nur noch eine einzige LED des Batteriesymbols 5 leuchtet Ist die Batterien leer möglichst bald aufladen da sich ihre Lebensdauer ansonsten verkürzt Den Ladezustand der Batterie mindestens einmal pro Woche überprüfen 1 Das Gerät in den für das Laden der Batterie vorgesehenen Bereich schieben 2 Sicherstel...

Страница 16: ...lätter unversehrt sind und weder Schnitte noch Risse aufweisen ggf Sauglippenhalter austauschen 6 Die Leitungen für das Schmutzwasser G Abb 10 sorgfältig von eventueller Verschmutzung befreien bevor die Sauglippenleisten montiert werden 7 Die Sauglippenhalter 20 bis zum endgültigen Einhaken montieren A A B B Abbildung 9 P100940 REINIGUNG DER BÜRSTE UND DES BÜRSTENRAUMBEREICHS 1 Den Hebel gegen den...

Страница 17: ...h auswechseln 7 Das Fach G des Tanks waschen und reinigen dann sorgfältig spülen 8 Überprüfen ob die gesamte Auflagefläche H der Dichtung D sauber ist und die Dichtigkeit gewährleistet 9 Die abmontierten Teile wieder einbauen 10 Falls erforderlich den Reinigungslösungstank mit sauberem Wasser waschen A G H D E C F B Abbildung 11 P100942 REINIGUNG DES REINIGUNGSLÖSUNGSFILTERS DES LUFTFILTERS DER DI...

Страница 18: ...pft Die Dosiervorrichtungen der Reinigungslösung reinigen Der Reinigungslösungstank ist leer Tank auffüllen Reinigungslösungsfilter schmutzig Den Filter reinigen Defekt an Wasserpumpe Pumpe auswechseln Die Sauglippen verursachen Streifen auf dem Boden Schmutz unter den Sauglippenwischblättern Abfälle entfernen Sauglippenwischblätter abgenutzt beschädigt bzw eingerissen Gummis austauschen Schmutzfa...

Страница 19: ...ILISATION FONCTIONNEMENT 8 CONTRÔLE PRÉPARATION SUR UNE MACHINE NEUVE 8 PÉDALE DE STATIONNEMENT 9 REMPLISSAGE DU RÉSERVOIR DE SOLUTION 9 DÉMARRAGE DE LA MACHINE LAVAGE SÉCHAGE 10 ÉTAT DE CHARGE DE LA BATTERIE 11 ARRÊT DE LA MACHINE 11 VIDANGE DES RÉSERVOIRS 11 TRANSPORT STATIONNEMENT DE LA MACHINE 11 APRÈS L UTILISATION DE LA MACHINE 12 INACTIVITÉ PROLONGÉE DE LA MACHINE 12 DÉPOSE DE LA BATTERIE 1...

Страница 20: ...ONNÉES D IDENTIFICATION La SC250 Scrubtec 334 est une autolaveuse à usage commercial Le numéro de série et le modèle de la machine sont indiqués sur la plaque 30 La plaque indique également l année de fabrication le code de date A16 signifie janvier 2016 et le code du produit Ces informations sont nécessaires lors de la commande des pièces de rechange de la machine Utiliser l espace suivant pour n...

Страница 21: ...naler les conditions de danger potentielles Lire attentivement ces informations et prendre les précautions nécessaires pour protéger les personnes et les choses Pour éviter tout accident la collaboration de l opérateur est essentielle Aucun programme de prévention des accidents du travail ne peut résulter efficace sans la totale collaboration de la personne directement responsable du fonctionnemen...

Страница 22: ... circuit ne pas conserver la batterie avec des objets métalliques Si la batterie est endommagée la porter dans un Service après vente Nilfisk Avant de mettre à machine à la ferraille enlever la batterie Protéger et conserver le chargeur en lieu sec Si le chargeur ou son câble sont mouillés ne pas les utiliser Avant d utiliser le chargeur de batterie vérifier que les valeurs de fréquence et de tens...

Страница 23: ...ion de détergents pour le nettoyage des sols mettre les gants et les vêtements de protection adéquats Ne pas utiliser la machine comme moyen de transport Ne pas faire travailler la brosse lorsque la machine est à l arrêt pour ne pas endommager le sol En cas d incendie il est préférable d utiliser un extincteur à poudre plutôt qu un extincteur à eau Ne pas altérer pour aucune raison les protections...

Страница 24: ...on poussoir de contact arrêt 3 Bouton poussoir de détergent 1 Del allumée pour le nettoyage normal avec un débit de solution minimum 2 Del allumées pour le nettoyage avec un débit de solution maximum 2 Del clignotantes réservoir de détergent vide Del éteintes détergent désactivé 4 Bouton poussoir système d aspiration Del allumée système d aspiration activé 5 Symbole de charge de la batterie 1 à 6 ...

Страница 25: ...INSTRUCTIONS D UTILISATION FRANÇAIS 9100001614 SC250 Scrubtec 334 7 07 2016 STRUCTURE DE LA MACHINE suite 26 29 30 25 10 12 15 13 14 1 21 18 20 19 17 11 16 23 4 6 8 9B 7 9A 6 2 5 3 22 24 27 28 P100930 ...

Страница 26: ...e électronique afficheur M1 Moteur brosse M2 Moteur d aspiration PM Pompe de solution S1 Capteur de poignée droite S2 Capteur de poignée gauche S3 Capteur de présence de solution détergente Codes des couleurs BK Noir BU Bleu BN Marron GN Vert GY Gris OG Orange PK Rose RD Rouge VT Violet WH Blanc YE Jaune P100931 UTILISATION FONCTIONNEMENT CONTRÔLE PRÉPARATION SUR UNE MACHINE NEUVE ATTENTION Les co...

Страница 27: ...mables adéquats pour les machines utilisées ATTENTION Pendant l utilisation de détergents pour le nettoyage des sols suivre toujours les instructions et les avertissements indiqués sur les étiquettes des flacons Avant la manipulation de détergents pour le nettoyage des sols mettre les gants et les vêtements de protection adéquats 1 Enlever le couvercle du réservoir 12 2 Enlever le bouchon A Fig 2 ...

Страница 28: ...ibre pousser sur le levier 8 et le bloquer avec la touche 9B REMARQUE Pour débloquer la fonction des touches 9A 9B et retourner avec l embouchure avant abaissée ou le guidon en position fixe pousser brièvement sur le levier de l embouchure 7 ou le levier d inclinaison du guidon 8 10 Si le sol est souillé par une saleté particulièrement résistante on peut augmenter la pression de la brosse sur le s...

Страница 29: ...l n est pas sec Lorsque le réservoir de l eau de récupération est plein le vider en procédant comme suit Vidange du réservoir de l eau de récupération 1 Éteindre la machine et appuyer sur la pédale de stationnement 2 Porter la machine dans la zone destinée à l écoulement 3 Tourner et saisir la poignée A Fig 6 pour soulever le bac de réservoirs B de la machine 4 Enlever le couvercle C et vider le r...

Страница 30: ...ien soigné et régulier Veuillez trouver ci dessous le plan récapitulatif d entretien programmé Les périodicités indiquées peuvent subir des variations en fonction de conditions de travail particulières ATTENTION Les opérations doivent être effectuées sur une machine éteinte et avec la batterie débranchée En outre lire attentivement toutes les instructions du chapitre Sécurité Toutes les opérations...

Страница 31: ...ATTERIE AVERTISSEMENT Charger la batterie quand une seule del du symbole de batterie 5 reste allumée Lorsque la batterie est déchargée la recharger dès que possible afin de ne pas réduire sa durée de vie utile Contrôler la charge de la batterie au moins une fois par semaine 1 Amener la machine dans la zone destinée au chargement de la batterie 2 Vérifier que la machine est éteinte 3 Brancher la br...

Страница 32: ...nt en parfait état et ne présentent aucune coupure ou lacération sans quoi remplacer les embouchures 6 Avant de monter les barres des embouchures nettoyer soigneusement les conduits pour l eau de récupération G fig 10 de toute saleté 7 Monter les embouchures 20 et les accrocher complètement A A B B Figure 9 P100940 NETTOYAGE DE LA BROSSE ET DE LA ZONE DU LOGEMENT DE LA BROSSE 1 Tourner le levier d...

Страница 33: ...F du conduit d air Le cas échéant remplacer le joint 7 Laver et nettoyer à l eau et au détergent le compartiment G du réservoir puis rincer avec soin 8 Contrôler aussi la propreté et l efficacité de la surface d appui H du joint d étanchéité D 9 Installer à nouveau les composants déposés 10 Si besoin est laver le réservoir de solution à l eau claire A G H D E C F B Figure 11 P100942 NETTOYAGE DU F...

Страница 34: ... Doseurs de la solution colmatés Nettoyer les doseurs de la solution Réservoir de solution détergente vide Remplir le réservoir Filtre de solution sale Nettoyer le filtre Panne de pompe à eau Remplacer la pompe Les embouchures laissent des traces au sol Débris sous les lamelles en caoutchouc de les embouchures Enlever les débris Lamelles en caoutchouc des embouchures usées ébréchées ou déchirées R...

Страница 35: ...RIPTION 6 MACHINE STRUCTURE 6 ACCESSORIES OPTIONS 8 WIRING DIAGRAM 8 USE OPERATION 8 CHECKING SETTING UP A NEW MACHINE 8 PARK PEDAL 9 SOLUTION TANK FILLING 9 STARTING UP THE MACHINE SCRUBBING DRYING 10 BATTERY CHARGE LEVEL 11 STOPPING THE MACHINE 11 TANK EMPTYING 11 MACHINE TRANSPORT PARKING 11 AFTER USING THE MACHINE 12 MACHINE LONG INACTIVITY 12 REMOVING THE BATTERY 12 MAINTENANCE 12 SCHEDULED M...

Страница 36: ...r with the machine documentation IDENTIFICATION DATA SC250 Scrubtec 334 is a scrubber dryer for commercial use The machine serial number and model name are marked on the plate 30 Year of production Date code A16 means January 2016 and product code are marked on the same plate This information is useful when requiring machine spare parts Use the following table to write down the machine identificat...

Страница 37: ...ways read this information carefully and take all necessary precautions to safeguard people and property The operator s cooperation is essential in order to prevent injury No accident prevention program is effective without the total cooperation of the person responsible for the machine operation Most of the accidents are caused by failure to comply with the simplest rules for exercising prudence ...

Страница 38: ...k of short circuit do not store the battery with metal objects If the battery is damages take it to a Nilfisk Service Centre Before decommissioning the machine remove the battery Store the battery charger in a dry place If the battery charger or the cable are wet do not use it Before using the battery charger make sure that the frequency and voltage values marked on the plate correspond to the mai...

Страница 39: ...g detergents wear suitable gloves and protections Do not use the machine as a means of transport Do not allow the brush to operate while the machine is stationary to avoid damaging the floor In case of fire use a powder fire extinguisher not a water one Do not tamper with the machine safety guards and follow the ordinary maintenance instructions scrupulously Do not allow any object to enter into t...

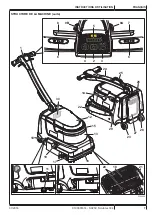
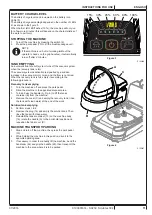
Страница 40: ...g MACHINE DESCRIPTION MACHINE STRUCTURE 1 Handlebar with control panel 2 Start stop switch 3 Solution switch 1 LED on normal cleaning with low solution flow 2 LEDs on cleaning with maximum solution flow 2 LEDs flashing solution tank empty LEDs off solution deactivated 4 Vacuum system push button LED on vacuum system activated 5 Battery charging symbol 1 6 LEDs on battery charge percentage 1 LED on...

Страница 41: ...INSTRUCTIONS FOR USE ENGLISH 9100001614 SC250 Scrubtec 334 7 07 2016 MACHINE STRUCTURE Continues 26 29 30 25 10 12 15 13 14 1 21 18 20 19 17 11 16 23 4 6 8 9B 7 9A 6 2 5 3 22 24 27 28 P100930 ...

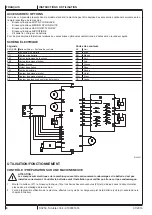
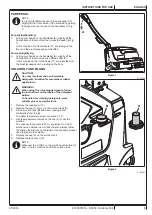
Страница 42: ...y charger EB1 Function electronic board EB2 Display electronic board M1 Brush motor M2 Vacuum system motor PM Solution pump S1 Grip handle sensor right S2 Grip handle sensor left S3 Solution presence sensor Colour codes BK Black BU Blue BN Brown GN Green GY Grey OG Orange PK Pink RD Red VT Violet WH White YE Yellow P100931 USE OPERATION CHECKING SETTING UP A NEW MACHINE WARNING The electric compon...

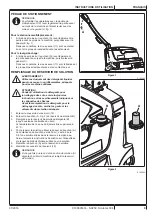
Страница 43: ...e only low foam and non flammable detergents intended for automatic scrubber applications WARNING When using floor cleaning detergents follow the instructions on the labels of the detergent bottles To handle floor cleaning detergents wear suitable gloves and protections 1 Remove the tank cover 12 2 Remove the cap A Fig 2 on the solution tank B 3 Fill the solution tank B with water leaving a few ce...

Страница 44: ...he handlebar allowing it to tilt press the lever 8 and lock it with the button 9B NOTE To unblock the function of the push buttons 9A 9B and return to the lowered front squeegee and fixed handlebar briefly press the squeegee lever 7 or the handlebar inclination lever 8 10 For floors with particularly tough dirt the pressure of the brush on the floor can be increased by turning the knob 19 to the l...

Страница 45: ...floor is not dried When the recovery tank is full empty it according to the following procedure Recovery tank emptying 1 Turn the machine off and press the park pedal 2 Drive the machine to the appointed disposal area 3 Turn and use the handle A Fig 6 to lift the tanks container B from the machine 4 Remove the cover C and empty the recovery tank rinse the tank with clean water at the end of the wo...

Страница 46: ... 7 P100938 MAINTENANCE The lifespan of the machine and its maximum operating safety are ensured by correct and regular maintenance The following chart provides the scheduled maintenance The intervals shown may vary according to particular working conditions WARNING The procedures must be performed with the machine off and the battery disconnected Moreover carefully read the instructions in the Saf...

Страница 47: ...ry charger level percentage A B C D Figure 8 P100939 BATTERY CHARGING CAUTION Charge the battery when only one LED of the battery symbol is lit 5 When the battery is discharged charge is as soon as possible as that condition makes its life shorter Check for battery charge at least once a week 1 Drive the machine to the appointed recharging area 2 Ensure that the machine is off 3 Plug the battery c...

Страница 48: ...hole B Check the blades for integrity cuts and tears if necessary replace the squeegee bars 6 Before installing the squeegee bars clean the recovery water duct G Fig 10 thoroughly 7 Install the squeegee bars 20 and make sure they are properly engaged A A B B Figure 9 P100940 BRUSH AND BRUSH COMPARTMENT CLEANING 1 Turn the lever A Fig 10 counter clockwise and remove the brush 2 Clean and wash the c...

Страница 49: ...place the gasket 7 Clean the tank compartment G with water and detergent then rinse carefully 8 Check that the seating surface H of the gasket D is clean and adequate for the gasket itself 9 Reassemble the components 10 If necessary wash the solution tank with clean water A G H D E C F B Figure 11 P100942 CLEANING OF THE SOLUTION FILTER AIR FILTER GASKETS AND RECOVERY WATER DUCT 1 Remove the tanks...

Страница 50: ...ion push button LEDs flash The solution dispensers are clogged Clean the solution dispensers Solution tank empty Fill the tank The solution filter is dirty Clean the filter Water pump fault Replace the pump The squeegees leave marks on the floor There is debris under the squeegee blades Remove the debris The squeegee blades are worn chipped or torn Replace the blades Debris collection tray full Em...

Страница 51: ...W VAN DE MACHINE 6 ACCESSOIRES OPTIES 8 ELEKTRISCH SCHEMA 8 GEBRUIK WERKING 8 CONTROLE VOORBEREIDING OP EEN NIEUWE MACHINE 8 PARKEERPEDAAL 9 DE TANK MET REINIGINGSMIDDEL VULLEN 9 DE MACHINE STARTEN REINIGEN DROGEN 10 LAADTOESTAND VAN DE ACCU 11 DE MACHINE STOPPEN 11 DE TANKS LEGEN 11 DE MACHINE TRANSPORTEREN PARKEREN 11 NA GEBRUIK VAN DE MACHINE 12 LANGE PERIODE VAN STILSTAND 12 DE ACCU DEMONTEREN...

Страница 52: ...s een schrobmachine voor commercieel gebruik Het serienummer en model van de machine staan op het serieplaatje 30 Op dit plaatje zijn ook het productiejaar Date code A16 wat januari 2016 betekent en de productcode aangegeven Deze informatie is nodig als u vervangingsonderdelen voor de machine bestelt Gebruik de onderstaande ruimte om de identificatiegegevens van de machine op te schrijven Model MA...

Страница 53: ...om mogelijk gevaarlijke situaties aan te geven Lees deze informatie altijd aandachtig door en neem de nodige voorzorgsmaatregelen om personen en voorwerpen te beschermen Samenwerking met de bediener is van essentieel belang om ongelukken te voorkomen Geen enkel preventieplan ter voorkoming van ongevallen is effectief zonder de volledige medewerking van de persoon die direct verantwoordelijk is voo...

Страница 54: ...dan 45 C Laad niet op bij temperaturen onder 0 C Bewaar de accu niet samen met metalen voorwerpen vanwege het risico van kortsluiting Breng de accu naar een Nilfisk servicecentrum als hij beschadigd is Verwijder de accu alvorens de machine te slopen Bescherm de acculader en bewaar hem op een droge plaats Gebruik de acculader niet als de acculader zelf of de bijbehorende kabel nat zijn Controleer v...

Страница 55: ... de etiketten van de flessen Draag handschoenen en andere geschikte beschermingsmiddelen voordat u reinigingsmiddelen hanteert Gebruik de machine niet als vervoermiddel Laat de borstels niet werken als de machine stilstaat om schade aan de vloer te voorkomen Gebruik bij brand een poederbrandblusser Gebruik geen water Verwijder de beschermingsdelen van de machine nooit met de hand hou u nauwkeurig ...

Страница 56: ...G VAN DE MACHINE OPBOUW VAN DE MACHINE 1 Stuur met bedieningspaneel en bedieningselementen 2 Knop voor inschakelen uitschakelen 3 Knop voor reinigingsmiddel 1 led aan voor normaal reinigen met minimale oplossingsstroom 2 leds aan voor reinigen met maximale oplossingsstroom 2 knipperende leds tank met reinigingsmiddel leeg Leds uit reinigingsmiddel niet actief 4 Knop aanzuigsysteem Led aan aanzuigs...

Страница 57: ...GEBRUIKSAANWIJZING NEDERLANDS 9100001614 SC250 Scrubtec 334 7 07 2016 OPBOUW VAN DE MACHINE vervolg 26 29 30 25 10 12 15 13 14 1 21 18 20 19 17 11 16 23 4 6 8 9B 7 9A 6 2 5 3 22 24 27 28 P100930 ...

Страница 58: ...playkaart M1 Motor voor de borstel M2 Aanzuigmotor PM Pomp reinigingsmiddle S1 Knopsensor rechts S2 Knopsensor links S3 Sensor aanwezigheid reinigingsmiddel Kleurcodering BK Zwart BU Blauw BN Bruin GN Groen GY Grijs OG Oranje PK Roze RD Rood VT Paars WH Wit YE Geel P100931 GEBRUIK WERKING CONTROLE VOORBEREIDING OP EEN NIEUWE MACHINE LET OP De elektrische onderdelen van deze machine kunnen ernstig ...

Страница 59: ...aar zijn ze moeten geschikt zijn voor de machine LET OP Volg bij gebruik van reinigingsmiddelen voor het reinigen van de vloeren de instructies en waarschuwingen op de etiketten van de flessen Draag handschoenen en andere geschikte beschermingsmiddelen voordat u reinigingsmiddelen hanteert 1 Verwijder het deksel van de tank 12 2 Verwijder de dop A Afb 2 van de tank met reinigingsmiddel B 3 Vul de ...

Страница 60: ... het stuur te gebruiken en vrij te houden OPMERKING Om de functies van de toetsen 9A 9B te ontgrendelen en terug te keren met de voorste trekker omlaag of het stuur in vaste positie drukt u kortstondig op de hendel van de trekker 7 of op de hendel voor het kantelen van het stuur 8 10 Bij een vloer met bijzonder hardnekkig vuil kan de druk van de borstel op de vloer verhoogd worden door de knop 19 ...

Страница 61: ... het aanzuigsysteem toeneemt en doordat de vloer niet meer wordt gedroogd Als de vuilwatertank vol is kunt u de tank als volgt legen De vuilwatertank legen 1 Schakel de machine uit en druk op het parkeerpedaal 2 Breng de machine naar de aangewezen verzamelzone 3 Draai en pak de handgreep A Afb 6 vast om de tankhouder B van machine op te tillen 4 Verwijder het deksel C en ledig de vuilwatertank Spo...

Страница 62: ...hine en de optimale veilige werking ervan worden geholpen door nauwkeurig en regelmatig onderhoud Hieronder staat het verkorte schema voor regelmatig onderhoud De aangegeven intervallen kunnen variëren op basis van de omstandigheden waarbij de machine wordt gebruikt LET OP De handelingen moeten worden uitgevoerd op een uitgeschakelde machine met losgekoppelde accu Lees altijd alle instructies in h...

Страница 63: ...beelding 8 P100939 DE ACCU OPLADEN WAARSCHUWING Laad de accu op wanneer slechts één led van het accusymbool 5 blijft branden Als de accu leeg zijn zorg dan dat deze dat niet te lang blijft omdat de levensduur van de accu anders minder wordt Controleer minstens een keer per week of de accu voldoende is opgeladen 1 Breng de machine naar de zone bestemd voor het opladen van de accu 2 Controleer of de...

Страница 64: ... B Controleer of de rubbers heel zijn en geen sneden of scheuren vertonen vervang anders de trekkerstangen 6 Verwijder zorgvuldig eventueel vuil uit de vuilwaterleidingen G Afb 10 alvorens de trekkerstangen te monteren 7 Monteer de trekkerstangen 20 als alles is teruggeplaatst A A B B Afbeelding 9 P100940 REINIGING VAN DE BORSTEL EN DE BORSTELRUIMTE 1 Draai de hendel linksom A Afb 10 en verwijder ...

Страница 65: ... 7 Was en reinig de tankruimte G met water en wasmiddel en spoel daarna grondig na 8 Controleer of ook de volledige steunomtrek H van de pakking D schoon is en geschikt is voor de afdichting van de pakking zelf 9 Monteer de verwijderde onderdelen 10 Spoel waar nodig de tank met reinigingsmiddel met schoon water A G H D E C F B Afbeelding 11 P100942 REINIgGG VAN HET REINIGINGSMIDDELFILTER HET LUCHT...

Страница 66: ... het reinigingsmiddel Tank met reinigingsmiddel is leeg Vul de tank Filter voor reinigingsmiddel vuil Reinig het filter Storing waterpomp Vervang de pomp De trekkers zorgen voor strepen op de vloer Er zitten afvaldeeltjes onder de rubbers van de trekkers Verwijder het vuil De rubbers van de trekkers zijn versleten gespleten of gescheurd Vervang de rubbers Verzamelbak grof vuil is vol Ledig de bak ...

Страница 67: ......

Страница 68: ...Nilfisk A S DK 2605 Broenby Banemarksvej 58 DENMARK www nilfisk com ...

Отзывы: