7
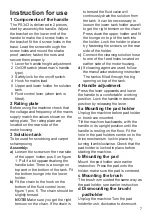
Instruction for use
1 Components of the handle
The PS 343 is delivered in 2 pieces,
start by assembly the handle. Adjust
the bracket on the lower end of the
handle to make the 4 screw holes in
the bracket fit the 4 screw holes in the
base. Lead the screws through the
screw holes and mount the shake
proof washer, fasten the nuts and
secure them properly.
1 Lever for handle height adjustment.
2 On/Off switch (dead man's handle
type).
3 Safety lock for the on/off switch.
4 Hook for mains lead.
5 Upper and lower holder for solution
tank.
6 Fluid control lever (when tank is
fitted).
2 Rating plate
Before using the machine check that
the voltage and frequency of the mains
supply match the values shown on the
rating plate. The rating plate are
located on the rear side of the
motorhousing.
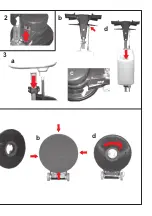
3 Solution tank
To be used for scrubbing and carpet
schampooing.
Assembly:
a)
Loosen the screws on the rear side
of the upper holder, pos.5 on figure
1. Pull it a bit uppwards along the
handle tube. There is a tounge on
top and in the bottom of the tank. Fit
the bottom tounge into the lower
holder.
b)
Fit the chain to the hook on the
bottom of the fluid control lever,
figure 1 pos. 6. The chain should be
slightly tensed.
NOTE!
Make sure you get the right
tension on the chain. If the chain is
to tensed the fluid valve will
continuosly drain the solution from
the tank. It can be neccessary to
loosen the lower tank holder as well
to get the right tension on the chain.
Press down the upper holder and fit
the tounge on top of the tank into
the holder. Lock the holder in place
by fastening the screws on the rear
side of the holder.
c)
Connect the cleaning solution hose
to one of the feed holes located on
eather side of the motorhousing.
d)
If cleaning agent are used, follow
the manufactures dosing instruction.
The tank is filled through the big
opening on top of the tank.
4 Handle adjustment
Press the lever uppwards and lower
the handle to a comfortable working
position. Lock the handle in desired
position by releasing the lever.
5a Mounting the pad holder
Unplug the machine before pad holder
or brush are mounted.
Tilt the machine backwards, with the
handle in its upright position until the
handle is resting on the floor. Fit the
hole in the pad holders centre on to the
drive mechanism, lock in place by
turning it anticlockwise. Check that the
pad holder is locked in place before
starting the machine.
b Mounting the pad
Mount the pad holder as in earlier
instruction. Press the pad onto the
holder, make sure the pad is centered.
c Mounting the brush
The brush is mounted the same way as
the pad holder, see earlier instruction.
d Dismounting the brush/
padholder
Unplug the machine.Turn the pad
holder/brush, clockwise to dismount.
Содержание PS 333
Страница 3: ...1 4 5 a c a c...
Страница 4: ...b 3 2 d a d b c...
Страница 42: ...43...
Страница 43: ...44 822 9324 000 Edition 2 9803...


