


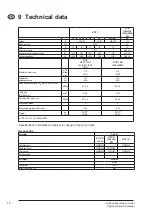
11
1)
Option depending on model
Original Instruction Manual
4 Operation
4.1.2 Electrical connection
The operating voltage shown on the
rating plate must corres pond to the
voltage of the mains power supply.
4.1.3 Connecting electrical
appliances
1)
Before switching the
switch to position „auto“,
ensure that the tool
connected to the appliance socket
is switched off.
To comply with regulations, only ap-
proved dust producing tools should
be connected.
The maximum power consumption
of the connected electrical appli-
ance is stated in section 9.4 "Tech-
nical data".
4.1
Connections
4.1.1 Connecting the suction
hose
4.2
Switching on the
vacuum cleaner
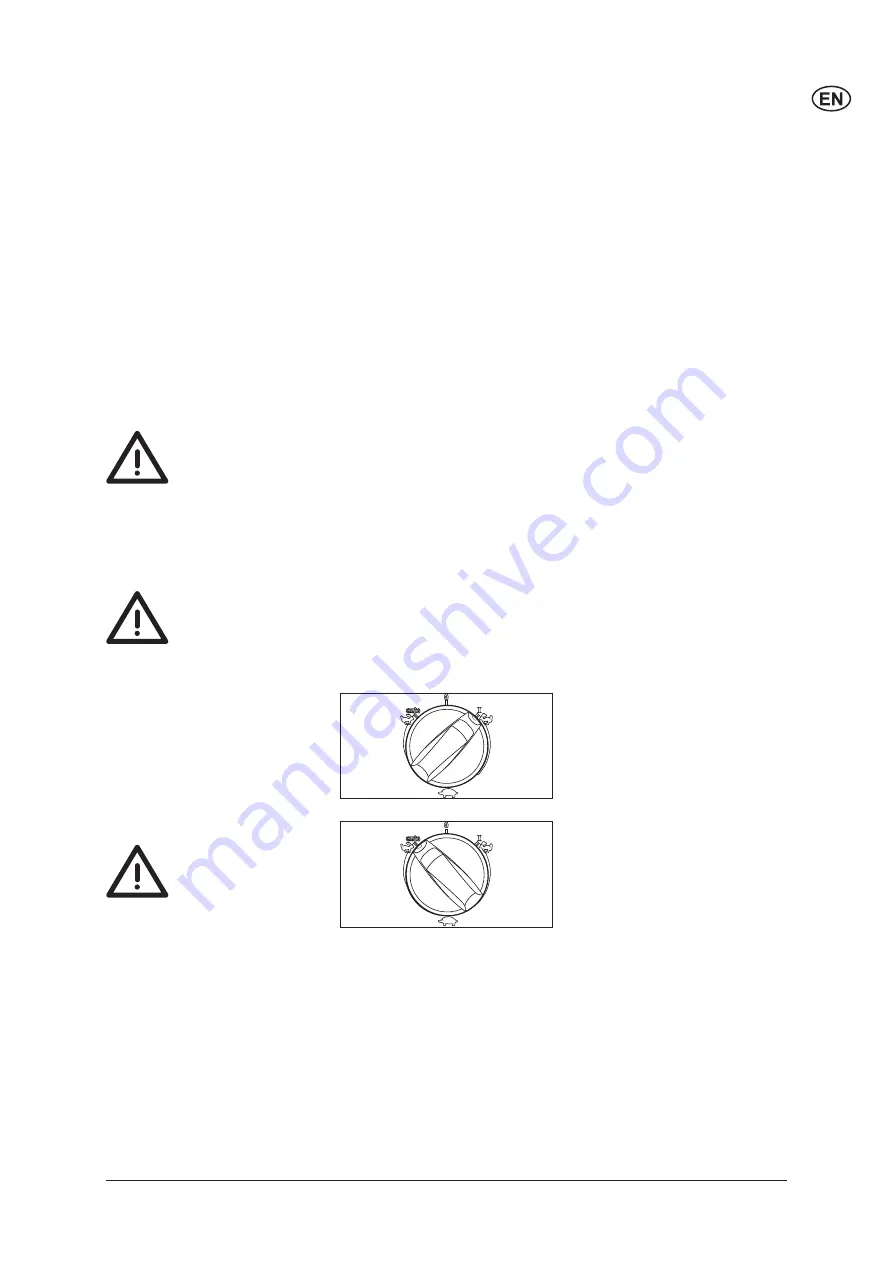
4.2.1 Switch position "I"
1. Turn the switch to position
"I".
The vacuum cleaner motor
starts.
1. Connect the suction hose.
1. Ensure that the cleaner is
switched off .
2. Insert the power cord into a
properly installed and fused
socket with earthing contact.
1. Connect the electrical ap-
pliance to the appliance
socket
1)
on the control panel.
4.2.2 Switch position "auto"
1)
Before switching the
switch to position „auto“,
ensure that the tool
connected to the appliance socket
is switched off.
1. Turn the switch to position
"auto"
1)
.
The vacuum cleaner motor
starts when the connected
power tool/pneumatic tool is
switched on.
2. When the power tool is
switched off , the vacuum
cleaner continues to run for
a short moment so that any
dust in the suction hose is
conveyed to the fi lter bag.
4.1.4 Connecting pneumatic
tools
1)
Before switching the
switch to position „auto“,
ensure that the tool
connected to the appliance socket
is switched off.
Operating pressure of the pneumat-
ic tool is stated in section 9.4 "Tech-
nical data".
1. Connect the pneumatic tool
to the upper quick coupling
1)
on the control panel.
2. Connect the compressed air
supply to the lower push-in
nipple
1)
.