background image

22

EXPOSURE MEASUREMENT

The Nikon FM’s built-in exposure meter utilizes Nikon’s
proven center-weighted through-the-lens metering system
which is cross-coupled with both the shutter speed control of
the camera and the aperture control of the lens mounted on
the camera. The meter reads the intensity of the light coming
through the lens over the entire focusing screen at full aper-
ture but favors the central 12mm-diameter area outlined on
the screen— allowing you to make precise readings and mak-
ing for overall balanced exposures.

Determining Degree of Exposure

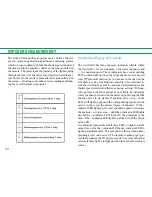
The viewfinder has three exposure indicators visible within
the viewfield: + for overexposure, o for correct exposure and
— for underexposure. These indicators have corresponding
LED’s which light up when the film advance lever is moved
to its 30

°

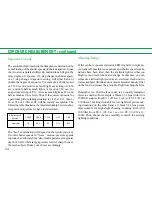
 stand-off position; as you can see in the chart on the

left, there are five combinations possible. Also included in-
side the viewfinder as aids to exposure determination are the
shutter speed selected and the lens aperture setting. With non-
AI type lenses, the lens aperture is not visible. To determine
correct exposure, first switch the meter on by moving the film
advance lever to its stand-off position. One or two of the
LED’swill light up opposite the corresponding exposure indi-
cator/s to show you the precise degree of exposure. If the +
indicator LED lights up, increase the shutter speed or decrease
the aperture—or vice versa— until the o indicator LED lights
up and the + indicator LED turns off; the procedure is the
same if the—indicator LED lights up alone or with the Vindi-
cator LED.
It is normally impossible for all three LED’s to light up at the
same time, or for the + indicator LED and—indicator LED to
light up simultaneously. The exception to this is when photo-
graphing a television screen. The rapidly scanning spot pat-
tern that produces the TV picture results in a cyclic effect that
causes all three LED’s to light up when the exposure setting is
correct.

Содержание FM

Страница 1: ...1 INSTRUCTION MANUAL ...

Страница 2: ...er lid Memo holder Shutter Speeed ASA selector ring Shutter release button Shutter release fingerguard Neckstrap eyelet Depth of field preview lever Self timer lever Lens mounting flange Lens aperture direct readout window Meter coupling lever Meter coupling lever release Sync terminal cover provided Lens mounting index Lens release button Reflex mirror ...

Страница 3: ...epth of field indicators Aperture direct read out scale Film rewind crank Film rewind knob Safety lock Film plane indicator Hot sync shoe Hot shoe contact Viewfinder eyepiece Shutter speed index Shutter speed selector Frame counter ASA film speed window Meter ON index Film advance lever ASA film speed indx Multi exposure button ...

Страница 4: ...ter release operation 15 Operation by cable release 15 C O N T E N T S Focusing 16 Infrared photography 18 Film planeindicator 18 Depth of field 19 Depth of field preview lever 19 Depth of field indicators 20 Exposure measurement 22 Determining degree of exposure 22 Exposure control 24 Metering range 24 High contrast lighting 25 Stop down exposure measurement 26 Exposure compensation adjustment 27...

Страница 5: ...p rated SLR s can do with that unique precision and reliability which you have come to associate with Nikon To get the most out of this camera study the instructions in this manual carefully as well as those in related manuals and practice using the controls before loading the camera with film Keep the manual on hand for ready reference until you have mastered operation The few minutes you spend f...

Страница 6: ...dvisable to remove the batteries when the camera is not to be used for a long period to prevent battery leakage within the camera for additional information on this refer to Tips on Camera Care on page Checking Battery Power To check battery power move the camera s film advance le ver from the flush to the stand off position by pulling it just far enough to uncover the red index on top of the came...

Страница 7: ...e spool s slots Rotate the take up spool as shown in the illustration so that the film passes under the spool with its emulsion side dull side facing out Make sure that the perforations along the edges of the film mesh with the sprockets If neces sary release the shutter by cocking the shutter release button and stroke the film advance lever slowly to make sure that the leader winds smoothly on th...

Страница 8: ...ce the film refer to page 11 for film advance opera tion and make two blank exposures this will dispose of the initial portion of the film exposed during loading As you advance the film confirm that the rewind crank turns in the direction opposite the arrow This indicates that the film has been loaded properly and is being advanced After advancing the film two frames check that the frame counter i...

Страница 9: ...Film Speed The camera s exposure meter must be adjusted to the speed of the film in use to ensure correct measurement Accordingly the camera is provided with anASAfilm speed scale To make the necessary adjustment lift the knurledASAfilm speed ring and turn it until the triangular red index is aligned with the ASA value of the film loaded in the camera The meter is sensitive across the full range o...

Страница 10: ... this indicates 1 125 sec the fastest shutter speed available for flash syn chronization with electronic flash units Refer to page 29 for additional information on flash photography Also at the B setting the shutter remains open for as long as the shutter release button is kept depressed Setting the Aperture The Nikon FM works best with Nikkor lenses The aperture rings of these lenses are knurled ...

Страница 11: ...e camera body With the lever set flush against the camera body it serves also as a lock to prevent accidental tripping when the shutter is cocked Frame Counter Each time the film is advanced one frame by a full stroke of the film advance lever the frame counter operates to show how many frames have been exposed It is automatically re set to S start two frames before 0 when the camera back is opene...

Страница 12: ...rrect exposure will invariably result To take a picture using the self timer first set the aperture and shutter speed controls advance the film and cock the self timer by turning the self timer lever downwards Then depress the shutter release button and the timer wiLl start A unique feature of the FM s self timer lever is that its setting is cancellable In other words should you decide not to use ...

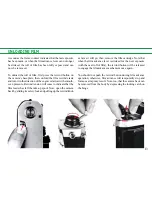
Страница 13: ... cease to indicate that the film leader has left the take up spool Now open the camera back by sliding its safety lock and pulling up the rewind knob as far as it will go then remove the film cartridge Note that when the film advance lever is stroked for the next exposure with the next roll of film the rewind button will be released to engage the filmadvance mechanism once again You should not pus...

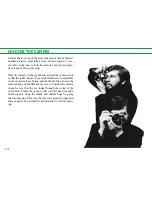
Страница 14: ...y so that the index finger of your right hand rests comfortably on the shutter release button and the thumb fits between the camera body and the film advance lever Position the camera in such a way that the eye looks through the center of the viewfinder Cradle the camera with your left hand for addi tional support using the thumb and middle finger to grasp the focusing ring This way the camera is ...

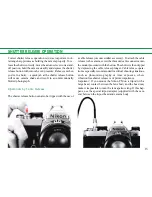
Страница 15: ...can also be tripped with the use of a cable release or some similar accessory To attach the cable release to the camera screw the threaded cable connector onto the mount provided with the button The shutter is then tripped by depressing the cable release plunger Cable release opera tion is especially recommended for critical shooting situations such as photomicrography or time exposure where vibra...

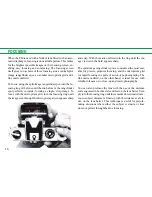
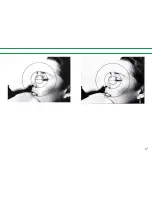
Страница 16: ...hrough the microprism pattern appears sharp and crisp With the matte outfield turn the ring until the im age viewed in the field appears sharp The split image rangefinder spot is considered the most suit able for precise pinpoint focusing and the microprism grid for rapid focusing in sports or action type photography The fine matte outfield on the other hand is ideal for use with telephoto lenses ...

Страница 17: ...17 ...

Страница 18: ...infrared shooting Note that when lenses with a focal length of 50mm or less are used stopped down to f 8 or below compensation is not necessary due to the large depth of field available There are some Nikkor lenses that do not require refocusing for infrared photography refer to their instruction manuals for details Film Plane Indicator To ensure the best results in critical picture taking situati...

Страница 19: ...hotog rapher Depth of Field Preview Lever Most of the Nikkor lenses you will find yourself using with the Nikon FM are automatic This means that the aperture diaphragm of the lens is kept open at its widest setting while you are viewing focusing and metering When you press the shutter release button the camera s mechanism automatically stops down i e closes the lens aperture the lens to the apertu...

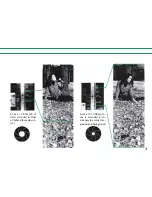
Страница 20: ...perture is indicated by the numbers on the focusing scale which are adjacent to the colored lines that correspond to the color of the f number set Example Taking aperture f 16 Color Blue Focusing distance Sm In the example above the farthest point of sharp focus be hind the subject is infinity on this is the figure on the fo cusing scale which is adjacent to the blue line on the second scale which...

Страница 21: ...21 Lens at f 8 Depth of field extended in front of behind the main sub ject Lens at f 16 Sharp fo cus is extended to en compass the entire fore ground and background ...

Страница 22: ...nations possible Also included in side the viewfinder as aids to exposure determination are the shutter speed selected and the lens aperture setting With non AI type lenses the lens aperture is not visible To determine correct exposure first switch the meter on by moving the film advance lever to its stand off position One or two of the LED swill light up opposite the corresponding exposure indi c...

Страница 23: ...23 ...

Страница 24: ... speeds to produce a deliberate blur Also small apertures give greater depth of field while large apertures restrict sharp focus to the main subject Make your choice accordingly Metering Range If the central exposure indicator LED lo fails to light up even after all possible lens aperture and shutter speed combi nations have been tried then the available light is either too bright or too dim for t...

Страница 25: ...d and or lens aperture adjustments Metering with a bright area in the center will causeunderexposure of the main subject After completing this procedure make your final picturt com position and shoot without readjustingeithershutte speed or lens aperture When shooting landscapes fo example it is often advisable to aim your camera slightly downwards while metering to eliminate the effects of bright...

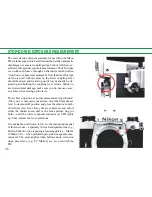
Страница 26: ...sure you do not use exces sive force when raising up the lever This is how stop down exposure measurement is performed After you ve composed your picture move the film advance lever to its stand off position and press the camera s depth of field preview lever Keep the lever pressed and adjust either the shutter speed dial or the lens aperture ring or both until the correct exposure indicator a LED...

Страница 27: ... EV A change of 1 EV for instance can be achieved by moving the lens aperture ring by one stop or the shutter speed dial by one shutter speed indication i e a change from f 2 to f 2 8 represents a change of 1 EV and a change of shut ter speeds from 1 60 to 1 30 represents a change of 1 EV For very specialized application consult both the instruction manual of the accessory in use and the technical...

Страница 28: ...each additional exposure on the same frame When you have achieved the desired number of exposures on the same frame release the button and stroke the film advance lever once more Note that during multiple exposure operation both the camera s shutter speed and the lens aperture can be freely changed to any setting also the frame counter will remain at the same setting until the multi exposure butto...

Страница 29: ...hoe to mount any ISO type electronic flash unit or speedlight directly onto the cam era For off camera flash photography or when using a non lSO type speedlight you will need a sync cord to connect the unit to the camera s threaded sync terminal Shuttter speed sec Flash bulb FP M MF Speedlight 1 1000 1 500 1 250 1 25 1 60 1 30 1 15 1 8 1 4 1 2 1 B Synchronized Cannot be used ...

Страница 30: ... cleaning cloth to clean the external surfaces of the camera body If condensation should form on the lens surfaces i e when the camera is exposed to sudden temperature changes or to high humidity dry the camera thoroughly at room tempera ture without using anything before storing it in a cool dry place Should you drop the camera accidentally on the floor or in water take it to an authorized Nikon ...

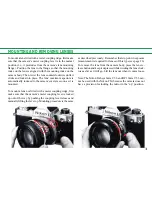
Страница 31: ... To mount a lens not fitted with a meter coupling ridge first make sure that the camera s meter coupling lever is locked up out of the way by pushing the coupling lever release and manually lifting the lever up Mounting procedure is the same as described previously Remember that stop down exposure measurement is required for lenses of this type see page 26 To remove the lens from the camera body p...

Страница 32: ...of the camera body Continuous and single frame operation available with a maximum shooting speed of 3 5 frames per second from 1 125 sec to 1 1000 sec Firing speed automatically adjusted as shutter speed is adjusted Built in battery pack contributes to overall reduced size and weight Fitted with remote control socket for use with Nikon remote control accessories such as the MT 1 Intervalometer and...

Страница 33: ...us light from striking the lens and causing flare and ghost also useful for protecting the lens All kinds of models to match all kinds of Nikkor lenses Filters A wide selection of sizes and types to meet the needs of color or black and white photography These filters work best with Nikkor lenses and vice versa Also useful for protecting the front portion of the lens ...

Страница 34: ...in dicator LED lights up meter cross coupled with both lens diaphragm and shutter speed controls metering range EV 1 to EV 1 8 i e f 1 4 1 sec f 16 1 1000 sec with 50mm f 1 4 lens at ASA 100 built in meter coupling lever can be locked up enabling use with both Al type and non AI type Nikkor lenses ASArange 12 3200 aperture coupling range f 1 2 f 32 meter powered by two 1 5 silver oxide batteries S...

Страница 35: ...35 ...
Отзывы: