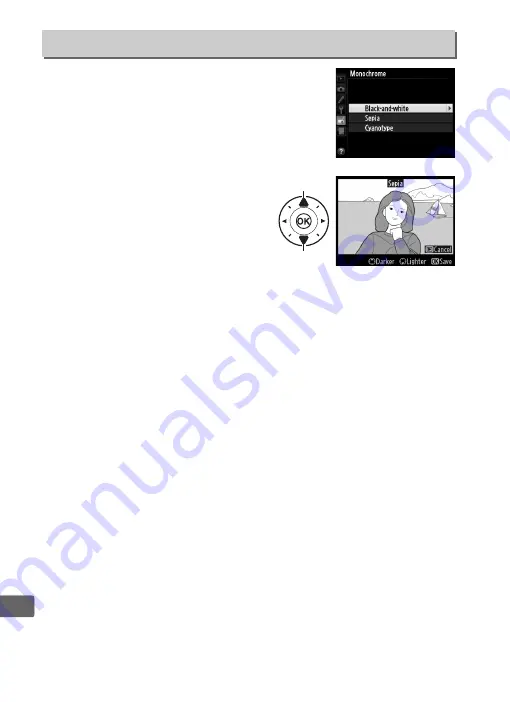
background image

294

U

Copy photographs in 

Black-and-white

Sepia

, or 

Cyanotype

 (blue and white 

monochrome).

Selecting 

Sepia

 or 

Cyanotype


displays a preview of the selected 
image; press 

1

 to increase color 

saturation, 

3

 to decrease. Press 

J


to create a monochrome copy.

Monochrome

G

 button

N

retouch menu

Increase 

saturation

Decrease 

saturation

Содержание Df

Страница 1: ... form of this manual in whole or in part except for brief quotation in critical articles or reviews may be made without written authorization from NIKON CORPORATION Nikon User Support Visit the site below to register your camera and keep up to date with the latest product information You will find answers to frequently asked questions FAQs and can contact us for technical assistance http www europ...

Страница 2: ...ms and other topics See page 15 for details This icon marks cautions information that should be read before use to prevent damage to the camera D This icon marks notes information that should be read before using the camera A This icon marks references to other pages in this manual 0 Nikon Manual Viewer 2 Install the Nikon Manual Viewer 2 app on your smartphone or tablet to view Nikon digital came...

Страница 3: ...ssages in English and Japanese only other languages are not supported We apologize for any inconvenience this may cause BS 1 accessory shoe cover BF 1B body cap EN EL14a rechargeable Li ion battery withterminal cover MH 24 battery charger plug adapter supplied in countries or regions where required shape depends on country of sale DK 26 eyepiece cap 0 23 AN DC9 strap 0 18 UC E6 USB cable String fo...

Страница 4: ...Taking Photographs 29 Basic Playback 34 Deleting Unwanted Photographs 35 Exposure Mode 36 P Programmed Auto 38 S Shutter Priority Auto 39 1 3 STEP Exposure Modes S and M 40 A Aperture Priority Auto 41 M Manual 42 Long Time Exposures M Mode Only 44 Release Mode 46 Choosing a Release Mode 46 Self Timer Mode 48 Mirror up Mode 50 Table of Contents ...

Страница 5: ...lity 55 Image Size 58 Focus 59 Autofocus 59 Autofocus Mode 59 AF Area Mode 62 Focus Point Selection 64 Focus Lock 66 Manual Focus 68 ISO Sensitivity 70 The ISO Sensitivity Dial 70 Auto ISO Sensitivity Control 72 Exposure 75 Metering 75 Autoexposure Lock 77 Exposure Compensation 79 ...

Страница 6: ...Creating Custom Picture Controls 106 Preserving Detail in Highlights and Shadows 110 Active D Lighting 110 High Dynamic Range HDR 112 Flash Photography 116 Using a Flash 116 i TTL Flash Control 124 Flash Modes 125 Flash Compensation 128 FV Lock 130 Other Shooting Options 133 Two Button Reset Restoring Default Settings 133 Bracketing 136 Multiple Exposure 149 Interval Timer Photography 156 Non CPU ...

Страница 7: ...me Playback 185 Photo Information 188 Thumbnail Playback 196 Calendar Playback 197 Taking a Closer Look Playback Zoom 199 Protecting Photographs from Deletion 201 Deleting Photographs 203 Full Frame Thumbnail and Calendar Playback 203 The Playback Menu 205 Connections 208 Installing ViewNX 2 208 Using ViewNX 2 211 Copy Pictures to the Computer 211 View Pictures 213 Printing Photographs 214 Viewing...

Страница 8: ... Exposure NR Long Exposure Noise Reduction 242 High ISO NR 242 A Custom Settings Fine Tuning Camera Settings 243 Custom Settings Bank 245 a Autofocus 246 a1 AF C Priority Selection 246 a2 AF S Priority Selection 246 a3 Focus Tracking with Lock On 247 a4 AF Activation 247 a5 Focus Point Illumination 248 a6 Focus Point Wrap Around 249 a7 Number of Focus Points 249 b Metering Exposure 250 b1 Center W...

Страница 9: ...ash 259 e5 Modeling Flash 259 e6 Auto Bracketing Set 259 e7 Auto Bracketing Mode M 260 e8 Bracketing Order 260 f Controls 261 f1 D Button 261 f2 OK Button 261 f3 Multi Selector 262 f4 Assign Fn Button 263 f5 Assign Preview Button 266 f6 Assign AE L AF L Button 267 f7 Customize Command Dials 267 f8 Release Button to Use Dial 269 f9 Slot Empty Release Lock 269 f10 Reverse Indicators 269 f11 Easy Shu...

Страница 10: ...u Creating Retouched Copies 287 Creating Retouched Copies 289 D Lighting 291 Red Eye Correction 292 Trim 293 Monochrome 294 Filter Effects 295 Color Balance 296 Image Overlay 297 NEF RAW Processing 300 Resize 302 Quick Retouch 304 Straighten 304 Distortion Control 305 Fisheye 305 Color Outline 306 Color Sketch 306 Perspective Control 307 Miniature Effect 308 Selective Color 309 Side by side Compar...

Страница 11: ...at Startup Shutdown 330 Manual Cleaning 331 Caring for the Camera and Battery Cautions 335 Exposure Program Mode P 339 Troubleshooting 340 Battery Display 340 Shooting 341 Playback 343 Miscellaneous 345 Error Messages 346 Specifications 352 AF S NIKKOR 50mm f 1 8G Special Edition 360 Approved Memory Cards 363 Memory Card Capacity 364 Battery Life 367 Index 368 Warranty Terms Nikon Europe Service W...

Страница 12: ...iewfinder care should be taken not to put your finger in your eye accidentally A Do not use in the presence of flammable gas Do not use electronic equipment in the presence of flammable gas as this could result in explosion or fire A Turn off immediately in the event of malfunction Should you notice smoke or an unusual smell coming from the equipment or AC adapter available separately unplug the A...

Страница 13: ...roperly handled Observe the following precautions when handling batteries for use in this product Use only batteries approved for use in this equipment Do not short or disassemble the battery Be sure the product is off before replacing the battery If you are using an AC adapter be sure it is unplugged Do not attempt to insert the battery upside down or backwards Do not expose the battery to flame ...

Страница 14: ...player could cause hearing loss or damage the equipment A Do not aim a flash at the operator of a motor vehicle Failure to observe this precaution could result in accidents A Observe caution when using the flash Using optional flash units in close contact with the skin or other objects could cause burns Using optional flash units close to the subject s eyes could cause temporary visual impairment ...

Страница 15: ...cal and electronic equipment is to be collected separately The following apply only to users in European countries This product is designated for separate collection at an appropriate collection point Do not dispose of as household waste Separate collection and recycling helps conserve natural resources and prevent negative consequences for human health and the environment that might result from i...

Страница 16: ...circuit different from that to which the receiver is connected Consult the dealer or an experienced radio television technician for help CAUTIONS Modifications The FCC requires the user be notified that any changes or modifications made to this device that are not expressly approved by Nikon Corporation may void the user s authority to operate the equipment InterfaceCables Use the interface cables...

Страница 17: ...malicious use of personal image data Ensuring the privacy of such data is the user s responsibility Before discarding a data storage device or transferring ownership to another person erase all data using commercial deletion software or format the device and then completely refill it with images containing no private information for example pictures of empty sky Be sure to also replace any picture...

Страница 18: ...se by a company Also do not copy or reproduce passports issued by the government licenses issued by public agencies and private groups ID cards and tickets such as passes and meal coupons Comply with copyright notices The copying or reproduction of copyrighted creative works such as books music paintings woodcuts prints maps drawings movies and photographs is governed by national and international...

Страница 19: ...be included when the camera is inspected or serviced A Before Taking Important Pictures Before taking pictures on important occasions such as at weddings or before taking the camera on a trip take a test shot to ensure that the camera is functioning normally Nikon will not be held liable for damages or lost profits that may result from product malfunction A Life Long Learning As part of Nikon s Li...

Страница 20: ...xviii ...

Страница 21: ...r camera strap 2 Exposure compensation dial 79 3 Exposure compensation dial lock release 79 4 ISO sensitivity dial 70 5 ISO sensitivity dial lock release 70 6 Focal plane mark E 69 7 Accessory shoe for optional flash unit 116 8 Accessory shoe cover 116 9 Shutter speed dial lock release 39 10 Power switch 5 11 Shutter release button 31 12 Release socket 323 13 Exposure mode dial 6 14 D button LCD i...

Страница 22: ...racketing 137 141 145 5 Self timer lamp 48 6 Flash sync terminal cap 7 USB connector cover 8 HDMI connector cover 9 Cover for accessory terminal 325 10 Lens release button 25 11 AF mode button 60 63 175 176 12 Focus mode selector 59 68 175 13 Flash sync terminal 117 14 USB connector 211 214 15 HDMI mini pin connector 222 16 Accessory terminal 325 ...

Страница 23: ...ing the Pv button 41 174 266 3 Fn button Using the Fn button 263 4 Battery chamber memory card slot cover 19 5 Battery chamber memory card slot cover latch 19 6 Power connector cover 326 7 CPU contacts 8 Lens mount 24 9 AF coupling 10 Tripod socket 11 Body cap 24 324 ...

Страница 24: ...tton Help 15 Protect 201 White balance 82 6 X T button Playback zoom in 199 Image quality size 56 58 7 W M button Playback zoom out thumbnails 196 197 Two button reset 133 Flash mode 126 Flash compensation 128 8 P button Changing settings in the information display 14 Changing settings during live view 179 Retouching pictures 290 9 Viewfinder eyepiece 23 10 Viewfinder 28 11 Diopter adjustment cont...

Страница 25: ...he Power Switch Rotate the power switch as shown to turn the camera on Rotate the power switch as shown to turn the camera off A The LCD Illuminator Pressing the D button while the camera is on activates the control panel backlight LCD illuminator allowing the display to be read in the dark The backlight will remain lit for about 6 seconds or until the shutter is released or the D button is presse...

Страница 26: ...6 X The Exposure Mode Dial To choose from the modes listed below lift and rotate the exposure mode dial P Programmed auto 0 38 S Shutter priority auto 0 39 A Aperture priority auto 0 41 M Manual 0 42 ...

Страница 27: ...speed The camera takes photographs at a slow rate while the shutter release button is pressed CH Continuous high speed The camera takes photographs at a fast rate while the shutter release button is pressed J Quiet shutter release As for single frame except that camera noise is reduced E Self timer Take pictures with the self timer MUP Mirror up Raise the mirror before taking photographs Release m...

Страница 28: ...tor 145 4 Multiple exposure indicator 150 5 Aperture f number 41 42 Aperture number of stops 37 Number of shots per interval 158 PC mode indicator 325 6 Aperture stop indicator 37 7 k appears when memory remains for over 1000 exposures 30 8 Number of exposures remaining 30 Number of shots remaining before memory buffer fills 47 Preset white balance recording indicator 91 Capture mode indicator 325...

Страница 29: ...3 2 Focus points 64 249 AF area mode 62 3 AF area brackets 28 189 4 Focus indicator 32 69 5 Metering 75 6 Autoexposure AE lock 77 7 Exposure mode 36 8 Flexible program indicator 38 9 Shutter speed 39 42 Autofocus mode 59 10 Aperture f number 41 42 Aperture number of stops 37 11 Monochrome indicator 100 displayed when the Monochrome Picture Control or a Picture Control based on Monochrome is select...

Страница 30: ...r 145 24 Auto ISO sensitivity indicator 72 25 Number of exposures remaining 30 Number of shots remaining before memory buffer fills 47 Preset white balance recording indicator 91 Exposure compensation value 80 Flash compensation value 128 ISO sensitivity 70 AF area mode 62 26 Flash ready indicator 121 D No Battery When the battery is totally exhausted or no battery is inserted the display in the v...

Страница 31: ... 13 10 16 17 18 19 20 25 24 23 21 14 8 22 1 Exposure mode 36 2 Flexible program indicator 38 3 Flash sync indicator 257 4 Shutter speed 39 42 Number of shots in exposure and flash bracketing sequence 137 Number of shots in WB bracketing sequence 141 Number of exposures multiple exposure 151 Focal length non CPU lenses 163 Color temperature 88 5 Color temperature indicator 88 6 Aperture stop indica...

Страница 32: ...ng exposure noise reduction indicator 242 20 Custom settings bank 245 21 Vignette control indicator 241 22 White balance 81 White balance fine tuning indicator 85 23 Image quality 55 24 Image size 58 25 Flash mode 125 A Turning the Monitor Off To clear shooting information from the monitor press the R button or press the shutter release button halfway The monitor will turn off automatically if no ...

Страница 33: ...lue 80 33 ADL bracketing amount 111 34 Copyright information 279 35 Camera battery indicator 29 36 Image comment indicator 278 37 ISO sensitivity indicator 70 ISO sensitivity 70 Auto ISO sensitivity indicator 72 38 Pv button assignment 266 39 HDR indicator 113 HDR exposure differential 114 40 Active D Lighting indicator 111 41 High ISO noise reduction indicator 242 42 Shooting menu bank 236 43 Aut...

Страница 34: ... High ISO noise reduction 242 3 Active D Lighting 110 4 HDR High Dynamic Range 112 5 Pv button assignment 266 6 Fn button assignment 263 7 AE L AF L button assignment 267 8 Picture Control 100 9 Long exposure noise reduction 242 10 Custom settings bank 245 A Tool Tips A tool tip giving the name of the selected item appears in the information display Tool tips can be turned off using Custom Setting...

Страница 35: ... 0 287 O m MY MENU or RECENT SETTINGS defaults to MY MENU 0 313 d If a d icon is displayed at the bottom left corner of the monitor help can be displayed by pressing theL U button Adescription of the currently selected option or menu will be displayed while the button is pressed Press 1 or 3 to scroll through the display G button Slider shows position in current menu Current settings are shown by ...

Страница 36: ...he menus Press the G button to display the menus 2 Highlight the icon for the current menu Press 4 to highlight the icon for the current menu 3 Select a menu Press 1 or 3 to select the desired menu Select highlighted item or display sub menu Move cursor up Move cursor down J button select highlighted item Cancel and return to previous menu G button ...

Страница 37: ... 1 or 3 to highlight an option 8 Select the highlighted item Press J to select the highlighted item To exit without making a selection press the G button Note the following Menu items that are displayed in gray are not currently available While pressing 2 generally has the same effect as pressing J there are some cases in which selection can only be made by pressing J To exit the menus and return ...

Страница 38: ...e the wall plug and connect the adapter making sure the plug is fully inserted then insert the battery and plug the charger in About an hour and 50 minutes are required to fully recharge the battery when no charge remains Unplug the charger and remove the battery when charging is complete D Charging the Battery Charge the battery indoors at ambient temperatures between 5 C 35 C 41 F 95 F The batte...

Страница 39: ...n the orientation shown q using the battery to keep the battery latch pressed to one side The latch locks the battery in place when the battery is fully inserted w D Inserting and Removing Batteries and Memory Cards Always turn the camera off before inserting or removing batteries or memory cards A No Memory Card If the camera is turned off with a charged EN EL14a battery and no memory card insert...

Страница 40: ...correct orientation The cover will not close if the card is not correctly inserted A Removing the Battery Turn the camera off and open the battery chamber memory card slot cover Press the battery latch in the direction shown by the arrow to release the battery and then remove the battery by hand A Removing Memory Cards After confirming that the memory card access lamp is off turn the camera off op...

Страница 41: ... the temperature is in the correct range and then unplug the charger and remove and reinsert the battery If the problem persists cease use immediately and take battery and charger to your retailer or a Nikon authorized service representative Do not short the charger terminals failure to observe this precaution could result in overheating and damage to the charger Do not move the charger or touch t...

Страница 42: ...atting or while data are being recorded deleted or copied to a computer Failure to observe these precautions could result in loss of data or in damage to the camera or card Do not touch the card terminals with your fingers or metal objects Do not bend drop or subject to strong physical shocks Do not apply force to the card casing Failure to observe this precaution could damage the card Do not expo...

Страница 43: ...time exposures self timer photography and on other occasions in which you will not be looking through the viewfinder while the shutter is open To remove the cap press the clips and lift A Removing the Viewfinder Eyepiece The viewfinder eyepiece must be removed before optional diopter adjustment viewfinder lenses can be attached To remove the eyepiece grasp it lightly between your finger and thumb ...

Страница 44: ...d The lens generally used in this manual for illustrative purposes is an AF S NIKKOR 50mm f 1 8G Special Edition Attach the lens as shown Remove the rear lens cap Remove the camera body cap Align the mounting marks Mounting mark camera Mounting mark lens Rotate the lens as shown until it clicks into place ...

Страница 45: ...f the lens is equipped with a focus mode switch select autofocus mode A M A or A M D CPU Lenses with Aperture Rings In the case of CPU lenses equipped with an aperture ring 0 320 lock aperture at the minimum setting highest f number A Non CPU Non AI Lenses The camera can be used with non CPU lenses and lenses not equipped with AI mechanisms non AI lenses 0 163 A Image Area The DX format image area...

Страница 46: ... displayed 2 Select a language Press 1 or 3 to highlight the desired language and press J 3 Choose a time zone A time zone selection dialog will be displayed Press 4 or 2 to highlight the local time zone the UTC field shows the difference between the selected time zone and Coordinated Universal Time or UTC in hours and press J 4 Choose a date format Press 1 or 3 to choose the order in which the ye...

Страница 47: ...menu The camera clock can also be set using data provided by an optional GPS unit 0 170 A The Clock Battery The camera clock is powered by an independent rechargeable power source which is charged as necessary when the main battery is installed or the camera is powered by an optional power connector and AC adapter 0 323 Two days of charging will power the clock for about three months If the camera...

Страница 48: ...e viewfinder be careful not to put your fingers or fingernails in your eye AF area brackets Viewfinder not in focus Viewfinder in focus A Adjusting Viewfinder Focus If you are unable to focus the viewfinder as described above select single servo autofocus AF S 0 59 single point AF 0 62 and the center focus point 0 65 and then frame a high contrast subject in the center focus point and press the sh...

Страница 49: ...control panel will turn on and the display in the viewfinder will light 2 Check the battery level Check the battery level in the control panel or viewfinder TakingPhotographs Icon Description Control panel Viewfinder L Battery fully charged K Battery partially discharged H d Low battery Charge battery or ready spare battery H flashes d flashes Battery exhausted shutter release disabled Charge or e...

Страница 50: ...own as 2 9 k When this number reaches zero A will flash in the exposure count displays while the shutter speed displays will show a flashing n or j Insert another memory card or delete some photos Choose an Exposure Mode Lift the exposure mode dial and rotate it to the desired setting A Image Sensor Cleaning The camera vibrates the low pass filter covering the image sensor to remove dust when the ...

Страница 51: ...upport and place one foot half a pace ahead of the other to keep your upper body stable When framing photographs in portrait tall orientation hold the camera as shown in the bottom of the three illustrations at right Focus and Shoot 1 Press the shutter release button halfway Press the shutter release button halfway to focus The active focus point will be displayed Focus indicator Buffer capacity F...

Страница 52: ...ng Good Results with Autofocus 0 61 3 Shoot Smoothly press the shutter release button the rest of the way down to release the shutter and record the photograph While the photograph is being recorded to the memory card the memory card access lamp will light Do not eject the memory card or remove or disconnect the power source until the lamp has gone out and recording is complete Viewfinder display ...

Страница 53: ...hutter speed and aperture displays will turn off if no operations are performed for about 6 seconds reducing the drain on the battery Press the shutter release button halfway to reactivate the display The length of time before the standby timer expires automatically can be selected using Custom Setting c2 Standby timer 0 251 Exposure meters on Exposure meters off Exposure meters on A Camera Off Di...

Страница 54: ...e current photograph press 1 and 3 0 188 To end playback and return to shooting mode press the shutter release button halfway A Image Review When On is selected for Image review in the playback menu 0 232 photographs are automatically displayed in the monitor for a few seconds after shooting K button 0 0 1 125 F5 6 50mm 100 100NC_DF DSC_0001 JPG 15 10 2013 10 02 28 N NOR ORMAL AL 4928x3280 NIKON D...

Страница 55: ...wish to delete as described on the preceding page 2 Delete the photograph Press the O button A confirmation dialog will be displayed press the O button again to delete the image and return to playback To exit without deleting the picture press K A Delete To delete selected images 0 205 all images taken on a selected date 0 206 or all images in the current folder 0 205 use the Delete option in the ...

Страница 56: ...ttle time to adjust camera settings S Shutter priority auto 0 39 User chooses shutter speed camera selects aperture for best results Use to freeze or blur motion A Aperture priority auto 0 41 User chooses aperture camera selects shutter speed for best results Use to blur background or bring both foreground and background into focus M Manual 0 42 User controls both shutter speed and aperture Set sh...

Страница 57: ...ens aperture ring to adjust aperture If the maximum aperture of the lens has been specified using the Non CPU lens data item in setup menu 0 163 when a non CPU lens is attached the current f number will be displayed in the viewfinder and control panel rounded to the nearest full stop Otherwise the aperture displays will show only the number of stops F with maximum aperture displayed as FA and the ...

Страница 58: ...ow f numbers that blur background details or fast shutter speeds that freeze motion Rotate the dial to the left for small apertures high f numbers that increase depth of field or slow shutter speeds that blur motion All combinations produce the same exposure While flexible program is in effect a E indicator appears in the viewfinder To restore default shutter speed and aperture settings rotate the...

Страница 59: ...k release pressed while rotating the dial Settings of T time 0 44 and B bulb 0 44 take effect only in exposure mode M A See Also For information on using the command dial to fine tune the shutter speed selected with the shutter speed dial see Custom Setting f11 Easy shutter speed shift 0 270 See page 347 for information on what to do if flashing A or indicator appears in the shutter speed displays...

Страница 60: ...ed can be adjusted in increments of 1 3 EV by rotating the main command dial the selected shutter speed is displayed in the control panel and viewfinder Choose from values between 1 4000 and 30 s In exposure mode M speeds of Bulb and Time can be used to record long time exposures Main command dial ...

Страница 61: ... Customize command dial Aperture setting 0 268 aperture can be set using the lens aperture ring A Depth of Field Preview To preview the effects of aperture press and hold the Pv button The lens will be stopped down to the aperture value selected by the camera exposure modes P and S or the value chosen by the user exposure modes A and M allowing depth of field to be previewed in the viewfinder A Cu...

Страница 62: ...o set aperture to values between the minimum and maximum for the lens to set shutter speed keep the shutter speed dial lock release pressed while rotating the shutter speed dial Use the exposure indicators to check exposure Sub command dial Shutter speed dial 1 4000 s 1 2 s 1 4 s red Long time exposures 0 44 Flash sync 0 257 1 3 EV steps 0 40 ...

Страница 63: ...er or over exposed at current settings If the limits of the exposure metering system are exceeded the displays will flash Optimal exposure Underexposed by 1 3 EV Overexposed by over 2 EV A See Also For information on using the command dial to fine tune the shutter speed selected with the shutter speed dial see Custom Setting f11 Easy shutter speed shift 0 270 For information reversing the exposure...

Страница 64: ...r thirty minutes or until the button is pressed a second time Before proceeding mount the camera on a tripod or place it on a stable level surface To prevent loss of power before the exposure is complete use a fully charged battery or an optional AC adapter and power connector Note that noise bright spots randomly spaced bright pixels or fog may be present in long exposures before shooting choose ...

Страница 65: ... time is selected 3 Open the shutter Bulb After focusing press the shutter release button on the camera or optional remote cord or wireless remote controller all the way down Keep the shutter release button pressed until the exposure is complete Time Press the shutter release button all the way down 4 Close the shutter Bulb Take your finger off the shutter release button Time Press the shutter rel...

Страница 66: ...pressed CL Continuous low speed While shutter release button is held down camera records 1 5 frames per second 1 Frame rate can be chosen using Custom Setting d5 CL mode shooting speed 0 254 CH Continuous high speed While shutter release button is held down camera records up to 5 5 frames per second 2 J Quiet shutter release As for single frame except that mirror does not click back into place whi...

Страница 67: ...eing recorded to the memory card the memory card access lamp will light Depending on shooting conditions and memory card performance recording may take from a few seconds to a few minutes Do not remove the memory card or remove or disconnect the power source until the access lamp has gone out If the camera is switched off while data remain in the buffer the power will not turn off until all images...

Страница 68: ...the way down to start the self timer note that the timer will not start if the camera is unable to focus or in other situations in which the shutter can not be released The self timer lamp will start to flash Two seconds before the photograph is taken the self timer lamp will stop flashing The shutter will be released ten seconds after the timer starts To cancel shooting select another release mod...

Страница 69: ...ng the duration of the self timer the number of shots taken and the interval between shots see Custom Setting c3 Self timer 0 252 For information on controlling the beeps that sound when the self timer is used see Custom Setting d1 Beep 0 253 ...

Страница 70: ...o raise the mirror 3 Take a picture Press the shutter release button all the way down again to take a picture To prevent blurring caused by camera movement press the shutter release button smoothly The mirror lowers when shooting ends D Mirror Up While the mirror is raised photos can not be framed in the viewfinder and autofocus and metering will not be performed A Mirror up Mode A picture will be...

Страница 71: ...35mm format cameras If Auto DX crop is off and FX 36 24 1 0 FX format is selected for Choose image area when a DX lens is attached the edges of the image may be eclipsed This may not be apparent in the viewfinder but when the images are played back you may notice a drop in resolution or that the edges of the picture are blacked out Viewfinder display Photo with FX image area 36 24 Photo with DX im...

Страница 72: ...mera a DX 24 16 1 5 DX format An area at the center of the image sensor 23 4 15 5 mm is used to record pictures in DX format To calculate the approximate focal length of the lens in 35mm format multiply by 1 5 Option Description On Camera automatically selects DX crop when DX lens is attached If another lens is attached the crop selected for Choose image area will be used Off Crop selected for Cho...

Страница 73: ...a in the shooting menu Press G to display the menus Highlight Image area in the shooting menu 0 235 and press 2 2 Choose an option Highlight Auto DX crop or Choose image area and press 2 3 Adjust settings Choose an option and press J The selected crop is displayed in the viewfinder 0 52 A Image Area The selected option is shown in the information display G button ...

Страница 74: ...se the selected control to choose an image area The image area can be selected by pressing the selected button and rotating the main or sub command dial until the desired crop is displayed in the viewfinder 0 51 The option currently selected for image area can be viewed by pressing the button to display the image area in the viewfinder or information display FX format is displayed as 36 24 and DX ...

Страница 75: ... RGB TIFF RGB Record uncompressed TIFF RGB images at a bit depth of 8 bits per channel 24 bit color TIFF is supported by a wide variety of imaging applications JPEG fine JPEG Record JPEG images at a compression ratio of roughly 1 4 fine quality JPEG normal Record JPEG images at a compression ratio of roughly 1 8 normal quality JPEG basic Record JPEG images at a compression ratio of roughly 1 16 ba...

Страница 76: ...ure NX 2 available separately 0 325 or ViewNX 2 available on the supplied ViewNX 2 CD Note that the option selected for image size does not affect the size of NEF RAW images when viewed on a computer NEF RAW images have the dimensions given for large size images in the table on page 58 JPEG copies of NEF RAW images can be created using the NEF RAW processing option in the retouch menu 0 300 A NEF ...

Страница 77: ... quality Optimal image quality File size varies with scene recorded Option Description N Lossless compressed NEF images are compressed using a reversible algorithm reducing file size by about 20 40 with no effect on image quality O Compressed NEF images are compressed using a non reversible algorithm reducing file size by about 35 55 with almost no effect on image quality Uncompressed NEF images a...

Страница 78: ...1 0 FX format Large 4928 3280 41 7 27 8 16 4 10 9 Medium 3696 2456 31 3 20 8 12 3 8 2 Small 2464 1640 20 9 13 9 8 2 5 5 DX 24 16 1 5 DX format Large 3200 2128 27 1 18 0 10 7 7 1 Medium 2400 1592 20 3 13 5 8 0 5 3 Small 1600 1064 13 5 9 0 5 3 3 5 Approximate size when printed at 300 dpi Print size in inches equals image size in pixels divided by printer resolution in dots per inch dpi 1 inch approx...

Страница 79: ...us modes Autofocus Mode Description AF S Single servo AF For stationary subjects Focus locks when shutter release button is pressed halfway At default settings shutter can only be released when in focus indicator I is displayed focus priority 0 246 AF C Continuous servo AF For moving subjects Camera focuses continuously while shutter release button is pressed halfway if subject moves camera will e...

Страница 80: ...iate predictive focus tracking if the subject moves toward or away from the camera while the shutter release button is pressed halfway or the B button is pressed This allows the camera to track focus while attempting to predict where the subject will be when the shutter is released A See Also For information on using focus priority in continuous servo AF see Custom Setting a1 AF C priority selecti...

Страница 81: ...e photograph There is little or no contrast between the subject and the background Example Subject is the same color as the background The focus point contains objects at different distances from the camera Example Subject is inside a cage The subject is dominated by regular geometric patterns Example Blinds or a row of windows in a skyscraper The focus point contains areas of sharply contrasting ...

Страница 82: ...g subjects that are moving predictably e g runners or race cars on a track 21 point dynamic area AF Choose when photographing subjects that are moving unpredictably e g players at a football game 39 point dynamic area AF Choose when photographing subjects that are moving quickly and can not be easily framed in the viewfinder e g birds 3D tracking Select the focus point as described on page 64 In A...

Страница 83: ...ted after the other focus points have turned off AF area mode can be selected by pressing the AF mode button and rotating the sub command dial until the desired setting is displayed in the viewfinder AF mode button Sub command dial Viewfinder A 3D tracking When the shutter release button is pressed halfway the colors in the area surrounding the focus point are stored in the camera Consequently 3D ...

Страница 84: ...int AF 39 point dynamic area AF 9 point dynamic area AF 3D tracking 21 point dynamic area AF Auto area AF Only active focus point is displayed in the viewfinder Remaining focus points provide information to assist focus operation A Manual Focus Single point AF is automatically selected when manual focus is used A See Also For information on adjusting how long the camera waits before refocusing whe...

Страница 85: ...or auto area AF is selected automatically manual focus point selection is not available A See Also For information on choosing when the focus point is illuminated see Custom Setting a5 Focus point illumination 0 248 For information on setting focus point selection to wrap around see Custom Setting a6 Focus point wrap around 0 249 For information on choosing the number of focus points that can be s...

Страница 86: ...oint and press the shutter release button halfway to initiate focus Check that the in focus indicator I appears in the viewfinder 2 Lock focus AF C focus mode With the shutter release button pressed halfway q press the A AE L AF L button w to lock both focus and exposure an AE L icon will be displayed in the viewfinder Focus will remain locked while the A AE L AF L button is pressed even if you la...

Страница 87: ...ly is selected for Custom Setting a4 AF activation 0 247 the camera will not focus when the shutter release button is pressed halfway instead the camera will focus when the B button is pressed at which point focus will lock and remain locked until the button is pressed again The shutter can be released at any time regardless of the options selected for Custom Settings a1 AF C priority selection 0 ...

Страница 88: ...s mode selector to M Manual focus lenses Set the camera focus mode selector to M To focus manually adjust the lens focus ring until the image displayed on the clear matte field in the viewfinder is in focus Photographs can be taken at any time even when the image is not in focus D AF Lenses Do not use AF lenses with the lens focus mode switch set to M and the camera focus mode selector set to AF F...

Страница 89: ...s indicator I is displayed Note that with the subjects listed on page 61 the in focus indicator may sometimes be displayed when the subject is not in focus confirm focus in the viewfinder before shooting For information on using the electronic rangefinder with optional AF S AF I teleconverters see page 321 A Focal Plane Position To determine the distance between your subject and the camera measure...

Страница 90: ... ISO 100 and 0 3 to 4 EV above ISO 12800 for special situations ISO sensitivity is selected using the ISO sensitivity dial Keeping the ISO sensitivity dial lock release pressed rotate the dial to the desired setting The selected value is displayed in the viewfinder while the dial is in motion TheISOSensitivityDial ISO sensitivity dial ISO sensitivity dial lock release ...

Страница 91: ...ixels fog or lines A Lo 0 3 Lo 1 The settings Lo 0 3 through Lo 1 correspond to ISO sensitivities 0 3 1 EV below ISO 100 ISO 80 50 equivalent Use for larger apertures when lighting is bright Contrast is slightly higher than normal in most cases ISO sensitivities of ISO 100 or above are recommended A See Also For information on using the High ISO NR option in the shooting menu to reduce noise at hi...

Страница 92: ...ately when the flash is used 1 Select Auto ISO sensitivity control for Auto ISO sensitivity control in the shooting menu To display the menus press the G button Select Auto ISO sensitivity control in the shooting menu highlight Auto ISO sensitivity control and press 2 ISO sensitivity shows the value selected with the ISO sensitivity dial 2 Select On Highlight On and press J if Off is selected ISO ...

Страница 93: ... the value selected by the user will be used instead In exposure modes P and A sensitivity will only be adjusted if underexposure would result at the shutter speed selected for Minimum shutter speed 1 2000 1 s or Auto in exposure modes S and M ISO sensitivity will be adjusted for optimal exposure at the shutter speed selected by the user If Auto is selected the camera will choose the minimum shutt...

Страница 94: ...um exposure can not be achieved at the ISO sensitivity chosen for Maximum sensitivity A Auto ISO Sensitivity Control Noise randomly spaced bright pixels fog or lines is more likely at higher sensitivities Use the High ISO NR option in the shooting menu to reduce noise see page 242 When a flash is used the value selected for Minimum shutter speed is ignored in favor of the option selected for Custo...

Страница 95: ...CPU lens data option in setup menu 0 164 otherwise camera uses center weighted metering Z Center weighted Camera meters entire frame but assigns greatest weight to center area if CPU lens is attached size of area can be selected using Custom Setting b1 Center weighted area 0 250 if non CPU lens is attached area is 12 mm in diameter Classic meter for portraits recommended when using filters with an...

Страница 96: ... Also For information on choosing the size of the area assigned the greatest weight in center weighted metering see Custom Setting b1 Center weighted area 0 250 For information on making separate adjustments to optimal exposure for each metering method see Custom Setting b2 Fine tune optimal exposure 0 250 Metering selector ...

Страница 97: ...er release button halfway With the shutter release button pressed halfway and the subject positioned in the focus point press the A AE L AF L button to lock focus and exposure if you are using autofocus confirm that the I in focus indicator appears in the viewfinder While exposure lock is in effect an AE L indicator will appear in the viewfinder 2 Recompose the photograph Keeping the A AE L AF L b...

Страница 98: ...be adjusted without altering the metered value for exposure Exposure mode Setting P Shutter speed and aperture flexible program 0 38 S Shutter speed A Aperture The new values can be confirmed in the viewfinder and control panel Note that metering can not be changed while exposure lock is in effect A See Also If On is selected for Custom Setting c1 Shutter release button AE L 0 251 exposure will lo...

Страница 99: ... 3 EV underexposure and 3 EV overexposure in increments of 1 3 EV In general positive values make the subject brighter while negative values make it darker Exposure compensation is adjusted using the exposure compensation dial Keeping the exposure compensation dial lock release pressed rotate the exposure compensation dial to the desired setting 1 EV No exposure compensation 1 EV Exposure compensa...

Страница 100: ...re Mode M In exposure mode M exposure compensation affects only the exposure indicator shutter speed and aperture do not change A Using a Flash When a flash is used exposure compensation affects both flash level and exposure altering the brightness of both the main subject and the background Custom Setting e4 Exposure comp for flash 0 259 can be used to restrict the effects of exposure compensatio...

Страница 101: ...s results are adjusted appropriately Normal Keep warm lighting colors J Incandescent 3000 K Use under incandescent lighting I Fluorescent Use with Sodium vapor lamps 2700 K Sodium vapor lighting found in sports venues Warm white fluorescent 3000 K Warm white fluorescent lights White fluorescent 3700 K White fluorescent lights Cool white fluorescent 4200 K Cool white fluorescent lights Day white fl...

Страница 102: ...h as reference for white balance 0 90 All values are approximate and do not reflect fine tuning if applicable L U button Main command dial Information display A The Shooting Menu White balance can also be adjusted using the White balance option in the shooting menu 0 235 which also can be used to fine tune white balance 0 84 or measure a value for preset white balance 0 90 The Auto option in the W...

Страница 103: ...te light in the same wavelengths While light sources with a color temperature in the neighborhood of 5000 5500 K appear white light sources with a lower color temperature such as incandescent light bulbs appear slightly yellow or red Light sources with a higher color temperature appear tinged with blue The camera white balance options are adapted to the following color temperatures I sodium vapor ...

Страница 104: ... rotating the sub command dial TheWhiteBalanceMenu 1 Select a white balance option in the shooting menu To display the menus press the G button Select White balance in the shooting menu then highlight a white balance option and press 2 If an option other than Auto Fluorescent Choose color temp or Preset manual is selected proceed to Step 2 If Auto or Fluorescent is selected highlight the desired s...

Страница 105: ...or temperature with each increment equivalent to about 5 mired The vertical green magenta axis has the similar effects to the corresponding color compensation CC filters 3 Press J Press J to save settings and return to the shooting menu Fine tuning is indicated by an asterisk E in the information display Adjustment Coordinates Increase green Increase magenta Increase blue Increase amber Green G Ma...

Страница 106: ...ngs in both directions are available each increment is equivalent to about 5 mired 0 87 Press the L U button and rotate the sub command dial until the desired value is shown in the information display Rotating the sub command dial to the left increases the amount of amber A Rotating the sub command dial to the right increases the amount of blue B At settings other than 0 an asterisk E appears in t...

Страница 107: ... 1000 K produces a much greater change in color at 3000 K than at 6000 K Mired calculated by multiplying the inverse of the color temperature by 10 6 is a measure of color temperature that takes such variation into account and as such is the unit used in color temperature compensation filters E g 4000 K 3000 K a difference of 1000 K 83 mired 7000 K 6000 K a difference of 1000 K 24 mired A See Also...

Страница 108: ...1 Select Choose color temp Press the G button and select White balance in the shooting menu Highlight Choose color temp and press 2 2 Select a value for amber blue Press 4 or 2 to highlight digits and press 1 or 3 to change D Choose Color Temperature Note that the desired results will not be obtained with flash or fluorescent lighting Choose N Flash or I Fluorescent for these sources With other li...

Страница 109: ...information display TheL U Button The L U button can be used to select the color temperature for the amber A blue B axis only Press the L U button and rotate the sub command dial until the desired value is displayed in the information display adjustments are made in mireds 0 87 To enter a color temperature directly in increments of 10 K press the L U button and press 4 or 2 to highlight a digit an...

Страница 110: ...that will be used in the final photograph In studio settings a standard gray panel can be used as a reference object Note that exposure is automatically increased by 1 EV when measuring white balance in exposure mode M adjust exposure so that the exposure indicator shows 0 0 43 Method Description Direct measurement Neutral gray or white object is placed under lighting that will be used in final ph...

Страница 111: ...displayed in the information display 4 Select direct measurement mode Release the L U button briefly and then press the button until D starts to flash in the control panel and viewfinder L U button Main command dial Information display A Measuring Preset White Balance Viewfinder Photography Preset manual white balance can not be measured during HDR photography or multiple exposure 0 112 149 L U bu...

Страница 112: ...mera was able to measure a value for white balance C will flash in the control panel for about six seconds while the viewfinder will show a flashing a If lighting is too dark or too bright the camera may be unable to measure white balance A flashing b a will appear in the control panel and viewfinder for about six seconds Press the shutter release button halfway to return to Step 5 and measure whi...

Страница 113: ...no operations are performed during viewfinder photography while the displays are flashing direct measurement mode will end after the sum of the times selected for Custom Settings c4 Monitor off delay Information display 0 253 and Custom Setting c2 Standby timer 0 251 A Selecting a Preset Selecting Preset manual for the White balance option in the shooting menu displays the dialog shown at right hi...

Страница 114: ...sub command dial until the desired white balance preset d 1 to d 4 is displayed in the monitor 4 Select direct measurement mode Release the L U button briefly and then press the button until the L icon in the monitor starts to flash A spot white balance target r will be displayed at the selected focus point L U button Main command dial Monitor L U button Sub command dial Monitor Monitor ...

Страница 115: ...m Setting c4 Monitor off delay Live view 0 253 If the camera is unable to measure white balance the message shown at right will be displayed Choose a new white balance target and repeat the process from Step 4 When Preset manual is selected for White balance in the shooting menu the position of the target used to measure preset white balance will be displayed on presets recorded during live view p...

Страница 116: ...ct L Preset manual for White balance in the shooting menu Press the G button and select White balance in the shooting menu Highlight Preset manual and press 2 2 Select a destination Highlight the destination preset d 1 to d 4 and press W M 3 Choose Select image Highlight Select image and press 2 4 Highlight a source image Highlight the source image G button W M button ...

Страница 117: ...the selected preset A Choosing a Source Image To view the image highlighted in Step 4 full frame press and hold the X T button A Choosing a White Balance Preset Press 1 to highlight the current white balance preset d 1 d 4 and press 2 to select another preset A Fine Tuning Preset White Balance The selected preset can be fine tuned by selecting Fine tune and adjusting white balance as described on ...

Страница 118: ...r a selected white balance preset 1 Select L Preset manual Highlight Preset manual in the white balance menu and press 2 2 Select a preset Highlight the desired preset and press W M 3 Select Edit comment Highlight Edit comment and press 2 4 Edit the comment Edit the comment as described on page 107 W M button ...

Страница 119: ...and Edit comment options can not be used 1 Select L Preset manual Highlight Preset manual in the white balance menu and press 2 2 Select a preset Highlight the desired preset and press W M 3 Select Protect Highlight Protect and press 2 4 Select On Highlight On and press J to protect the selected white balance preset To remove protection select Off W M button ...

Страница 120: ...or type of scene PictureControls Option Description Q Standard Standard processing for balanced results Recommended for most situations R Neutral Minimal processing for natural results Choose for photographs that will later be extensively processed or retouched S Vivid Pictures are enhanced for a vivid photoprint effect Choose for photographs that emphasize primary colors T Monochrome Take monochr...

Страница 121: ...icture Controls Custom Picture Controls are created through modifications to existing Picture Controls using the Manage Picture Control option in the shooting menu 0 106 Custom Picture Controls can be saved to a memory card for sharing among other cameras of the same model and compatible software 0 109 A The Picture Control Indicator The current Picture Control is shown in the information display ...

Страница 122: ...esired Picture Control in the Picture Control list 0 100 and press 2 2 Adjust settings Press 1 or 3 to highlight the desired setting 0 103 and press 4 or 2 to choose a value Repeat this step until all settings have been adjusted or select Quick adjust to choose a preset combination of settings Default settings can be restored by pressing the O button 3 Press J A Modifications to Original Picture C...

Страница 123: ...d out in direct sunlight higher values to preserve detail in misty landscapes and other low contrast subjects Brightness Choose 1 for reduced brightness 1 for enhanced brightness Does not affect exposure Manual adjustments non monochrome only Saturation Control the vividness of colors Select A to adjust saturation automatically according to the type of scene or choose from values between 3 and 3 l...

Страница 124: ...a Picture Control grid showing the contrast and saturation for the selected Picture Control in relation to the other Picture Controls only contrast is displayed when Monochrome is selected Release the W M button to return to the Picture Control menu The icons for Picture Controls that use auto contrast and saturation are displayed in green in the Picture Control grid and lines appear parallel to t...

Страница 125: ...andscape photographs Orange produces more contrast than yellow red more contrast than orange O Orange R Red G Green Softens skin tones Can be used for portraits Note that the effects achieved with Filter effects are more pronounced than those produced by physical glass filters A Toning Monochrome Only Pressing 3 when Toning is selected displays saturation options Press 4 or 2 to adjust saturation ...

Страница 126: ...n the shooting menu To display the menus press the G button Highlight Manage Picture Control in the shooting menu and press 2 2 Select Save edit Highlight Save edit and press 2 3 Select a Picture Control Highlight an existing Picture Control and press 2 or press J to proceed to Step 5 to save a copy of the highlighted Picture Control without further modification G button ...

Страница 127: ...ture Controls are named by adding a two digit number assigned automatically to the name of the existing Picture Control to use the default name proceed to Step 7 To move the cursor in the name area hold the W M button and press 4 or 2 To enter a new letter at the current cursor position use the multi selector to highlight the desired character in the keyboard area and press J To delete the charact...

Страница 128: ...on in the Manage Picture Control menu A Manage Picture Control Delete The Delete option in the Manage Picture Control menu can be used to delete selected custom Picture Controls when they are no longer needed A The Original Picture Control Icon The original preset Picture Control on which the custom Picture Control is based is indicated by an icon in the top right corner of the edit display Origin...

Страница 129: ...opy to camera Copy custom Picture Controls from the memory card to custom Picture Controls C 1 through C 9 on the camera and name them as desired Delete from card Delete selected custom Picture Controls from the memory card The confirmation dialog shown at right will be displayed before a Picture Control is deleted to delete the selected Picture Control highlight Yes and press J Copytocard Copy a ...

Страница 130: ...outdoor scenery through a door or window or taking pictures of shaded subjects on a sunny day It is most effective when used with matrix metering 0 75 Active D Lighting off Active D Lighting YAuto A Active D Lighting Versus D Lighting The Active D Lighting option in the shooting menu adjusts exposure before shooting to optimize the dynamic range while the D Lighting option in the retouch menu 0 29...

Страница 131: ...ghting according to shooting conditions in exposure mode M however YAuto is equivalent to Q Normal D Active D Lighting Noise randomly spaced bright pixels fog or lines may appear in photographs taken with Active D Lighting Uneven shading may be visible with some subjects Active D Lighting can not be used at ISO sensitivities of Hi 0 3 or above A See Also When ADL bracketing is selected for Custom ...

Страница 132: ...ethods and a non CPU lens an exposure differential of Auto is equivalent to about 2 EV It can not be used to record NEF RAW images HDR can not be used with flash lighting bracketing 0 136 multiple exposure 0 149 or shutter speeds of B bulb or T time 1 Select HDR high dynamic range Press the G button to display the menus Highlight HDR high dynamic range in the shooting menu and press 2 First exposu...

Страница 133: ...elect 6 On series HDR shooting will continue until you select Off for HDR mode To take one HDR photograph select On single photo Normal shooting will resume automatically after you have created a single HDR photograph To exit without creating additional HDR photographs select Off u appears in the viewfinder when HDR is enabled ...

Страница 134: ...ote that choosing a value higher than required may not produce the desired results if Auto is selected the camera will automatically adjust exposure to suit the scene 4 Choose the amount of smoothing To choose how much the boundaries between the two images are smoothed highlight Smoothing and press 2 The options shown at right will be displayed Highlight an option and press J Higher values produce...

Страница 135: ...rns off automatically after the photograph is taken The u icon clears from the display when HDR shooting ends D Framing HDR Photographs The edges of the image will be cropped out The desired results may not be achieved if the camera or subject moves during shooting Use of a tripod is recommended Depending on the scene shadows may appear around bright objects or halos may appear around dark objects...

Страница 136: ...nits Optional flash units can be attached directly to the camera accessory shoe as described below The accessory shoe is equipped with a safety lock for flash units with a locking pin 1 Remove the accessory shoe cover 2 Mount the flash unit on the accessory shoe See the manual provided with the flash unit for details UsingaFlash ...

Страница 137: ...lash unit mounted on the camera accessory shoe D Use Only Nikon Flash Accessories Use only Nikon flash units Negative voltages or voltages over 250 V applied to the accessory shoe could not only prevent normal operation but damage the sync circuitry of the camera or flash Before using a Nikon flash unit not listed in this section contact a Nikon authorized service representative for more informati...

Страница 138: ...O 200 48 157 48 157 53 174 39 128 42 138 30 98 25 82 14 46 1 If a color filter is attached to the SB 910 SB 900 or SB 700 when v or N flash is selected for white balance the camera will automatically detect the filter and adjust white balance appropriately 2 Wireless flash control is not available 3 Controlled remotely with optional SB 910 SB 900 SB 800 or SB 700 flash unit or SU 800 wireless Spee...

Страница 139: ...lash z Advanced Wireless Lighting Master Remote flash control z z z z i TTL i TTL z z A B Quick wireless flash control z z AA Auto aperture z 5 A Non TTL auto z M Manual z z RPT Repeating flash z Remote i TTL i TTL z z z z A B Quick wireless flash control z z z z AA Auto aperture z 5 A Non TTL auto z M Manual z z z z RPT Repeating flash z z z Flash Color Information Communication z z z z z Auto FP...

Страница 140: ...d with non CPU lenses regardless of mode selected with flash unit 6 Available only in i TTL AA A GN and M flash control modes 7 Availalbe only in i TTL AA and A flash control modes 8 Firmware updates for the SB 910 and SB 900 can be performed from the camera A Modeling Illumination CLS compatible flash units such as the SB 910 SB 900 SB 800 SB 700 and SB 600 emit a modeling flash when the camera P...

Страница 141: ...rts CLS refer to the section on CLS compatible digital SLR cameras The Df is not included in the digital SLR category in the SB 80DX SB 28DX and SB 50DX manuals i TTL flash control can be used at ISO sensitivities between 100 and 12800 At values over 12800 the desired results may not be achieved at some ranges or aperture settings If the flash ready indicator flashes for about three seconds after ...

Страница 142: ...nses however autofocus is available only with the focus points shown at right SB 700 AF assist illumination is available with 24 135 mm AF lenses however autofocus is available only with the focus points shown at right In exposure mode P the maximum aperture minimum f number is limited according to ISO sensitivity as shown below Maximum aperture at ISO equivalent of 100 200 400 800 1600 3200 6400 ...

Страница 143: ...y shows the flash control mode for optional flash units attached to the camera accessory shoe as follows Flash sync Auto FP 0 257 i TTL Auto aperture AA Non TTL auto flash A Distance priority manual GN Manual Repeating flash Advanced wireless lighting ...

Страница 144: ...natural balance between main subject and ambient background lighting If type G E or D lens is used distance information is included when calculating flash output Precision of calculation can be increased for non CPU lenses by providing lens data focal length and maximum aperture see 0 163 Not available when spot metering is used Standard i TTL flash for digital SLR Flash output adjusted to bring l...

Страница 145: ...for portraits taken against a backdrop of night scenery Available only with SB 910 SB 900 SB 800 SB 700 SB 600 and SB 400 in programmed auto and aperture priority auto exposure modes Use of a tripod is recommended to prevent blurring caused by camera shake Slow sync Flash is combined with shutter speeds as slow as 30 s to capture both subject and background at night or under dim light This mode is...

Страница 146: ...vailable only in exposure modes P and A In exposure modes S and M red eye reduction with slow sync becomes red eye reduction 3 Available only in exposure modes P and A In exposure modes S and M slow sync becomes front curtain sync 4 In exposure modes P and A flash sync mode will be set to slow rear curtain sync when the W M button is released W M button Main command dial Rear curtain sync4 Slow sy...

Страница 147: ... 42 1 Shutter speed may be set as slow as 30 s in slow sync slow rear curtain sync and slow sync with red eye reduction flash modes 2 When 1 250 s Auto FP or 1 200 s Auto FP is selected for Custom Setting e1 Flash sync speed 0 257 speeds as fast as 1 4000 s are available with optional flash units that support auto FP high speed sync 3 Flash range varies with aperture and ISO sensitivity When setti...

Страница 148: ... the desired value is displayed in the information display In general choose positive values to make the main subject brighter negative values to make it darker At values other than 0 0 a Y icon will be displayed in the information display and viewfinder after you release the W M button The current value for flash compensation can be confirmed by pressing the W M button Normal flash output can be ...

Страница 149: ...nit is added to the flash compensation selected with the camera A See Also For information on choosing how flash and exposure compensation combine see Custom Setting e4 Exposure comp for flash 0 259 For information on automatically varying flash level over a series of shots see page 136 ...

Страница 150: ...s available with CLS compatible flash units only 0 118 To use FV lock 1 Assign FV lock to a camera control Select FV lock as the press option for Custom Setting f4 Assign Fn button 0 263 f5 Assign preview button 0 266 or f6 Assign AE L AF L button 0 267 2 Attach a CLS compatible flash unit Mount a CLS compatible flash unit 0 118 on the camera accessory shoe 3 Set the flash unit to the appropriate ...

Страница 151: ...tor preflash to determine the appropriate flash level Flash output will be locked at this level and FV lock icon e will appear in the viewfinder 6 Recompose the photograph 7 Take the photograph Press the shutter release button the rest of the way down to shoot If desired additional pictures can be taken without releasing FV lock 8 Release FV lock Press the button selected in Step 1 to release FV l...

Страница 152: ... are as follows Flash unit Flash mode Metered area Stand alone flash unit i TTL 5 mm circle in center of frame AA Area metered by flash exposure meter Used with other flash units Advanced Wireless Lighting i TTL Entire frame AA Area metered by flash exposure meter A master flash ...

Страница 153: ...n be restored to default values by holding the W M and D buttons down together for more than two seconds these buttons are marked by a green dot The control panel turns off briefly while settings are reset Two ButtonReset Restoring DefaultSettings D button W M button ...

Страница 154: ...nterval timer settings only settings in the bank currently selected using the Shooting menu bank option will be reset 0 236 Settings in the remaining banks are unaffected 2 Exposure differential and smoothing are not reset 3 If interval timer shooting is currently in progress shooting will end Starting time shooting interval and number of intervals and shots are not reset 4 Current Picture Control...

Страница 155: ... AE lock hold Off 66 77 Bracketing Off 136 Flash compensation Off 128 Flash mode Front curtain sync 125 Exposure delay mode2 Off 256 FV lock Off 130 Flexible program Off 38 NEF RAW Off 264 1 Focus point not displayed if auto area AF is selected for AF area mode 2 Only settings in the bank currently selected using the Custom settings bank option will be reset 0 245 Settings in the remaining banks a...

Страница 156: ...ach shot or to experiment with different settings for the same subject ExposureandFlashBracketing To vary exposure and or flash level over a series of photographs 1 Select flash or exposure bracketing for Custom Setting e6 Auto bracketing set in the Custom Settings menu To display the menus press the G button Select Custom Setting e6 Auto bracketing set in the Custom Settings menu highlight an opt...

Страница 157: ... settings other than r a M icon is displayed in the control panel D appears in the viewfinder while the information display provides a bracketing indicator and an icon showing the type of bracketing v exposure and flash bracketing w exposure bracketing only or x flash bracketing only D button Main command dial Number of shots Exposure and flash bracketing indicator Information display Viewfinder ...

Страница 158: ...1 2 and 3 EV The bracketing programs with an increment of 1 3 EV are listed below Information display No of shots Bracketing order EVs 0 0 3 0 0 3 0 7 3 0 0 7 0 3 2 0 0 3 2 0 0 3 3 0 0 3 0 3 5 0 0 7 0 3 0 3 0 7 A See Also For information on choosing the order in which bracketing is performed see Custom Setting e8 Bracketing order 0 260 D button Sub command dial Exposure increment Information displ...

Страница 159: ...om the indicator after each shot CancelingBracketing To cancel bracketing press the D button and rotate the main command dial until the number of shots in the bracketing sequence is zero r and the bracketing icon v w or x is no longer displayed The program last in effect will be restored the next time bracketing is activated Bracketing can also be cancelled by performing a two button reset 0 133 a...

Страница 160: ...fter the memory card has been replaced or shots have been deleted to make room on the memory card If the camera is turned off before all shots in the sequence have been taken bracketing will resume from the next shot in the sequence when the camera is turned on A Exposure Bracketing The camera modifies exposure by varying shutter speed and aperture programmed auto aperture shutter priority auto or...

Страница 161: ...g set 2 Choose the number of shots Pressing the D button rotate the main command dial to choose the number of shots in the bracketing sequence The number of shots is shown in the information display At settings other than r M and D are displayed respectively in the control panel and viewfinder a y icon and a bracketing indicator appear in the information display D button Main command dial Number o...

Страница 162: ...r 3 15 mired Higher B values correspond to increased amounts of blue higher A values to increased amounts of amber 0 87 The bracketing programs with an increment of 1 are listed below Information display No of shots Whitebalance increment Bracketing order EVs 0 1 0 2 1 B 0 1 B 2 1 A 0 1 A 3 1 A 1 B 0 1 A 1 B A See Also See page 87 for a definition of mired D button Sub command dial White balance i...

Страница 163: ...cations to white balance are added to the white balance adjustment made with white balance fine tuning If the number of shots in the bracketing program is greater than the number of exposures remaining n will flash in the control panel a flashing j icon will appear in the viewfinder as shown at right and the shutter release will be disabled Shooting can begin when a new memory card is inserted ...

Страница 164: ...ot available at an image quality of NEF RAW Selecting NEF RAW NEF RAW JPEG fine NEF RAW JPEG normal or NEF RAW JPEG basic cancels white balance bracketing White balance bracketing affects only color temperature the amber blue axis in the white balance fine tuning display 0 84 No adjustments are made on the green magenta axis In self timer mode 0 48 the number of copies specified in the white balan...

Страница 165: ...ther than r M and D are displayed respectively in the control panel and viewfinder a z icon and a bracketing indicator appear in the information display Choose two shots to take one photograph with Active D Lighting off and another at a selected value Choose three to five shots to take a series of photographs with Active D Lighting set successively to values between Off and Normal three shots betw...

Страница 166: ...button rotate the sub command dial to choose Active D Lighting Active D Lighting is shown in the information display Information display ADL Information display ADL Y Auto P High R Low c Extra high 1 Q Normal d Extra high 2 D button Sub command dial ...

Страница 167: ...vary Active D Lighting shot by shot according to the bracketing program selected A bracketing progress indicator can be viewed by activating the information display A segment will disappear from the indicator after each shot No shots 3 Display after first shot ...

Страница 168: ...me the shutter release button is pressed In self timer mode the camera will take the number of shots selected in Step 2 on page 145 each time the shutter release button is pressed regardless of the option selected for Custom Setting c3 Self timer Number of shots 0 252 the interval between shots is however controlled by Custom Setting c3 Self timer Interval between shots In other modes one shot wil...

Страница 169: ...tomatically if no operations are performed for 30 s 1 Select Multiple exposure in the shooting menu Press the G button to display the menus Highlight Multiple exposure in the shooting menu and press 2 A Extended Recording Times For an interval between exposures of more than 30 s extend the meter off delay using Custom Setting c2 Standby timer 0 251 The maximum interval between exposures is 30 s lo...

Страница 170: ...posure shooting will continue until you select Off for Multiple exposure mode To take one multiple exposure select On single photo Normal shooting will resume automatically after you have created a single multiple exposure To exit without creating additional multiple exposures select Off If On series or On single photo is selected a n icon will be displayed in the control panel ...

Страница 171: ...m Setting f4 Assign Fn button 0 263 or f5 Assign preview button 0 266 you can choose the multiple exposure mode by pressing the selected button and rotating the main command dial and the number of shots by pressing the button and rotating the sub command dial Your selection is shown in the information display when multiple exposure is enabled multiple exposure mode is shown as follows n with a B t...

Страница 172: ... J On Gain is adjusted according to number of exposures actually recorded gain for each exposure is set to 1 2 for 2 exposures 1 3 for 3 exposures etc Off Gain is not adjusted when recording multiple exposure Recommended if background is dark but note that photographs may be affected by noise randomly spaced bright pixels fog or lines ...

Страница 173: ...f shots 0 252 the interval between shots is however controlled by Custom Setting c3 Self timer Interval between shots In other release modes one photograph will be taken each time the shutter release button is pressed continue shooting until all exposures have been recorded for information on interrupting a multiple exposure before all photographs are recorded see page 154 The n icon will flash un...

Страница 174: ...the specified number of exposures have been taken a multiple exposure will be created from the exposures that have been recorded to that point If Auto gain is on gain will be adjusted to reflect the number of exposures actually recorded Note that shooting will end automatically if A two button reset is performed 0 133 The camera is turned off The battery is exhausted Pictures are deleted ...

Страница 175: ... If interval timer photography is activated before the first exposure is taken the camera will record exposures at the selected interval until the number of exposures specified in the multiple exposure menu have been taken the number of shots listed in the interval timer shooting menu is ignored These exposures will then be recorded as a single photograph and interval timer shooting will end if On...

Страница 176: ...timer Before beginning interval timer photography take a test shot at current settings and view the results in the monitor Before choosing a starting time select Time zone and date in the setup menu and make sure that the camera clock is set to the correct time and date 0 276 Use of a tripod is recommended Mount the camera on a tripod before shooting begins To ensure that shooting is not interrupt...

Страница 177: ...tions shown at right Press 4 or 2 to highlight hours or minutes and press 1 or 3 to change Press 2 to continue 3 Choose the interval Press 4 or 2 to highlight hours minutes or seconds press 1 or 3 to change Choose an interval longer than the time needed to take the number of shots selected in Step 4 If the interval is too short the number of photos taken may be less than the total listed in Step 4...

Страница 178: ...selected for Choose start time in Step 2 Shooting will continue at the selected interval until all shots have been taken Note that because the shutter speed frame rate and time needed to record images may vary from one interval to the next the time between the end of one interval and the beginning of the next may vary If shooting can not proceed at current settings for example if a shutter speed o...

Страница 179: ...osures 0 44 or live view 0 172 A Release Mode Regardless of the release mode selected the camera will take the specified number of shots at each interval A Bracketing Adjust bracketing settings before starting interval timer photography If exposure flash or ADL bracketing is active while interval timer photography is in effect the camera will take the number of shots in the bracketing program at e...

Страница 180: ...se button halfway once the button is released the shutter speed and aperture will be displayed until the standby timer expires To view current interval timer settings select Interval timer shooting between shots While interval timer photography is in progress the interval timer menu will show the starting time the shooting interval and the number of intervals and shots remaining None of these item...

Страница 181: ... off and then on again if desired the memory card can be replaced while the camera is off Selecting self timer E or MUP release mode To resume shooting 1 Choose a new starting time Choose a new starting time as described on page 157 2 Resume shooting Highlight Restart and press J Note that if interval timer photography was paused during shooting any shots remaining in the current interval will be ...

Страница 182: ... item in the shooting menu 0 236 Changing bracketing settings 0 136 Normal shooting will resume when interval timer photography ends NoPhotograph The camera will skip the current interval if any of the following situations persist for eight seconds or more after the interval was due to start the photograph or photographs for the previous interval have yet to be taken the memory buffer is full or t...

Страница 183: ...the maximum aperture of the lens is known The aperture value is displayed in the control panel and viewfinder Flash level is adjusted for changes in aperture if the flash unit supports AA auto aperture mode Aperture is listed with an asterisk in the playback photo info display Specifying both the focal length and maximum aperture of the lens Enables color matrix metering note that it may be necess...

Страница 184: ...nses To enter or edit data for a non CPU lens 1 Select Non CPU lens data Press the G button to display the menus Highlight Non CPU lens data in the setup menu and press 2 2 Choose a lens number Highlight Lens number and press 4 or 2 to choose a lens number between 1 and 9 G button ...

Страница 185: ...e lens is not equipped with an AI mechanism 0 167 A Focal Length Not Listed If the correct focal length is not listed choose the closest value greater than the actual focal length of the lens A Teleconverters and Zoom Lenses The maximum aperture for teleconverters is the combined maximum aperture of the teleconverter and the lens Note that lens data are not adjusted when non CPU lenses are zoomed ...

Страница 186: ...ns number selection to a camera control Select Choose non CPU lens number as the command dials option for Custom Setting f4 Assign Fn button 0 263 Custom Setting f5 Assign preview button 0 266 or f6 Assign AE L AF L button 0 267 2 Use the selected control to choose the lens number Press the selected button and rotate the main command dial until the desired lens number appears in the information di...

Страница 187: ...he camera or lens AIVersusNon AILenses Non CPU lenses are divided into lenses with AI mechanisms AI lenses and those without non AI lenses A Incompatible Lenses Some non AI lenses can not be attached even when the meter coupling lever is raised See page 320 for more information A AI Lenses Lower the metering coupling lever before attaching AI lenses Metering coupling lever AI lens Non AI lens Mete...

Страница 188: ...ovided lens data 0 164 2 Select the lens number 0 166 Confirm that Non AI lens is selected for Non CPU lens data Exposure meter coupling F will flash in the control panel and f will appear in the information display 3 Select exposure mode A or M Rotate the exposure mode dial to A or M 4 Adjust aperture Choose an aperture using the lens aperture ring 5 Match the camera aperture setting to the lens ...

Страница 189: ...169 t 6 Take pictures Repeat Steps 4 and 5 as necessary to change the aperture during shooting ...

Страница 190: ...xposure meters turn off automatically when a GPS unit is attached Position This item is only available if a GPS unit is connected when it displays the current latitude longitude altitude and Coordinated Universal Time UTC as reported by the GPS unit Set clock from satellite Select Yes to synchronize the camera clock with the time reported by the GPS unit Option Description Enable Exposure meters t...

Страница 191: ...with the GPS unit Photo information for pictures taken while this icon is displayed include an additional page of location data 0 194 o flashing The GPS unit is searching for a signal Pictures taken while the icon is flashing do not include location data Noicon No new location data have been received from the GPS unit for at least two seconds Pictures taken when the o icon is not displayed do not ...

Страница 192: ...played in the camera monitor The subject will no longer be visible in the viewfinder 2 Position the focus point Position the focus point over your subject as described on page 175 D Cover the Viewfinder To prevent light entering via the viewfinder interfering with photographs or exposure cover the viewfinder with the supplied DK 26 eyepiece cap before shooting 0 23 a button ...

Страница 193: ...ven when the focus point flashes red check focus in the monitor before shooting Exposure can be locked by pressing the A AE L AF L button 0 77 focus locks while the shutter release button is pressed halfway In exposure mode M exposure can be adjusted with the assistance of an exposure indicator 0 43 4 Take the picture Press the shutter release button the rest of the way down to shoot The monitor w...

Страница 194: ...ew when the camera is not in use Note that the temperature of the camera s internal circuits may rise and noise bright spots randomly spaced bright pixels or fog may be displayed in the following instances the camera may also become noticeably warm but this does not indicate a malfunction The ambient temperature is high Live view has been used for extended periods The camera has been used in conti...

Страница 195: ...choose an autofocus mode press the AF mode button and rotate the main command dial until the desired mode is displayed in the monitor Mode Description AF S Single servo AF For stationary subjects Focus locks when shutter release button is pressed halfway AF F Full time servo AF For moving subjects Camera focuses continuously until shutter release button is pressed Focus locks when shutter release ...

Страница 196: ...ons The subject contains lines parallel to the long edge of the frame The subject lacks contrast The subject in the focus point contains areas of sharply contrasting brightness or includes spot lighting or a neon sign or other light source that changes in brightness Flicker or banding appears under fluorescent mercury vapor sodium vapor or similar lighting A cross star filter or other special filt...

Страница 197: ...non portrait subjects Use the multi selector to move the focus point anywhere in the frame or press J to position the focus point in the center of the frame Normal area AF Use for pin point focus on a selected spot in the frame Use the multi selector to move the focus point anywhere in the frame or press J to position the focus point in the center of the frame A tripod is recommended Subject track...

Страница 198: ...178 x To choose an AF area mode press the AF mode button and rotate the sub command dial until the desired mode is displayed in the monitor AF mode button Sub command dial Monitor ...

Страница 199: ...sired setting press J to exit Option Description Image quality Choose image quality 0 55 Image size Choose image size 0 58 Set Picture Control Choose a Picture Control 0 100 Active D Lighting Adjust Active D Lighting to preserve details in highlights and shadows 0 110 Monitor brightness Press 1 or 3 to adjust monitor brightness for live view Changes to monitor brightness have no effect on photogra...

Страница 200: ...ing will end in 30 s or less 184 w Autofocus mode The current autofocus mode 175 e AF area mode The current AF area mode 177 r Focus point The current focus point The display varies with the option selected for AF area mode 0 177 172 t Exposure indicator Indicates whether the photograph would be under or overexposed at current settings exposure mode M only 43 r t q e w ...

Страница 201: ...frame Flicker and banding visible in the monitor under fluorescent mercury vapor or sodium lamps can be reduced using Flicker reduction 0 276 although they may still be visible in the final photograph at some shutter speeds When shooting in live view mode avoid pointing the camera at the sun or other strong light sources Failure to observe this precaution could result in damage to the camera s int...

Страница 202: ...iew Photography To hide or display indicators in the monitor during live view photography press the R button Information on Information off 16 cell framing grid 9 cell framing grid 1 1 aspect ratio 16 9 aspect ratio Virtual horizon 0 282 ...

Страница 203: ...ise focus press the X T button While the view through the lens is zoomed in a navigation window will appear in a gray frame at the bottom right corner of the display Use the multi selector to scroll to areas of the frame not visible in the monitor available only if wide or normal area AF is selected for AF area mode or press W M to zoom out X T button Navigation window ...

Страница 204: ...oes not appear during playback live view will still end automatically when the timer expires A HDMI If the camera is attached to an HDMI video device during live view photography the camera monitor will remain on and the video device will display the view through the lens as shown at right If the device supports HDMI CEC select Off for the HDMI Device control option in the setup menu 0 223 before ...

Страница 205: ...phs back press the K button The most recent photograph will be displayed in the monitor Full FramePlayback K button K button W M button L U button J button Multi selector O button Sub command dial Main command dial X T button G button P button ...

Страница 206: ...W M See page 196 for more information Zoom in on photograph X T See page 199 for more information Delete images O Confirmation dialog will be displayed Press O again to delete photo 0 203 Change protect status L U To protect image or to remove protection from protected image press L U 0 201 Return to shooting mode K Monitor will turn off Photographs can be taken immediately Retouch photo P Create ...

Страница 207: ...tomatically displayed in the monitor for about 4 s after shooting because the camera is already in the correct orientation images are not rotated automatically during image review In continuous release mode display begins when shooting ends with the first photograph in the current series displayed A See Also For information on choosing how long the monitor will remain on when no operations are per...

Страница 208: ...rmation None image only Overview Location data Highlights RGB histogram Shooting data 1 12 100NC_DF DSC_0001 JPG 15 10 2013 10 02 28 N NOR ORMAL AL 4928x3280 0 0 1 125 F5 6 50mm 100 100NC_DF DSC_0001 JPG 15 10 2013 10 02 28 N NOR ORMAL AL 4928x3280 NIKON Df 1 12 L L A T A O L I T N T M I G I E T I T U T U U D U D T E D E C E N E 1 3 1 0 3 3 5 5 1 5 9 m º º 1 1 3 4 0 5 5 3 2 0 9 6 0 0 7 9 1 1 6 3 N...

Страница 209: ...F was selected for AF area mode and camera was able to focus 3 Displayed in yellow if picture is in DX format 0 51 1 12 100NC_DF DSC_0001 JPG 15 10 2013 10 02 28 N NOR ORMAL AL 4928x3280 11 12 2 4 5 3 1 6 7 8 9 10 1 Protect status 201 2 Retouch indicator 287 3 Focus point1 2 64 4 AF area brackets1 28 5 Frame number total number of frames 6 Image quality 55 7 Image size 58 8 Image area3 51 9 Time o...

Страница 210: ...ent channel Hold W M button and press 4 or 2 to cycle through channels as follows 2 Displayed in yellow if picture is in DX format 0 51 100 1 RGB Highlights Select R G B 2 1 3 1 Image highlights1 2 Folder number frame number2 237 3 Current channel1 W M button RGB all channels R red G green B blue ...

Страница 211: ...t R G B Highlights 4 3 2 1 8 7 6 5 1 Image highlights1 2 Folder number frame number2 237 3 White balance 81 Color temperature 88 White balance fine tuning 84 Preset manual 90 4 Current channel1 5 Histogram RGB channel In all histograms horizontal axis gives pixel brightness vertical axis number of pixels 6 Histogram red channel 7 Histogram green channel 8 Histogram blue channel W M button RGB all ...

Страница 212: ...g applications Some sample histograms are shown below If the image contains objects with a wide range of brightnesses the distribution of tones will be relatively even If the image is dark tone distribution will be shifted to the left If the image is bright tone distribution will be shifted to the right Increasing exposure compensation shifts the distribution of tones to the right while decreasing...

Страница 213: ... Commander mode4 8 Flash mode4 125 9 Flash control4 118 121 258 Flash compensation4 128 10 Camera name 11 Image area5 51 12 Folder number frame number5 237 W C P H O I Q S C B S H I L C U H O R A U T O T I A N I T E E R U C R T G U R K P R H R B S E E A T A A P A N S N T L A C D I T E I A C T J N S O N E R U G S N C L S E T A s S 0 3 0 0 0 0 U R T T G A O B N 1 D AR 0 D 0 NIKON Df 100 1 21 20 19 1...

Страница 214: ...aph as described on page 279 LocationData N A H V R O C D I E I T R G T S N O E E U D T C R T H E L E D I U G C C H T T R L H N A N D W C T I O U O A Y R R T R L R A I I M O M I M N M S A A G O O L H L H F T I T I Y N G I L P O H N T E R G E M R COMMENT SPRING HAS COME NIKON Df 100 1 26 25 24 27 23 22 22 High ISO noise reduction 242 Long exposure noise reduction 242 23 Active D Lighting 110 24 HDR...

Страница 215: ...tatus 201 3 Retouch indicator 287 4 Camera name 5 Histogram showing the distribution of tones in the image 0 192 6 Image quality 55 7 Image size 58 8 Image area1 51 9 File name 239 10 Time of recording 27 276 11 Date of recording 27 276 12 Folder name 237 13 Metering 75 14 Exposure mode 36 15 Shutter speed 39 42 16 Aperture 41 42 17 ISO sensitivity2 70 18 Focal length 163 322 19 Location data indi...

Страница 216: ...ed press to view highlighted image full frame Highlight images Use multi selector to highlight images for full frame playback playback zoom 0 199 deletion 0 203 or protection 0 201 View highlighted image J Press J to display the highlighted image full frame Delete highlighted image O See page 203 for more information Change protect status of highlighted image L U See page 201 for more information ...

Страница 217: ...s W M again to return to date list Exit to thumbnail playback Zoom in on highlighted photo X T Date list Exit to 72 frame playback Thumbnail list Press and hold X T button to zoom in on highlighted picture Highlight dates Highlight images Date list Highlight date Thumbnail list Highlight picture Toggle full frame playback J Thumbnail list View highlighted picture Delete highlighted photo s O Datel...

Страница 218: ... I Return to shooting mode K Monitor will turn off Photographs can be taken immediately Retouch photo P Thumbnail list Create retouched copy of photo highlighted in thumbnail list 0 287 To Use Description ...

Страница 219: ...ge images in 36 24 3 2 format 23 medium images or 15 small images Press W M to zoom out While photo is zoomed in use multi selector to view areas of image not visible in monitor Keep multi selector pressed to scroll rapidly to other areas of frame Navigation window is displayed when zoom ratio is altered area currently visible in monitor is indicated by yellow border View other areas of image Sele...

Страница 220: ...on in other photos at current zoom ratio Changeprotect status L U See page 201 for more information Return to shooting mode K Monitor will turn off Photographs can be taken immediately Retouch photo P Create retouched copy of current photograph 0 287 To Use Description ...

Страница 221: ...ot be deleted using the O button or the Delete option in the playback menu Note that protected images will be deleted when the memory card is formatted 0 22 272 To protect a photograph 1 Select an image Display the image in full frame playback or playback zoom or highlight it in the thumbnail list in thumbnail or calendar playback Full frame playback Thumbnail playback Calendar playback ...

Страница 222: ... deleted display the photograph or highlight it in the thumbnail list and then press the L U button A Removing Protection from All Images To remove protection from all images in the folder or folders currently selected in the Playback folder menu press the L U and O buttons together for about two seconds during playback L U button ...

Страница 223: ... option in the playback menu Once deleted photographs can not be recovered Note that pictures that are protected or hidden can not be deleted Full Frame Thumbnail and Calendar Playback Press the O button to delete the current photograph 1 Select an image Display the image or highlight it in the thumbnail list in thumbnail or calendar playback 2 Press the O button A confirmation dialog will be disp...

Страница 224: ... Calendar Playback During calendar playback you can delete all photographs taken on a selected date by highlighting the date in the date list and pressing the O button 0 197 A See Also The After delete option in the playback menu determines whether the next image or the previous image is displayed after an image is deleted 0 233 O button ...

Страница 225: ...the playback menu Press the G button and select Delete in the playback menu Highlight Selected and press 2 2 Highlight a picture Use the multi selector to highlight a picture To view the highlighted picture full screen press and hold the X T button Option Description Q Selected Delete selected pictures n Select date Delete all pictures taken on a selected date 0 206 R All Delete all pictures in th...

Страница 226: ...Repeat steps 2 and 3 to select additional pictures to deselect a picture highlight it and press W M 4 Press J to complete the operation A confirmation dialog will be displayed highlight Yes and press J SelectDate DeletingPhotographsTakenonaSelectedDate 1 Choose Select date In the delete menu highlight Select date and press 2 W M button ...

Страница 227: ...the current picture full screen Press W M to return to the date list 3 Select the highlighted date Press 2 to select all pictures taken on the highlighted date Selected dates are marked with a M icon Repeat steps 2 and 3 to select additional dates to deselect a date highlight it and press 2 4 Press J to complete the operation A confirmation dialog will be displayed highlight Yes and press J W M bu...

Страница 228: ...the system requirements on page 210 Be sure to use the latest version of ViewNX 2 which is available for download from the websites listed on page xvii as earlier versions that do not support the Df may fail to transfer NEF RAW images correctly 1 Launch the installer Start the computer insert the ViewNX 2 installer CD and launch the installer InstallingViewNX2 Your Imaging Toolbox ViewNX 2TM ...

Страница 229: ...and follow the on screen instructions 4 Exit the installer 5 Remove the installer CD from the CD ROM drive D Installation Guide For help installing ViewNX 2 click Installation Guide in Step 3 Windows Mac OS Click Yes Click OK A Windows To visit the Nikon website after installing ViewNX 2 select All Programs Link to Nikon from the Windows start menu Internet connection required q Select region if r...

Страница 230: ...ndows 8 Windows 7 Windows Vista and Windows XP note that 64 bit versions of Windows XP are not supported OS X 10 8 or 10 7 Mac OS X 10 6 Memory RAM 32 bit Windows 8 Windows 7 or Windows Vista 1 GB or more 2 GB or more recommended 64 bit Windows 8 Windows 7 or Windows Vista 2 GB or more 4 GB or more recommended Windows XP 512 MB or more 2 GB or more recommended OS X 10 8 10 7 2 GB or more 4 GB or m...

Страница 231: ... and then turn the camera on SDcardslot If your computer is equipped with an SD card slot the card can be inserted directly in the slot SD card reader Connect a card reader available separately from third party suppliers to the computer and insert the memory card A Use a Reliable Power Source To ensure that data transfer is not interrupted be sure the camera battery is fully charged If in doubt ch...

Страница 232: ... disconnect the USB cable If you are using a card reader or card slot choose the appropriate option in the computer operating system to eject the removable disk corresponding to the memory card and then remove the card from the card reader or card slot A Windows 7 If the following dialog is displayed select Nikon Transfer 2 as described below 1 Under Import pictures and videos click Change program...

Страница 233: ...r connected to the computer A Starting ViewNX 2 Manually Windows Double click the ViewNX 2 shortcut on the desktop Mac OS Click the ViewNX 2 icon in the Dock A For More Information Consult online help for more information on using ViewNX 2 A Connecting Cables Be sure the camera is off when connecting or disconnecting interface cables Do not use force or attempt to insert the connectors at an angle...

Страница 234: ...ed USB cable 1 Turn the camera off 2 Connect the USB cable Turn the printer on and connect the USB cable as shown Do not use force or attempt to insert the connectors at an angle 3 Turn the camera on A welcome screen will be displayed in the monitor followed by a PictBridge playback display D USB Hubs Connect the camera directly to the printer do not connect the cable via a USB hub ...

Страница 235: ... PictBridge printing options A Printing Via Direct USB Connection Be sure the battery is fully charged or use an optional AC adapter and power connector When taking photographs to be printed via direct USB connection set Color space to sRGB 0 240 D Selecting Photographs for Printing Images created at image quality settings of NEF RAW or TIFF RGB 0 55 can not be selected for printing JPEG copies of...

Страница 236: ...ly if supported by the printer Highlight Printer default use current printer settings Print with border print photo with white border or No border and press J to select and exit to the previous menu Time stamp Highlight Printer default use current printer settings Print time stamp print times and dates of recording on photos or No time stamp and press J to select and exit to the previous menu Crop...

Страница 237: ...ting Select date Print one copy of all the pictures taken on a selected date Print DPOF Print an existing print order created with the DPOF print order option in the playback menu 0 219 The current print order will be displayed in Step 3 Index print To create an index print of all JPEG pictures 0 55 on the memory card proceed to Step 4 Note that if the memory card contains more than 256 pictures o...

Страница 238: ...he number of prints up to 99 to deselect the picture press 3 when the number of prints is 1 Continue until all the desired pictures have been selected If you chose Select date in Step 2 press 1 or 3 to highlight a date and press 2 to toggle the highlighted date on or off To view the pictures taken on the selected date press W M Use the multi selector to scroll through the pictures or press and hol...

Страница 239: ... J to start printing To cancel before all copies have been printed press J Creating a DPOF Print Order Print Set The DPOF print order option in the playback menu is used to create digital print orders for PictBridge compatible printers and devices that support DPOF 1 Choose Select set for the DPOF print order item in the playback menu Press the G button and select DPOF print order in the playback ...

Страница 240: ...on and press 1 The picture will be marked with a Z icon and the number of prints will be set to 1 Keeping the W M button pressed press 1 or 3 to specify the number of prints up to 99 to deselect the picture press 3 when the number of prints is 1 Continue until all the desired pictures have been selected 3 Display imprint options Press J to display data imprint options W M 13 Choose number of copie...

Страница 241: ...nt DPOF in the PictBridge menu and follow the steps in Printing Multiple Pictures to modify and print the current order 0 217 DPOF print date and shooting data options are not supported when printing via direct USB connection to print the date of recording on photographs in the current print order use the PictBridge Time stamp option The DPOF print order option can not be used if there is not enou...

Страница 242: ...the camera off before connecting or disconnecting an HDMI cable 2 Connect the HDMI cable as shown 3 Tune the device to the HDMI channel 4 Turn the camera on and press the K button During playback images will be displayed on the television screen A HDMI and Live View HDMI displays connected via an HDMI cable can be used for live view 0 172 Connect to high definition device choosecablewith connector...

Страница 243: ... television that supports HDMI CEC and both the camera and television are on the television remote can be used in place of the camera multi selector and J button during full frame playback and slide shows If Off is selected the television remote can not be used to control the camera A HDMI CEC Devices When the camera is connected to an HDMI CEC device will appear in the control panel in place of t...

Страница 244: ...ault Playback folder 0 230 NC_DF Image review 0 232 Off After delete 0 233 Show next Rotate tall 0 233 On Slide show 0 234 Frame interval 2 s Option Default File naming 0 239 DSC Image quality 0 55 JPEG normal Image size 0 58 Large Image area Choose image area 0 52 FX 36 24 1 0 Auto DX crop 0 52 On JPEG compression 0 57 Size priority NEF RAW recording 0 57 Type Lossless compressed NEF RAW bit dept...

Страница 245: ...ff Shooting ends when reset is performed White balance 0 81 Auto Normal Fine tuning 0 84 A B 0 G M 0 Choose color temp 0 88 5000 K Preset manual 0 90 d 1 Set Picture Control 0 100 Standard Color space 0 240 sRGB Active D Lighting 0 110 Off HDR high dynamic range HDR mode 0 113 Off Exposure differential 0 114 Auto Smoothing 0 114 Normal Vignette control 0 241 Normal Auto distortion control 0 241 Of...

Страница 246: ...wrap a7 Number of focus points 0 249 39 points b1 Center weighted area 0 250 ø 12 mm b2 Fine tune optimal exposure 0 250 Matrix metering 0 Center weighted metering 0 Spot metering 0 c1 Shutter release button AE L 0 251 Off c2 Standby timer 0 251 6 s c3 Self timer 0 252 Self timer delay 10 s Number of shots 1 Interval between shots 0 5 s c4 Monitor off delay 0 253 Playback 10 s Menus 1 min Informat...

Страница 247: ... e5 Modeling flash 0 259 On e6 Auto bracketing set 0 259 AE flash e7 Auto bracketing Mode M 0 260 Flash speed e8 Bracketing order 0 260 MTR under over f1 D button 0 261 LCD backlight D f2 OK button 0 261 Shooting mode Select center focus point Playback mode Thumbnail on off Live view Select center focus point f3 Multi selector 0 262 Do nothing f4 Assign Fn button 0 263 Press None Press command dia...

Страница 248: ...rs 0 269 f11 Easy shutter speed shift 0 270 Off Option Default Monitor brightness 0 273 0 Auto info display 0 273 Off Clean image sensor 0 329 Clean at startup shutdown Clean at startup shutdown Flicker reduction 0 276 Auto Time zone and date Daylight saving time 0 276 Off Auto image rotation 0 277 On HDMI 0 223 Output resolution Auto Device control On Location data 0 170 Standby timer Enable Set ...

Страница 249: ...back menu tab The playback menu contains the following options G button Option 0 Delete 205 Playback folder 230 Hide image 230 Playback display options 232 Image review 232 After delete 233 Rotate tall 233 Slide show 234 DPOF print order 219 Option 0 A See Also Menu defaults are listed on page 224 ...

Страница 250: ...k Current Only pictures in the current folder will be visible during playback HideImage G button D playback menu Option Description Select set Hide or reveal selected pictures Select date Selecting this option displays a list of dates To hide all pictures taken on a date highlight the date and press 2 Selected dates are marked by a L to reveal all pictures taken on a selected date highlight it and...

Страница 251: ...l through the pictures on the memory card to view the highlighted picture full screen press and hold the X T button and press W M to select the current picture Selected pictures are marked by a R icon to deselect a picture highlight it and press W M again Continue until all the desired pictures have been selected 3 Press J Press J to complete the operation W M button ...

Страница 252: ...splay A L appears next to selected items to deselect highlight and press 2 To return to the playback menu highlight Done and press J Choose whether pictures are automatically displayed in the monitor immediately after shooting If Off is selected pictures can only be displayed by pressing the K button PlaybackDisplayOptions G button D playback menu ImageReview G button D playback menu ...

Страница 253: ...ious picture If deleted picture was first frame following picture will be displayed U Continue as before If user was scrolling through pictures in order recorded following picture will be displayed as described for Show next If user was scrolling through pictures in reverse order previous picture will be displayed as described for Show previous RotateTall G button D playback menu Option Descriptio...

Страница 254: ...nu SlideShow G button D playback menu Option Description Start Start slide show Frame interval Choose how long each picture will be displayed To Press Description Skip back skip ahead Press 4 to return to previous frame 2 to skip to next frame View additional photo info Change or hide photo info displayed 0 188 Pause resume J Pause or resume slide show Exit to playback menu G End slide show and re...

Страница 255: ...age quality 55 Image size 58 Image area 51 JPEG compression 57 NEF RAW recording 57 White balance 81 Set Picture Control 100 Manage Picture Control 106 Color space 240 Active D Lighting 110 HDR high dynamic range 112 Vignette control 241 Auto distortion control 241 Long exposure NR 242 High ISO NR 242 Auto ISOsensitivity control 70 Multiple exposure 149 Interval timer shooting 156 Option 0 A See A...

Страница 256: ...ngs can be stored in the other banks allowing the user to switch instantly from one combination to another by selecting the appropriate bank from the bank menu The default names for the four shooting menu banks are A B C and D A descriptive caption up to 20 characters long can be added as described on page 107 by highlighting the menu bank and pressing 2 RestoringDefaultSettings To restore default...

Страница 257: ...will be displayed to the left of the folder number W Folder is empty X Folder is partially full Y Folder contains 999 pictures or a picture numbered 9999 No further pictures can be stored in this folder 3 Save changes and exit Press J to complete the operation and return to the shooting menu to exit without choosing the storage folder press the G button If a folder with the specified number does n...

Страница 258: ...stored in the selected folder D Folder and File Numbers If the current folder is numbered 999 and contains 999 pictures or a picture numbered 9999 the shutter release will be disabled and no further photographs can be taken To continue shooting create a folder with a number less than 999 or select an existing folder with a number less than 999 and less than 999 images A Startup Time Additional tim...

Страница 259: ... three letters to replace the DSC portion of the file name For information on editing file names see page 107 FileNaming G button C shooting menu A Extensions The following extensions are used NEF for NEF RAW images TIF for TIFF RGB images JPG for JPEG images and NDF for dust off reference data In each pair of photographs recorded at image quality settings of NEF RAW JPEG the NEF and JPEG images h...

Страница 260: ... or when taking photographs that will be printed with ExifPrint the direct printing option on some household printers or kiosk printing or other commercial print services Adobe RGB photographs can also be printed using these options but colors will not be as vivid JPEG photographs taken in the Adobe RGB color space are DCF compliant applications and printers that support DCF will select the correc...

Страница 261: ...with other lenses Before using auto distortion control with DX lenses select On for Auto DX crop or choose an image area of DX 24 16 1 5 0 52 selecting other options may result in heavily cropped photographs or in photographs with severe peripheral distortion VignetteControl G button C shooting menu A Vignette Control Depending on the scene shooting conditions and type of lens TIFF and JPEG images...

Страница 262: ...ll slow and while photographs are being processed the capacity of the memory buffer will drop Photographs taken at high ISO sensitivities can be processed to reduce noise LongExposureNR Long ExposureNoiseReduction G button C shooting menu HighISONR G button C shooting menu Option Description High Reduce noise randomly spaced bright pixels lines or fog particularly in photographs taken at high ISO ...

Страница 263: ...tings To display the Custom Settings menu press G and select the A Custom Settings menu tab G button Main menu Custom settings bank 0 245 Custom Setting groups Custom Settings are used to customize camera settings to suit individual preferences ...

Страница 264: ...51 c3 Self timer 252 c4 Monitor off delay 253 d Shooting display d1 Beep 253 d2 Viewfinder grid display 253 d3 ISO display 254 d4 Screen tips 254 d5 CL mode shooting speed 254 d6 Max continuous release 254 d7 File number sequence 255 d8 Information display 256 d9 LCD illumination 256 d10 Exposure delay mode 256 e Bracketing flash e1 Flash sync speed 257 e2 Flash shutter speed 258 e3 Optional flash...

Страница 265: ...instantly from one combination to another by selecting the appropriate bank from the bank menu The default names for the four Custom Settings banks are A B C and D A descriptive caption up to 20 characters long can be added as described on page 107 by highlighting the menu bank and pressing 2 RestoringDefaultSettings To restore default settings highlight a bank in the Custom settings bank menu and...

Страница 266: ...er the shutter release button is pressed release priority Regardless of the option selected if the in focus indicator I is displayed when AF S is selected for autofocus mode focus will lock while the shutter release button is pressed halfway Focus lock continues until the shutter is released a Autofocus a1 AF CPrioritySelection G button A Custom Settings menu Option Description G Release Photos ca...

Страница 267: ... FocusTrackingwithLock On G button A Custom Settings menu Option Description C 5 Long When the distance to the subject changes abruptly the camera waits for the specified period before adjusting the distance to the subject This prevents the camera from refocusing when the subject is briefly obscured by objects passing through the frame 4 D 3 Normal 2 E 1 Short Off The camera immediately adjusts fo...

Страница 268: ...PointIllumination G button A Custom Settings menu Option Description Auto The selected focus point is automatically highlighted as needed to establish contrast with the background On The selected focus point is always highlighted regardless of the brightness of the background Depending on the brightness of the background the selected focus point may be difficult to see Off The selected focus point...

Страница 269: ...example pressing 2 when a focus point at the right edge of the display is highlighted q selects the corresponding focus point at the left edge of the display w No wrap The focus point display is bounded by the outermost focus points so that for example pressing 2 when a focus point at the right edge of the display is selected has no effect a7 NumberofFocusPoints G button A Custom Settings menu Opt...

Страница 270: ...e selected by the camera Exposure can be fine tuned separately for each metering method by from 1 to 1 EV in steps of 1 6 EV b Metering Exposure b1 Center WeightedArea G button A Custom Settings menu b2 Fine tuneOptimal Exposure G button A Custom Settings menu D Fine Tuning Exposure Exposure can be fine tuned separately for each Custom Settings bank and is not affected by two button resets Note th...

Страница 271: ...sure when no operations are performed The shutter speed and aperture displays in the control panel and viewfinder turn off automatically when the timer expires Choose a shorter standby timer delay for longer battery life c Timers AE Lock c1 Shutter ReleaseButtonAE L G button A Custom Settings menu c2 Standbytimer G button A Custom Settings menu ...

Страница 272: ...de Self timer delay Choose the length of the shutter release delay 0 48 Number of shots Press 1 and 3 to choose the number of shots taken each time the shutter release button is pressed Interval between shots Choose the interval between shots when the Number of shots is more than 1 c3 Self Timer G button A Custom Settings menu ...

Страница 273: ...rvo AF AF S 0 59 when focus locks while the release timer is counting down in self timer mode 0 48 or if you attempt to take a photograph when the memory card is locked 0 22 To disable the beep choose Off c appears in the information display when an option other than Off is selected Note that a beep will not sound in quiet shutter release mode mode J 0 46 regardless of the option selected Choose O...

Страница 274: ... rate for single frame The maximum number of shots that can be taken in a single burst in continuous mode can be set to any value between 1 and 100 d3 ISODisplay G button A Custom Settings menu d4 ScreenTips G button A Custom Settings menu d5 CLModeShootingSpeed G button A Custom Settings menu d6 Max ContinuousRelease G button A Custom Settings menu A The Memory Buffer Regardless of the option sel...

Страница 275: ...der will be created automatically and file numbering will begin again from 0001 Off File numbering is reset to 0001 when a new folder is created the memory card is formatted or a new memory card is inserted in the camera Note that a new folder is created automatically if a photograph is taken when the current folder contains 999 photographs Reset As for On except that the next photograph taken is ...

Страница 276: ...t LCD illuminator will light only when the D button is pressed If On is selected the control panel will be illuminated whenever the standby timer is active 0 5 note that regardless of the option selected the backlight turns off while the shutter release button is pressed Select Off for increased battery life In situations where the slightest camera movement can blur pictures select 1 s 2 s or 3 s ...

Страница 277: ...to 1 200 s When the camera shows a shutter speed of 1 200 s in exposure mode P or A auto FP high speed sync will be activated if the actual shutter speed is faster than 1 200 s 1 200 s 1 60 s Flash sync speed set to selected value A Fixing Shutter Speed at the Flash Sync Speed Limit To fix shutter speed at the sync speed limit in exposure mode S or M rotate the shutter speed dial to X An X flash s...

Страница 278: ...e reduction with slow sync Options range from 1 60 s 1 60 s to 30 s 30 s Choose a flash control mode for optional SB 400 or SB 300 flash units e2 FlashShutterSpeed G button A Custom Settings menu e3 OptionalFlash G button A Custom Settings menu Option Description 1 TTL Flash output is adjusted automatically in response to shooting conditions 0 124 2 Manual Choose a flash level Monitor pre flashes ...

Страница 279: ...ting AE only k to bracket only exposure Flash only l to perform only flash level bracketing WB bracketing m to perform white balance bracketing 0 141 or ADL bracketing y to perform bracketing using Active D Lighting 0 145 Note that white balance bracketing is not available at image quality settings of NEF RAW or NEF RAW JPEG e4 ExposureComp forFlash G button A Custom Settings menu Option Descripti...

Страница 280: ... is selected shooting will proceed in order from the lowest to the highest value This setting has no effect on ADL bracketing e7 AutoBracketing ModeM G button A Custom Settings menu Option Description F Flash speed Camera varies shutter speed Custom Setting e6 set to AE only or shutter speed and flash level Custom Setting e6 set to AE flash G Flash speed aperture Camera varies shutter speed and ap...

Страница 281: ...enter focus point K Highlight active focus point Highlight the active focus point Not used None Option Role assigned to J button Q Thumbnail on off Toggle between full frame and thumbnail playback R View histograms In both full frame and thumbnail playback a histogram is displayed 0 192 while the J button is pressed S Zoom on off Toggle between full frame or thumbnail playback and playback zoom Ch...

Страница 282: ...essed Option Role assigned to J button J Select center focus point Pressing the J button in live view selects the center focus point S Zoom on off Press the J button to toggle zoom on and off Choose the initial zoom setting from Low magnification Medium magnification and High magnification The zoom display will center on the active focus point Not used Pressing the J button has no effect in live v...

Страница 283: ...F lock Focus and exposure lock while the Fn button is pressed C AE lock only Exposure locks while the Fn button is pressed D AE lock Reset on release Exposure locks when the Fn button is pressed and remains locked until the button is pressed a second time the shutter is released or the standby timer expires E AE lock Hold Exposure locks when the Fn button is pressed and remains locked until the bu...

Страница 284: ... RAW copies with a series of photographs keep the shutter release button pressed halfway between shots To exit without recording an NEF RAW copy press the Fn button again L Matrix metering Matrix metering is activated while the Fn button is pressed M Center weighted metering Center weighted metering is activated while the Fn button is pressed N Spot metering Spot metering is activated while the Fn...

Страница 285: ... Press command dials was selected first will be set to None A Viewfinder Virtual Horizon When Viewfinder virtual horizon is selected for Custom Setting f4 Assign Fn button Press pressing the Fn button converts the exposure indicator in the viewfinder to a roll display Press the button again to restore the indicator to its normal function Camera tilted right Camera level Camera tilted left Viewfind...

Страница 286: ...ied using the Non CPU lens data option 0 163 y Active D Lighting Keeping the Fn button pressed rotate a command dial to adjust Active D Lighting 0 110 U HDR high dynamic range Keeping the Fn button pressed rotate the main command dial to choose an HDR mode the sub command dial to choose Exposure differential 0 112 V Auto ISO sensitivity control Keeping the Fn button pressed rotate a command dial t...

Страница 287: ...tively This option controls the operation of the main and sub command dials Reverse rotation Reverse the direction of rotation of the command dials Change main sub If Off is selected the main command dial controls shutter speed and the sub command dial controls aperture If On is selected the main command dial will control aperture and the sub command dial shutter speed If On Mode A is selected the...

Страница 288: ...s used to choose the picture displayed during full frame playback highlight thumbnails and navigate menus If On or On image review excluded is selected the main command dial can be used to choose the picture displayed during full frame playback move the cursor left or right during thumbnail playback and move the menu highlight bar up or down The sub command dial is used to display additional photo...

Страница 289: ...er expires or the shutter release button is pressed halfway Selecting Enable release allows the shutter to be released when no memory card is inserted although no pictures will be recorded they will however be displayed in the monitor in demo mode If Release locked is selected the shutter release button is only enabled when a memory card is inserted in the camera If W is selected the exposure indi...

Страница 290: ...hutter speed selected with the shutter speed dial by 2 3 EV in increments of 1 3 EV If the shutter speed dial is set to 4 4 s labelled in red the main command dial can be used to select shutter speeds as slow as 30 s f11 EasyShutter SpeedShift G button A Custom Settings menu ...

Страница 291: ...tness 273 Auto info display 273 Clean image sensor 329 Lock mirror up for cleaning 1 331 Image Dust Off ref photo 274 Flicker reduction 276 Time zone and date 276 Language 277 Auto image rotation 277 Image comment 278 Copyright information 279 Save load settings 280 Virtual horizon 282 Non CPU lens data 163 AF fine tune 283 HDMI 223 Location data 170 Assign remote Fn button 284 Wireless mobile ada...

Страница 292: ... highlight No and press J 2 Press J Press J to begin formatting Do not remove the memory card or remove or disconnect the power source until formatting is complete FormatMemoryCard G button B setup menu D Formatting Memory Cards Formattingmemorycardspermanentlydeletesanydatatheymaycontain Be sure to copy any photographs and other data you wish to keep to a computer before proceeding 0 211 ...

Страница 293: ...brightness If Auto info display is selected shooting information will automatically be displayed in the monitor when the shutter release button returns to its starting position after being pressed halfway MonitorBrightness G button B setup menu A See Also For information on adjusting monitor brightness in live view see page 179 AutoInfoDisplay G button B setup menu ...

Страница 294: ...ill be displayed and rEF will appear in the viewfinder and control panel displays Clean sensor and then start Select this option to clean the image sensor before starting The message shown at right will be displayed and rEF will appear in the viewfinder and control panel displays when cleaning is complete 2 Frame a featureless white object in the viewfinder With the lens about ten centimeters four...

Страница 295: ...ll be displayed Choose another reference object and repeat the process from step 1 D Image Sensor Cleaning Dust off reference data recorded before image sensor cleaning is performed can not be used with photographs taken after image sensor cleaning is performed Select Clean sensor and then start only if the dust off reference data will not be used with existing photographs D Image Dust Off Referen...

Страница 296: ...est both the 50 and 60 Hz options and choose the one that produces the best results Flicker reduction may not produce the desired results if the subject is very bright in which case you should try choosing a smaller aperture higher f number TimeZoneandDate G button B setup menu Option Description Time zone Choose a time zone The camera clock is automatically set to the time in the new time zone Da...

Страница 297: ...rientations are recorded Camera orientation is not recorded when Off is selected Choose this option when panning or taking photographs with the lens pointing up or down Language G button B setup menu AutoImageRotation G button B setup menu Landscape wide orientation Camera rotated 90 clockwise Camera rotated 90 counter clockwise A Rotate Tall To automatically rotate tall portrait orientation photo...

Страница 298: ...hooting data page in the photo information display 0 193 Done Save changes and return to the setup menu Input comment Input a comment as described on page 107 Comments can be up to 36 characters long Attach comment Select this option to attach the comment to all subsequent photographs Attach comment can be turned on and off by highlighting it and pressing 2 ImageComment G button B setup menu ...

Страница 299: ...n page 107 Copyright holder names can be up to 54 characters long Attach copyright information Select this option to attach copyright information to all subsequent photographs Attach copyright information can be turned on and off by highlighting it and pressing 2 CopyrightInformation G button B setup menu D Copyright Information To prevent unauthorized use of the artist or copyright holder names m...

Страница 300: ... menu Menu Option Playback Playback display options Image review After delete Rotate tall Shooting all banks Shooting menu bank File naming Image quality Image size Image area JPEG compression NEF RAW recording White balance with fine tuning and presets d 1 d 4 Set Picture Control Color space Active D Lighting Vignette control Auto distortion control Long exposure NR High ISO NR Auto ISO sensitivi...

Страница 301: ...Custom Settings Setup Auto info display Clean image sensor Flicker reduction Time zone and date excepting date and time Language Auto image rotation Image comment Copyright information Non CPU lens data HDMI Location data Assign remote Fn button Wireless mobile adapter Eye Fi upload My Menu Recent Settings All My Menu items All recent settings Choose tab A Saved Settings Settings are saved in a fi...

Страница 302: ... to 5 VirtualHorizon G button B setup menu Camera level Camera tilted left or right Camera tilted forward or back D Tilting the Camera The virtual horizon display is not accurate when the camera is tilted at a sharp angle forward or back If the camera is unable to measure tilt the amount of tilt will not be displayed A See Also For information on viewing a roll indicator in the viewfinder see Cust...

Страница 303: ...hen no previously saved value exists for the current lens CPU lenses only List saved values List previously saved AF tuning values To delete a lens from the list highlight the desired lens and press O To change a lens identifier for example to choose an identifier that is the same as the last two digits of the lens serial number to distinguish it from other lenses of the same type in light of the ...

Страница 304: ...is not applied to autofocus during live view A Saved Value Only one value can be stored for each type of lens If a teleconverter is used separate values can be stored for each combination of lens and teleconverter AssignRemoteFnButton G button B setup menu WirelessMobileAdapter G button B setup menu Option Description Enable Enable wireless connections to smart devices running the Wireless Mobile ...

Страница 305: ...es are prohibited When an Eye Fi card is inserted its status is indicated by an icon in the information display d Eye Fi upload disabled e Eye Fi upload enabled but no pictures available for upload f static Eye Fi upload enabled waiting to begin upload f animated Eye Fi upload enabled uploading data g Error camera can not control Eye Fi card If a flashing W appears in the control panel or viewfind...

Страница 306: ...urn Eye Fi cards on and off but may not support other Eye Fi functions Some cards may not be available in some countries or regions consult the manufacturer for more information Eye Fi cards are for use only in the country of purchase Be sure the Eye Fi card firmware has been updated to the latest version A Using Eye Fi Cards in Ad Hoc Mode Additional time may be required when connecting using Eye...

Страница 307: ...by pressing G and selecting N tab 2 Only available if P is pressed in full frame playback when a retouched image or original is displayed G button Option 0 i D Lighting 291 j Red eye correction 292 k Trim 293 l Monochrome 294 m Filter effects 295 n Color balance 296 o Image overlay1 297 7 NEF RAW processing 300 8 Resize 302 Quick retouch 304 e Straighten 304 Distortion control 305 Fisheye 305 f Co...

Страница 308: ...age are grayed out and unavailable A Image Quality Except in the case of copies created with Trim Image overlay NEF RAW processing and Resize copies created from JPEG images are the same size and quality as the original while copies created from NEF RAW photos are saved as large fine quality JPEG images and copies created from TIFF RGB photos are saved as fine quality JPEG images of the same size ...

Страница 309: ...item To exit without creating a retouched copy press G A Retouch In the case of images recorded at image quality settings of NEF JPEG 0 56 only the NEF RAW image will be retouched The camera may not be able to display or retouch images created with other devices A Monitor off Delay The monitor will turn off and the operation will be cancelled if no actions are performed for a brief period Any unsa...

Страница 310: ... a retouched copy Retouched copies are indicated by a o icon A Creating Retouched Copies During Playback Retouched copies can also be created during playback Display picture full frame and press P Highlight an option and press J Create retouched copy ...

Страница 311: ...s making it ideal for dark or backlit photographs Press 1 or 3 to choose the amount of correction performed The effect can be previewed in the edit display Press J to copy the photograph D Lighting G button N retouch menu Before After ...

Страница 312: ... before proceeding Red EyeCorrection G button N retouch menu To Use Description Zoom in X T Press X T to zoom in W M to zoom out While photo is zoomed in use multi selector to view areas of image not visible in monitor Keep multi selector pressed to scroll rapidly to other areas of frame Navigation window is displayed when zoom buttons or multi selector is pressed area currently visible in monitor...

Страница 313: ...between aspect ratios of 3 2 4 3 5 4 1 1 and 16 9 Position crop Use multi selector to position the crop Press and hold to move the crop rapidly to the desired position Create copy J Save the current crop as a separate file A Trim Image Quality and Size Copies created from NEF RAW NEF RAW JPEG or TIFF RGB photos have an image quality 0 55 of JPEG fine cropped copies created from JPEG photos have th...

Страница 314: ...pe blue and white monochrome Selecting Sepia or Cyanotype displays a preview of the selected image press 1 to increase color saturation 3 to decrease Press J to create a monochrome copy Monochrome G button N retouch menu Increase saturation Decrease saturation ...

Страница 315: ...iewed in the monitor Red intensifier Intensify reds Red intensifier greens Green intensifier or blues Blue intensifier Press 1 to increase the effect 3 to decrease Green intensifier Blue intensifier Cross screen Add starburst effects to light sources Number of points Choose from four six or eight Filter amount Choose the brightness of the light sources affected Filter angle Choose the angle of the...

Страница 316: ... green Increase amount of blue Create retouched copy Increase amount of amber Increase amount of magenta A Zoom To zoom in on the image displayed in the monitor press X T The histogram will be updated to show data only for the portion of the image displayed in the monitor While the image is zoomed in press L U to toggle back and forth between color balance and zoom When zoom is selected you can zo...

Страница 317: ... The new picture is saved at current image quality and size settings before creating an overlay set image quality and size 0 55 58 all options are available To create a NEF RAW copy choose an image quality of NEF RAW 1 Select Image overlay Highlight Image overlay in the retouch menu and press 2 The dialog shown at right will be displayed with Image 1 highlighted press J to display a list of the NE...

Страница 318: ...bed in Step 2 4 Adjust gain Highlight Image 1 or Image 2 and optimize exposure for the overlay by pressing 1 or 3 to select gain from values between 0 1 and 2 0 Repeat for the second image The default value is 1 0 select 0 5 to halve gain or 2 0 to double it The effects are visible in the Preview column 5 Preview the overlay Press 4 or 2 to place the cursor in the Preview column and press 1 or 3 t...

Страница 319: ...of recording metering shutter speed aperture exposure mode exposure compensation focal length and image orientation and values for white balance and Picture Control as the photograph selected for Image 1 The current image comment is appended to the overlay when it is saved copyright information however is not copied Overlays saved in NEF RAW format use the compression selected for Type in the NEF ...

Страница 320: ...ss 2 to display a picture selection dialog listing only NEF RAW images created with this camera 2 Select a photograph Highlight a photograph to view the highlighted photograph full frame press and hold the X T button Press J to select the highlighted photograph and proceed to the next step NEF RAW Processing G button N retouch menu ...

Страница 321: ...et to values between 2 and 2 EV The Picture Control grid is not displayed when Picture Controls are adjusted 4 Copy the photograph Highlight EXE and press J to create a JPEG copy of the selected photograph to exit without copying the photograph press the G button Image quality 0 55 Image size 0 58 White balance 0 81 Exposure compensation 0 79 Set Picture Control 0 100 High ISO NR 0 242 Color space...

Страница 322: ...t Resize To resize selected images press G to display the menus and select Resize in the retouch menu 2 Choose a size Highlight Choose size and press 2 The options shown at right will be displayed highlight an option and press J Resize G button N retouch menu ...

Страница 323: ...d pictures are marked by a 8 icon Press J when the selection is complete 4 Save the resized copies A confirmation dialog will be displayed Highlight Yes and press J to save the resized copies A Viewing Resized Copies Playback zoom may not be available when resized copies are displayed A Image Quality Copies created from NEF RAW NEF RAW JPEG or TIFF RGB photos have an image quality 0 55 of JPEG fin...

Страница 324: ...Create a straightened copy of the selected image Press 2 to rotate the image clockwise by up to five degrees in increments of approximately 0 25 degrees 4 to rotate it counterclockwise the effect can be previewed in the edit display note that edges of the image will be trimmed to create a square copy Press J to copy the photograph or press K to exit to playback without creating a copy QuickRetouch...

Страница 325: ...exit to playback without creating a copy Note that distortion control may heavily crop or distort the edges of copies created from photographs taken with DX lenses at an image area setting of FX 36 24 1 0 Create copies that appear to have been taken with a fisheye lens Press 2 to increase the effect this also increases the amount of that will be cropped out at the edges of the image 4 to reduce it...

Страница 326: ...idness or Outlines and press 4 or 2 to change Vividness can be increased to make colors more saturated or decreased for a washed out monochromatic effect while outlines can be made thicker or thinner Thicker outlines makes colors more saturated The results can be previewed in the edit display Press J to copy the photograph or press K to exit to playback without creating a copy ColorOutline G butto...

Страница 327: ...lector to adjust perspective note that greater amounts of perspective control result in more of the edges being cropped out The results can be previewed in the edit display Press J to copy the photograph or press K to exit to playback without creating a copy PerspectiveControl G button N retouch menu Before After ...

Страница 328: ...n focus Choose position If area of effect is in wide orientation press 1 or 3 to position frame showing area of copy that will be in focus If area of effect is in tall orientation press 4 or 2 to position frame showing area of copy that will be in focus Choose size If area of effect is in wide orientation press 4 or 2 to choose height If area of effect is in tall orientation press 1 or 3 to choose...

Страница 329: ...n Press J to select the highlighted photograph and proceed to the next step 3 Select a color Use the multi selector to position the cursor over an object and press the A AE L AF L button to select the color of the object as one that will remain in the final copy the camera may have difficulty detecting unsaturated colors choose a saturated color To zoom in on the picture for precise color selectio...

Страница 330: ...nclude hues from other colors The effect can be previewed in the edit display 6 Select additional colors To select additional colors rotate the main command dial to highlight another of the three color boxes at the top of the display and repeat Steps 3 5 to select another color Repeat for a third color if desired To deselect the highlighted color press O or press and hold O to remove all colors A ...

Страница 331: ...splay the retouch menu when a copy or original is played back full frame 1 Select a picture In full frame playback select a retouched copy shown by a o icon or a photograph that has been retouched and press P 2 Select Side by side comparison Highlight Side by side comparison and press J Side by sideComparison P button ...

Страница 332: ...he X T button If the copy was created from two source images using Image overlay or if the source has been copied multiple times press 1 or 3 to view the other source images or copies To exit to playback mode press the K button or press J to exit to playback with the highlighted image selected D Side by side Comparisons The source image will not be displayed if the copy was created from a photogra...

Страница 333: ...be used to create and edit a customized list of options from the playback shooting Custom Settings setup and retouch menus for quick access up to 20 items If desired recent settings can be displayed in place of My Menu 0 317 Options can be added deleted and reordered as described on the following pages G button ...

Страница 334: ...h to add and press 2 3 Select an item Highlight the desired menu item and press J 4 Position the new item Press 1 or 3 to move the new item up or down in My Menu Press J to add the new item 5 Add more items The items currently displayed in My Menu are indicated by a check mark Items indicated by a V icon can not be selected Repeat steps 1 4 to select additional items ...

Страница 335: ... items are indicated by a check mark 3 Select Done Highlight Done and press J A confirmation dialog will be displayed 4 Delete the selected items Press J to delete the selected items A Deleting Items in My Menu To delete the item currently highlighted in My Menu press the O button A confirmation dialog will be displayed press O again to remove the selected item from My Menu ...

Страница 336: ...items and press 2 2 Select an item Highlight the item you wish to move and press J 3 Position the item Press 1 or 3 to move the item up or down in My Menu and press J Repeat Steps 2 3 to reposition additional items 4 Exit to My Menu Press the G button to return to My Menu G button ...

Страница 337: ...and press J The name of the menu will change from MY MENU to RECENT SETTINGS Menu items will be added to the top of the recent settings menu as they are used To view My Menu again select O MY MENU for m RECENT SETTINGS Choose tab A Removing Items from the Recent Settings Menu To remove an item from the recent settings menu highlight it and press the O button A confirmation dialog will be displayed...

Страница 338: ... not be used with shifting or tilting CompatibleLenses Camera setting Focus mode Exposure mode Metering system Lens accessory AF M with electronic rangefinder M P S A M L M N 3D Color CPU lenses 1 Type G E or D AF NIKKOR2 AF S AF I NIKKOR 3 PC E NIKKOR series4 5 5 5 5 3 5 PC Micro 85mm f 2 8D6 5 7 3 5 AF S AF I Teleconverter8 3 Other AF NIKKOR except lenses for F3AF 9 9 3 AI P NIKKOR 10 3 Non CPU ...

Страница 339: ...d results are not achieved 15 For improved precision specify lens focal length and maximum aperture using Non CPU lens data 0 163 16 Can be used only if Non CPU lens data 0 163 has been used to specify lens focal length and maximum aperture and to set exposure meter coupling to Non AI lens 0 167 Match camera aperture setting to value selected with lens aperture ring 17 Can be used in manual exposu...

Страница 340: ...it 400mm f 4 5 600mm f 5 6 800mm f 8 1200mm f 11 Fisheye 6mm f 5 6 7 5mm f 5 6 8mm f 8 OP 10mm f 5 6 2 1cm f 4 Extension Ring K2 AF lenses for the F3AF AF 80mm f 2 8 AF 200mm f 3 5 ED AF Teleconverter TC 16 PC 35mm f 3 5 old type Reflex 1000mm f 6 3 old type NIKKOR H Auto 2 8cm 3 5 28mm 3 5 lenses with serial numbers below 362000 NIKKOR S Auto 3 5cm 2 8 35mm 2 8 lenses with serial numbers below 92...

Страница 341: ...rters are used with the AF S VR Micro Nikkor 105mm f 2 8G IF ED 1 Focus data for focus points other than the center focus point are obtained from line sensors 2 Single point AF is used when 3D tracking or auto area AF is selected for AF area mode 0 62 3 Autofocus not available Accessory Maximum aperture of lens Focus points TC 14E TC 14E II f 4 or faster f 5 6 TC 17E II f 2 8 or faster f 4 f 5 6 1...

Страница 342: ...5 by turning Auto DX crop off and selecting DX 24 16 The DX 24 16 angle of view is about 1 5 times smaller than the 35mm format angle of view To calculate the focal length of lenses in 35mm format when DX 24 16 is selected multiply the focal length of the lens by about 1 5 for example the effective focal length of a 50mm lens in 35mm format would be 75 mm when DX 24 16 is selected FX 36 24 picture...

Страница 343: ...he EP 5A is required to connect the camera to the EH 5b see page 326 for details Cable releases Cable Release AR 3 Attaches to the release socket to help prevent camera shake in close ups or under low light Filters Filters intended for special effects photography may interfere with autofocus or the electronic rangefinder The Df can not be used with linear polarizing filters Use C PL or C PL II cir...

Страница 344: ... the DG 2 magnifier or DR 3 right angle viewing attachment to the Df AntifogFinderEyepieceDK 14 AntifogFinderEyepieceDK 17A These viewfinder eyepieces prevent fogging in humid or cold conditions Right Angle Viewing AttachmentDR 5 Right Angle Viewing AttachmentDR 4 The DR 5 and DR 4 attach to the viewfinder eyepiece at a right angle allowing the image in the viewfinder to be viewed from above when ...

Страница 345: ...nnected to the Internet A message is automatically displayed when an update is found Wireless remote controllers Wireless Remote Controller WR R10 WR T10 When a WR R10 wireless remote controller is attached to the camera accessory terminal the camera can be controlled wirelessly using a WR T10 wireless remote controller Wireless Remote Controller WR 1 WR 1 units are used in groups of two or more w...

Страница 346: ...2 Insert the EP 5A power connector Be sure to insert the connector in the orientation shown using the connector to keep the battery latch pressed to one side The latch locks the connector in place when the connector is fully inserted 3 Close the battery chamber memory card slot cover Position the power connector cable so that it passes through the power connector slot and close the battery chamber...

Страница 347: ... AC adapter Connect the AC adapter power cable to the AC socket on AC adapter q and the EP 5A power cable to the DC socket w A V icon is displayed in the monitor when the camera is powered by the AC adapter and power connector ...

Страница 348: ... Use a blower to remove dust and lint then wipe gently with a soft dry cloth After using the camera at the beach or seaside wipe off sand or salt with a cloth lightly dampened in distilled water and dry thoroughly Important Dust or other foreign matter inside the camera may cause damage not covered under warranty Lens mirror and viewfinder These glass elements are easily damaged Remove dust and li...

Страница 349: ...the Clean now option or cleaning can be performed automatically when the camera is turned on or off CleanNow 1 Select Clean image sensor in the setup menu Press the G button to display the menus Highlight Clean image sensor in the setup menu and press 2 2 Select Clean now The camera will check the image sensor and then begin cleaning During cleaning P flashes in the control panel and other operati...

Страница 350: ...escription 5 Clean at startup The image sensor is automatically cleaned each time the camera is turned on 6 Clean at shutdown The image sensor is automatically cleaned during shutdown each time the camera is turned off 7 Clean at startup shutdown The image sensor is cleaned automatically at startup and at shutdown Cleaning off Automatic image sensor cleaning off A Place the Camera Base Down Image ...

Страница 351: ...y or connect an optional AC adapter and power connector The Lock mirror up for cleaning option is only available in the setup menu at battery levels over H 2 Remove the lens Turn the camera off and remove the lens D Image Sensor Cleaning Using camera controls during startup interrupts image sensor cleaning Cleaning is performed by vibrating the low pass filter If dust can not be fully removed usin...

Страница 352: ... the monitor and a row of dashes will appear in the control panel and viewfinder To restore normal operation without inspecting the low pass filter turn the camera off 5 Raise the mirror Press the shutter release button all the way down The mirror will be raised and the shutter curtain will open revealing the low pass filter The display in the viewfinder will turn off and the row of dashes in the ...

Страница 353: ...he camera off The mirror will return to the down position and the shutter curtain will close Replace the lens or body cap A Use a Reliable Power Source The shutter curtain is delicate and easily damaged If the camera powers off while the mirror is raised the curtain will close automatically To prevent damage to the curtain observe the following precautions Do not turn the camera off or remove or d...

Страница 354: ...n matter find its way onto the low pass filter clean the filter as described above or have the filter cleaned by authorized Nikon service personnel Photographs affected by the presence of foreign matter on the filter can be retouched using Capture NX 2 available separately 0 325 or the clean image options available in some third party imaging applications D Servicing the Camera and Accessories The...

Страница 355: ...strong electromagnetic radiation or magnetic fields Strong static charges or the magnetic fields produced by equipment such as radio transmitters could interfere with the monitor damage data stored on the memory card or affect the product s internal circuitry Donotleavethelenspointedatthesun Do not leave the lens pointed at the sun or other strong light source for an extended period Intense light ...

Страница 356: ...s clean Do not touch the shutter curtain The shutter curtain is extremely thin and easily damaged Under no circumstances should you exert pressure on the curtain poke it with cleaning tools or subject it to powerful air currents from a blower These actions could scratch deform or tear the curtain Storage To prevent mold or mildew store the camera in a dry well ventilated area If you are using an A...

Страница 357: ...batteries approved for use in this equipment Do not expose the battery to flame or excessive heat Keep the battery terminals clean Turn the product off before replacing the battery Remove the battery from the camera or charger when not in use and replace the terminal cover These devices draw minute amounts of charge even when off and could draw the battery down to the point that it will no longer ...

Страница 358: ...ant occasions ready a spare battery and keep it fully charged Depending on your location it may be difficult to purchase replacement batteries on short notice Note that on cold days the capacity of batteries tends to decrease Be sure the battery is fully charged before taking photographs outside in cold weather Keep a spare battery in a warm place and exchange the two as necessary Once warmed a co...

Страница 359: ...n matrix metering is used values over 161 3 EV are reduced to 161 3 EV f 1 4 f 1 f 2 f 2 8 f 4 f 5 6 f 8 f 11 f 16 f 22 f 32 4 5 3 1 2 1 3 2 1 0 1 2 3 4 5 6 7 8 9 1 0 1 1 30 15 8 4 2 1 2 4 8 15 30 60 125 250 500 1000 2000 4000 8000 2 2 2 1 2 0 1 9 1 8 1 7 1 6 1 5 1 4 EV 2 3 1 6 1 3 f 1 4 f 16 ISO 100 lens with maximum aperture of f 1 4 and minimum aperture of f 16 e g AF S NIKKOR 50mm f 1 4G Shutt...

Страница 360: ...a that have already been recorded will not be affected by removing or disconnecting the power source Viewfinder is out of focus Adjust viewfinder focus or use optional eyepiece correction lenses 0 28 324 Viewfinder is dark Insert a fully charged battery 0 18 29 Displays turn off without warning Choose longer delays for Custom Setting c2 Standby timer or c4 Monitor off delay 0 251 253 Controlpanela...

Страница 361: ...delay mode 0 256 Only one shot taken each time shutter release button is pressed in continuous release mode Turn HDR off 0 112 Photos are out of focus Rotate focus mode selector to AF 0 59 Camera unable to focus using autofocus use manual focus or focus lock 0 66 68 The shutter release button can not be used to focus when AF ON is assigned as the Press option for Custom Setting f4 Assign Fn button...

Страница 362: ... reduction 0 242 Turn Active D Lighting off to avoid heightening the effects of noise 0 110 Smudges appear in photographs Clean front and rear lens elements If problem persists perform image sensor cleaning 0 329 Colors are unnatural Adjust white balance to match light source 0 81 Adjust Set Picture Control settings 0 100 Can not measure white balance Subject is too dark or too bright 0 92 Imageca...

Страница 363: ...tches the frequency of the local AC power supply 0 276 Brightbandsappearduringliveview A flashing sign flash or other light source with brief duration was used during live view NEF RAW image is not played back Photo was taken at image quality of NEF JPEG 0 55 Can not view pictures recorded with other cameras Pictures recorded with other makes of camera may not be displayed correctly Some photos ar...

Страница 364: ...223 Adjust HDMI CEC settings for the television as described in documentation provided with the device Cannottransferphotostocomputer OS not compatible with camera or transfer software Use card reader to copy photos to computer 0 325 Photos are not displayed in Capture NX 2 Update to latest version 0 325 Image Dust Off option in Capture NX 2 does not have desired effect Image sensor cleaning chang...

Страница 365: ...n Miscellaneous Date of recording is not correct Set camera clock 0 27 276 Menu item can not be selected Some options are not available at certain combinations of settings or when no memory card is inserted ...

Страница 366: ... type G or E lenses Remove lens lower metering coupling lever and re attach lens 167 H d Low battery Ready a fully charged spare battery 29 H flashes d flashes Battery exhausted Recharge or replace battery xvi 18 19 Battery can not be used Contact Nikon authorized service representative Replace the battery or recharge the battery if the rechargeable Li ion battery is exhausted F No lens attached o...

Страница 367: ...erture higher f number 41 Subjecttoodark photo will be underexposed Use a higher ISO sensitivity 70 In exposure mode P Use flash 38 116 S Lower shutter speed 39 A Choose a larger aperture lower f number 41 A flashes B Bulb selected in exposure mode S Change shutter speed or select exposure mode M 39 42 flashes T Time selected in exposure mode S Change shutter speed or select exposure mode M 39 42 ...

Страница 368: ...s Memory insufficient to record further photos at current settings or camera has run out of file or folder numbers Reduce quality or size 55 58 Delete photographs 203 Insert new memory card 19 O flashes Camera malfunction Release shutter If error persists or appears frequently consult Nikon authorized service representative Indicator Problem Solution 0 Control panel View finder ...

Страница 369: ...ized service representative Unabletocreate new folder Delete files or insert new memory card after copying important images to computer or other device 19 203 g W O flashes Camera can not control Eye Fi card Check that Eye Fi card firmware is up to date 285 Copy files on Eye Fi card to a computer or other device and format card or insert new card 19 Memory card is locked Slidelock to write positio...

Страница 370: ...thorized service representative Unable to start live view Please wait The internal temperature of the camera is high Wait for the internal circuits to cool before resuming live view 174 Folder contains no images No images on memory card or in folder s selected for playback Select folder containing images fromPlaybackfolder menu or insert memory card containing images 19 230 All images are hidden A...

Страница 371: ...esume select Continue if available 214 Check paper Paper in printer is not of selected size Insert paper of correct size and select Continue 214 Paper jam Paper is jammed in printer Clear jam and select Continue 214 Out of paper Printer is out of paper Insert paper of selected size and select Continue 214 Check ink supply Ink error Check ink To resume select Continue 214 Out of ink Printer is out ...

Страница 372: ...128 2400 1592 1600 1064 File format NEF RAW 12 or 14 bit lossless compressed compressed or uncompressed TIFF RGB JPEG JPEG Baseline compliant with fine approx 1 4 normal approx 1 8 or basic approx 1 16 compression Size priority Optimal quality compression available NEF RAW JPEG Single photograph recorded in both NEF RAW and JPEG formats Picture Control System Standard Neutral Vivid Monochrome Port...

Страница 373: ...Compatible lenses Compatible with AF NIKKOR lenses including type G E and D lenses some restrictions apply to PC lenses and DX lenses using DX 24 16 1 5 image area AI P NIKKOR lenses and non CPU lenses IX NIKKOR lenses and lenses for the F3AF can not be used The electronic rangefinder can be used with lenses that have a maximum aperture of f 5 6 or faster the electronic rangefinder supports the ce...

Страница 374: ...e of entire frame non CPU lenses use 12 mm circle Spot Meters 4 mm circle about 1 5 of frame centered on selected focus point on center focus point when non CPU lens is used Range ISO 100 f 1 4 lens 20 C 68 F Matrix or center weighted metering 0 20 EV Spot metering 2 20 EV Exposure meter coupling Combined CPU and AI collapsible metering coupling lever Exposure mode Programmed auto with flexible pr...

Страница 375: ... Single servo AF AF S continuous servo AF AF C predictive focus tracking activated automatically according to subject status Manual focus M Electronic rangefinder can be used Focus point Can be selected from 39 or 11 focus points AF area mode Single point AF 9 21 or 39 point dynamic area AF 3D tracking auto area AF Focus lock Focus can be locked by pressing shutter release button halfway single se...

Страница 376: ...tible flash units Sync terminal ISO 519 sync terminal with locking thread White balance White balance Auto 2 types incandescent fluorescent 7 types direct sunlight flash cloudy shade preset manual up to 4 values can be stored spot white balance measurement available during live view choose color temperature 2500 K 10000 K all with fine tuning Live view Lens servo Autofocus AF Single servo AF AF S ...

Страница 377: ...languages Supported languages Arabic Chinese Simplified and Traditional Czech Danish Dutch English Finnish French German Greek Hindi Hungarian Indonesian Italian Japanese Korean Norwegian Polish Portuguese Portugal and Brazil Romanian Russian Spanish Swedish Thai Turkish Ukrainian Power source Battery One rechargeable Li ion EN EL14a battery AC adapter EH 5b AC adapter requires EP 5A power connect...

Страница 378: ...ty 85 or less no condensation MH 24 battery charger Rated input AC 100 240 V 50 60 Hz 0 2 A maximum Rated output DC 8 4 V 0 9 A Supported batteries Nikon Rechargeable Li ion Battery EN EL14a Charging time Approx 1 hour and 50 minutes at an ambient temperature of 25 C 77 F when no charge remains Operating temperature 0 C 40 C 32 F 104 F Dimensions W H D Approx 70 26 97 mm 2 8 1 0 3 8 in excluding p...

Страница 379: ...s 31 30 Distance information Output to camera Focusing Autofocus controlled by Silent Wave Motor and separate focus ring for manual focus Focus distance indicator 0 45 m to infinity Minimum focus distance 0 45 m 1 5 ft from focal plane Diaphragm blades 7 rounded diaphragm opening Diaphragm Fully automatic Aperture range f 1 8 16 Metering Full aperture Filter attachment size 58 mm P 0 75 mm Dimensi...

Страница 380: ...the AF S NIKKOR 50mm f 1 8G Special Edition are shown below Lens cap Focus distance indicator Lens mounting mark Focus distance mark CPU contacts 0 320 Focus mode switch 0 25 68 Focus ring 0 68 183 Rear lens cap Lens hood mounting mark Rubber lens mount gasket ...

Страница 381: ...ur fingers Never use organic solvents such as paint thinner or benzene to clean the lens The lens hood or NC filters can be used to protect the front lens element Attach the front and rear caps before placing the lens in its flexible pouch If the lens will not be used for an extended period store it in a cool dry location to prevent mold and rust Do not store in direct sunlight or with naphtha or ...

Страница 382: ... printer without first transferring them to a computer HDMI High Definition Multimedia Interface is a standard for multimedia interfaces used in consumer electronics and AV devices capable of transmitting audiovisual data and control signals to HDMI compliant devices via a single cable connection A Trademark Information Mac OS and OS X are registered trademarks of Apple Inc in the United States an...

Страница 383: ...t The camera supports UHS I 3 Check that any card readers or other devices with which the card will be used are SDXC compliant The camera supports UHS I Other cards have not been tested For more details on the above cards please contact the manufacturer SD cards SDHC cards 2 SDXC cards 3 SanDisk 2 GB 1 4 GB 8 GB 16 GB 32 GB 64 GB Toshiba Panasonic 4 GB 6 GB 8 GB 12 GB 16 GB 24 GB 32 GB 48 GB 64 GB...

Страница 384: ...apacity2 NEF RAW Lossless compressed 12 bit 15 4 MB 279 37 NEF RAW Lossless compressed 14 bit 19 4 MB 216 29 NEF RAW Compressed 12 bit 13 9 MB 377 47 NEF RAW Compressed 14 bit 17 0 MB 315 38 NEF RAW Uncompressed 12 bit 26 5 MB 279 30 NEF RAW Uncompressed 14 bit 34 3 MB 216 25 TIFF RGB Large 49 1 MB 151 21 Medium 28 3 MB 265 25 Small 13 2 MB 566 36 JPEG fine3 Large 7 9 MB 729 100 Medium 5 4 MB 1100...

Страница 385: ...ases the file size of JPEG images number of images and buffer capacity drop accordingly Image quality Image size File size1 No of images1 Buffer capacity2 NEF RAW Lossless compressed 12 bit 7 2 MB 618 100 NEF RAW Lossless compressed 14 bit 8 9 MB 484 96 NEF RAW Compressed 12 bit 6 6 MB 818 100 NEF RAW Compressed 14 bit 7 9 MB 692 100 NEF RAW Uncompressed 12 bit 12 0 MB 618 72 NEF RAW Uncompressed ...

Страница 386: ...366 n A d6 Max Continuous Release 0 254 The maximum number of photographs that can be taken in a single burst can be set to any amount between 1 and 100 ...

Страница 387: ...edium shutter speed 1 250 s shutter release button pressed halfway for three seconds and focus cycled from infinity to minimum range three times six shots are then taken in succession and monitor turned on for five seconds and then turned off cycle repeated once standby timer expires The following can reduce battery life Using the monitor Keeping the shutter release button pressed halfway Repeated...

Страница 388: ...es 323 Accessory shoe 116 Accessory terminal 170 325 Active D Lighting 110 145 Add items My Menu 314 Adjust viewfinder focus 28 ADL bracketing Auto bracketing set 145 259 Adobe RGB 240 AE flash Auto bracketing set 136 259 AE lock 77 AE only Auto bracketing set 136 259 AE L AF L button 66 77 267 AF 59 67 175 178 AF activation 247 AF area brackets 28 AF fine tune 283 AF point illumination 248 AF are...

Страница 389: ...7 Cloudy White balance 82 CLS 118 Color balance 296 Color outline 306 Color sketch 306 Color space 240 Color temperature 82 83 88 Compatible lenses 318 Compressed Type 57 Continuous high speed 7 46 Continuous low speed 7 46 254 Continuous release mode 7 46 Continuous servo AF 59 246 Control panel 8 Copyright 279 Copyright information 279 CPU contacts 320 360 CPU lens 25 318 320 Creative Lighting S...

Страница 390: ...ation 128 Flash control 124 Flash mode 125 126 Flash only Auto bracketing set 136 259 Flash ready indicator 121 131 Flash shutter speed 258 Flash sync speed 127 257 Flash sync terminal 117 Flexible program 38 Flicker reduction 276 Fluorescent White balance 81 f number 37 320 Focal length 165 322 Focal plane mark 69 Focus distance indicator 360 Focus distance mark 360 Focus indicator 31 66 69 Focus...

Страница 391: ...3 360 Lens mount 69 Lens mounting mark 360 Live view 172 184 Live view photography 172 Lo Sensitivity 71 Location data 170 194 Lock mirror up for cleaning 332 Long exposure NR 242 Long time exposures 44 Lossless compressed Type 57 Low pass filter 329 M M medium 58 Manage Picture Control 106 Manual 42 Manual focus 68 183 Matrix 75 Max continuous release 254 Maximum aperture 69 122 320 Maximum sensi...

Страница 392: ...racking 60 Preset manual White balance 82 90 Press the shutter release button all the way down 33 Press the shutter release button halfway 33 Print DPOF 217 Print select 217 Printing 214 Programmed auto 38 Protecting photographs 201 Q Quick retouch 304 Quiet shutter release 7 46 R Rank items My Menu 316 Rear curtain sync 125 Recent settings 317 Red intensifier Filter effects 295 Red eye correction...

Страница 393: ... 251 Start printing PictBridge 216 219 Storage folder 237 Straighten 304 Subject tracking AF 177 Sync terminal 117 T Television 222 Thumbnail 261 Thumbnail playback 196 TIFF 55 Time 44 Time stamp PictBridge 216 Time zone 26 276 Time zone and date 26 276 Timer 48 156 Trim 293 Tripod 3 Two button reset 133 Type NEF RAW recording 57 Type D lens 318 320 Type E lens 318 320 Type G lens 318 320 U Uncomp...

Страница 394: ...al or workmanship our authorized service network within the sales territory of Nikon Europe BV will without charge for labor and parts repair the product in the terms and conditions set as below Nikon reserves the right at its sole discretion to replace or repair the product 1 This warranty is only provided upon presentation of the completed warranty card and original invoice or purchase receipt i...

Страница 395: ...ce and to installation or use of the product inconsistent with the safety standards in force in the country where it is used damage caused by accidents including but not limited to lightning water fire misuse or neglect defacing illegibility or removal of the model or serial number on the product damage resulting from repairs or adjustments which have been conducted by unauthorized service organiz...

Страница 396: ... form of this manual in whole or in part except for brief quotation in critical articles or reviews may be made without written authorization from NIKON CORPORATION Nikon User Support Visit the site below to register your camera and keep up to date with the latest product information You will find answers to frequently asked questions FAQs and can contact us for technical assistance http www europ...

Отзывы: