background image

31

Pg. For more information on:

41 Confirming That the Device Driver Is Correctly Installed (Windows 2000)

11-11

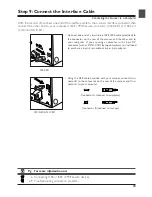
A dialog will be displayed announcing that registration is complete.
Click 

Finish

.

11-12

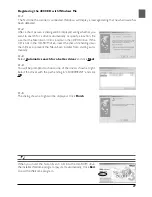
The dialog shown at right may be displayed; click 

Yes 

to restart your

computer.

After completing device registration, check that the Windows de-
vice drivers are installed and functioning normally.

11-10

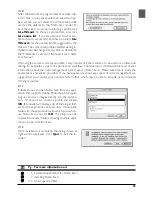
The dialog shown at right will be displayed while Windows registers
the scanner.

Содержание CoolScan IV ED

Страница 1: ...ides instructions for setting up and using your scanner Nikon Scan 3 Reference Manual on CD This electronic manual provides complete operating instructions for the software that makes your scanner run Nikon Scan 3 It is available on the reference CD provided with your scanner where it can be viewed using Adobe Acrobat Reader 4 0 available on the reference CD or later Installation and viewing instr...

Страница 2: ...requency energy and if not installed and used in accordance with the instructions may cause harmful interference to radio communications However there is no guarantee that interference will not occur in a particu lar installation If this equipment does cause harmful interference to radio or television reception which can be determined by turn ing the equipment off and on the user is encouraged to ...

Страница 3: ... and tickets such as passes and meal coupons Comply with copyright notices The copying or reproduction of copyrighted creative works such as books music paintings woodcut prints maps drawings movies and photographs is prohibited except when it is done for personal use at home or for similar restricted and non commercial use Trademark Information Apple the Apple logo Macintosh Mac OS Power Macintos...

Страница 4: ... Unplug the equipment immediately should you notice anything out of the ordinary Should you notice an unusual noise smell or smoke coming from the equipment turn the scanner off at once and unplug the power cable Continued use could cause fire or electric shock After ensuring that the equipment is no longer smoking contact your dealer or Nikon service represen tative for information on replacement...

Страница 5: ...less Use a power cord that complies with the safety standards of the country in which it is used that has a plug rated for AC 125V 10A and insulation of SVT type or better and that is more than AWG18 in thickness Observe appropriate precautions when handling the power cable Do not damage or modify the power cable Fire or electric shock could result if the cable is placed under heavy objects expose...

Страница 6: ...andling the power cable Do not place the power cable in the vicinity of a stove or heater as this could melt the insulation resulting in fire or electric shock Unplug the cable by the plug never by pulling on the cord itself Failure to observe this precaution could damage the cord resulting in fire or electric shock Do not plug the power cable into an extension cord or multi outlet adapter as this...

Страница 7: ...or Windows 98 SE 4000 ED Only Updating the Windows 98 Second Edition IEEE 1394 Drivers 15 Step 6 View the Nikon Scan 3 Reference Manual Installing Adobe Acrobat Reader 16 Step 7 Install Nikon Scan 3 Installing the Driver Software forYour Scanner 18 Step 8 Connect the Power Cable Connecting the Scanner to a Power Source 22 Step 9 Connect the Interface Cable Connecting the Scanner to a Computer 23 S...

Страница 8: ...ring the Scanner 84 Cleaning the Scanner 85 Transporting the Scanner 85 Caring for Adapters 86 Storing the SA 21 Strip Film Adapter 86 Cleaning the SA 21 Strip Film Adapter 86 Caring for the FH 3 Film Holder 89 Caring for the MA 20 S Slide Mount Adapter 89 Optional Accessories Options Available forYour Scanner 90 Specifications Specifications forYour Scanner Accessories and Optional Adapters 92 Ap...

Страница 9: ... step through the process of making your first scan Nikon Scan Quick Reference This section gives a brief overview of the driver software for your scanner Nikon Scan More detailed information on using Nikon Scan may be found in the Nikon Scan 3 Reference Manual which is available in electronic format on the reference CD included with your scanner Reference This chapter provides troubleshooting ins...

Страница 10: ...hat more information is available elsewhere in this manual or in other documentation This symbol indicates that the cross reference marked with the icon is to the Nikon Scan 3 Reference Manual on CD To make it easier to find the information you need the following symbols and conventions are used Life Long Learning As part of Nikon s Life Long Learning commitment to ongoing product support and educ...

Страница 11: ...st fromYour Scanner AboutThis Chapter The information in this chapter will help ensure that you always get the best possible results when using your scanner Be sure to read this section before using your Nikon product ...

Страница 12: ... remove an adapter from the scanner without first ejecting the film and checking that the status LED on the front of the scanner is glowing steadily Do not insert or remove adapters insert or eject film or turn the scanner off while the LED is blinking After using the scanner eject the film from the adapter and turn the scanner off then remove the adapter and close the sliding cover Sliding cover ...

Страница 13: ...t the temperature and humidity given in the specifications see below Sudden changes in temperature and humidity even when within the limits given in the specifications can cause condensation on the film Before using film check to be sure that no condensation is present If condensation is present on the film leave the film out until it dries Condensation can cause damage when film is inserted in th...

Страница 14: ...irewire hub With the exception of a USB keyboard or mouse the scanner may not function as expected when used together with other USB or IEEE 1394 Firewire devices Should you experience difficulties operating the scanner we recommend that you disconnect all other devices on the same bus and reconnect the scanner and computer Do not connect two or more scanners of the same type to the same computer ...

Страница 15: ...7 Setup Guide AboutThis Chapter This chapter takes you step by step through the process of setting up your scanner and making your first scans ...

Страница 16: ...indows 98 SE only 15 4000 ED COOLSCAN IV ED Install Photoshop LE Optional See documentation provided Step 6 View the Nikon Scan 3 Reference Manual 16 17 Step 7 Install Nikon Scan 3 18 21 Photoshop LE is not required to use your Nikon scanner If desired installa tion can be performed at a later date Macintosh users will need to copy the Nikon Scan 3 plug in into the Photoshop plug ins folder manual...

Страница 17: ...D in the CD ROM drive Windows Step 10 Turn the Scanner On 24 Step 11 Register the Scanner with Windows 25 42 Windows Step 12 Make a Scan 43 60 No Insert the Nikon Scan 3 CD into the CD ROM drive Macintosh Yes Windows Windows Macintosh Step 8 Connect the Power Cable 22 ...

Страница 18: ... COOLSCAN IV ED Connect the USB interface cable here 8 Feet Always place the scanner on one of its two sets of feet 7 IEEE 1394 Firewire interface connector 4000 ED Connect the IEEE 1394 Firewire interface cable here 6 AC connector Connect the female end of the power cable here 5 Film gate for optional SA 30 roll film adapter 4000 ED Open this gate only when you are using the SA 30 roll film adapt...

Страница 19: ...11 1 9 5 4 6 8 7 3 2 4000 ED COOLSCAN IV ED 4000 ED COOLSCAN IV ED FrontView RearView ...

Страница 20: ...s with built in Firewire ports IEEE 1394 Firewire interface cable 1 4000 ED only Use this cable to connect the 4000 ED to your com puter USB interface cable 1 COOLSCAN IV ED only Use this cable to connect the COOLSCAN IV ED to your computer Power cable 1 shape of cable depends on country of sale MA 20 S slide mount adapter 1 Use this adapter to scan mounted slides or with the FH 3 to scan strip fi...

Страница 21: ...envelope contains user registration cards and other important documents CD ROM C D R O M C D R O M C D R O M C D R O M Reference CD 1 This CD contains a reference manual for the Nikon Scan driver software together with installers forAdobe Acrobat Reader the software used to view the manual CD ROM C D R O M C D R O M C D R O M C D R O M Photoshop LE 5 0 CD ROM 1 With this application installed on y...

Страница 22: ... two sides allowing it to be installed in either of the orientations shown below Leave enough space around the scanner to ensure ease of operation at least 5 cm 2 above and on either side of the scanner and 10 cm 4 behind it When using the SA 21 strip film adapter the front of the scanner should be at least 15 cm 6 from the edge of the surface on which the scanner is placed to prevent film from fa...

Страница 23: ...nstall one of the IEEE 1394 Firewire PCMCIA cards recommended by Nikon before you can use your scan ner The IEEE 1394 Firewire interface board is not required in the case of Macintosh G3 and G4 computers with built in Firewire ports Step 4 Turn the Computer On PreparingYour Computer With the scanner off turn on your computer Wait until the operating system has finished starting up before proceedin...

Страница 24: ...Spanish French Italian Japanese and Dutch versions of Adobe Acrobat Reader 4 0 can be found on the reference CD To install Acrobat Reader follow the instructions below 6 1 Insert the reference CD in the CD ROM drive Macintosh users can proceed to Step 6 3 6 2 Windows only Double click the My Computer icon In the My Computer window double click the CD ROM drive labeled Nikon 6 3 The Nikon window wi...

Страница 25: ...icking the INDEX pdf icon in the root directory of the reference CD and choosing a language from the menu that appears When installing Nikon Scan be sure to exit all other programs including virus checking software and Adobe Acrobat Reader If desired before installing Nikon Scan you can print the Getting Started section of the reference manual which details the installation process ...

Страница 26: ...can be sure that Your computer meets the system requirements for Nikon Scan You have turned off any virus checking software that may be running You have exited all other applications After checking the above points insert the Nikon Scan 3 CD in the CD ROM drive 7 2 The Welcome window will be displayed Click Nikon Scan 3 Depending on where you purchased your scanner you may be prompted to select th...

Страница 27: ...d The color space profile selected during in stallation can be changed at any time as detailed in the Preferences section of the Nikon Scan Refer ence 3 Manual Choosing the correct color space profile is very important if the scanner is to be used in a professional setting for example as a part of a production workflow The Nikon Scan 3 Reference Manual contains information about the color manageme...

Страница 28: ...ke a few moments to view this file which may contain important information that could not be included in the manuals After reading the file click Continue to proceed with installation Depending on where you purchased your scanner the Nikon Scan 3 CD will contain installers for from one to four language versions of Nikon Scan English EN French FR German DE and Spanish ES Where installers for more t...

Страница 29: ...s information about the color management system used in Nikon Scan Please take time to study the explanations and advice provided If you have questions about any aspect of color management we suggest that you contact your national Nikon office which may be able to provide or recommend training resources 7 11 If desired you can open Nikon Scan from any appli cation that supports Adobe Photoshop 5 0...

Страница 30: ... to the AC connector on the rear of the scanner and insert the male end into a general purpose AC 100 240 V 50 60 Hz household outlet Shape of plug varies with country of purchase Be sure that the socket to which the scanner is con nected is grounded if a separate ground wire is pro vided be sure to attach the ground wire to the earth connector Power switch off Power switch on ...

Страница 31: ...Troubleshooting connection problems 4000 ED Connect one end of a 6 pin 6 pin IEEE 1394 cable provided to the connector on the rear of the scanner and the other end to your computer If you are using a computer with a 4 pin DV connector such as SONYVAIO laptop computers you will need to purchase a 6 pin 4 pin cable or 6 pin 4 pin adapter Connector A connect to computer Connector B connect to scanner...

Страница 32: ...adapter in place be sure that the FH 3 film holder is not inserted Leaving the FH 3 in the scanner can prevent the scanner from initializing normally The status LED should blink slowly about twice every three seconds while the scanner initializes If the LED flashes rapidly about five times a second there may be a problem with the scanner or with the connection to your computer Try turning the scan...

Страница 33: ...the system the first time the scanner is connected Macintosh users can proceed directly to Step 12 4000 ED SUPER COOLSCAN 4000 ED The process of registering your scanner varies with the operating system used Registering the 4000 ED withWindows 98 SE Before beginning device registration be sure that you have completed the IEEE 1394 update described in Step 5 11 1 The first time the scanner is conne...

Страница 34: ...will be displayed Click Next 11 5 In the Browse for Folder dialog select the Win98SE folder from under Nkscan INF LS4000 and click OK 11 8 A dialog will be displayed announcing that registration is complete Click Finish After completing device registration check that the Windows de vice drivers are installed and functioning normally Pg For more information on 37 ConfirmingThat the Device Driver Is...

Страница 35: ...If the CD is not in the CD ROM drive insert the disk while holding down the shift key to prevent the Nikon Scan installer from starting auto matically 11 3 Select Automatic search for a better driver and click Next 11 4 You will be prompted to choose one of the drivers shown at right Select the driver with the path ending in LS4000ME INF and click OK 11 5 The dialog shown at right will be displaye...

Страница 36: ...ed click Yes to restart your computer After completing device registration check that the Windows de vice drivers are installed and functioning normally Pg For more information on 39 ConfirmingThat the Device Driver Is Correctly Installed Windows Me ...

Страница 37: ...ct the search option and click Next Registering the 4000 ED with Windows 2000 11 1 The first time the scanner is connected Windows will display a message stating that new hardware has been detected 11 2 After a short pause the message will be replaced by the opening dialog for the Windows hardware wizard Click Next When you insert the Nikon Scan 3 CD into the CD ROM drive the installer Welcome pro...

Страница 38: ...alog select the CD ROM drive containing the Nikon Scan 3 CD Nkscan from the Look in pop up menu and double click the INF folder Open the Win2000 folder under the LS4000 folder and click Open This will return you to the dialog shown in Step 11 6 click OK 11 6 The dialog shown at right will be displayed click Browse 11 5 You will be prompted to choose the location of the driver files Select Specify ...

Страница 39: ...nnouncing that registration is complete Click Finish 11 12 The dialog shown at right may be displayed click Yes to restart your computer After completing device registration check that the Windows de vice drivers are installed and functioning normally 11 10 The dialog shown at right will be displayed while Windows registers the scanner ...

Страница 40: ...ck Browse COOLSCAN IV ED The process of registering your scanner varies with the operating system used Registering the COOLSCAN IV ED withWindows 98 SE 11 1 The first time the scanner is connected Windows will display a message stating that new hardware has been detected 11 2 After a short pause the message will be replaced by the opening dialog for the Windows hardware wizard Click Next When you ...

Страница 41: ... will be displayed Click Next 11 5 In the Browse for Folder dialog select the LS40 folder from under Nkscan INF and click OK 11 8 A dialog will be displayed announcing that registration is complete Click Finish After completing device registration check that the Windows de vice drivers are installed and functioning normally Pg For more information on 37 ConfirmingThat the Device Driver Is Correctl...

Страница 42: ...shift key to prevent the Nikon Scan installer from starting auto matically 11 3 Select Automatic search for a better driver and click Next 11 4 The dialog shown at right will be displayed Click Finish 11 5 The dialog shown at right may be displayed click Yes to restart your computer After completing device registration check that the Windows de vice drivers are installed and functioning normally W...

Страница 43: ... IV ED with Windows 2000 11 1 The first time the scanner is connected Windows will display a message stating that new hardware has been detected 11 2 After a short pause the message will be replaced by the opening dialog for the Windows hardware wizard Click Next 11 5 You will be prompted to choose the location of the driver files Select CD ROM drives and click Next When you insert the Nikon Scan ...

Страница 44: ...Next 11 7 The dialog shown at right will be displayed Click Yes 11 8 The dialog shown at right will be displayed while Windows registers the scanner 11 9 A dialog will be displayed announcing that registration is complete Click Finish 11 10 The dialog shown at right may be displayed click Yes to restart your computer After completing device registration check that the Windows de vice drivers are i...

Страница 45: ...to view a list of imaging devices ConfirmingThat the Device Driver Is Correctly Installed Windows 98SE 5Double click the listing for your scanner If your scanner is not listed as an imaging device pro ceed to Updating the Device Driver Windows 98SE 6The properties window for your scanner will be displayed If This device is working prop erly appears under Device status in the Gen eral tab the devic...

Страница 46: ...the shift key held down to prevent the installer from starting automatically insert the Nikon Scan 3 CD into a CD ROM drive Se lect Specify a location in the dialog below and click Browse If the Welcome dialog ap pears when the CD is inserted in the drive click Exit and proceed with driver installation 7In the Browse for Folder dialog select the folder on the Nikon Scan 3 CD Nkscan containing the ...

Страница 47: ...ce If an Imaging Device item ap pears click the mark next to the item to view a list of imaging devices 5Double click the listing for your scanner If your scanner is not listed as an imaging device pro ceed to Updating the Device Driver Windows Me 6The properties window for your scanner will be displayed If This device is working prop erly appears under Device status in the Gen eral tab the device...

Страница 48: ...y held down to pre vent the installer from starting automatically insert the Nikon Scan 3 CD into a CD ROM drive if theWelcome dialog appears when the CD is inserted in the drive click Exit and pro ceed with driver installation 5If you are using the 4000 ED the wizard will prompt you to choose from a list of drivers choose the driver with the path ending in LS4000ME INF and click Next This step is...

Страница 49: ...rk next to the item to view a list of imaging devices ConfirmingThat the Device Driver Is Correctly Installed Windows 2000 5Double click the listing for your scanner If your scanner is not listed as an imaging device pro ceed to Updating the Device Driver Windows 2000 6The properties window for your scanner will be displayed If This device is working prop erly appears under Device Status in the Ge...

Страница 50: ...pear Click Next 5Select Search for a suitable driver for my device recommended and click Next 6Insert the Nikon Scan 3 CD in a CD ROM drive if theWelcome dialog appears when the CD is inserted in the drive click Exit and pro ceed with driver installation Follow the in structions in steps 11 5 to 11 10 of Register ing the 4000 ED with Windows 2000 or 11 5 to 11 8 of Registering the COOLSCAN IV ED w...

Страница 51: ...hop or it can be used as a stand alone application for scanning images and saving them to disk To start Nikon Scan from another application select Nikon Scan from the application s list of acquire or import sources If you are using a Macintosh the Nikon Scan 3 0 plug in must first be copied to the Import Export folder in the application s plug ins folder When using Nikon Scan as a stand alone appl...

Страница 52: ...wing steadily open the sliding cover on the front of the scanner and slide a film adapter into the adapter slot as shown below with the film slot towards the front of the scanner If you are using the SA 21 be sure that the connectors on the rear of the adapter are fully inserted in the connectors at the rear of the adapter slot the status LED will blink when the connectors are fully inserted Pg Fo...

Страница 53: ...cognize the adapter push the adapter back into the adapter slot to re establish the connection Pg For more information on 75 Scanning short long or damaged film strips 71 What to do if film jams in the SA 21 12 3 Insert the film to be scanned into the adapter film slot The type of film that can be scanned depends on the adapter This step describes the kinds of film that can be used with the SA 21 ...

Страница 54: ...de smoothly stopping when it contacts the back of the film slot To remove a slide press the eject button and pull the slide the rest of the way out with your fingers The MA 20 S can also be used to scan film strips of one to six frames using the FH 3 film holder Slides for use in the MA 20 S must be between 1 0 and 3 2 mm thick and from 49 to 50 8 mm in width Pg For more information on 75 Scanning...

Страница 55: ... color model menu Calibrated RGB is the best choice in most cir cumstances The Grayscale option is for use when scanning black and white monochrome film while CMYK is intended for professionals who wish to create a file ready for printing on an industrial four color printer Pg For more information on 26 Making a scan ...

Страница 56: ...icon will change to click the button again to return to a frame number display 12 6 SA 21 only If you are using the SA 21 strip film adapter you can choose the frames to be scanned from the thumb nail drawer Click the thumbnail drawer tab to open the thumbnail drawer Thumbnail drawer tab Click here to display and hide thumbnails SA 21 ...

Страница 57: ...own the shift key while clicking two images to select the images and all frames between them Pg For more information on 26 Scanning multiple frames Selected thumbnail If the thumbnail drawer is too small to display all the frames at once you can enlarge the drawer by dragging its lower right corner or use the scroll slider to view frames that do not fit it in the drawer Drag here to enlarge thumbn...

Страница 58: ...lick the Preview button to create a preview of the image to be scanned You can also create a preview by double clicking the desired frame in the thumbnail drawer The preview will be displayed in the preview area ...

Страница 59: ...es each containing an information display or controls for a specific task If theTool Chest is not already open on the desktop you can open theTool Chest by clicking the Tools button in the scan win dow and selecting Tool Palette 1 from the menu that appears To open a tool palette within theTool Chest click on the triangle to the left of the palette s title ...

Страница 60: ...e preview area can be rotated and flipped using the following four buttons Rotate the image ninety degrees to the right Rotate the image ninety degrees to the left Flip the image horizontally Flip the image vertically Any flips and rotations performed on the image are reflected in the orientation of the letter R in the LayoutTools palette Pg For more information on 43 The LayoutTools palette Click...

Страница 61: ...the effects of film grain first check Enable Post Processing Faded colors can be restored adjusting the Digital ROC for Restoration of Color slider while the image can be processed to minimize grain using the Digital GEM for Grain Equalization and Management slider Moving the sliders to the right increases the effects of Digital ICE3 To view the effects of Digital ROC or Digital GEM in the preview...

Страница 62: ... its boundaries To change the position of the crop place the cursor inside the selected area and drag it to a new location 12 12 Using the tools in the Crop palette specify the resolution and size at which the image will be printed or displayed on a monitor after scanning the output resolution and size Open the Crop palette by clicking the triangle at its top left corner Click ...

Страница 63: ...ou want to select the general area to be scanned using the mouse then specify the exact dimensions of the image to fit it into a pre determined space for example in a magazine or on a web page Follow the directions above to select the output resolution and output units then enter the desired values for Width and Height in the output size text boxes The crop selected in the preview area will automa...

Страница 64: ...hannels Color Balance The Color Balance palette can be used to adjust brightness contrast and color balance over the entire tone range LCH Editor The LCH Editor is used to adjust brightness and contrast in specific portions of the tone range edit chroma to modify color saturation or vividness and change one set of hues or colors in the image to a different color Unsharp Mask The tools in the Unsha...

Страница 65: ...ack and forth between the processed and original image The image produced when you click the Scan button to open the image in the host application will be the same as the image in the Processed tab When using Nikon Scan as a stand alone application you can use the Ctrl T Windows or T Macintosh keyboard shortcut to switch between the Processed and Natural tabs ...

Страница 66: ...58 The scanned image will be opened in an independent image window where it can be saved to disk 12 14 To scan the image click the Scan button Windows Macintosh ...

Страница 67: ...12 14 or the film can be ejected and new film inserted and previewed To eject a slide from the slide mount adapter press the eject button and then pull the slide the rest of the way out with your fingers To eject film from the SA 21 click the eject button in the scan window After confirming that the scanner s status LED is glowing steadily you can insert a new film or slide and conduct a preview a...

Страница 68: ...to turn the scanner off When using the 4000 ED with a computer running Win dows 98 SE or Windows Me before turning the scanner off you will need to remove the scanner from the system Click the Unplug or Eject Hardware icon in the task bar with the left mouse button and select Stop Nikon SUPER COOLSCAN 4000 ED from the menu that appears When the message The Nikon LS 4000 ED device can now be safely...

Страница 69: ...hapter provides a quick guide to the centerpiece of the Nikon Scan interface the scan window For more complete information on installing and using Nikon Scan see the Nikon Scan 3 Reference Manual on CD Nikon Scan Quick Reference ...

Страница 70: ...the control under the mouse cursor Thumbnail drawer tab F Click to select frames to be scanned from multi frame film Preview area G The preview image is displayed here A B C D G F E Tool chest H Contains tools for setting the image orientation and choosing the portion of the im age to be scanned controlling the physical dimen sions and file size of the image when opened in the host applica tion en...

Страница 71: ...ocus point Window Buttons Prefs click to open the prefer ences dialog Help click to open the Nikon Scan help file Tools open the Tool Chest or Scan Progress windows Settings Menu Using the options in this menu you can reset the scanner to default set tings or save scanner settings suited to particular scanning conditions and recall them as desired MediaType Menu Adjusts scanner settings to match t...

Страница 72: ...iew Button Clicking this button displays a pre view of the image to be scanned if multiple frames are selected in the thumbnail drawer a preview will be performed for each frame You will need to create a new preview after changing the media type or using the zoom buttons TheThumbnail DrawerTab This tab is only displayed when a multi frame adapter such as the SA 21 is inserted in the scanner Clicki...

Страница 73: ...diting tools offered by Nikon Scan the curves tool is useful when adjusting con trast and making changes to color balance that effect only a specific portion of the tone range shadows mid tones or highlights Color Balance Use the color balance tools to make adjustments to brightness contrast and color balance that affect the entire image These tabs allow for a quick before and after comparison sho...

Страница 74: ...log Gain Using analog gain you can adjust colors by directly altering the ex posure value for each of the col ored elements in the scanner s light source The Scan Progress Window Scanner Extras These tools offer control over fea tures specific to your scanner This window shows the progress of preview and scan operations The current task can be cancelled by clicking the Stop button Tasks that have ...

Страница 75: ...ur scanner will not scan re installing the scanner drivers and troubleshooting for the SA 21 Caring for your scanner Optional accessories available for the 4000 ED SUPER COOLSCAN 4000 ED and COOLSCAN IV ED Scanner specifications Reference Troubleshooting Maintenance Optional Accessories Specifications ...

Страница 76: ...is off reconnect the power cable The scanner is off Turn the scanner on The power supply to scanner has been interrupted Try plugging a different device into the outlet used by the scanner to determine whether the problem is caused by a failed fuse or circuit breaker The status LED flashes rapidly scanner not connected to computer or computer off The FH 3 film holder was inserted Turn the scanner ...

Страница 77: ...ed Turn the scanner and computer off and disconnect the scanner from the computer Wait five seconds then turn the scanner on again If the status LED flashes rapidly a hardware malfunction has occurred Contact your retailer or Nikon service representative for advice If the status LED blinks slowly at first and then glows steadily turn the scanner off and reconnect it to your computer then start you...

Страница 78: ...or more informa tion on system requirements The interface board is not compatible with Nikon Scan If you are using the 4000 ED check the compatiblity infor mation provided with your scanner to determine whether the IEEE 1394 Firewire board you are using is compatible with Nikon Scan if you are usingWindows computer with a built in IEEE 1394 port check the make and model num ber of your computer Up...

Страница 79: ...film can be used in the SA 21 wait until the status LED is glowing steadily and re insert the film If the film can not be scanned using the SA 21 you may still be able to scan it using the FH 3 film holder with the MA 20 S slide mount adapter If there is no problem with the film dust or dirt inside the adapter may be interfering with scanning See Maintenance Caring for Adapters for instructions on...

Страница 80: ...able for use in the SA 21 the film may need to be modified before use see Scanning Short Long or Damaged Film Strips below If the film can be used in the SA 21 wait until the status LED is glowing steadily and re insert the film If the film can not be scanned using the SA 21 you may still be able to scan it using the FH 3 film holder with the MA 20 S slide mount adapter If there is no problem with...

Страница 81: ...lace the adapter on a table or other flat stable surface before opening the cover If you hold the adapter in your hand while removing the upper cover the adapter could fall to the floor and be damaged If the end of the film strip is not visible rotate the toothed wheel until the end of the film protrudes from either end of the adapter Release button Upper cover Front panel ...

Страница 82: ... adapter and scanner on a table or other flat stable surface The adapter or scanner could be damaged should either fall to the floor After removing the film follow the steps above in reverse order to close and lock the roller frame and return the upper cover to its place before closing the front cover Frame lock lever Pull gently on the film to remove it from the film slot or from the rear of the ...

Страница 83: ...Long or Damaged Film Strips This section details how to scan film that can not be used in the SA 21 FilmThat Can Not Be Used in the SA 21 Pg For more information on 78 Using the FH 3 film holder 90 Optional accessories for the 4000 ED Problem Solution Perforations Perforations 6 mm or more Less than 30 mm Film strip is more than six frames long Using scissors cut the film into lengths of two to si...

Страница 84: ...ed Before It Can Be Used in the SA 21 Problem Solution Before scanning remove dirt and dust from the film and perforations with a blower and wipe off fingerprints with a dry soft cloth being careful not to scratch the film Film is cut on an angle or torn Trim the end of film straight across being care ful not to cut across the perforations The final perforation has been cut or torn Trim the film s...

Страница 85: ...am in the adapter If the film jams use the FH 3 film holder with the MA 20 S slide mount adapter The end of the film is folded Trim the folded portion from the film cutting the film straight across and being careful not to cut across the perforations The end of the film is tapered Trim the end of film straight across being careful not to cut across the perforations ...

Страница 86: ...strip film adapter can be scanned in the MA 20 S slide mount adapter using the FH 3 film holder FH 3 MA 20 S Eject button Eject Button When removing the FH 3 film holder from the adapter do not use the eject button Remove the holder by hand after confirming that the scanner is not in operation ...

Страница 87: ...79 Hold the adapter with the Nikon logo upper most Unlatch the holder snaps and flip the upper holder open Upper holder Nikon logo ...

Страница 88: ...aperture in the lower holder The shiny surface of the film should be uppermost the emulsion surface lowermost so that the frame numbers are not reversed Aperture Lower holder Frame number Return the upper holder to its original posi tion aligning the ends with the ends of the lower holder ...

Страница 89: ...81 Fasten the snap on the FH 3 and fit the upper and lower ends of the holder together Slide the holder until the frame to be scanned appears in one of the two apertures in the FH 3 Apertures ...

Страница 90: ...e a blower to remove dirt and dust from the film and film holder Dirt and dust can lower scan quality and scratch the film After scanning remove the film holder from the adapter and the MA 20 S from the adapter slot then close the sliding cover To remove the FH 3 from the adapter wait until the scanner s status LED glows steadily and then remove the FH 3 by hand Do not use the eject button on the ...

Страница 91: ...Order The position of the frame scanned is shown in the diagram below Direction of insertion Frame scanned Frame scanned Frame scanned Frame scanned Frame scanned Frame scanned Frame 1 Frame 2 Frame 3 Frame 4 Frame 5 Frame 6 ...

Страница 92: ...hine We recommend that you take your scanner and adapters to an authorized Nikon service representative once every one to two years for inspection and once every three to five years for servicing a fee is charged for these services Frequent inspection and servicing are particularly recommended in the case of scanners used in commercial applications When not using the scanner remove any adapters an...

Страница 93: ...e Scanner Follow the steps below to prepare the scanner for transport 1 Remove any adapters and close the sliding cover 2 Turn the scanner on 3 Wait for the status LED on the front of the scanner to stop blinking 4 Turn the scanner off 5 Disconnect the power and interface cables 6 After checking that no film remains in the adapters package the scanner and adapters in the original packing materials...

Страница 94: ...eriod store it where the temperature is between minus twenty and plus sixty degrees Centigrade 4 F 140 F the humidity is between twenty and ninety percent no condensation Cleaning the SA 21 Strip Film Adapter When cleaning the strip film adapter press the release button on the upper cover and open the front panel Open and remove the upper cover Release button Upper cover Front panel ...

Страница 95: ...e adapter several times in succession possibly resulting in damage to the film Should this occur you will need to clean the rollers If the film continues to jam after the rollers have been cleaned consult with your nearest Nikon service representative Using a dry cotton swab or a swab that has been slightly dampened with water and wrung out remove dirt from the rollers with while turning the tooth...

Страница 96: ...ll of your thumb Do not use force or attempt to turn the wheel with a screwdriver or other rigid object as this could deform the wheel Work with the adapter and scanner on a table or other flat stable surface The adapter or scanner could be damaged should either fall to the floor Roller frame ...

Страница 97: ...hol or paint thinner Use a blower to remove dust Clean dirt from the holder with a soft dry cloth or dampen the cloth with a neutral detergent to remove particularly stubborn stains drying once cleaning is complete Caring for the MA 20 S Slide Mount Adapter When cleaning the adapter do not use volatile cleaners such as alcohol or paint thinner Use a blower to remove dust Clean dirt from the adapte...

Страница 98: ...dapter for APS IX240 Film The IA 20 S is used to scan APS IX240 film For information on optional adapters see the manual supplied with the adapter FH G1 Medical Slide Holder The FH G1 is used in combination with the MA 20 S to scan prepared microscope slides containing samples of pathological tissue FILM 2 2 5 0 2 8 3 9 ...

Страница 99: ...h the scanner installed horizontally for automated sequential scanning of mounted 35 mm slides 1 0 3 2 mm thick and 49 0 50 8 mm across feeder can hold approximately fifty slides 1 5 mm in thickness The SF 200 S comes with an attachment for scanning thick mounts with rounded edges the attachment utility provided with Nikon Scan is required when installing and removing the attachment the attachment...

Страница 100: ...in the MA 20 S or SF 200 S 25 1 38 0 mm when scanning 35 mm film in the SA 21 or SA 30 18 6 28 4 mm when scanning APS IX240 film Scan range 3946 5782 pixels when scanning 35 mm film in the MA 20 S or SF 200 S 3946 5959 pixels when scanning 35 mm film in the SA 21 or SA 30 2916 4453 pixels when scanning APS IX240 film Effective aperture 22 5 34 3 mm when scanning 35 mm film in the MA 20 S or SF 200...

Страница 101: ...allation not possible with optional SF 200 S slide feeder Horizontal installation not possible with optional SA 30 film roll adapter Duration of Scanning on processes Computer Gateway Performance PentiumIII 850MHz RAM 768MB OS Windows 2000 Using the IEEE 1394 I F Board included in the 4000 ED package Using MA 20 for a slide mount Input Resolution 4000dpi Scan Bit Depth 14bit CMS off Output Resolut...

Страница 102: ...Effective aperture 22 5 34 3 mm when scanning 35 mm film in the MA 20 S 23 3 36 0 mm when scanning 35 mm film in the SA 21 16 1 26 9 mm when scanning APS IX240 film Effective scan range 2565 3911 pixels when scanning 35 mm film in the MA 20 S 2657 4104 pixels when scanning 35 mm film in the SA 21 1836 3067 pixels when scanning APS IX240 film Scanning system Fixed film movable plane single pass opt...

Страница 103: ... both vertical and horizontal installations FH 3 STRIP FILM HOLDER Film 35 mm film of one to six frames color or monochrome positive or negative Dimensions 262 0 4 7 50 5 mm 10 31 0 18 1 99 W H D Weight Approximately 40 g 1 43 oz Operating Mode Can be used with the MA 20 S slide mount adapter in both vertical and horizontal installations SA 21 STRIP FILM ADAPTER Film 35 mm film of two to six frame...

Страница 104: ...or or mono chrome positive or negative Feed Mechanism Automatic feed with built in motor Power Source Supplied from scanner Dimensions Adapter 80 70 230 mm 3 15 2 76 9 06 W H D Take up reel 90 160 230 mm 3 54 6 30 9 06 W H D Weight Adapter Approximately 500 g 1 lb 1 86 oz Take up reel Approximately 500 g 1 lb 1 86 oz Operating Mode Can only be used in a vertical installation SF 200 S SLIDE FEEDER ...

Страница 105: ... the 4000 ED SUPER COOLSCAN 4000 ED Appendix A de scribes how to install the IEEE 1394 Firewire interface board provided with your scanner Appendix B provides instructions for installing the IEEE 1394 update for Windows 98 Second Edition included on the Nikon Scan CD ...

Страница 106: ...of the models tested and approved by Nikon see list provided separately The IEEE 1394 Firewire interface board provided with the 4000 ED can not be installed in laptop computers or in computers not equipped with a PCI bus If your laptop is not equipped with a built in IEEE 1394 Firewire port or if your laptop is equipped with a built in IEEE 1394 Firewire port but is not one of the models listed a...

Страница 107: ...ng PCI boards see the documentation provided with your computer Do not use force when installing the interface board Excessive force could damage the computer or the board If you will be using the interface board with de vices that require power to be supplied by the computer you will need to connect the board to the computer s power supply You will not need to connect the power supply if you will...

Страница 108: ... Windows 98 SE Step 1 The first time the computer is powered on with the board in place the dialog shown at right will be displayed Click Next Step 2 Select Search for the best driver for your device Recom mended and click Next Step 3 The dialog shown at right will be displayed After making sure that none of the options are selected click Next Step 4 Select The updated driver Recommended NEC Firew...

Страница 109: ...nd enter D WIN98 substi tute the drive letter of your CD ROM drive for D in the Copy files from text box and click OK Step 7 The dialog shown at right will be displayed Click Finish Step 8 Insert the Nikon Scan 3 CD into the CD ROM drive Double click on the My Computer icon and open the CD ROM drive Open the Microsoft folder and double click 242975USA8 EXE Follow the on screen directions to comple...

Страница 110: ...n place Windows 2000 will automatically install the board drivers To confirm that the drivers are installed and functioning normally Step 1 Click on the My Computer icon with the right mouse button and select Properties from the menu that appears Step 2 In the System Properties window open the Hardware tab and click the Device Manager button Step 3 Check that NEC Firewarden OHCI Compliant IEEE 139...

Страница 111: ...users of Windows 2000 Windows Me and Macintosh computers will not need to perform this update Step 1 Turn on your computer and insert the Nikon Scan 3 CD in the CD ROM drive Double click on the My Computer icon and open the CD ROM drive Open the Microsoft folder and double click 242975USA8 EXE Follow the on screen directions to complete installation Step 2 When the dialog shown at right is display...

Страница 112: ...ecifications 14 Status LED 4 10 24 44 45 60 71 85 Registration 13 Rollers 74 87 88 Perforations film 75 76 77 Photoshop LE 13 Preview 50 62 64 Nomenclature 10 62 Non emulsion surface 80 Macintosh computers 20 44 Media 47 Medical Holder FH G1 90 94 Layout Tools 65 IEEE 1394 devices connecting 6 23 IEEE 1394 interface card 12 15 A 2 Icons 16 20 44 Inspection 84 Installation 16 18 A 3 A 4 Film holder...

Отзывы: