background image

Содержание COOLPIX S3500

Страница 1: ...Nikon DIGITAL CAMERA COOLPI X 3500 Reference Manual ...

Страница 2: ...ing effects that are fun and easy to apply while shooting Quick effects _ 30 39 Create images with effects in three easy steps simply by shooting selecting and saving Thirty effects are available You can preview the results of each effect on the image and choose your favorite one to suit the scene or your mood You can aWso apply effects to images later by pressing the _ button during playback _33 ...

Страница 3: ...i_iiiii iii_ RecordingandPlayingBackMovies General Camera Setup Technical Notes and Index ...

Страница 4: ...amera Before using the camera please read the information in For Your Safety _ viii x and familiarize yourself with the information provided in this manual After reading please keep this manual handy and refer to it to enhance your enjoyment of your new camera ...

Страница 5: ...l If you want to start using the camera right away see Basic Steps for Shooting and Playback 1_13 To learn about the parts of the camera and information that is displayed in the monitor see Parts of the Camera _ 1 ifl ...

Страница 6: ...D SDHC and SDXC memory cards are referred to as memory cards in this manual The setting at the time of purchase is referred to asthe default setting The names of menu items displayed in the camera monitor and the names of buttons or messages displayed on a computer monitor appear in bold In this manual images are sometimes omitted from monitor display samples so that monitor indicators can be more...

Страница 7: ...y Only Nikon brand electronic accessories including battery chargers batteries Charging AC Adapter and AC adapters certified by Nikon specifically for use with this Nikon digital camera are engineered and proven to operate within the operational and safety requirements of this electronic circuitry THE USE OF NON NIKON ELECTRONIC ACCESSORIES COULD DAMAGE THE CAMERA AND MAY VOID YOUR NIl ON WARRANTY...

Страница 8: ...al government bonds even if such copies or reproductions are stamped Sample The copying or reproduction of paper money coins or securities which are circulated in a foreign country is prohibited Unless the prior permission of the government was obtained the copying or reproduction of unused postage stamps or post cards issued by the government is prohibited The copying or reproduction of stamps is...

Страница 9: ...ersonal image data Ensuring the privacy of such data is the user s responsibility Before discarding a data storage device or transferring ownership to another person erase all data using commercial deletion software or _rmat the device and then completely refill it with images containing no private in_rmation _r example images of empty sky Be sure to also replace any images selected for the Select...

Страница 10: ...ake the equipment to a Nikon authorized service representative for inspection A Do not disassemble Touching the internal parts of the camera or Charging AC Adapter could result in injury Repairs should be performed only by qualified technicians Should the camera or Charging AC Adapter break open as the result of afall or other accident take the product to a Nikomauthorized service viii representat...

Страница 11: ...lation or casing Do not expose the battery to flame or to excessive heat Do not immerse in or expose to water Put the battery in the battery case before transporting it Do not transport or store with metal objects such as necklaces or hairpins The battery is prone to leakage when fully discharged To avoid damage to the product be sure to remove the battery when no charge remains Discontinue use im...

Страница 12: ...age the equipment Observe caution when using the flash Using tile flash close to your subject s eyes could cause temporary visual impairment Particular care should be observed if photographing infants when the flash should be no less than one meter 3 ft 4 in from the subject Do not operate the flash with the flash window touching a person or object Failure to observe fl_is precaution could result ...

Страница 13: ...ause harmful interference to radio communications However there is no guarantee that interference will not occur in a particular installation If this equipment does cause harmful interference to radio or television reception which can be determined by turning the equipment offand on the user is encouraged to try to correct the interference by one or more of the following measures Reorient or reloc...

Страница 14: ...TYPE DISPOSE OF USED BATTERIES ACCORDING TO THE INSTRUCTIONS Tills symbol indicates that this _ product is to be collected separately The following apply only to users in European countries This product is designated for separate collection at an appropriate collection point Do not dispose of as household waste For more information contactthe retailer or the local authorities in charge of waste ma...

Страница 15: ...ff 25 Step 2 Select a Shooting Mode 26 Available Shooting Modes 27 Step 3 Frame a Picture 28 Using the Zoom 29 Step 4 Focus and Shoot 30 The Shutter release Button 31 Step 5 Play Back Images 32 Step 6 Delete Images 34 Shooting Features 37 I_1 Auto Mode 38 Using Quick Effects 39 Scene Mode Shooting Suited to Scenes 40 Displaying a Description of Each Scene Mode Help Display 41 Scene Mode and Featur...

Страница 16: ...Movies 90 Functions That Can Be Set Using the MENU Button Movie Menu 94 Movie Playback 95 General Camera Setup 97 Functions That Can Be Set Using the MENU Button Setup Menu 98 Reference Section _1 Using Panorama Assist _2 Favorite Pictures Mode _5 Adding Images to Albums _5 Viewing images in an Album _6 Removing images from Albums _7 Changing Icons Assigned to Albums _8 Auto Sort Mode _9 Auto Sort...

Страница 17: ...d Memory Card _61 The Movie Menu _63 Movie Options _63 Autofocus Mode _65 Wind Noise Reduction _65 The Setup Menu _66 Welcome Screen _66 Time Zone and Date _67 Monitor Settings _70 Print Date Imprinting Date and Time _72 Vibration Reduction _73 Motion Detection _75 AF Assist _76 Digital Zoom _77 Sound Settings _78 Auto Off _79 Format Memory Format Card _80 Language _81 Video Mode _82 Charge by Com...

Страница 18: ...Cleaning _ _ 6 Storage _ _ 6 Troubleshooting _ _ 7 Specifications _ _ 17 Supported Standards _ _ 21 Approved Memory Cards _ _ 22 Index _ _s24 xw ...

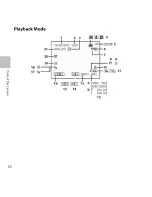
Страница 19: ...lains information that is displayed in the monitor The Camera Body 2 Attaching the Camera Strap 5 Using Menus the MENU Button 6 The Monitor 8 Shooting Mode 8 Playback Mode 10 o t If you want to start using the camera right away see Basic Steps for Shooting and Playback _ 13 1 ...

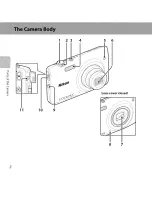
Страница 20: ...11 1 2 3 4 10 9 5 6 Lenscover closed I f ii 8 7 ...

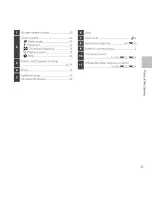
Страница 21: ...amp 24 25 Q Flash 53 Selhtimer lamp 55 AF assist illuminator 98 I Lens g Lens cover _ _ 2 _ Built in microphone 90 _59 U Eyelet for camera strap 5 Connector cover 16 80 _22 _26 USB audio video output connector 16 80 _22 _26 o ...

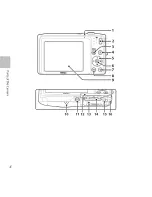
Страница 22: ... I o 10 11 12 13 14 15 16 ...

Страница 23: ...7 a_ apply selection button D_ delete button 34 95 _60 _ MI NUbutton 6 62 78 94 98 _ Speaker 95 _ _60 Tripod socket _ 19 Battery cha m bet memory card slot cover 14 15 _ Battery chamber 14 _ Memory card slot 18 Q Battery latch 14 Power connector cover for connection with optional AC adapter _ _94 Attaching the Camera Strap ...

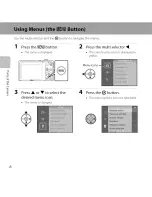
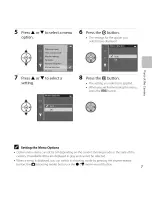
Страница 24: ...menus 1 Press the MENUbutton 2 Press the multi selector 4 The menu isdisplayed The current menu icon isdisplayed in yellow Menu icons 3 Press or to select the 4 Press the _ button desired menu icon The menu options become sdectable The menu is changed A _ aJ Y ...

Страница 25: ...ied _ When you are finished using the menu press the MENUbutton A Y Setting the Menu Options Certain menu items cannot be set depending on the current shooting mode or the state of the camera Unavailable items are displayed in gray and cannot be selected When a menu is displayed you can switch to shooting mode by pressing the shutter release button the 0 shooting mode button or the _ movie record ...

Страница 26: ...the indicators below are displayed when the camera isturned on or is in operation and they disappear after a few seconds elapse when Photo info is set to Auto info in Monitor settings _98 Shooting Mode 37 _ 1 36M I 2 4 s 7 li I _ _ 10 32 I_E_ L _ 1112 _ _ r II II r _ F L _P 29 J _ I _ L_ s _16 I I H H _ _ _ _ _ 26 25 24 23 21_ I g_ 18 ...

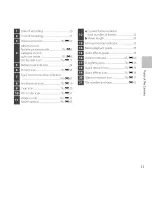
Страница 27: ...h 90 0 _64 Image mode 63 0 _32 _ Number of exposures remaining still images 24 _33 Internal memory indicator 24 90 m Aperture value 30 m Print date 98 _72 Shutter speed 30 Focus area auto 30 63 _42 _ Focus area for manual or center 63 _43 _ ocus area face detection pet detection 30 46 49 63 _42 M Focus area subject tracking 63 _43 ISO sensitivity 63 _39 Exposure compensation value 59 Color options...

Страница 28: ...Playback Mode 2 3 21 20 19 18 N _ 15 14 b E _ 2_E_ 0_ E 2_E_0_ 12 I0 ...

Страница 29: ...cator 99 _87 _ Small picture icon 78 _19 g Crop icon 74 _ _20 _ Print order icon 78 d_51 Image mode 63 _32 Movie options 94 _63 a Current frame number total nu m her of ffa mes 32 b Movie length 95 W Internal memory indicator 32 _ Movie playback guide 95 _ Quick effe_ ts guide 33 _ Volume indicator 95 _60 _D Lighting icon 78 _16 _ Quick retouch icon 78 _16 _ Quick effects icon 33 _ 14 _ GBmour ret...

Страница 30: ...12 ...

Страница 31: ..._ _i _ ii_ iiL L i i Zi 16 Preparation 3 Insert a Mem0ry Card ii i Z _ ii _Zi i z 18 Preparation 4 Setting the Display Language Date and Time _ _ _ _ _ _ _ _ _ 20 Shooting Step 1 Turn the Camera On _i _ ii i i _ Z L ii_ _ i _ LZ _ _ _ 24 Step 2 Select a Shooting Mode L Z Z Z 6 Step3 Frame a pictur e _ Z _ Z _ _ _ _ iZ _ Zi_I _ _I _ _i _ _ _28 o Z 13 ...

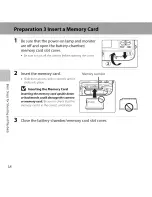
Страница 32: ...t the r_ l I _ I battery I t L_ When thebattery isproperly inserted I _ _ k_i__ __ the battery latch will lock it in place _1 _ _1_ Inserting the Battery Correctly Inserting the battery upside down or backwards could damage the camera Be sure to check that the battery is in the correct orientation 3 i Close the battery chamber memory card slot cover Charge the battery before first use or when it i...

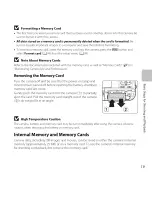
Страница 33: ...e arrow i to partially eject the battery Pull the battery straight out of the camera _ do not pull it at an angle _1_ High Temperature Caution The camera battery and memory card may be hot immediately after using the camera Observe caution when removing the battery or memory card oo _1_ Note About the Battery Besure to read and follow the warnings for the battery on page ixand in the section The B...

Страница 34: ... with the plug adapter attached in Argentina and Korea Make sure the battery is installed in the camera and then connect the camera to the Charging AC Adapter in order of 1_to 37 Keep the camera turned off Be sure that plugs are properly oriented Do not attempt to insert plugs at an angle and do not use force when connecting or disconnecting the plugs Charge lamp outlet USBcable included The charg...

Страница 35: ...ging AC Adapter and correctly connect it again or change the battery _1_ Note About Charging AC Adapter Be sure to read and follow the warnings for the Charging AC Adapter on page ix and in the section Charging AC Adapter _ 5 before use Charging Using Computer or Battery Charger Connecting the COOLPIX 3500 to a computer also charges the Rechargeable Li ion Battery EN EL19 _80 _ B83 Rechargeable Li...

Страница 36: ...era before opening the cover LS D_ATTE_ I _ 0 2 Insert the memory card Memorycard slot Slide the memory card in correctly until it clicks into place _ _1_ Inserting the MemoryCard Inserting the memory card upside down or backwards could damage the camera __ or memory card Be sure to check that the _i 3 Close the battery chamber memory card slot cover 18 ...

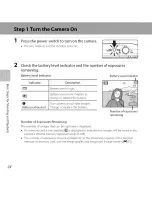
Страница 37: ...g Camera Life and Performance Removing the Memory Card Turn the camera off and be sure that the power on lamp and monitor have turned off before opening the battery chamber memory card slot cover Gently push the memory card into the camera ii to partially eject the card Pull the memory card straight out of the camera 2 do not pull it at an angle t_ _1_ High Temperature Caution D_ The camera batter...

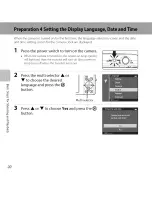
Страница 38: ...power switch to turn on the camera _ 1 When the camera is turned on the power on lamp green _r_ _ _ _1 willli ht and then the monitor will tum on the_oweron _ _ Y _ I lamp turns off when the monitor turns on i i i i i _ i _I Press the multi selector or II Ia ntg hg iSnedt hp eds _h e_ II _ button J _ _i j Multi selector Press or to choose Yes and press the _ button 20 ...

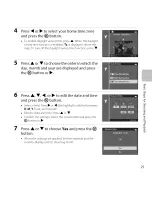
Страница 39: ...hich the day month and year are displayed and press the _ button or i_ 6 Press 4 or i_ to edit the date and time and press the I_ button Select a field Press or the highlight switches between D M Y hour and minute Edit the date and time Press or V Confirm the settings Select the minute field and press the _ button or 7 Press or to choose Yes and press the _ button When the settings are applied the...

Страница 40: ...n is displayed Use the Time zone and date setting in the setup menu to set the date and time _98 Clock Battery The camera clock is powered by a built in backup battery The backup battery charges when the main battery is inserted into the camera or when the camera is connected to an optional AC adapter and it can run the clock for several days after about ten hours of charging if the backup battery...

Страница 41: ...23 ...

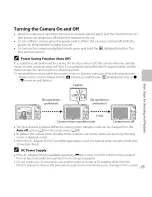
Страница 42: ...indicator Number of exposures remaining Number of Exposures Remaining The number of images that can be captured is displayed If a memory card is not inserted is displayed to indicate that images will be saved in the camera s internal memory approximately 25 MB The number of exposures remaining depends on the remaining capacity of the internal memory or memory card and the image quality and image s...

Страница 43: ...g buttons Power switch shutter release button O shooting mode button playback button or _ movie record button Flashes No operations _ _ No operations performed V performed ooooooooo_ oooeoeoeo_ 3 min Camera enters standby mode Camera turns off The time allowed to elapse before the camera enters standby mode can be changed from the Auto off option _99 in the setup menu _98 By default the camera ent...

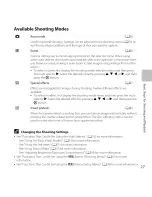
Страница 44: ...desired shooting mode is displayed oo o_ n 2 Press the mu t se ector or _ _ to choose a shoot ng mode and I _il 3 press the I_ button J_ _ _ _ _l O aoto mode sosed n h se amp e iil The shooting mode setting is saved ______ z _l___z_ even after the camera is turned off Multi selector 26 ...

Страница 45: ... To select an effect first display the shooting mode menu and then press the multi selector I_ Select the desired effect by pressing A V 4 or 1_ and then press the _ buttorl _ srnart portrait When the camera detects a smiling face you can take an image automatically without pressing the shutter release button smile timer The skin softening option can be used to make skin tones of human faces appea...

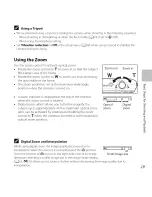
Страница 46: ...above the lens _I Frame the picture Shootingmodeicon Frame the picture so that the intended subject is at or near _ the center of the fra me When the camera detects a face that face is framed by a yellow double border focus area default setting 28 ...

Страница 47: ...camera is turned on Zoom out Zoom in w _o_4g_ Oq _ 22222211 211 _ A zoom indicator isdisplayed at the top of the monitor when the zoom control is rotated Digital zoom which allows you to further magnify the subject up to approximately 4x the maximum optical zoom zoom ratio can be activated by rotating and holding the zoom control to T when the camera iszoomed in to the maximum optical zoom positio...

Страница 48: ...green Ifthe focus area or the focus indicator flashes red when the shutter release button ispressed halfway the camera is unable to focus Modify the composition and pressthe shutter release button halfway again I I Shutter speed Aperture value 2 Press the shutter release button the rest of the way down _ _31 The shutter is released and the image issaved to the memory card or internal memory TO app...

Страница 49: ...er of exposures remaining or the indicator showing the maximum movie length flashes while images are being recorded or while a movie is being saved Do not open o the battery chamber memory cerd slot cover or remove the bettery or memory card while an o indicator is flashing Doing this could result in loss of data or in damage to the camera or the memory card _1_ NoteAbout Focusing _ See Subjects N...

Страница 50: ..._ Press or _ to view the next image _ To scroll quickly through images press and hold the multi kd_ _ _ _1_ o selector A or _ _u _ _ _ _ _ v _4 _ Display the next image o_ n To play back images that are saved in the internal memory remove the memory card is displayed in the current frame number total nu tuber of frames area To return to shooting mode press the _ button the shutter release button o...

Страница 51: ...tes About the Quick Effects Function When ri_ lr l is displayed in full frame playback mode you can press the Q button to apply an effect to the image When the effect selection screen is displayed press the multi selector or to select a n effect press the _ button and then select Yes in the confirmation dialog and press the _ button to save the image as a separate file See Quick Effects _ _14 for ...

Страница 52: ... for more information All images Delete all images To exit without deleting the image press the MENUbutton _ 3 Press or to choose Yes and press the_ _ button o_ Deleted images cannot be recovered _ To exit without deleting the image press or to selec_ _u No and press the _ button g 34 ...

Страница 53: ...displayed Follow the on screen instructions to complete operations _1_ Notes About Deleting Images Once deleted images cannot be recovered Transfer important images to a computer or other media before deleting them Protected images cannot be deleted _78 Deleting the Last Image Captured while in Shooting Mode In shooting mode press the _ button to delete the last image that was saved Selecting Cert...

Страница 54: ...36 ...

Страница 55: ...0 Auto Mode 38 Scene Mode Shooting Suited to Scenes 40 Special Effects Mode Applying Effects When Shooting 47 Smart Portrait Mode Capturing Images of Smiling Faces 49 Functions That Can Be Set Using the Multi Selector 52 Using the Flash Flash Modes 53 Using the Self timer 55 Using Macro Mode 57 Adjusting Brightness Exposure Compensation 59 Functions That Can Be Set Using the MENU Button Shooting M...

Страница 56: ...ra detects a human face the camera automatically focuses on it see Face Detection _ 68 for more information if no faces are detected the camera automatically selects one or more of the nine focus areas containing the subject closest to the camera When the subject is in focus the focus area active focus area lights in green maximum of nine areas __ Changing I_ Auto Mode Settings o Functions That Ca...

Страница 57: ... effects to Off _62 _I Press the multi selector _ or i_ to select the desired effect and press the I_ button Rotate the zoom control _3 to T C to switch to full frame playback mode or W _ _ to six image thumbnail playback mode To exit without saving the edited image press the MENU button When a confirmation dialog is displayed select Yes and press the _ button See Quick Effects _ 14 for more infor...

Страница 58: ...portrait _ Party indoor _ Beach Snow _42 _42 _43 _43 Sunset i Dusk dawn Night landscape _ Close up _43 _43 _43 _44 _ll Food _ Museum _ i _ Fireworks show Blackandwhite _44 _45 _45 copy _45 BacHighdng _ Panorama assist _ Pet portrait _45 _4S _46 Changing Scene Mode Settings Depending on the scene the multi selector _ _ _ __ and _ can be used to set the corresponding features See Functions That Can ...

Страница 59: ...he frame that the camera focuses on AF area depends on the composition of the image When the camera detects a human face it focuses on that face _68 _ When the camera selects _ night landscape flash mode is fixed at _1 off regardless of the oo setting made and the camera captures one image at a slower shutter speed m Depending upon shooting conditions the camera may not select the desired scene mo...

Страница 60: ...hooting may vary depending on the current image mode setting the memory card used or shooting conditions _ Night portrait _ The camera detects a human face and focuses on it _68 o _m If no faces are detected the camera focuses on the subject at the center of the frame The camera smoothes skin tones of human faces by applying the skin softening function _ Digital zoom is not available _ _ Party ind...

Страница 61: ...ght iandscape When the shutter release button is pressed halfway focus areas or the focus indicator _8 _ always glows green o After you select Night landscape select Hand held or Tripod on the next screen Hand held default setting Select this option to produce shots with reduced blurring and T noise even when the camera is hand held Tripod Select this option when using a tripod or other means to s...

Страница 62: ...t position at which it can focus You can move the focus area To move the focus area press the _ button and then press the multi selector A V or I_ To change settings for any of the following functions first press the _ button to cancel focus area selection then change the settings as desired Hue Sel_timer Exposure compensation The camera continuously adjusts focus even when the shutter release but...

Страница 63: ...ite opy The camera focuses on the subject at the center of the frame Use with macro mode _57 when shooting a subject at close distance _ Backlighting The camera focuses on the subject at the center of the frame The flash fires automatically oo _I Panorama assist Select the direction in which to add images to the panorama by pressing the multi selector A V or and then press the _ button After takin...

Страница 64: ...ected Press the shutter release button to release the shutter The camera also detects human faces _68 If the camera detects a human face and a pet face in the same shot it focuses on the pet face Pet portrait auto release turns offautomatically when Five bursts have been taken Internal memory or the memory card is full To continue taking images with Pet portrait auto release press the multi select...

Страница 65: ...ostalgic sepia old photograph High contrast Changes the image to black and white and gives it sharp contrast monochrome High key Gives the entire image a bright tone Low key Gives the entire image a dark tone _ Selective color Creates a black and white image in which only the specified color remains POP Pop Increases the color saturation of the entire image to create a bright look Vl Super vivid I...

Страница 66: ... ng funct ons f rst press the _ button to cancd color selection then change tile settings as desired Flash mode _53 Self timer _55 Macro mode _57 Slider Exposure compensation _59 To return to tile color selection screen press tile _ button again _ Changing Special Effects Mode Settings 8 _ Functions that carl be set using tile multi selector _52 Flash mode _53 self timer _ 55 macro mode _57 and ex...

Страница 67: ...t the face framed by the double border is smiling the shutter is automatically released See Smile timer _64 for more information After the camera releases the shutter it will continue to detect faces and smiles and will release the shutter again if it detects a smiling face _ 8 3 Stop shooting To stop automatic shooting of smiling faces perform the followings Turn the camera off _ Set Smile timer ...

Страница 68: ... face and it flashes quickly immediately after the shutter isreleased Releasing the Shutter Manually Images can also be taken by pressing the shutter release button If no facesare detected the camera focuses on the subject at the center of the frame Changing Smart Portrait Mode Settings Functions That Carl Be Set Using tile Multi Selector _52 Flash rnode _53 self timer _ 55 and exposure compensati...

Страница 69: ...ng can be applied to saved images by using Glamour retouch _78 8 _1_ Notes About the Skin Softening Function it may take more time than usual to save images after shooting Under some shooting conditions the desired skin softening results may not be achieved and skin softening may be applied to areas of the image where there are no faces The skin softening level cannot be adjusted when shooting in ...

Страница 70: ...t vary depending on the shooting mode as shown below See Default Settings _60 for information about each mode s default settings Flash mode _53 Self timer _55 Pet portrait auto release _46 _ j Macro mode _57 Exposure compensation _Sg O Auto mode V V V V Scene Special effects V V V portrait V 2 V 2 V 1 Varies depending on the scene See Default Settings _60 for more information 2 Varies depending on...

Страница 71: ...or settings _98 _1_ Notes About the Flash Lamp The flash lamp indicates flash status when the shutter release button is pressed halfway On The flash will fire when you press the shutter release button all the way down Flashing The flash is charging Wait a few seconds and try again Off The flash will not fire when an image is taken If the battery is low the monitor turns offwhile the flash charges ...

Страница 72: ...de Setting The flash mode setting varies depending on the shooting mode See Functions Available for Each Shooting Mode _52 and Default Settings _60 for more information Some settings cannot be used with other functions _65 The flash mode setting applied in 0 auto mode is stored in the camera s memory even after the camera is turned off Red eye Reduction This camera uses advanced red eye reduction ...

Страница 73: ...menu _gS when using a tripod to stabilize the camera during shooting 1 Press the multi selector _ _Q self timer f 2 Press or to choose _Q lOs or _Q 2sand press the I_ button _ lOs ten seconds Use on important occasions such as weddings _ 2s two seconds Use to prevent camera shake Ifa setting is not applied by pressing the_ button within a few seconds the selection will be canceled When the shootin...

Страница 74: ...monitor The selhtimer lamp flashes while the timer is counting down About one second before the shutter is released the lamp stops flashing and glows steadily When the shutter is released the selhtimer will be set to OFF To stop the timer before an image is taken press the shutter release button again oo 2 _1_ Functions That Cannot Be Used Simultaneously Some settings cannot be used with other fun...

Страница 75: ...the _ button within a few seconds the selection will be canceled o 3 Rotate the zoom control to set the zoom ratio _ _ to a position where _C_ and the zoom indicator glow green How close you can be to the subject when shooting depends on the zoom ratio When the zoom ratio is set to a position where _ and the zoom indicator glow green the camera can focus on subjects as close as approximately 30 cm...

Страница 76: ...oting menu _63 to Full time AF When using other shooting modes Full time AF is turned on automatically when macro mode is turned on You may hear the sound of the camera focusing Macro Mode Setting Macro mode cannot be used when using certain shooting modes See Default Settings _60 for more information Some settings cannot be used with other functions _65 The macro mode setting applied in I_1 auto ...

Страница 77: ...pply the compensation value If you do not press the _ button within a few seconds the setting is applied and the menu disappears When an exposure compensation value other than 0 0 is applied the value is displayed with the _ indicator in the monitor d 4 Press the shutter release button to take an image To turn off exposure compensation return to step 1 and revert the value to 0 0 Exposure Compensa...

Страница 78: ...ects Off _47 _ Off Smart portrait _4 f_AIITO_ Off2 OffS Scene _41 _ AUT 4 off Off _ 0 0 2 _41 _ Off Off s 0 0 _42 _ s Off Off s 0 0 _42 _ 3 Off_ Off_ 0 0 _42 _5 Off Off _ 0 0 _ _ _42 _l_ 6 Off Off _ 0 0 _43 _ AIJTO Off Off _ 0 0 _43 _IAIJTO Off Off _ 0 0 _43 _s Off Off _ 0 0 i _43 _s Off Off _ 0 0 _43 _s Off Off _ 0 0 _ _44 _ Off On s 0 0 _q _44 Off On 3 0 0 Exposure compensatio n r _LB9 0 0 0 0 0...

Страница 79: ... _ AIJTO Auto or _ Off ca n be selected When _ AIJTO Auto is selected the camera automatically selects the flash mode appropriate for the scene it has been selected s Cannot be modified Fixed to the fill flash with slow sync and red eye reduction 0 Slow sync with red eye reduction flash mode may be used 7 Sel_timer is disabled Pet portrait auto release _46 can be turned on or off oo g s _1_ Functi...

Страница 80: ...cated below i Special Smart Auto mode Scene2 i effects portrait Image mode 1 ql_ White balance Continuous ISO sensitivity Color options AF area mode Autofocus mode Quick effects ql_ Skin softening Smile timer Blink proof V V V V V V 1 The setting is also applied to other shooting modes 2 Additional settings are available for some scene modes See Scene for more information Mode and Features _41 ...

Страница 81: ...ck the setting at 80 100 200 400 800 1600 or 3200 ISO sensitivity When iS sensitivity is set to Auto the camera sets the ISO 8639 sensitivity automatically When Fixed range auto is selected an ISO sensitivity range of either ISO 80 400 or ISO 80 800 can be selected Allows you to change the color tones of images The available Color options settings are Standard color default setting Vivid color 864...

Страница 82: ...When On default setting is selected the camera detects human feces and then automatically releases the shutter Smile timer whenever a smile is detected The self timer cannot be used with this feature _48 _49 When On is selected the camera automatically releases the shutter twice each time an image is taken Of the two shots Blink proof one in which the subject s eyes are open is saved _S0 Flash can...

Страница 83: ...ed When Multi shot 16 is selected the Image mode setting is fixed at image size 2560 1920 pixels When 3200 is selected the image mode setting of only _1 2272xl 704 1600xl 200 or _ 640x480 can be selected If any image mode m setting other than above is selected the image mode setting is automatically changed to 2272xl 704 when ISO sensitivity is set to 3200 Color options When Black and white Sepia ...

Страница 84: ...ction is disabled area mode When taking a image using Subject tracking _63 Motion detection is disabled When Multi shot 16 is selected digital zoom is not available Digital zoom Shutter sound Blink warning Continuous _63 AF area mode _63 When Subject tracking is selected digital zoom is disabled When a setting other than Single is selected the shutter sound is disabled When Continuous BSS or Multi...

Страница 85: ...camera performs the focus operations described below when the shutter release button is pressed halfway Ira face is detected it is framed by the double border indicating the active focus area When the subject is in focus the double border turns green If no faces are detected the camera automatically selects one or more of the nine focus areas containing the subject closest to the camera When the s...

Страница 86: ...set to Face priority _42 in IPl auto mode _38 Scene auto selector Portrait _41 or Night portrait _42 in scene mode _40 Upto 12 i il i Focus area t u J do bleborder The face closest to the camera Pet portrait scene mode when Pet The face closest to the portrait auto release is turned off Up to 121 camera 2 _46 The face closest to the Smart portrait mode _49 Up to 3 center of the frame 1 When taking...

Страница 87: ... center of the frame _1_ Notes About Face Detection Function The ca mera s ability to detect feces depends on a variety of factors including the direction in which the faces are looking The camera may be unable to detect feces in the following situations When feces are partially hidden by sunglasses or otherwise obstructed When feces take up too much or too little of the frame When the frame inclu...

Страница 88: ...on the subject at the center of the frame 2 Press the shutter release button halfway Thecamerafocuses on the subject andthe focus I _jv I area glows green Focus and exposure are locked 3 Continue holding down the shutter release I I button halfway and recompose the image I _J_ _ _ Be sure that the distance between the camera and the subject does not change 4 Press the shutter release button the re...

Страница 89: ...and surroundings e g a portrait subject wearing a white shirt is standing in front of a white wall Several objects are at different distances from the camera e g the subject is inside a cage Regular geometric patterns e g window blinds or windows on a skyscraper Subject is moving rapidly In the situations noted above try pressing the shutter release button halfway to refocus several times or focus...

Страница 90: ...72 ...

Страница 91: ...l Display Calendar Display 75 Selecting Certain Types of Images for Playback 76 Functions That Can Be Set Using the MENU Button Playback Menu 78 Connecting the Camera to a TV Computer or Printer oooooooooooooooooooooooooooooooooooooooooooooooooooooooooooooooooooooooooooooooooooooooooooo 80 Using ViewNX 2 82 Installing ViewNX 2 82 Transferring Images to the Computer 85 Viewing Images 88 73 ...

Страница 92: ...ed using face detection _ 68 or pet detection _46 the camera zooms in on the face detected at the time of shooting except for images captured with Continuous BSS Multi shot 16 _ 63 or Subject tracking _1 63 If the camera detected multiple faces when the image was captured _ press A V or to display a different face To zoom in on an area of the image where _o there are no faces change the zoom ratio...

Страница 93: ...the zoom control to W II_ orT q Pressthe multi selector A V or to select an image and then press the _ _ button to display it full frame When 16 thumbnails are displayed rotate the zoom control to W _ _ to switch to calendar display except for list by date mode While using calendar display mode press A V or to select a date and then press the _ _ button to display the first image captured on that ...

Страница 94: ...om shooting mode to playback mode this mode is selected Favorite pictures _ 65 Only images added to albums are played back images should be added to albums before selecting this mode _7 _ Autosort 6 69 Images are automatically sorted into categories such as portraits landscapes and movies I_l List by date _11 images captured on the selected date are played back 76 ...

Страница 95: ...he playback screen is displayed When an option other than IMI Play is selected the album category or shooting date selection screen is displayed To return to the current pbyback mode without switching playback modes press the button 3 Select an album a category or a shooting date and press the _ button For El Favorite Pictures Mode see _ 55 For _ Auto Sort Mode see _ _9 For f_ List by Date Mode se...

Страница 96: ...vels can be adjusted When using a printer to print images saved on the memory Print order 2 card you can use the Print order function to select which _ BS 1 _mages are printed and how many copies of each image are printed Slide show 2 View images stored in the internal memory or on a memory 8555 card in an automatic slide show Protect 2 Protect selected images from accidental deletion 8556 Specifi...

Страница 97: ...nd the copy is saved with a different file name Movies cannot be edited _ 12 Once an image has been edited some editing functions may become unavailable _ _13 2 When using list by date mode press the MENUbutton from the list of dates screen _ 11 to apply the same function to all images captured on the selected date 3 This function is not displayed when using favorite pictures mode auto sort mode o...

Страница 98: ... externaWdevice make sure the remaining battery level is sufficient and the camera is turned off For information about the connection methods and subsequent operations refer to the documentation included with the device in addition to this document How to open the connector cover USB audio video output connector Insert the plug straight 80 ...

Страница 99: ...the computer using the included ViewNX 2 CD ROM For information about using the ViewNX 2 CD ROM and transferring images to a computer see page 85 If any USB devices that draw the power from the computer are connected disconnect them from the computer before you connect the camera to it Connecting the camera and other USB powered devices to the same computer simultaneously may cause a camera malfun...

Страница 100: ...cluded ViewNX 2 CD R M till ns a ogV wox2 An Internet connection is required _ Compatible Operating Systems Windows Windows 8 Windows 7 Windows Vista Windows XP _ Macintosh Mac OS X 10 6 10 7 10 8 Refer to the Nikon website for details on system requirements including the latest information on operating system compatibility 82 ...

Страница 101: ... Region Selection to choose a different region and then choose the desired language the Region Selection button is not available in the European release Click Next to display the installation window ii_i _1i 3 Startthe installer We recommend clicking Installation Guide in the installation window to check the installation help information and system requirements before installing ViewNX 2 Click Typ...

Страница 102: ...of the three modules below Nikon Transfer 2 For transferring images to the computer ViewNX 2 For viewing editing and printing transferred images Nikon Movie Editor For basic editing of transferred movies Panorama Maker for creating asingle panorama photo using a seriesof images shot in panorama assistscene mode 6 Remove the ViewNX 2 CD ROM from the CD ROM drive 84 ...

Страница 103: ...mputer using the included USB cable The camera automatically turns on To transfer images that a re saved in the ca mera s internal memory remove the memory card from the camera before connecting it to the computer SD card slot If your computer is equipped with an SD card slot the card can be inserted directly in the slot SD card reader Connect a card reader available separately from third party su...

Страница 104: ... and videos click Change program A program selection dialog will be displayed select Import File using Nikon Transfer 2 and click OK 2 Double clicklmport File If the memory card contains a large number of images it may take a while for Nikon Transfer 2 to start Wait until Nikon Transfer 2 starts _1_ Connecting the USB Cable The connection may not be recognized if the camera isconnected to the comp...

Страница 105: ...ll the images on the memory card will be copied to the computer 3 Terminate the connection If the camera is connected to the computer turn the camera offand disconnect the USB cable If you are using a card reader or card slot choose the appropriate option in the computer operating system to elect the remova hie disk corresponding to the memory card and then remove the card from the card reader or ...

Страница 106: ...re displayed in ViewNX 2 when transfer is complete Consult online help for more information on using ViewNX 2 88 Starting ViewNX 2 Manually Windows Double click the ViewNX 2 shortcut on the desktop Mac OS Click the ViewNX 2 icon in the Dock ...

Страница 107: ... and Playing Back Movies You can record movies by simply pressing the _ movie record button k _ 8 B_ t_ o d Recording Movies 90 Functions That Can Be Set Using the MENU Button Movie Menu 94 Movie Playback 95 89 ...

Страница 108: ..._94 _63 isset to _ 480 30p by default 7_ 720 30p cannot be selected 1 Display the shooting screen Movie options The icon for the selected movie option is displayed The default setting is _E 720 30p _94 Maximum movie length 2 Press the _ movie record button to start _ movie recording The camera focuses on the subject at the center of the frame Focus areas are not displayed during recording _ _L____...

Страница 109: ...l zoom cannot be adjusted once movie recording begins Rotate the zoom control during recording to enable digital zoom Subjects can be magnified up to 4x the optical zoom ratio applied before movie recording began There is some degradation in image quality when digital zoom is used When recording ends digital zoom turns off The sounds of zoom control operation autofocus lens drive movement vibratio...

Страница 110: ... at the center of the frame press the 1_ movie record button to start recording and modify the composition _1_ Notes About Camera Temperature The camera temperature may increase significantly when used for an extended period of time for movie recording etc or when used in places with high ambient temperature If the camera becomes extremely hot while recording a movie the camera automatically termi...

Страница 111: ...ettings before starting movie recording The selPtimer _SS can be used When the 1_ movie record button is pressed after the self timer is enabled the camera starts movie recording after the specified two or ten seconds The flash will not fire Press the MENUbutton to select the _1 movie menu icon and adjust movie menu settings before starting movie recording _94 When the Photo info option in Monitor...

Страница 112: ...in the internal memory the default setting is _ 480 30p and 7_E 720 30p cannot be selected Select between AF S Single AF default setting which locks focus when movie recording starts and AF F Full time AF which focuses continuously during movie recording When AF FFull time AF isselected the sou nd of the camera focusing may be heard in the recorded movie If you want to prevent the sound of the cam...

Страница 113: ...dicated by the movie options icon _94 Press the _ button and the movie is played back Movie options Deleting Movies To delete a movie select the desired movie in full frame playback mode _32 or thumbnail playback mode _75 and press the _ button _34 t_ o B_ t_ o 95 ...

Страница 114: ...can be performed while playback is paused using the controls displayed at top in the monitor _ Press the _ button to rewind the movie one frame Hold down the _ button for continuous frame by frame rewinding Press the _ button to advance the movie one frame Hold down the _ button for continuous frame by frame advancing Press the _ button to resume playback Press the _ button to return to full frame...

Страница 115: ...General Camera Setup This chapter describes the various settings that can be adjusted in the _ setup menu 97 ...

Страница 116: ..._ _70 Monitor settings review setting or the monitor brightness Print date Allows you to imprint the shooting date and time on images _ _72 Vibration reduction Allows you to select the vibration reduction setting used when _ _73 shooting Allows you to set whether or not the camera automatically Motion detection increases the shutter speed to reduce blurring caused by _ _75 camera shake if motion i...

Страница 117: ...ttery by connecting the camera to a computer Charge by provided that the computer is able to supply power computer When charging by computer it takes more time to charge the battery than when using the Charging AC Adapter EH 70P Blink warning Allows you to set whether or not closed eyes are detected when taking images of people using face detection Allows you to set whether or not to enable the fu...

Страница 118: ...100 ...
Страница 119: ...ist by Date Mode _ _11 Editing Images Still Images _ _12 Connecting the Camera to a TV Playback on a TV _22 Connecting the Camera to a Printer Direct Print _24 Menu The Shooting Menu for I _ Auto Mode _ _32 i _ Smart Portrait Menu _48 The Playback Menu _51 whe ove enu The Setup Menu _66 Additional Information Image Sound Fileand Folder Names _92 Optional Accessories _94 Error Messages _95 HI ...

Страница 120: ... are displayed Select the direction in which images will bejoined in the completed panorama right left up x or down The yellow panorama direction icon _ _ is displayed for the current direction and the direction is fixed when _ is pressed The icon changes to the white fixed direction _ icon If necessary apply flash mode _53 self timer _55 macro mode _57 and exposure compensation _59 settings with ...

Страница 121: ...ep 1 _1_ Notes About Panorama Assist Flash mode selfltimer macro mode and exposure compensation settings cannot be adjusted after the first image is taken images cannot be deleted nor can zoom or Image mode setting _ _32 be adjusted after the first image has been taken Shooting for the panorama series is terminated if the auto off function _ _79 initiates standby mode during shooting Setting the t...

Страница 122: ... Maker to join them in a single panorama Panorama Maker can be installed on a computer using the included ViewNX 2 CD _82 After installation is complete follow the procedure described below to start Panorama Maker Windows Choose Start menu All Programs ArcSoft Panorama Maker Panorama Maker Mac OS X Open Applications and double click the Panorama Maker icon For more information on using Panorama Ma...

Страница 123: ...added to multiple albums Up to 200 images can be added to each album Adding Images to Albums Press the _ 1button playback nqode _ _IEN J button _ Favorite pictures _ 0o_ button In favorite pictures mode images cannot be added to albums I Pressthe multi selector _ or i_ to select the desired image and then press to display 81 You car add D to multiple images To remove Lr2 press V Rotate the zoom co...

Страница 124: ...e images that have been added to the selected album Tile following operations are available from the album selection screen MENU button Changes the album icon _8 _ button Deletes all images in the selected album When viewing images in full frame playback mode or thumbnail playback mode press the MENUbutton to select a feature from the favorite pictures menu _78 _1_ Note About Deleting Images in Fa...

Страница 125: ...e multi selector _ or i_ to select an image and press to hide t_11 You can hide the t_1 icons for multiple images To display the icons again press V Rotate the zoom control _3 to T to switch to full frame playback mode or W _i_ to six image thumbnail playback mode Press the _ button to display a removal confirmation screen 2 Select Yes and press the I_ button To cancel removal select No _7 ...

Страница 126: ...button m o 3 PressA V _ or b to select an icon and press the _ button The icon changes and the monitor display returns to the list of albums screen w L_ Notes About Icons for Albums Choose icons for albums separately for the internal memory and for every memory card used To change the icon for an album containing images stored in the internal memory remove the memory card from the camera The defau...

Страница 127: ...playback mode press the MENU button to select a feature from the auto sort menu _78 Auto Sort Mode Categories Category Description Smile Images captured in smart portrait mode _49 with the smile timer setting set to On images captured in IPl auto mode _38 with face detection _6S Images captured in Portrait _ Night portrait _ Party indoor and Portraits Backlighting _scene modes _40 images captured ...

Страница 128: ...ate categories o _1_ Notes About Auto Sort Mode Up to 999 images and movie flies can be sorted into each category in auto sort mode If999 images or movies have already been sorted into a specific category new images and movies cannot be sorted into that category nor can they be displayed in auto sort mode Display images and movies that could not be sorted into a category in normal playback mode _3...

Страница 129: ...ed date print order slide show protect _ button Deletes all images captured on tile selected date When viewing images in full frame playback mode or thumbnail playback mode press the MENUbutton to select a feature from tile list by date menu _78 Calendar display _75 is not available in list by date mode _1_ Notes About List by Date Mode Up to 29 dates can be selected If images exist for mote than ...

Страница 130: ... be adjusted Create a small copy of images suitable for use as e mail attachments Enlarge the image or refine the composition and create a copy containing only the portion visible in the monitor m rD m _1_ Notes About Image Editing The COOLPIX 3500 editing functions are not available for images captured with another make or model of digital cameras If no face is detected in an image a copy cannot ...

Страница 131: ...ate them When combining the small picture or crop function and another editing function use the small picture or crop function after other editing function has been applied Retouch effects such as the glamour retouch function s skin softening effect can be applied to images captured with the skin softening function _48 Original and Edited Images Copies created with editing functions are not delete...

Страница 132: ...fect Turns multicolor images into single color High contrast monochrome Sepia images Selective color transforms all colors Cyanotype and Selective color 12 colors except a specified color to black and white I Display the image to which you want to apply _ _ an effect in full frame playback mode and press the I_ button The effect selection screen is displayed 2 Press the multi selector _ or b_ to s...

Страница 133: ...3 Select Yes and press the I_ button A new edited copy is created Copies created with the quick effects function are indicated by the _ icon displayed during playback _ 10 ...

Страница 134: ...ut saving the copy press 4 Copies created with the quick retouch option can be recognized bythe _ icon displayed during playback _10 B n D Lighting Enhancing Brightness and Contrast Press the _ button playback mode _ select an image _ MENUbutton _ D Lighting _ button Use the multi selector to select OK and press the _ button The original version is displayed on the left and the edited version is d...

Страница 135: ...or all effects before pressing the _ button Skin softening _J Small face o Big eyes Br ghten faces _ _ H de eye bags o o Wh ten eyes _u Whiten teeth _ e Redden cheeks Press the MENUbutton to return to the screen for selecting a person 3 Preview the result of the effects and press the I_ button To retry different settings press to return to step 2 To exit without saving the edited image press the M...

Страница 136: ...er image can be edited using the glamour retouch function The glamour retouch function may not perform as expected depending on the direction in which the faces are looking or the brightness of the faces in the image if no faces are detected in the image a warning is displayed and the screen returns to the playback menu The glamour retouch function is available only for images captured when the IS...

Страница 137: ...the I_ button The 640x480 320x240 and 160xl 20 sizes are available Images taken at an image mode setting of _ 5120x2880 are saved at 640x360 pixels Proceed to step 2 2 Choose Yes and press the I_ button A new smaller copy is created compression ratio of approximately 1 16 Copies created with the small picture function are displayed at a smaller size with the icon during playback _ 10 t_ _19 ...

Страница 138: ...cropping _74 2 Refine copy composition Rotate the zoom control to T 00 or W _ _ to adjust the zoom ratio Press the multi selector A V or I_ to scroll the image until only the portion you want to copy is visible in the monitor 3 Press the MENU button 4 Usethe multi selector to choose Yes and press the _ button A cropped copy is created Copiescreatedwiththecropfunctionareindicated bythe icon display...

Страница 139: ...he Image in Its Current Tall Orientation Use the Rotate image option _ _58 to rotate the image so that it is displayed in landscape orientation After cropping the image rotate the cropped image back to tall orientation The image displayed in tall orientation can be cropped by zooming in on the image until the black bars displayed on the both sides of the monitor disappear The cropped image is disp...

Страница 140: ...nect the yellow plug to the video in lack and the white plug to the audio in jack on the TV Be sure that plugs are properly oriented Do not attempt to insert plugs at an angle and do not use force when connecting or disconnecting the plugs VIDEO AUDIO Yellow_ _White ooo _ 3 Tune the television to the video channel See the documentation provided with your television for details _22 ...

Страница 141: ...mode and images are i_ _ _ p While connected to the the ca mera monitor will remain J J off 4 t_ _1_ If Images are not Displayed on the TV Be sure that the camera s video mode setting conforms to the standard used by your television Specify the Video mode option _82 in the setup menu _23 ...

Страница 142: ...int images without using a computer Follow the procedures below to print images I Take images q Select images for printing number of copies using Print I order option _511 J Connect to printer _ _25_ 1 Print multiple images _29 I When printing is complete turn the camera off and disconnect USB cable 1 _24 ...

Страница 143: ... Images Images saved on a memory card can be printed by transferring the images to a computer or connecting the camera directly to a printer The _llowing printing methods are also available inserting a memory card into a DPOF compatible printer s card slot Taking a memory card to a digital photo lab For printing using these methods specify the images and the number of prints each to the memory car...

Страница 144: ...ting the plugs 8 m o 4 The camera automatically turns on When properly connected the PictBridge startup screen _ _ _1_ is disp ayed in the camera monitor followed by the o _ _ _k _ Print selection screen _ _ j _1_ If the PictBridge Screen is not Displayed Turn off the camera and disconnect the USB cable Set Charge by computer _83 in the camera s setup menu to Off then connect the camera again _26 ...

Страница 145: ...ow to print an image 1 Use the multi selector to choose the desired image and press the _ button Rotate the zoom control to W _ _ to switch to six thumbnail display and to T q to switch back to full frame playback 2 Choose Copies and press the I_ button _ Choose the number of copies up to nine and press the I_ button _27 ...

Страница 146: ...o specify paper size using printer settings choose Default in the paper size menu 6 Choose Start print and press the I_ button B m 7 Printing begins n o Monitor dispby returns to the print selection screen shown in step 1 when printing is complete _28 Current number of copies total number of copies ...

Страница 147: ...s displayed press the MENU button 2 Use the multi selector to choose Paper size and press the I_ button To exit the print menu press the MENUbutton 3 Choose the desired paper size and press the _ button To specify paper size using settings on the printer select Default in the paper size option 4 Choose Print selection Print all images or DPOF printing and press the _ button _29 ...

Страница 148: ...T c to switch to full frame playback Rotate the zoom control to W _ _ to switch back to six thumbnail display Press the _ button when setting is complete When the menu shown at right is displayed choose Start print and press the _ button to start printing Choose Cancel and press the Q button to return to the print menu m o Print all images One copy each of all images stored in the internal memory ...

Страница 149: ...t order choose View images and press the _ button To print the images press the _ button again 5 Printing begins The monitor display returns to the _rint menu shown in step 2 when printing is complete Current number of copies total number of copies t_ Paper Size The camera supports the following paper sizes Default the default paper sizefor the current printer 3 5x5 in 5x7 in 100xlS0 mm 4x6 in 8x1...

Страница 150: ...t ratio horizontal to vertical 4 3 4 3 4 3 4 3 4 3 4 3 16 9 Print size 2 cmiin Approx 43 x 32 17 x 12 5 Approx 43 x 32 17 x 12 5 Approx 31 x 23 12 x 9 Approx 19 x 14 7 5 x 5 6 Approx 13 x 10 5 3 x4 Approx 5 x 4 2 x 1 5 Approx 43 x 24 17 x 9 5 I The total number of ixels recorded and the number of pixels recorded horizontally and vertically Exam e _ 5152x3864 Approx 20 megapixeis 5152 x 3864 pixels...

Страница 151: ... the same image mode setting in addition the number of images that can be saved may vary depending on the make of the memory card Image mode Number of images that can be saved 4 GB _ i_ 5152x3864 _r 350 5152x3864 default setting 710 I_ 3648x2736 1400 _1 2272xl 704 3490 1600x1200 6650 640x480 26300 5120x2880 950 If the number of exposures remaining is 10 000 or more the number of exposures remainin...

Страница 152: ...nce setting that matches the light source before shooting Although the default setting Auto can be used under most types of lighting the white babnce setting suited to a particular light source can be specified manually to achieve more accurate results Option Description AUTO Auto White balance isautomatically adjusted to suit lighting conditions default setting PRE Preset manual useful when shoot...

Страница 153: ...asure the white Balance value according to the light source when shooting 1 Place a white or gray reference object under the lighting that will be used during shooting 2 Display shooting menu 1_6 63 use the multi selector to choose PRE Preset manual in the White balance menu and press the I_ button The camera zooms in to the position for measuring white balance 3 Choose Measure To apply the most r...

Страница 154: ...value for preset manual is set No image is saved n o _1_ Notes About White Balance Some settings cannot be used with other functions _65 At white balance settings other than Auto or Flash turn the flash off _ _S3 _1_ Note About Preset Manual A value for flash lighting cannot be measured with Preset manual When shooting using the flash set White balance to Auto or Flash _ _36 ...

Страница 155: ...h the flash off or the camera zoomed in or in other situations in which BSS BSS inadvertent motion can result in blurred images When BSS is on Best Shot Selector the camera takes up to ten images while the shutter release button is held down The sharpest image in the series is automatically selected and saved Each time the shutter release button is ressed camera takes 16 shots at a rate of about 3...

Страница 156: ...ns Some settings cannot be used with other functions _65 _1_ NoteAbout BSS BSS is effective when taking images of still subjects BSS may not produce the desired results if the su_ect moves or the composition changes while the shutter release button is held down _1_ Note About Multi shot 16 Smear _ 3 visible in tile monitor when shooting with Multi shot 16 enabled will be recorded with images Avoid...

Страница 157: ...fault setting corn pensates by raising sensitivity to a maximu m of ISO 1600 when lighting is dim Choose the range in which the camera automatically adjusts iSO sensitivity from ISO 80 400 default setting and ISO 80 800 The Fixed range auto camera will not increase sensitivity beyond the maximum value in the selected range Specify the maximum iSO sensitivity for effective control over the amount o...

Страница 158: ...oes not function when the ISO sensitivity is set to any setting other than Auto _1_ ISO 3200 When ISO sensitivity is set to 3200 the available Image mode settings are limited to _1 2272xl 704 _ 1600xl 200 and 640x480 _ is displayed next to the IS sensitivity indicator in the bottom left of the monitor m o _40 ...

Страница 159: ...hibiting natural color Use to achieve a vivid photoprint effect Save images in black and white Save images in sepia tones Save images in cyan blue monochrome The current setting can be confirmed in the monitor when shooting _g No indicator is displayed when Standard color is selected Color tones in shooting display change according to the selected color option 8 t_ _1_ Note About Color Options Som...

Страница 160: ...etting subjects other than people or framing a subject with which no face is detected the AF area mode setting switches to Focus area Auto and the camera automatically selects the focus area up to nine areas containing the subject closest to the camera and focus on it The camera automatically selects the focus area up to nine areas containing the subject closest to the camera and focuses on it Pre...

Страница 161: ...press the _ button to cancel the focus area selection Flash mode Focus area Selectable focus area Macro mode selfitimer or exposure compensation When the settings are complete press the _ button again to reactivate the focus area selection The camera focuses on the subject at _ the center of the fra me The center focus area is always displayed Use this function to take images of moving subjects Re...

Страница 162: ...e camera automatically moves the focus area to track the subject I Registera subject Align the subject that you want to register with the white border in the center of the monitor and press the _ button When the border glows red the camera is unable to focus on the subiect Change the composition and try to register the subject again When the subject is registered a yellow focus area is displayed o...

Страница 163: ...ocked If the focus area is not displayed when the shutter release button is pressed halfway the camera focuses on the subject at the center of the frame t_ _1_ Notes About Subject Tracking Mode Adjust zoom position flash mode exposure compensation and menu settings prior to registering the subject Subject tracking may not be possible in certain shooting conditions Digital zoom is not available _45...

Страница 164: ...ase button is pressed default setting halfway The camera continuously adjusts the focus until the shutter release AF F Full time AF button is pressed halfway Use with moving subjects The sound of lens drive movement may be heard while the camera focuses m o Autofocus Mode for Movie Recording Autofocus mode for movie recording can be set with Autofocus mode _65 in the movie menu _46 ...

Страница 165: ...shutter when _ On default setting in 0 auto mode to display the effect selection screen and use the quick effects function _39 Off Disables the quick effects function during shooting The current setting can be confirmed in the monitor when shooting _9 No indicator is displayed when Off is selected t_ _1_ Note About Quick Effects Thisfunction cannot be used with some functions _65 _47 ...

Страница 166: ...n _ Skin _ _ _ button portrait softening Enable skin softening m o off The current setting can be confirmed in the monitor when shooting _9 No indicator is displayed when Off is selected The effects of skin softening are not visible when framing images shooting Check the degree of skin softening performed in playback mode _48 ...

Страница 167: ...the shutter whenever a smile is detected Optioll _ Descriptioll On default setting Enables the smile timer Off Turns the smile timer off The current setting can be confirmed in the monitor when shooting _9 No Indicator is displayed when Off is selected 8 t_ _1_ Note About Smile Timer This function cannot be used with some functions _65 _49 ...

Страница 168: ...es blink warning Flash cannot be used when On is selected if the camera saved an image in _ On which the subject s eyes may have been closed the dialog shown on the right is displayed for a few seconds Off default setting Turns the blink warning off The current setting can be confirmed in the monitor when shooting _9 No indicator is displayed when Off is selected p_ m o _1_ Note About Blink Proof ...

Страница 169: ...he playback menu is used to create digital print orders for printing on DPOF compatible devices Inserting the memory card into a DPOF compatible _ _ 21 printer s card slot Taking the memory card to a digital photo lab Connecting the camera to a PictBridge compatible _ _ 21 printer _24 A print order can also be created for images stored in the internal memory if the memory card is removed from the ...

Страница 170: ...o T o0 to switch to full frame pbyback Rotate the zoom control to W _ _ to switch back to six thumbnail display Press the _ button when setting is complete 3 Choose whether or not to print shooting date and photo information Choose Date and press the _ button to print the shooting date on all images in the print order Choose Info and press the _ button to print shutter speed and aperture value inf...

Страница 171: ...ly marked images and restrict the print order to images in the selected album or category or captured on the selected shooting date Favorite pictures mode auto List by date mode sort mode If the total number of marked images exceeds 99 as a result of adding the current print order setting the screen shown below will be displayed Select Yes to remove all print markings previously added from the pri...

Страница 172: ... zone and date option in the setup menu after an image has been captured has no effect on the date printed on the image Canceling Existing Print Order Select Delete print order in step of Print Order Creating a DPOF Print Order _ _51 and press the _ button to remove print marking from all images and cancel the print order Print Date When date and time of recording are imprinted on images using the...

Страница 173: ... intvl select the desired interval time and press the _ button before choosing Start To repeat the slide show automatically choose Loop and press the Q button before choosing Start The check mark _l will be added to the loop option when enabled 2 The slide show begins While the slide show isin progress press the multi selector I_ to display the subsequent image or to display the previous image Hol...

Страница 174: ...time is about 30 minutes even if Loop is enabled _ _78 p_ n Protect Press the I _ 1 button mode _ MENUbutton _ Protect _ _ button playback Protect selected images from accidental deletion Select images to protect or cancel protection for previously protected images from the image selection screen See Selecting Images _57 Note that formatting the camera s internal memory or the memory card will per...

Страница 175: ...ctor _ or i_ to choose the desired image Rotate the zoom control _3 to T q to switch to fun frame playback or W _ _ to switch back to sixthumbnail display Only one image can be selected at atime for Rotate image and Welcome screen Proceed to step 3 2 Press or to select or deselect or to specify the number of copies When an image isselected an icon isdisplayed below the image Repeat steps I and 2 t...

Страница 176: ...erclockwise Images that were recorded in portrait tall orientation can be rotated up to 180 degrees in either direction Select an image in the image selection screen _57 When the rotate image screen is displayed press tile multi selector or to rotate the image go degrees n Rotate 90 degrees Rotate 90 degrees counterclockwise clockwise Press the _ button to finalize display orientation and save ori...

Страница 177: ...e _ icon in full frame the screen changes to the voice memo playback screen Recording Voice Memos A voice menlo of up to 20 seconds carl be recorded while the _ _ button is pressed Do not touch the built in microphone during recording During recording _ and _ flash in the monitor When recording ends the voice memo playback screen is displayed See Playing Voice Memos for more information Pressthe m...

Страница 178: ...sstt_e multi selector or to choose Yes and press the _ button Only the voice memo will be deleted m rD 2 o _1_ Notes About Voice Memos When an image with a voice memo attached is deleted both the image and its voice memo are deleted Voice memos attached to protected images cannot be deleted if a voice memo already exists for the current image it must be deleted before a new voice memo can be recor...

Страница 179: ...rd 1 Use the multi selector to select an option from the copy screen and press the I_ button Camera to card Copy images from internal memory to memory card Card to camera Copy images from memory card to internal memory 2 Select a copy option and press the I_ button Selected images Copy selected images from the image selection screen _57 All images Copy all images _61 ...

Страница 180: ...ngs are copied with images Images or movies copied from the internal memory or a memory card cannot be displayed in auto sort mode _ _c_ When images added to albums _ _S are copied the copies are not automatically added to the same albums asthe original images Memory contains no images Message If a memory card that contains no images is inserted into the camera Memory contains no images message is...

Страница 181: ...larger image size improves the image quality and increases the file size 7_ 720 30p default setting _ 4_g E 480 30p 2_g_E 240 30p When recording in the internal rnernor cannot be selected 1280x720 16 9 640x480 4 3 320x240 4 3 the default setting is _ 480 30p and _ 720 30p The frame rate isapproximately 30 fps for all options 4 t_ _53 ...

Страница 182: ...y depending on the make of the memory card Movie OptionZ Maximum Movie Length 4 GB 2 7_ _E 720 30p 1 15 rain 4_ _E 480 30p 45 rain 2_ 240 30p 2 h 45 rain 1 7_E720 30 p cannot be selected when saving movies to the camera s internal memo 2 Individual movie files cannot exceed 2 GB in size or 29 minutes in length even when there is sufficient free space on the memory card for longer recording The max...

Страница 183: ...F FFull time AF change significantly during recording To prevent sound of camera focusing from interfering with recording use of Single AF is recommended Wind Noise Reduction Enter shooting mode _ MENU button _ _ menu icon _ Wind noise reduction _ button Select whether to reduce wind noise when recording movies Option Description Records while minimizing the noise of wind blowing on the _ On micro...

Страница 184: ...creen before entering shooting or COOLPIX playback mode Displays an image selected for the welcome screen When the image selection screen is displayed select an image _ _57 and press _ button As the selected image is stored in the camera it will be displayed when Select an image the camera is turned on even if the original image is deleted Images captured at an Image mode _ 532 setting of 5120x288...

Страница 185: ...V Apply the settings Select the minute field and press the _ button Select the order in which the day month and year are displayed from Year Month Day Month Day Year a nd Day Month Year _ Home time zone can be specified and daylight saving enabled or disabled from time zone options When the travel destination _ is selected the camera automatically calculates the time difference between the travel ...

Страница 186: ...tor to choose Time zone and press the I_ button 2 Choose _ Travel destination and press the I_ button The date and time displayed in the monitor changes according to the region currently selected p_ n o 3 Press i_ The time zone selection screen is displayed _68 ...

Страница 187: ... the icon is displayed in the monitor while the camera is in shooting mode _ Home Time Zone To switch to the home time zone choose t_ Home time zone in step 2 and press the _ button To change the home time zone choose t_ Home time zone in step 2 and perform the same procedure as for 1_ Travel destination to set the home time zone Daylight Saving Time When daylight saving time starts or ends turn t...

Страница 188: ...ess _ Choose from five settings for monitor brightness The default setting is 3 Photo Info Select whether or not tile photo information is displayed in the monitor Shooting mode _ _Pl_yback m L_te _ _ o Show info Auto info Current settings and operational guides are displayed as in Show info if no default setting operations are pe_ormed for a few seconds the display will be the same as Hide info i...

Страница 189: ... begins that represents the area that will be captured when recording movies The frame is not displayed when the shutter release button is pressed halfway or while recording The current settings or operational guides are displayed as in Auto info The current settings or operational guides are displayed as in Auto info g _1_ Note About Monitor Settings When Quick effects _47 is set to On Image revi...

Страница 190: ...me cannot be imprinted on images after they have been captured The date cannot be imprinted in the following situations When using Panorama assist scene mode When recording movies Dates imprinted at an Image mode setting _32 of 640x480 may be difficult to read Choose 1600xl 200 or larger when using the Print date option The date is recorded using the format selected in the setup menu s Time zone a...

Страница 191: ...en shooting with zoom or at slow shutter speeds The effects of camera shake are reduced when recording movies in addition to when taking still images Set Vibration reduction to Off when using a tripod to stabilize the camera during shooting Description _On _fault setting 1 Vibration reduction is enabled Off Vibration reduction isdisabled The current setting can be confirmed in the monitor when sho...

Страница 192: ...tely before taking images Due to characteristics of the vibration reduction function images displayed in the camera s monitor immediately after shooting may be displayed blurry Vibration reduction may be unable to completely eliminate the effects of camera shake in some situations When Tripod is selected in Night landscape scene mode vibration reduction is turned off m o _74 ...

Страница 193: ...ty is fixed at a particular value in It_ auto mode When AF area mode _42 is set to Subject tracking in I_1 auto mode When Sports Night portrait Dusk dawn Night landscape Museum Fireworks show Backlighting or Pet portrait scene mode is enabled Off Motion detection is not enabled The current setting can be confirmed in the monitor when shooting _9 The motion detection icon turns green when the camer...

Страница 194: ...subject is poorly lit The illuminator has a range of about 1 9 m 6 ft 2 in at AUTO Auto the maximum wide angle position and about 1 5 m 4 ft 11 in at the default setting maximum telephoto position Note that for some scene modes such as Museum _45 or Pet portrait _46 scene mode or focus areas the AF assist illuminator may not light even when Auto is selected AF assist illuminator does not light up ...

Страница 195: ...camera focuses on the area in the center of the fra me Digital zoom cannot be used in the following situations When Continuous is set to Multi shot 16 _ B37 in IPl auto mode When AF area mode _ B42 is set to Subject tracking in I_1 auto mode When Scene auto selector Portrait Night portrait or Pet portrait scene mode is selected When smart portrait mode is selected _77 ...

Страница 196: ...when the camera acquires focus on the subject and three times when an error is detected Start up sound will also play when the camera is turned on Select On default setting or Off No sound is played with shutter release Shutter sound when some features such as continuous shooting or BSS Best Shot Selector are enabled or recording movies even if On is selected n o _1_ Note About Sound Settings In P...

Страница 197: ...urns off after approximately three minutes passes in standby mode To reactivate the monitor while the power on lamp is flashing press any of the following buttons Power switch shutter release button O button button or _ movie record button Auto Off Settings The time allowed to elapse before the camera enters standby mode is fixed in the following situations When a menu is displayed Three minutes m...

Страница 198: ...emory card from the camera The Format memory option isdisplayed in the setup menu m Formatting a Memory Card A memory card carl be formatted when it is inserted in the camera The Format card option isdisplayed in the setup menu _1_ Formatting Internal Memory and Memory Cards Formatting the internal memory or memory card restores album icon settings _8 to the default setting displayed as number Do ...

Страница 199: ...pafiOI j Spanish YKpa l HCbKa _ Ukrainian EAArlv K_ Greek Fran_aJs French IndOnesia Indonesian Italiano italian _ oo_I_ _2 Magyar Hungarian Nederlands Dutch Norsk j Norwegian Polski Polish _ uw u _o_ w_ Portugu s BR Brazilian Portuguese Portugu_S PT Portuguese Pycc_t_ Russian _w_ _ 2 _ 2 2 Rom_n_ Romanian _ _ Arabic _ TR_j Bengali _ _ i i _ Simplified Chinese _ Traditional Chinese Hindi I_ _ Japan...

Страница 200: ...Video Mode Press the MENU button _ _ icon _ Video mode _ _ button menu Adjust settings necessary for connection to a television Select from NTSC and PAL 8 n _82 ...

Страница 201: ...and time If the camera is turned off charging stops If a computer enters sleep mode while charging charging stops and the camera may turn off When disconnecting the camera from a computer turn the camera offand then disconnect the USB ca hie It takes about 3 hours to charge a fully exhausted battery Charging time increases when images are transferred while the battery is charging When the camera i...

Страница 202: ...p The _llowing chart explains charge lamp status when the camera is connected to a computer Status Description Flashes slowly Battery charging green Off Flashes quickly green Battery not charging When the charge lamp changes from slow flashing green to off while the power on lamp is lit charging is complete The ambient temperature is not suited to charging Charge the battery indoors with an ambien...

Страница 203: ...a detects that one or more human subjects may have blinked in an image captured using face detection the Did someone blink screen is displayed in the monitor The face of the human su biect that may have blinked when the shutter was released is framed by a yellow border Should this occur check the image and determine whether or not another image should be captured See Operating the Blink Warning Sc...

Страница 204: ...urns to shooting mode m o Option Enlarge the detected face that blinked Switch to full frame playback Select the face to be displayed Delete the image Switch to shooting mode Description Rotate the zoom control to T c Rotate the zoom control to W _1_ If the camera detects that more than one human subject blinked press or with display zoomed in to switch to another face Press the _ button Press the...

Страница 205: ...on When it is set on a computer disable the function if the endless memory function is enabled the number of images taken may not be displayed correctly Eye Fi cards are for use only in the country of purchase Observe all local laws concerning wireless devices Leaving the setting as Enable will result in the battery being depleted in a shorter period of time Eye Fi Communication Indicator The comm...

Страница 206: ...asic Shooting Functions Option _ Flash mode _53 Self timer _55 0 Macro mode _57 Off Exposure compensation _59 Shooting Menu Option Default value Image mode _32 _ White balance _34 Continuous _37 ISO sensitivity _39 Color options _ _41 P_ AF area mode _42 _ Autofocus mode _46 o Quick effects _47 Auto Single Auto Standard color Face priority ion _88 ...

Страница 207: ...to release in pet portrait mode _46 Default value Scene auto selector Hand held Center Continuous Special Effects Mode selection menu _47 Smart Portrait Menu Option Skin softening _ _48 Smile timer _ _49 0 Blink proof _ _50 Movie Menu Option _ _When using a memory card Movie options _63 _1 720 30p _When using the internal memory Autofocus mode _65 Wind noise reduction _65 t_ _89 ...

Страница 208: ...ightness _570 Print date _72 Vibration reduction _73 Motion detection _575 AF assist _76 Digital zoom _77 Button sound _7B Shutter sound _578 Auto off _79 Charge by computer _B3 Blink warning _585 Eye Fi upload _B7 Default value None Auto info On Auto Auto On min Auto off Enable _90 ...

Страница 209: ...34 before selecting Reset all The following menu settings will remain unaffected when menus are reset with Reset all Shooting menu Preset manual data _35 acquired for White balance Setup menu image selected for Welcome screen _66 Time zone and date _67 Language _ _81 and Video mode _ _82 Others Favorite album icon _8 Firmware Version Press the MENU button _ I1_ icon _ Firmware version _ _ button m...

Страница 210: ...e and crop _ voice memo attachment included including images edited using the quick effects function _39 in ill auto mode _ Files are stored in folders named with a folder number followed by a five character identifier P_ plus a three digit sequential number for images captured in Panorama assist scene mode e g 101P_00I _ _2 and NIKON for all other images e g IOONIKON When the number of files with...

Страница 211: ...d in ascending order starting from the largest folder number on the destination medium _61 A single folder can hold up to 200 files if the current folder already contains 200 files a new folder named by adding one to the current folder name will be created the next time a file is stored If the current folder is numbered 999 and contains 200 files or a file is numbered 9999 no further files can be ...

Страница 212: ...shown 1 2 Be sure that the power connector cord has been properly aligned in power connector and battery chart bet grooves before closing the battery chamber memory card slot cover If part of the cord runs out of the grooves the cover or cord may be damaged when the cover is closed Audio video cable Audio Video Cable EG CP14 _94 ...

Страница 213: ...tomatically Pressing the power switch also turns off the camera The camera will turn The camera has become hot off to prevent The camera turns off automatically Leave the camera off overheating until it has cooled and then turn it on again Camera cannot focus 28 71 _ _O 0 flashes red Refocus _Use focus lock 70 Please wait for the Camera cannot perform other operations until recording is camera to ...

Страница 214: ... inserted 18 Error accessing memory card Useapproved card _ _22 Check that connectors are clean 18 Confirm that memory card is correctly inserted 18 Memory card has not been formatted for use in COOLPIX 3500 Formatting deletes all data stored on the memory card If you need to keep copies of any images make sure to select No 19 and save the copies to a computer or other medium before formatting the...

Страница 215: ...ufficient space to save a copy Delete images from destination 200 images have already been added to album Remove some images from album Add to other albums _80 34 Album is full No further pictures can _7 be added _S A voice memo cannot be attached to this file Sound file cannot be Voice memos cannot be attached to movies saved Select an image captured with COOLPIX 53500 _60 A blink was detected On...

Страница 216: ... in the playback menu images The image has not been added to album Add the image to album _S Choose the album that the image was added _6 No images are contained in the category selected in auto sort mode _9 Select the category containing the sorted images File contains no image data This file cannot be played back All images are hidden This image cannot be deleted File not created with COOLPIX 35...

Страница 217: ... and reconnect USB cable An error occurred in camera s internal circuitry Turn camera off remove and reinsert battery and turn System error camera on If error persists contact retailer or Nikon 14 25 authorized service representative An error occurred with the printer Printer error check beck printer After solving the problem select Resume and printer status Dress the _ button to resume printing _...

Страница 218: ...rror occurred with the ink Printer error check ink Check ink select Resume and press the _ button to resume printing _ Running out of ink or ink cartridge is empty Printer error out of ink Replace ink cartridge select Resume and press the _ button to resume printing _ Printer error file An error occurred with the image file to be printed corrupt Select Cancel and press the _ button to cancel print...

Страница 219: ... and Performance _ 2 The Camera _ 2 The Battery _ 4 Charging AC Adapter _ S Memory Cards _ 5 Cleaning and Storage _ 6 Cleaning _ 6 Storage _ 6 Troubleshooting _ 7 Specifications _ 17 Supported Standards _ 21 Approved Memory Cards _ 22 Index _ 24 z o D_ ...

Страница 220: ...nitor break care should be taken to avoid injury caused by broken glass and to prevent the liquid crystal from the display touching the skin or entering the eyes or mouth _1_ Do Not Point the Lens at Strong Light Sources for Extended Periods Avoid pointing the lens at the sun or other strong light sources _r extended periods when using or storing the camera intense light may cause deterioration of...

Страница 221: ...e Hence while these displays may contain pixels that are always lit white red blue or green or always off black this is not a malfunction and has no effect on images recorded with the device White or colored streaks may be visible when bright subjects are framed in the monitor This phenomenon known as smear occurs when extremely bright light strikes the image sensor it is characteristic of image s...

Страница 222: ...pare batteries in a warm place and exchange as necessary Once warmed a cold battery may recover some of its charge Dirt on the battery terminals can prevent the camera from functioning Should the battery terminals become dirty wipe them off with a clean dry cloth before use If the battery will not be used for some time insert it in the camera and completely exhaust it before removing it for storag...

Страница 223: ...Do not put labels or stickers on memory cards The first time you insert a memory card that has been used in another device into this camera be sure to format it with this camera We recom mend formatting new memory cards with this camera before using them with this camera Note that formattingpermanentlydeletesallimagesandotherdata on thememory card Be sure to make copies of any images you wish to k...

Страница 224: ...or other sandy or dusty environment wipe off Body any sand dust or salt with a dry cloth lightly dampened with fresh water and dry thoroug hly Note that foreign matter inside the camera could cause damage not covered by the warranty n m til Storage Turn tile camera off when not in use Be sure that tile power on lamp is off before putting the camera away Remove the battery if the camera will not be...

Страница 225: ...connect and reconnect the AC adapter Note that although any data currently being recorded will be lost data that have already been recorded will not be affected by removing or disconnecting the power source Confirm all connections Off is selected for Charge by computer in the setup menu When charging by connecting the camera to a computer battery charging stops when the camera is turned off When c...

Страница 226: ...as been disconnected Reconnect the USB cable The internal temperature of the camera or the memory card is high Leave the camera off until it has cooled and then turn it on again The camera is off Battery is exhausted Standby mode for saving power Press the power switch shutter release button It_ button button or 11_movie record button When flash lamp flashes wait until flash has charged The camera...

Страница 227: ...ected for Photo info in Monitor 98 _ _70 monitor settings in the setup menu Print date not available The camera clock has not been set 20 98 _67 Date not appearing on The current shooting mode is one that does not images even when Print support Print date 98 _72 date is enabled The date cannot be imprinted on movies Screen for setting time zone and date is displayed when Clock battery was exhauste...

Страница 228: ...ter release button or _ movie record button When menus are displayed press the MENU button Battery is exhausted When flash lamp is flashing flash is charging The subject is too close to the camera Try shooting using macro mode or Scene auto selector or Close up scene mode The intended subject is one with which autofocus does not perform well Select Auto for AF assist in the set up menu Turn the ca...

Страница 229: ... mode setting to _1 Off The flash mode is set to _ Off Some scene modes with which the flash does not function are selected On is selected for Blink proof in smart portrait menu Another unction that restricts flash is enabled Optical zoom cannot be used while recording movies Digital zoom is set to Off in the setup menu Digital zoom is not available in the following situations When Continuous is s...

Страница 230: ...t is dark Noise can be reduced by Using flash 53 Specifying a lower ISO sensitivity setting 63 _39 When recording movies in dim lighting the image may become somewhat grainy in appearance This occurs when the ISO sensitivity increases and it does not indicate a malfunction The flash mode is set to _ Off 54 Flash window is blocked 28 Subject is beyond flash range 53 Adjust exposure compensation 59 ...

Страница 231: ...ion and try shooting again Under some shooting conditions facial skin 51 _ _48 tones may not be softened Use Skin softening for Glamour retouch in 51 _17 the playback menu _r images containing more than three faces It may take more time to save images in the following situations When the noise reduction function is in operation When the flash mode is set to _l Auto with red eye reduction When the ...

Страница 232: ...ave been cropped to a size of 320 x 240 or smaller Voice memos cannot be attached to movies Voice memos cannot be attached to images captured with other cameras Voice memos attached to images using another camera cannot be played back on this camera These options cannot be used with movies Select images that support editing functions The camera is unable to edit images captured with other cameras ...

Страница 233: ... images copied using the copy option cannot be displayed in auto sort mode Images recorded in internal memory or on the memory card may not be played back correctly if overwritten by a computer Up to 999 images or movie flies can be added to each category If the desired category already contains 999 images new images or movies cannot be added The camera is off Battery is exhausted USB cable is not...

Страница 234: ...s when Auto is selected for the Charge by computer option in the setup menu Set the Charge by computer option to Off and reconnect the camera to the printer Memory card contains no images Replace the memory ca rd Remove the memory card to print images from the internal memory Paper size cannot be selected from the camera in the following situations even when printing from The printer does not supp...

Страница 235: ... 6 4 Construction 8 elements in 8 groups 1 ED lens element U p to 4x angle of view equivalent to that of approx 728 mm lens in 35ram 135 format Lens shift Motion detection still pictures 6 7 cm 2 7 in approx 230k dot TFT LCD with anti reflection coating and 5 level brightness adjustment Frame coverage Approx 98 horizontal and 98 vertical compared to actual shooting mode image Frame coverage Approx...

Страница 236: ...S152x3864 _ 20M 5152x3864 10M 3648x2736 4M 2272xl 704 2 M 1600x 1200 VGA 640 480 16 9 14M 5120x2880 ISO80 1600 ISO 3200 available when using Auto mode Matrix center weighted digital zoom less than 2x spot digital zoom 2 or more Programmed auto exposure and exposure compensation 2 0 2 0 EV in steps of 1 3 EV Mechanical and CCD electronic shutter 1 2000 I s 4 s when scene mode is set to Fireworks sh...

Страница 237: ...n Spanish Swedish Tamil Telugu Thai Turkish Ukrainian Vietnamese One Rechargeable Li ion Battery EN EL19 included AC Adapter EH 62G available separately Approx 2 h 40 rain when using Charging AC Adapter EH 70P and when no charge remains Still pictures Approx 220 shots when using EN EL19 i_ Movies actual battery Approx 50 rain when using EN EL19 life for recording 2 so 222 TemperatuEe s Humidity Ap...

Страница 238: ...is limit is reached if camera temperature becomes elevated Rechargeable Li ion Battery EN EL19 Rechargeable lithium ion battery DC 3 7 V 700 mAh Approx 31 5 39 5 x 6 mm 1 3 x 1 6 x 0 3 in excluding projections Ap p rox 14 5 g 0 5 oz ex cl udin g batt e ry case 3 z _ til Charging AC Adapter EH 70P AC 24o v Hz 0 00 0 A DC 5 0 V 550 mS 0o _40o 32oF 104oF Approx 55 x 22 x 54 mm 2 2 x 0 9 x 2 2 in excl...

Страница 239: ...stored on memory cards Exif version 2 3 This camera supports Exchangeable image file format ExiO version 23 for digital still cameras a standard that allows information stored with photographs to be used for optimal color reproduction when images are output from Exif compliant printers PictBridge A standard developed cooperatively by the digital camera and printer industries allowing photographs t...

Страница 240: ...Lexar 4 GB 8 GB 16 GB 32 GB SDXC memory card 3 64GB 128GB 64 GB 64GB 64GB 128GB 1 If the memory ca rd is used with a card reader or similar device make su re that the device supports 2 GB ca rds 2 SDHC compliant if the memory card is used with a card reader or similar device be sure _ _ that the device is compliant with the SDHC standard CI_ 3 SDXCcompliant lfthememorycardisusedwithacardreaderorsi...

Страница 241: ... SDHC and SD Logos aretrademarks of SD 3C LLC PictBridge isa trademark AJ other trade names mentioned in this manual or the other documentation provided with your Nikon product are the trademarks or registered trademarks of their respective holders FreeType License FreeType2 Portions of this software arecopyright c 2013The FreeTypeProject www freetype org All rights reserved MIT License Harfbuzz P...

Страница 242: ...2 _ Apply selection button 5 P_ MENUMenu button z o 5 6 63 78 94 98 _ Delete button 5 34 95 _60 _ Flash mode 53 o_ _ Self timer 55 x_ _ Macro mode 57 Exposure compensation 59 AF_AI_ IL _ _4 Numerics 240 30p 94 _t_63 480 30p 94 _t_63 720 30p 94 _t_63 A AC adapter 17 _94 Adding favorite pictures 76 _5 Advanced red eye reduction 54 AF area mode 63 _42 AF assist 98 _76 Album _8 Aperture value 30 Audio...

Страница 243: ...99 _t_83 Charge lamp 5 17 _84 Charging AC Adapter 16 Close up _ 44 Cloudy _t_34 Color options 63 _t_41 Compression ratio _t_32 Connector cover 3 Continuous 63 _t_37 Copying images 78 _t_61 Crop 74 _t_20 Cross process _ 48 Cyanotype 63 _t_41 U Date and time 21 _t_67 Date format 21 _t_67 Daylight _t_34 Daylight saving time 21 98 _t_69 Delete 34 95 _t_60 Digital zoom 98 _t_77 Direct print 81 _t_24 D ...

Страница 244: ...ormat memory 99 _t_80 Format memory card 19 99 _t_80 FSCN _ _92 Full frame playback 32 Full timeAF 63 94 _t_46 _t_65 G Glamour retouch 78 _t_17 H Help 41 High key 47 High ontrast monochrome 47 I Identifier _t_92 Image mode 63 _ _32 _t_33 Image review _t_70 Image size 63 _t_32 Imprinting date and time 22 _ _54 _ _72 Internal memory 19 Internal memory indicator 9 24 90 ISO sensitivity 63 _t_39 j JPG...

Страница 245: ...r size _27 _29 Party indoor _ _ 42 Pet portrait auto release 46 Pet portrait 46 Photo info _70 PictBridge 81 _t_24 _ 21 Playback 32 95 _t_60 PJayback menu 78 _t_51 PJayback mode 32 76 Mayback zoom 74 Pop POP 47 Portrait _ 41 Power 20 24 25 Power switch 3 24 25 Power on lamp 3 24 25 Preset manual _35 Pressing halfway 31 Print 78 81 _t_27 _t_29 Print date 22 98 _52 _54 _t_72 Print order 78 _51 Print...

Страница 246: ...it menu 50 _48 Smart portrait mode 49 Smile timer 64 _49 Snow 43 SoftSO 47 Sound settings 99 _t_78 Speaker 5 Special effects mode 47 Sports _ 42 SSCN 0_92 Standard color 63 0 _41 Strap 5 Subject tracking 63 _43 _44 Sunset _ 43 Super vivid Vl 47 i Telephoto 29 Televisions 81 0 622 Thumbnail display 75 Time zone 98 0 667 Time zone and date 20 98 0 667 Toy camera effect 1 _I_1 47 Toy camera effect 2 ...

Страница 247: ...Voice memo 78 _t_59 Volume 96 _t_60 w WAV _t_92 Welcome screen 98 _t_66 White balance 63 _t_34 Wide angle 29 Wind noise reduction 9 94 _t_65 z Zoom control 3 29 96 Zoom in 29 Zoom out 29 2 z o _29 ...

Страница 248: ...rm of this manual in whole or in part except for brief quotation in critical articles or reviews may be made without written authorization from NIKON CORPORATION NIKON CORPORATION 2013 Nikon Corporation _ YP3B02 11 6MN11311 02 ...

Отзывы: