background image

77

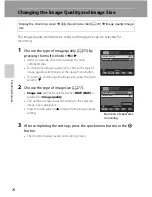
Changing the Image Quality and Image Size

Sh
ooting Feat

ures

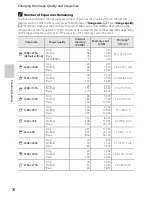
Available Image Size

You can set the JPEG image size (amount of pixels) for pictures recorded with an 
image quality of 

Fine

Normal

 or 

Basic

.

The larger the image, the larger the size at which it can be printed or displayed 
without becoming noticeably “grainy,” limiting the number of pictures that can be 
recorded.
Conversely, small image sizes are suitable for pictures attached to e-mails or used 
on web pages. However, printing small images in large print sizes results in the 
image turning “grainy.”

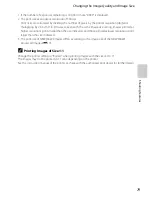
* The total number of pixels captured, and the number of pixels captured horizontally and 

vertically.
Example: 

M


3

6

48

×2

73

6

 = 10 megapixels, 3648×2736 pixels

C

Image Size Setting

The setting for the image size is shown by an icon displayed on the monitor during shooting and 
playback (

A

8 to 10).

The setting is also applied to other shooting modes (except for low noise night mode, and 
shooting modes 

E

F

 and 

N

).

In low noise night mode, the available image size is 

C


2

048

×1

53

6

 or smaller.

The size of JPEG images can be chosen when you create JPEG images from NRW (RAW) images 
using 

NRW (RAW) processing

 (

E

17) (up to a maximum of 3648 × 2736 pixels).

Image size

 for the JPEG image can be set when 

NRW (RAW) + Fine

NRW (RAW) + Normal

 or 

NRW (RAW) + Basic

 is selected. However, note that 

I


3

6

48

×2

43

2

z


3584

×2

0

16

 and 

H

2

73

6×2

73

6

 cannot be selected.

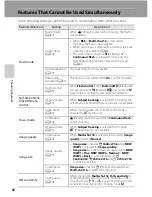
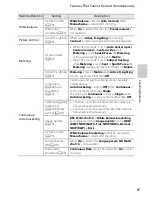
This feature may not be used in combination with certain features. See “Features That Cannot Be 
Used Simultaneously” (

A

80) for more information.

Options*

Description

M

3648×2736
(default setting)

Record pictures with finer detail than those shot at 

E

3

26

4

×2

448


or 

D

2

5

92×19

44

.

E

3264×2448

Good balance between file size and quality; suitable in most 
situations.

D

2592×1944

C

2048×1536

Smaller than 

M

3

6

48

×2

73

6

E

3

26

4

×2

448

 and 

D

2

5

92×19

44

; for recording more pictures.

B

1600×1200

A

1280×960

J

1024×768

Record pictures of a size suitable for display on devices such as a 
computer monitor.

f

640×480

Record pictures suitable for display on a television with a screen 
aspect ratio of 4:3, or for e-mail attachment.

I

3648×2432

Record pictures with the same aspect ratio (3:2) as those shot with 
35mm [135] format film cameras.

z

3584×2016

Record pictures with the same aspect ratio (16:9) as wide screen TV.

H

2736×2736

Record square pictures.

Содержание COOLPIX P71 00

Страница 1: ...Nikon Quick Start Guide Take the Camera Out of the Box 3 First Steps 5 Shooting and Playback 11 Using ViewNX 2 16 Other Functions 20 ...

Страница 2: ... mx soporte Telephone Please call for technical support and other product assistance Our professional advisers are standing by to help with your digital camera needs For customers in the United States 1 800 N KON UX 1 800 645 6689 For customers in Canada 1 877 534 9910 For customers in Mexico 001 888 565 5452 W Viewing the Reference Manual CD 1 Turn on the computer and insert the CD ROM into the c...

Страница 3: ...ry EN EL14 with terminal cover Audio Video Cable EG CP16 A plug adapter is included if the camera was purchased in a country or region that requires a pi ug adapter The shape of the pi ug adapter varies with the country or region of purchase OS NOTE A Secure Digital SO memory card hereafter referred to as a memory card is not provided See page 23 of the Reference Manual for a list of approved memo...

Страница 4: ... FUNCl button Take the Camera Out ofthe Box 14 15 16 17 18 19 20 21 22 mLens ring release button BJ Flash pop up button mDiopter adjustment control mAutofocus AF access lamp ID Flash lamp I J Viewfinder m E playback button Em IDI monitor button I n AE L AF L button b list by date button E J Main command dial mMonitor ED Rotary multi selector Multi selector m apply selection button Em MENU menu but...

Страница 5: ...country or region in which the camera was purchased The Battery Charger comes with the plug adapter attached in Argentina Brazil and Korea 1 2 While pushing in the battery _ 1 set it into the Battery Charger 1 3 Plug the Battery Charger into an electrical outlet CHARGE lamp starts blinking when charging starts A fully exhausted battery charges in about one hour and 30 minutes When charging is comp...

Страница 6: ...l memory approximately 94MB 3 1 Open the battery chamber memory card slot cover 3 2 Insert the battery Use the battery to push the orange battery latch in the direction shown G and fully insert the battery When the battery is fully inserted the battery latch locks it in place Lt Inserting the Battery Correctly Battery latch e Inserting the battery upside down or backwards could damage the camera B...

Страница 7: ... chamber memory card slot cover turn the camera off and confirm that the power on lamp and the monitor are off The camera battery and memory card may be hot immediately after using the camera Observe caution when removing the battery or memory card Removing the Battery To eject the battery open the battery chamber memory card slot cover and slide the orange battery latch in the direction shown 1 a...

Страница 8: ...f the camera will enter standby mode and the power on lamp will blink If no operations are performed for another three minutes the camera wi ll turn off automatically To turn on the monitor again in sta ndby mode perform either one of the following operations Press the power switch the shutter release button or the E button Rotate the mode dial The camera enters standby mode in about one minute de...

Страница 9: ...o the prev1ous screen next screen move the highlight J t move the highlight to the left to the right T Apply selection Move the highlight down Press A or T to choose the desired language and press the button Press or to choose your home time zone Time zone and press the button 5 2 Press A or T to choose Yes and press the button Daylight Saving Time To set the date and time in a time zone where day...

Страница 10: ... procedure explains basic shooting operations using 0 auto mode f 4i Imprinting the Shooting Date in Printed Images After setting the date and time press the MENU button to display theY setup menu and set Print date setting Use the multi selector to select and set menu options Press the MENU button to exit the menu _Page 75 of the Reference Manual f 4i Changing the Language Setting and the Date an...

Страница 11: ...attery 6 Cannot take pictures Battery exhausted Charge or replace the battery _ Pages 24 and 28 of the Reference Manual n Information Displayed on the Monitor Battery level indicator Shutter speed Aperture value Number of exposures remaining When data is recorded to the internal memory ll is displayed Press the IDI monitor button to switch between the information displayed on the monitor __ Page 1...

Страница 12: ... the Reference Manual Using the Viewfinder Use the viewfinder to frame pictures when bright light makes it difficult to see the monitor When the image in the viewfinder is difficult to see adjust by rotating the diopter adjustment control while looking through the viewfinder Take care not to scratch your eye with your fingertips or nails _ Page 16 of the Reference Manual Shooting and Playback Diop...

Страница 13: ... raised upward to about 105 This is convenient when taking pictures with the camera held at high or low positions Put the monitor back in the original position when using in normal situations mNote on the Flash In situations where a flash is needed such as in dark locations or when the subject is backlit press the flash pop up button to raise the flash When the flash is lowered it is fi xed to off...

Страница 14: ...shutter release button halfway again Flash lamp Focus area The flash lamp indicates the statusof the flash when the shutter release button is pressed halfway On Flash fires when the shutter button is pressed Blinking Flash charging Off Flash does not fire When the battery level is low the monitor is turned off during charging of the flash 4 2 Press the shutter release button all the way i e press ...

Страница 15: ...he shutter release button Delete Unwanted Images To delete the image currently displayed on the monitor press the liD button When the confirmation dialog is displayed use the multi selector to select Yes and press the button to delete the image that is displayed Deleted images cannot be recovered To cancel choose No and press the button _ Pages 34 and 36 of the Reference Manual step 6 Turn Offthe ...

Страница 16: ... Enterprise Ultimate Windows Vista Home Basic Home Premium Business Enterprise Ultimate Service Pack 2 Windows XP Home Edition Professional Service Pack 3 Macintosh Mac OS X version 10 5 8 10 6 7 Refer to the Nikon website for the latest information on operating system compatibility 1 Start the computer and insert the ViewNX 2 Installer CD into the CD ROM drive Mac OS When the ViewNX 2 window is d...

Страница 17: ... installation window to check the installation help information and system requirements before installing ViewNX 2 Click Typical Installation Recommended in the installation window Follow the on screen instructions to install the software 4 Exit the installer when the installation completion screen is displayed 5 Windows Click Yes Mac OS Click OK The following software is installed ViewNX 2 consis...

Страница 18: ... and insert the memory card If a message is displayed prompting you to choose a program select Nikon Transfer 2 When using Windows 7 If the dialog shown at right is displayed follow the steps below to select Nikon Transfer 2 1 Select Nikon Transfer 2 for Import pictures and videos Under Import pictures and videos click Change program A program selection dialog will be displayed select Import File ...

Страница 19: ... camera off and disconnect the USB cable If you are using a card reader or card slot choose the appropriate option in the computer operating system to eject the removable disk corresponding to the memory card and then remove the card from the card reader or card slot Viewing Images Start ViewNX 2 Images are displayed in ViewNX 2 when transfer is complete Consult online help for more information on...

Страница 20: ...cts you can change how the camera selects the focus area for autofocus A Page 48 of the Reference Manual Focus mode Choose from AF Autofocus t Macro close up Infinity and MF Manual focus A Page 67 of the Reference Manual I The camera is equipped with ten and two second timers I Flash mode I Auto Autofocus A Page 64 of the Reference Manual 1 1 Smile timer The camera detects smiling faces using face...

Страница 21: ...2 or U3 Page 57 of the Reference Manual Auto mode _Movie mode Movies can be recorded with sound _ Page 98 of the Reference Manual SCENE Scene mode When one of the scene modes is selected pictures are captured using settings that are optimized for the selected scene In scene auto selector mode the camera automatically selects the optimum scene mode for simpler shooting _ Page 39 of the Reference Ma...

Страница 22: ...e Monitor settings Y Print date OFF Self timer after release ON Vibration reduction t Motion detection OFF Press the rotary multi selector 01111111 to highlight the tab Press the rotary multi selector or T to select a tab and press the button or The selected menu is displayed a Pages 13 and 14 of the Reference Manual Quick Menu When the quick menu dial is rotated while shooting the quick menu is d...

Страница 23: ... Reference Manual Switch between Hide or show the shooting information photo IDI information and tone level information on the monitor displays _ Page 15 of the Reference Manual Play back movies Press the button to play back the displayed movies _ Page 102 of the Reference Manual Press the button to delete the picture currently Delete pictures displayed in the monitor m1 _ Page 36 of the Reference...

Страница 24: ...tures during shooting Ten different effects are available In fE Low noise night mode you can shoot with the ISO sensitivity controlled automatically to a high level and without the flash to capture the atmosphere of a low lit scene In Movie mode movies can be recorded with sound Picture Editing _ Page 9 of the Reference Manual Various effects can be added to pictures taken In NRW RAW processing yo...

Страница 25: ... n hesitez pas acontacter votre support technique Nikon local Merci r Estimado cliente de Nikon gracias por elegir un producto Nikon En este paquete encontrara una Gula de inicio rapido impresa en varios idiomas Esta gula contiene informacion basica para que pueda empezar a utilizar rapidamente su camara Nikon 1 1 CD ROM adjunto contiene un Manual del usuario detallado en varios idiomas guardado c...

Страница 26: ...En Reference Manual DIGITAL CAMERA ...

Страница 27: ...censing LLC All other trade names mentioned in this manual or the other documentation provided with your Nikon product are trademarks or registered trademarks of their respective holders AVC Patent Portfolio License This product is licensed under the AVC Patent Portfolio License for the personal and non commercial use of a consumer to i encode video in compliance with the AVC standard AVC video an...

Страница 28: ...on Parts of the Camera and Basic Operations The Basics of Shooting and Playback Shooting Features Playback Features Recording and Playing Back Movies General Camera Setup Reference Section Technical Notes and Index ...

Страница 29: ...ckage Contents In the event that any items are missing please contact the store where you purchased the camera A plug adapter is included if the camera was purchased in a country or region that requires a plug adapter The shape of the plug adapter varies with the country or region of purchase NOTE A memory card is not included with the camera COOLPIX P7100 Digital Camera with Accessory Shoe Cover ...

Страница 30: ...se is referred to as the default setting The names of menu items displayed in the camera monitor and the names of buttons or messages displayed on a computer monitor appear in bold In this manual images are sometimes omitted from monitor and viewfinder display samples so that monitor indicators can be more clearly shown Illustrations and monitor content shown in this manual may differ from the act...

Страница 31: ...MAY VOID YOUR NIKON WARRANTY The use of third party rechargeable Li ion batteries not bearing the Nikon holographic seal could interfere with normal operation of the camera or result in the batteries overheating igniting rupturing or leaking For more information about Nikon brand accessories contact a local authorized Nikon dealer Before Taking Important Pictures Before taking pictures on importan...

Страница 32: ...py or reproduce passports issued by the government licenses issued by public agencies and private groups ID cards and tickets such as passes and meal coupons Comply with copyright notices The copying or reproduction of copyrighted creative works such as books music paintings woodcut prints maps drawings movies and photographs is governed by national and international copyright laws Do not use this...

Страница 33: ...representative for inspection after unplugging the product and or removing the battery Do not use the camera or Battery Charger in the presence of flammable gas Using the camera in the presence of flammable gases such as propane and gasoline as well as flammable sprays or dust could result in explosion or fire Do not look at the sun through the viewfinder Viewing the sun or other strong light sour...

Страница 34: ...void damage to the product be sure to remove the battery when no charge remains Discontinue use immediately should you notice any change in the battery such as discoloration or deformation If liquid from the damaged battery comes in contact with clothing or skin rinse immediately with plenty of water If leaked battery fluid gets into your eyes rinse them out immediately with clean running water an...

Страница 35: ...CD player could cause hearing loss or damage the equipment Observe caution when using the flash Using the flash close to your subject s eyes could cause temporary visual impairment Particular care should be observed if photographing infants when the flash should be no less than 1 m 3 ft 4 in from the subject Do not operate the flash with the flash window touching a person or object Failuretoobserv...

Страница 36: ...uctions may cause harmful interference to radio communications However there is no guarantee that interference will not occur in a particular installation If this equipment does cause harmful interference to radio or television reception which can be determined by turning the equipment off and on the user is encouraged to try to correct the interference by one or more of the following measures Reo...

Страница 37: ...LACED BY AN INCORRECT TYPE DISPOSE OF USED BATTERIES ACCORDING TO THE INSTRUCTIONS This symbol indicates that thisproductistobecollected separately The following apply only to users in European countries This product is designated for separate collectionatanappropriate collection point Donot disposeofas household waste For more information contact the retailer or the local authorities in charge of...

Страница 38: ...r 8 Basic Operations 11 Switching Between Shooting Mode and Playback Mode 11 Using the Rotary Multi Selector 12 Using Menus the d Button 13 Switching the Monitor Display the x Button 15 Using the Viewfinder 16 The Basics of Shooting and Playback 17 Preparation 1 Charge the Battery 18 Preparation 2 Insert the Battery 20 Preparation 3 Insert a Memory Card 22 Internal Memory and Memory Cards 23 Appro...

Страница 39: ... Setting the Exposure for Shooting 51 Changing A B C D Modes 54 Options Available in the Shooting Menu 54 E F and N User Setting Modes 57 Changing E F or N Mode Settings 57 Available Specialized Menu for E F or N 58 Features That Can Be Set Using the Multi Selector 60 Available Functions 60 Using the Flash Flash Modes 61 Using the Self timer 64 Smile Timer Shooting Smiling Faces 65 Using Focus Mod...

Страница 40: ...03 The Setup Menu 104 Reference Section E1 Taking Pictures with Manual Focus E2 Using Panorama Assist E3 A B C D Modes E5 A Programmed Auto B Shutter Priority Auto or C Aperture Priority Auto E5 D Manual Mode E7 Editing Still Images E9 Editing Features E9 k Quick Retouch Enhancing Contrast and Saturation E11 I D Lighting Enhancing Brightness and Contrast E11 e Skin Softening Softening Skin Tones E...

Страница 41: ...racketing Continuous Shooting While Changing the Shutter Speed ISO Sensitivity and White Balance E36 a Picture Control COOLPIX Picture Control Changing the Settings for Image Recording E38 a Movie Options Changing the Type of Movie to Shoot E42 Shooting Menu A B C or D Mode E43 Custom Picture Control COOLPIX Custom Picture Control E43 Metering E44 Continuous Shooting E45 AF Area Mode E48 Subject T...

Страница 42: ... E69 Autofocus Mode E69 Wind Noise Reduction E69 The Setup Menu E70 Welcome Screen E70 Time Zone and Date E71 Monitor Settings E74 Print Date Imprinting Date and Time on Pictures E75 Self timer After Release E76 Vibration Reduction E76 Motion Detection E77 AF Assist E78 Red eye Reduction E78 Digital Zoom E79 Zoom Speed E80 Fixed Aperture E80 Sound Settings E81 Record Orientation E81 Rotate Tall E8...

Страница 43: ...load E93 MF Distance Indicator Units E94 Reverse Indicators E94 Reset All E94 Firmware Version E98 File and Folder Names E99 Speedlights External Flash Unit E101 How to Attach a Speedlight E101 Optional Accessories E103 Shooting with Remote Control E105 Error Messages E107 Technical Notes and Index F1 Caring for the Products F2 The Camera F2 The Battery F3 The Battery Charger F4 The Memory Cards F...

Страница 44: ...ed in Shooting Mode 4 Controls Used in Playback Mode 6 Changing the Angle of the Monitor 7 Raising and Lowering the Flash 7 Attaching the Camera Strap 7 The Monitor 8 Basic Operations 11 Switching Between Shooting Mode and Playback Mode 11 Using the Rotary Multi Selector 12 Using Menus the d Button 13 Switching the Monitor Display the x Button 15 Using the Viewfinder 16 If you want to start using ...

Страница 45: ...2 9 Infrared receiver front 60 E105 10 Accessory Shoe Cover BS 1 E101 11 Accessory shoe E101 12 Flash 61 13 HDMI mini connector Type C 91 14 USB Audio video connector 91 15 Connector cover 91 16 Power connector cover for connection with an optional AC Adapter E103 17 w2 FUNC2 button 108 18 Shutter release button 4 32 19 Zoom control 31 f Wide 31 g Tele 31 h Thumbnail playback 35 i Playback zoom 35...

Страница 46: ...32 7 Flash lamp 61 8 Viewfinder 16 9 c playback button 11 34 10 x monitor button 15 16 11 g AE L AF L button 5 107 C list by date button 88 12 Main command dial 51 53 13 Speaker 90 102 106 14 Monitor 8 15 15 Rotary multi selector multi selector 12 16 k apply selection button 12 17 d menu button 13 18 Infrared receiver rear 60 E105 19 l delete button 36 102 20 Tripod socket 21 Battery chamber memor...

Страница 47: ...ry Multi Selector for more information 12 Main command dial Adjust shutter speed or aperture value 51 53 Sub command dial Quick menu dial Quick menu button Display or exit the quick menu 72 d menu button Display and hide the menu 13 Shutter release button When pressed halfway i e if you stop pressing when you feel resistance slightly Set focus and exposure When pressed all the way i e if you press...

Страница 48: ...ngth Combined with the shutter release button Shoot with the assigned function setting Combined with the command dial Change the assigned function setting 56 107 108 w2 FUNC2 button Change the assigned function setting 108 x monitor button Switch the monitor display 15 Playback button Play back images 11 34 Delete button Delete the last image that was saved 36 Control Name Main Function A ...

Страница 49: ...d toward f h Adjust the volume for voice memo and movie playback 35 90 102 Rotary multi selector See Using the Rotary Multi Selector for more information 12 Main command dial Select pictures and date 34 35 Sub command dial Apply selection button Play back movies Switch from image thumbnail or zoomed image display to full frame playback mode 102 12 d menu button Display and hide the menu 13 Delete ...

Страница 50: ...on Monitor Do not apply excessive force when changing the angle of the monitor The monitor cannot be moved horizontally Put the monitor back in the original position when using in normal situations Raising and Lowering the Flash Press the K flash pop up button to raise the flash See UsingtheFlash FlashModes A61 formoreinformationonsettingtheflash When not using the flash lower it by gently pushing...

Страница 51: ...r A15 Shooting Mode 1 250 1 250 F5 6 F5 6 F5 6 1 250 999 999 9999 9999 999 9999 1m 0s 1m 0s 1m 0s 1m 0s 1m 0s 1m 0s 37 28 30 36 29 39 38 2 1 8 9 10 11 7 b a 19 24 18 20 22 23 27 25 26 21 32 33 34 31 35 44 46 43 42 47 45 14 12 15 17 13 16 40 41 6 4 3 5 999 999 999 49 48 1342 1342 1342 1 250 1 250 1 250 F5 6 F5 6 F5 6 50 1342 1342 1 250 1 250 F5 6 F5 6 51 1342 1342 1 250 1 250 F5 6 F5 6 52 1342 1342...

Страница 52: ...or 108 25 Image quality 74 75 26 Image size 74 77 27 Movie options 73 100 28 a Number of exposures remaining still pictures 24 78 b Movie length 98 100 29 Internal memory indicator 24 30 Aperture value 51 31 Focus area for center 32 55 60 32 Focus area for manual 42 43 55 60 33 Focus area for auto 55 60 34 Focus area for face detection pet detection 45 55 60 65 85 35 Focus area for subject trackin...

Страница 53: ...indicator 90 4 List by date display 88 5 Battery level indicator 24 6 Monitor brightness boost indicator 16 7 Protect icon 89 8 Print order icon 89 9 Image quality 75 10 Image size 77 11 Movie options 73 100 12 a Current image number total number of images 34 b Movie length 102 13 Internal memory indicator 34 14 Movie playback guide 102 15 List by date guide 88 16 Volume indicator 90 102 17 Black ...

Страница 54: ...ing playback mode you can also switch to shooting mode by pressing the shutter release button Rotate the mode dial and align an icon to the mark to select different shooting modes A28 29 Press the C list by date button in playback mode to select pictures for playback by shooting date A88 4 4 4 4 0004 JPG 0004 JPG 0004 JPG 15 30 15 30 15 30 15 11 2011 15 11 2011 15 11 2011 1 250 1 250 1 250 38 38 F...

Страница 55: ...e playback mode When Displaying Menus Items above or below can also be chosen by rotating the rotary multi selector Display m flash mode A61 menu Apply selection Display D focus mode menu A67 Display n Self timer Smile timer Remote control menu A64 65 E105 Flash mode Display G AF area mode menu2 A55 Rotate to select an option1 Select the previous image1 move the displayed area when the image is ma...

Страница 56: ...ning Filter effects Print order Slide show Shooting mode Playback mode Tabs Tabs W tab Displays the settings that can be changed for the current shooting mode A29 Depending on the current shooting mode the tab icon that is displayed will be different A auto Tabs are not displayed C scene Scene menu tab A39 R special effects Special effects menu tab A48 O low noise night Low noise night menu tab A5...

Страница 57: ...sh exp comp Noise reduction filter Custom Picture Control Press the rotary multi selector J to highlight the tab Press the rotary multi selector H or I to select a tab and press the k button or K The selected menu is displayed Autofocus mode Single AF Full time AF Press the rotary multi selector H or I to select an item and then press K or the k button Press H or I to select an item and then press...

Страница 58: ...ness distribution in the picture The horizontal axis corresponds to pixel brightness with dark tones to the left and bright tones to the right The vertical axis shows the number of pixels 4 The shooting information displayed includes the shooting mode A B C or D shutter speed aperture value image quality image size ISO sensitivity white balance exposure compensation COOLPIX Picture Control and the...

Страница 59: ...ay can be changed in Virtual horizon display of Monitor settings in the setup menu A104 The default setting is Circle Using the Viewfinder Use the viewfinder to frame pictures when bright light makes it difficult to see the monitor When the image in the viewfinder is difficult to see adjust by rotating the diopter adjustment control while looking through the viewfinder Take care not to scratch you...

Страница 60: ...reparation 2 Insert the Battery 20 Preparation 3 Insert a Memory Card 22 Shooting Step 1 Turn the Camera On 24 Setting the Display Language Date and Time First Use Only 26 Step 2 Select a Shooting Mode 28 Step 3 Frame a Picture 30 Step 4 Focus and Shoot 32 Playback Step 5 Play Back Images 34 Step 6 Delete Unwanted Images 36 ...

Страница 61: ...plug adapter varies according to the country or region in which the camera was purchased The Battery Charger comes with the plug adapter attached in Argentina Brazil and Korea 2 While pushing in the battery 1 set it into the Battery Charger 2 3 Plug the Battery Charger into an electrical outlet CHARGE lamp starts blinking when charging starts A fully exhausted battery charges in about one hour and...

Страница 62: ...upplied to the camera from an electrical outlet enabling taking and playing back pictures Do not under any circumstances use an AC Adapter other than the EH 5b or a Power Connector other than the EP 5A Failure to observe this precaution could result in overheating or in damage to the camera Status Description Blinks Battery charging On Battery fully charged Flickers The battery is set incorrectly ...

Страница 63: ...e battery latch in the direction shown 1 and fully insert the battery 2 When the battery is fully inserted the battery latch locks it in place B Inserting the Battery Correctly Inserting the battery upside down or backwards could damage the camera Be sure to confirm that the battery is in the correct orientation 3 Close the battery chamber memory card slot cover Battery latch ...

Страница 64: ...onfirm that the power on lamp and the monitor are off To eject the battery open the battery chamber memory card slot cover and slide the orange battery latch in the direction shown 1 Then remove the battery straight 2 B High Temperature Caution The camera battery and memory card may be hot immediately after using the camera Observe caution when removing the battery or memory card ...

Страница 65: ...ory card is in the correct orientation 3 Close the battery chamber memory card slot cover B Formatting a Memory Card The first time you insert a memory card that has been used in another device into this camera be sure to format it with this camera All data stored on a memory card is permanently deleted when the card is formatted Be sure to make copies of any data you wish to keep before formattin...

Страница 66: ...or playback first remove the memory card Approved Memory Cards The following Secure Digital SD memory cards have been tested and approved for use in this camera When recording a movie onto a memory card a memory card with an SD speed class of Class 6 or higher is recommended If the transfer speed of the card is slow the movie recording may end unexpectedly 1 Before using a card reader or similar d...

Страница 67: ... memory card is not inserted C is displayed and pictures are recorded to the internal memory approx 94 MB The number of pictures that can be stored depends on the remaining capacity of the internal memory or memory card the image quality and the image size A78 The number of exposures remaining shown in the illustration differs from the actual value Display Description b Battery level high B Batter...

Страница 68: ...ower on lamp will blink If no operations are performed for another three minutes the camera will turn off automatically To turn on the monitor again in standby mode perform either one of the following operations Press the power switch shutter release button or the c button Rotate the mode dial The time that elapses before the camera enters standby mode can be changed using the Auto off setting in ...

Страница 69: ...ress H or I to choose Yes and press the k button To cancel setting select No 3 Press J or K to select your home time zone Time zone and press the k button See Daylight Saving Time A27 for more information 4 Press H or I to choose the date display order and press the k button or K Čeština Dansk Deutsch English Español Ελληνικά Cancel Language Multi selector Time zone and date No Yes Cancel set date...

Страница 70: ...e camera automatically calculates the time difference between the travel destination and the w home time zone and saves images using the date and time of the travel destination If you exit without setting the date and time O blinks when the shooting screen is displayed Use the Time zone and date setting in the setup menu A104 to set the date and time C The Clock Battery The camera s clock is power...

Страница 71: ...elect the shooting mode The following describes how to take pictures in A auto mode as an example Rotate the mode dial to A The camera switches to A auto mode and the shooting mode icon changes to A See The Monitor A8 for more information Auto mode 1 250 1 250 F5 6 F5 6 38 38 Shooting mode icon ...

Страница 72: ...37 for more information about the settings available in the menu for the current shooting mode A Auto mode A38 Shoot with basic camera operations y Scene mode A39 When one of the scene modes is selected pictures are captured using settings that are optimized for the selected scene In scene auto selector mode the camera automatically selects the optimum scene mode for simpler shooting u Special eff...

Страница 73: ...the Viewfinder A16 for more information C ISO Sensitivity E ISO sensitivity A8 may be displayed on the shooting screen When E is displayed the ISO sensitivity is automatically raised C Using a Tripod In the following situations use of a tripod is recommended to avoid the effects of camera shake When shooting in a dark location or with the flash mode A61 set to W off When shooting in the telephoto ...

Страница 74: ...on Unlike the optical zoom the digital zoom uses a digital imaging process known as interpolation to magnify images resulting in slight deterioration of image quality depending on the image size A77 and digital zoom magnification Interpolation is applied at zoom positions beyond V When the zoom is increased beyond the V position interpolation is initiated and the zoom indicator also turns yellow A...

Страница 75: ...en theshutter releasebutton ispressed halfwayand the focus area blinks red or the AF access lamp flickers the camera is unable to focus Change the composition and press the shutter release button halfway again 2 Press the shutter release button all the way i e press the button the rest of the way down The shutter is released and the picture is recorded If you press the shutter release button with ...

Страница 76: ... be focused using manual focus E2 B The Subject Is Too Close to the Camera If the camera does not focus try shooting with p macro close up A68 in the focus mode or Close up A42 scene mode C AF assist Illuminator In dark places the AF assist illuminator A105 may light when the shutter release button is pressed halfway C To Make Sure You Do Not Miss a Shot If you are concerned that you might miss a ...

Страница 77: ... is changed during playback the displayed images are rotated automatically except when fast forward rewind is performed Pictures taken in tall orientation will be rotated automatically A106 The rotating direction can be changed from the Rotate image option in the playback menu A89 Pictures taken using face detection A85 or pet detection A45 will be rotated automatically when displayed in full fram...

Страница 78: ...Press the k button to return to full frame playback mode Thumbnail Playback Calendar Display You can view several images on one screen making it easy to find the image you want You can change the number of images displayed by rotating the zoom control toward f h g i Rotate the multi selector or press H I J or K to select an image and then press the k button to display that image in full frame play...

Страница 79: ...uter before deleting them Protected images A89 cannot be deleted When pictures taken with an Image quality A75 setting of NRW RAW Fine NRW RAW Normal or NRW RAW Basic are deleted with the l button both the NRW RAW and JPEG images that were recorded at the same time are deleted To delete only NRW RAW images or JPEG images select Erase selected NRW images or Erase selected JPEG images in Delete of t...

Страница 80: ...tion you will learn how to select different shooting modes and adjust settings according to the shooting conditions and the kind of images you want to capture Programmed auto 1 250 1 250 1342 1342 1342 F5 6 F5 6 F5 6 1 250 Shooting menu AF area mode Metering Continuous Autofocus mode Flash exp comp Noise reduction filter Custom Picture Control 1 250 1342 1342 F5 6 F5 6 1 250 Flash mode ...

Страница 81: ...60 for more information on flash mode A61 self timer A64 smile timer A65 remote control A60 and focus mode A67 See Features That Can Be Set Using the Exposure Compensation Dial for more information on exposure compensation A71 See Features That Can Be Set with the Quick Menu for more information on available quick menu A73 C Features That Cannot Be Used Simultaneously This feature may not be used ...

Страница 82: ...he Default Settings A69 for more information See Features That Can Be Set Using the Exposure Compensation Dial for more information on exposure compensation A71 See Features That Can Be Set with the Quick Menu for more information on available quick menu A73 C Features That Cannot Be Used Simultaneously This feature may not be used in combination with certain features A80 x Scene auto selector A40...

Страница 83: ...he camera automatically selects the focus area for autofocus in accordance with the composition The camera detects and focuses on faces see Using Face Detection A85 for more information Depending upon shooting conditions the camera may not select the desired scene mode Should this occur switch to A auto mode A28 or select the optimum scene mode for the subject manually The digital zoom is not avai...

Страница 84: ...lity setting image size setting the memory card used or shooting condition e Night portrait Use this mode for portraits taken at sunset or at night The camera detects and focuses on a face see Using Face Detection A85 for more information After the skin softening feature makes facial skin tones softer the camera records the image A86 If no faces are detected the camera focuses on the subject at th...

Страница 85: ...lease button is pressed halfway the AF access lamp always lights in green k Close up Use this mode to photograph flowers insects and other small objects at close range The focus mode A67 setting is changed to p macro close up and the camera automatically zooms to the closest position to the subject where the camera can shoot You can move the focus area that the camera focuses on Press the k button...

Страница 86: ...button is not pressed halfway You may hear the sound of the camera focusing l Museum Use indoors where flash photography is prohibited for example in museums and art galleries or in other settings in which you do not want to use the flash The camera focuses at the center area of the frame The camera captures up to ten images while the shutter release button is pressed all the way and the sharpest ...

Страница 87: ... green The camera focuses at the center area of the frame When the shutter release button is pressed all the way the camera shoots pictures continuously and saves the following two images An image processed by D Lighting A89 at the time of shooting HDR composite image loss of detail is reduced in highlights and shadows The second image saved is an HDR composite image If only one image can be saved...

Страница 88: ...the shutter release button is fully held down when image quality is set to Normal and image size is set to M 3648 2736 The camera detects and focuses on the face of a dog or cat When the subject is in focus the shutter is released automatically Pet portrait auto release default setting Up to five pet faces are detected simultaneously If a pet s face is not detected press the shutter release button...

Страница 89: ... subject closest to the camera When the subject is in focus the focus area active focus area lights in green maximum of nine areas Characteristics of Each Special Effect Option Description Creative monochrome default setting Create monochrome photographs by adjusting the grainy feel and contrast Also the normal color image can be converted into black and white solarization Rotate the main command ...

Страница 90: ... in green create pictures by varying focus slightly between the shutter release button being pressed and the picture being shot The desired shooting effect is not produced when the subject is bright and the shutter speed cannot be slowed Cross process Create images with an unusual hue by converting a positive color image into negative or negative color image into positive Rotate the main command d...

Страница 91: ...th the Quick Menu for more information on available quick menu A73 See Options Available in the Special Effects Menu below for more information on functions that can be set using the d button Options Available in the Special Effects Menu In the special effects mode the following option settings can be changed C Features That Cannot Be Used Simultaneously This feature may not be used in combination...

Страница 92: ...closest to the camera When the subject is in focus the focus area active focus area lights in green maximum of nine areas B Notes on Low Noise Night Mode Although vibration is reduced even in low lit environments a tripod is recommended when not using a flash Set Vibration reduction A105 to Off when using a tripod to stabilize the camera The picture taken may be grainy because the shooting is perf...

Страница 93: ...noise night menu are stored in the camera s memory independently and is not applied to the settings in any other shooting mode When the camera is turned off or switched to another shooting mode AF area mode is reset to Auto C Features That Cannot Be Used Simultaneously This feature may not be used in combination with certain features A80 Select low noise night mode M d button M O tab A13 Option De...

Страница 94: ...The procedure for shooting pictures at the desired brightness exposure by adjusting the shutter speed or aperture value is called determine exposure The sense of dynamism and amount of background defocus in pictures to be shot vary depending on the combinations of shutter speed and aperture value even if the exposure is the same Rotate the command dial to set the shutter speed and aperture value E...

Страница 95: ...ion the aperture values are f 2 8 and f 5 6 respectively When Fixed aperture A106 is set to On zooming can be performed with minimum changes in the aperture value C Built in ND Filter When the subject is too bright set Built in ND filter in the setup menu A104 to reduce the light and shoot C E F or N User Setting Mode Even when the mode dial is set to E F or N user setting mode you can shoot in A ...

Страница 96: ...peed The shutter speed can be adjusted by rotating the main command dial C Aperture priority auto E5 Use to blur the background or bring both the foreground and background into focus The aperture value can be adjusted by rotating the sub command dial D Manual E7 Use to control the exposure according to shooting requirements When adjusting the aperture value or shutter speed the degree of deviation...

Страница 97: ...ou to store the settings customized in COOLPIX Picture Controls which can set picture editing options for recording images according to the shooting scene or your preferences E43 Metering Select the method that the camera uses to measure the brightness of the subject The camera adjusts the exposure which is a combination of shutter speed and aperture value based on the brightness measurement The d...

Страница 98: ...ormally performed when recording the picture The default setting is Normal E53 Long exposure NR At slow shutter speeds pictures may be affected by noise in the form of randomly spaced brightly colored dots concentrated in dark parts of the image Reduce noise at slow shutter speeds The default setting is Auto E53 Distortion control Choose whether to correct the peripheral distortion that occurs due...

Страница 99: ... be used in combination with certain features A80 Zoom memory When the zoom control is operated while pressing the w1 button the camera changes in steps to the focal length equivalent to 35mm 135 format of angle of view of the zoom lens that is set in advance The default setting is on w for all the check boxes E57 Option Description A ...

Страница 100: ...F or N can be changed as many times as you want in Save user settings See E58 for more information on the Save user settings Changing E F or N Mode Settings See Features That Can Be Set Using the Multi Selector A60 for more information on flash mode A61 self timer A64 smile timer A65 remote control A60 and focus mode A67 AF area mode See Features That Can Be Set Using the Exposure Compensation Dia...

Страница 101: ...lt setting 35 mm 50 mm 85 mm 105 mm 135 mm 200 mm or Current zoom position Photo info Set the information displayed on the monitor when the mode dial is set This setting is not applied to the setup menu settings E74 Virtual horizon display Set the virtual horizon display for when the mode dial is set This setting is not applied to the setup menu settings E74 Initial monitor display Set the informa...

Страница 102: ...area mode for when the mode dial is set The current focus area position is saved when AF area mode is set to Manual E48 AF assist Enable or disable the AF assist mode for when the mode dial is set This setting is not applied to the setup menu settings E78 Option Description A ...

Страница 103: ...ectively eliminating blur caused by camera shake that occurs when the shutter release button is pressed 2 Set the method of how to change the focus area for autofocus A54 Set Multi selector right press to Off in the setup menu A104 if you do not want to display the selected focus area when the multi sector K is pressed 3 The setting varies with scene mode or special effects See List of the Default...

Страница 104: ... k button is not pressed within a few seconds the selection is set and the setting menu disappears When U auto is applied D is only displayed for a few seconds even if monitor indicators A15 are turned on 4 Frame the subject and take a picture The flash lamp indicates the status of the flash when the shutter release button is pressed halfway On The flash will fire when you press the shutter releas...

Страница 105: ...scene auto selector or an optional Speedlight external flash unit is attached Use of a tripod is recommended to avoid the effects of camera shake when shooting in a dark location X Fill flash The flash fires when a picture is taken regardless of how bright the subject is Use to fill in illuminate shadows and backlit subjects S Manual Flash is forcibly fired at the flash output that is set for the ...

Страница 106: ...ncreases slightly Advanced red eye reduction may not produce the desired results in some situations In extremely rare instances areas not subject to red eye may be affected by advanced red eye reduction processing In these cases choose another mode and try again The red eye reduction process when NRW RAW images A75 are recorded consists only of the pre flashing before the main flash including the ...

Страница 107: ... scene mode Y pet portrait auto release is displayed A45 The self timer Y 10s and Y 2s are not available The mode selected for the self timer is displayed If the k button is not pressed within a few seconds the selection is set and the setting menu disappears 3 Frame the picture and press the shutter release button halfway Set the focus and exposure 4 Press the shutter release button all the way T...

Страница 108: ... setting menu disappears 3 Frame the picture and wait for the subject to smile without pressing the shutter release button When the camera detects a face a yellow double border focus area is displayed around that face When the camera has focused on that face the double border will turn green for a moment and focus is locked Up to three faces are detected When more than one face is detected the fac...

Страница 109: ...in shooting modes See Available Functions A60 and List of the Default Settings A69 for more information This feature may not be used in combination with certain features See Features That Cannot Be Used Simultaneously A80 for more information C When the Self timer Lamp Blinks When the camera detects a face the self timer lamp blinks The lamp flickers immediately after the shutter is released C Rel...

Страница 110: ...ulti selector 2 Use the multi selector to choose the desired focus mode and press the k button See Available Focus Modes A68 for more information If the k button is not pressed within a few seconds the selection is set and the setting menu disappears When A autofocus is applied P is only displayed for a few seconds even if monitor indicators A15 are turned on Autofocus ...

Страница 111: ... F or N mode O low noise night mode or special effects mode the focus area is not displayed on the screen A Autofocus The camera automatically adjusts the focus according to the distance to the subject Use when the distance from the subject to the lens is 50 cm 1 ft 8 in or more or 80 cm 2 ft 8 in or more at the maximum telephoto zoom position D Macro close up Use for close ups of flowers or small...

Страница 112: ...when in Painting or Zoom exposure When Defocus during exposure is selected W off or Y slow sync can be selected 4 Smile timer cannot be selected 5 s subject tracking cannot be selected The AF area mode is fixed at Center normal when Zoom exposure is selected 6 The setting cannot be changed 7 Quick response remote can be selected The setting applied in shooting modes A B C and D is saved in the cam...

Страница 113: ... selected 8 Quick response remote can be selected 9 When HDR is set to Off the flash mode is fixed at X fill flash When HDR is set to On the flash mode is fixed at W off 10 A autofocus D macro close up or B infinity can be selected 11 The self timer is not available Pet portrait auto release A45 can be set to on or off C Features That Cannot Be Used Simultaneously This feature may not be used in c...

Страница 114: ...adjust the exposure compensation value to the side When set to a value other than 0 0 the H mark and compensation value are displayed on the monitor and the exposure compensation dial mark turns on when shooting 2 Press the shutter release button to take a picture C Exposure Compensation Value When the shooting mode is the Fireworks show scene mode A43 or D manual mode E7 the exposure compensation...

Страница 115: ...o exit the quick menu press the quick menu button or the shutter release button Available functions differ according to the shooting mode C Features That Cannot Be Used Simultaneously This feature may not be used in combination with certain features A80 Dial position Function A A B C D E F N y u O D a Image quality Image size A73 w w w w w Movie options A73 w b ISO sensitivity A73 w c White balanc...

Страница 116: ...if Auto High ISO sensitivity auto ISO 100 200 or ISO 100 400 is selected E30 c White balance Adjust colors in the image closer to the colors as they appear to the eye Although Auto normal default setting can be used under most types of lighting you can apply the white balance setting suited to the sky conditions or light source to achieve better results if the default setting results are unsatisfa...

Страница 117: ...hange the image size press the multi selector I 2 Choose the type of image size A77 Image size cannot be selected when NRW RAW is selected for Image quality The number of exposures remaining for the selected image size is displayed Press the multi selectorH toreturnto the imagequality setting 3 After completing the settings press the quick menu button or the k button The monitor display reverts to...

Страница 118: ...for most applications File format JPEG compression ratio of about 1 8 c Basic Basic image quality is lower than with Normal suitable for pictures attached to e mails or used on web pages File format JPEG compression ratio of about 1 16 d NRW RAW Fine Two images are recorded at the same time one NRW RAW image and one fine quality JPEG image e NRW RAW Normal Two images are recorded at the same time ...

Страница 119: ...ecorded in the following shooting modes Scene mode Special effect mode except for Zoom exposure and Defocus during exposure Low noise night mode When the mode is changed to scene mode or special effect mode except for Zoom exposure and Defocus during exposure from other shooting modes the image quality is changed according to situation as follows When NRW RAW is set the image quality is changed to...

Страница 120: ...f JPEG images can be chosen when you create JPEG images from NRW RAW images using NRW RAW processing E17 up to a maximum of 3648 2736 pixels Image size for the JPEG image can be set when NRW RAW Fine NRW RAW Normal or NRW RAW Basic is selected However note that I 3648 2432 z 3584 2016 and H 2736 2736 cannot be selected This feature may not be used in combination with certain features See Features ...

Страница 121: ... Print size2 cm in M 3648 2736 default setting Fine Normal Basic NRW RAW 19 38 75 5 770 1 540 3 010 230 31 23 12 93 E 3264 2448 Fine Normal Basic 24 48 93 970 1 910 3 650 28 21 11 8 D 2592 1944 Fine Normal Basic 38 74 140 1 520 2 940 5 480 22 16 8 5 6 5 C 2048 1536 Fine Normal Basic 60 116 216 2 410 4 640 8 620 17 13 7 5 B 1600 1200 Fine Normal Basic 96 183 319 3 770 7 100 12 000 14 10 5 4 A 1280 ...

Страница 122: ... setting images printed at higher resolutions print smaller than the size indicated and those printed at lower resolutions print larger than the size indicated 3 The print size of NRW RAW images differs according to the image size of the NRW RAW processed images E17 C Printing Images of Size 1 1 Change the printer setting to Border when printing images with the size set to 1 1 The images may not b...

Страница 123: ...te control AF area mode A55 When Subject tracking is selected for shooting the self timer smile timer remote control are not available Focus mode Smile timer A65 When shooting with the smile timer the mode is changed to A autofocus Continuous A54 B infinity cannotbe usedwhen Continuousflashis set for shooting AF area mode A55 When Subject tracking is selected for shooting E manual focus is not ava...

Страница 124: ... mode other than Off Continuous Auto bracketing Continuous A54 Auto bracketing A73 Continuous and auto bracketing are not available simultaneously Autobracketing is reset to OFF when Continuous is set to any mode other than Single The setting for Continuous is reset to Single when Auto bracketing is set to any mode other than OFF Self timer A64 Smile timer A65 Remote control A60 Continuous and the...

Страница 125: ...RAW Normal or NRW RAW Basic Continuous A54 When Continuous Continuous flash or BSS is selected for shooting print date is not available Auto bracketing A73 Print date is not available Photo info Smile timer A65 The virtual horizon is not displayed when shooting with the smile timer AF area mode A55 The virtual horizon is not displayed when shooting with Face priority The virtual horizon is not dis...

Страница 126: ...ality is set to NRW RAW NRW RAW Fine NRW RAW Normal or NRW RAW Basic Continuous A54 The digital zoom cannot be used when Multi shot 16 is selected for shooting AF area mode A55 The digital zoom cannot be used when shooting with Subject tracking Wide angle converter A55 The digital zoom cannot be used when On is selected for shooting Setting Control range ISO sensitivity A73 1 Auto2 ISO 100 2002 IS...

Страница 127: ...n shooting using continuous or auto bracketing with the flash mode set to V auto with red eye reduction A61 62 only the pre flash element of red eye reduction is performed B Notes on Digital Zoom The digital zoom cannot be used with certain shooting modes When the digital zoom is in effect selectable options for AF area mode or metering mode is restricted E79 Continuous mode Built in flash Flash u...

Страница 128: ...en faces are partially hidden by sunglasses or otherwise obstructed When faces take up too much or too little of the frame When the frame includes more than one face the faces detected by the camera and the face on which the camera focuses depend upon a variety of factors including the direction in which the subject is facing In some rare cases such as those described in Autofocus A33 the subject ...

Страница 129: ...ones softer before saving the image Scene auto selector A40 Portrait A40 or Night portrait A41 in scene mode Skin softening can also be applied to saved images A89 B Notes on Skin Softening It may take more time to save images Under some shooting conditions the desired skin softening results may not be achieved and skin softening may be applied to areas of the image where there are no faces ...

Страница 130: ... back images 0004 JPG 0004 JPG 0004 JPG 15 30 15 30 15 30 15 11 2011 15 11 2011 15 11 2011 132 132 132 4 4 4 0004 JPG 0004 JPG 0004 JPG 15 30 15 30 15 30 15 11 2011 15 11 2011 15 11 2011 132 132 132 4 4 4 4 11 8 4 List by date 26 11 2011 20 11 2011 18 11 2011 15 11 2011 Playback menu Delete Quick retouch D Lighting Skin softening Filter effects Print order Slide show ...

Страница 131: ...ct the C tab list by date menu from the shooting date selection screen you can select one of the following features in the playback menu A89 and apply that feature to images captured on the selected date Print order slide show delete protect hide image When viewing images in full frame playback mode if you press the d button to display the menu and then select the C tab list by date menu you can t...

Страница 132: ...ive color Cross screen Fisheye Miniature effect and Painting E13 a Print order2 When using a printer to print images saved on the memory card the print order function can be used to select which images are printed and how many copies of each image are printed E60 b Slide show2 Images saved in the internal memory or on a memory card are played back in an automatic slide show E63 c Delete2 Delete an...

Страница 133: ... same function to all images captured on the selected date 3 This function is not displayed when using list by date mode See Editing Still Images E9 and The Playback Menu E60 in the Reference Section for more information about each function E Voice memo Use the camera s microphone to record voice memos and attach them to the picture taken Playback and deletion of voice memos can also be performed ...

Страница 134: ...I cable Type C to the TV s HDMI input jack Viewing and organizing images on a computer A92 If you transfer images to a computer you can perform simple retouching and manage image data in addition to playing back images and movies Connection method Connect the camera to the computer s USB input jack with the included USB Cable UC E6 Before connecting to a computer install ViewNX 2 on the computer u...

Страница 135: ...rofessional Enterprise Ultimate Windows Vista Home Basic Home Premium Business Enterprise Ultimate Service Pack 2 Windows XP Home Edition Professional Service Pack 3 Macintosh Mac OS X version 10 5 8 10 6 7 Refer to the Nikon website for the latest information on operating system compatibility 1 Start the computer and insert the ViewNX 2 CD into the CD ROM drive Mac OS When the ViewNX 2 window is ...

Страница 136: ...quirements before installing ViewNX 2 Click Typical Installation Recommended in the installation window Follow the on screen instructions to install the software 4 Exit the installer when the installation completion screen is displayed Windows Click Yes Mac OS Click OK The following software is installed ViewNX 2 consisting of the three modules below Nikon Transfer 2 For transferring images to the...

Страница 137: ...ppliers to the computer and insert the memory card If a message is displayed prompting you to choose a program select Nikon Transfer 2 When using Windows 7 If the dialog shown at right is displayed follow the steps below to select Nikon Transfer 2 1 Select Nikon Transfer 2 for Import pictures and videos Under Import pictures and videos click Change program A program selection dialog will be displa...

Страница 138: ...he computer turn the camera off and then disconnect the USB cable If you are using a card reader or card slot choose the appropriate option in the computer operating system to eject the removable disk corresponding to the memory card and then remove the card from the card reader or card slot Viewing Images Start ViewNX 2 Images are displayed in ViewNX 2 when transfer is complete Consult online hel...

Страница 139: ...one compensation sharpness adjustment and trimming cropping Editing Movies Click Movie Editor in the ViewNX 2 toolbar Movie editing functions include the ability to delete unwanted scenes Printing Images Click Print in the ViewNX 2 toolbar A dialog is displayed and images can be printed using a printer connected to the computer ...

Страница 140: ...et the mode dial to D to display the movie recording screen Press the shutter release button to record movies In playback mode press the k button to play back a movie 10m32s 10m32s 10m16s 10m16s 10m16s 0004 MOV 0004 MOV 15 30 15 30 15 30 0004 MOV 15 11 2011 7m42 7m42s 7m42s ...

Страница 141: ...rding The camera focuses at the center of the frame The focus area is not displayed when the movie is recorded When the g AE L AF L button is pressed while recording movies the exposure and focus are locked A3 Press the g AE L AF L button again to cancel the exposure and focus lock Recording stops automatically when the maximum movie length has been recorded 3 Press the shutter release button all ...

Страница 142: ...ht objects such as the sun reflections of the sun and electric lights when recording movies is recommended The flash does not fire B Notes on Autofocus When Autofocus mode in the movie menu A101 is set to A Single AF default setting the focus is locked when the shutter release button is pressed halfway Autofocus may not perform as expected A33 Should this occur try the following 1 Before recording...

Страница 143: ...he built in microphone a Stereo Microphone ME 1 available separately E103 can be connected to the external microphone connector A3 to record sound during movie recording or voice memos for still pictures A90 When the external microphone is connected Wind noise reduction in the movie menu A101 cannot be used The external microphones sensitivity can be set in External mic sensitivity in the setup me...

Страница 144: ...nu In the movie mode the following option settings can be changed Display the shooting screen in the movie mode M d button M D tab A13 Option Description A Autofocus mode Single AF default setting where the camera focuses on the same position as one at the start of movie recording or Full time AF where the camera focuses continuously during movie recording can be selected When Full time AF is sele...

Страница 145: ... playback mode A35 to select a movie and press the l button A36 B Note on Movie Playback Movies recorded with cameras other than COOLPIX P7100 cannot be played back To Use Description Rewind A Rewind the movie while the k button is pressed down Advance B Advance the movie while the k button is pressed down Pause E The following operations can be performed with the playback controls at the top of t...

Страница 146: ...enus the d Button A13 for more information about using the camera s menus For further details about each setting refer to The Setup Menu in the Reference Section E70 Set up Motion detection Vibration reduction Print date Monitor settings Time zone and date Welcome screen Self timer after release 1 250 1 250 1342 1342 1342 F5 6 F5 6 F5 6 1 250 ...

Страница 147: ...e travel destination and the w home time zone and saves images using the date and time of the travel destination E71 Monitor settings Set the image display after shooting and the screen brightness When using Photo info set whether or not to display virtual horizon histograms and framing grid on the monitor When using Virtual horizon display set the virtual horizon indicator to either Circle defaul...

Страница 148: ...m 26 ft at the maximum wide angle position and about 7 0 m 22 ft at the maximum telephoto position Even if Auto is selected the AF assist illuminator may not light depending on the position of the focus area or the scene mode that is selected E78 Red eye reduction When the flash mode A61 is set to V auto with red eye reduction and this feature is set to Pre flash on default setting the flash repea...

Страница 149: ...e operation sound is disabled in certain settings such as shooting mode E81 Record orientation When set to Auto default setting the orientation data is recorded with the picture taken Pictures taken using face detection A85 or pet detection A45 will be rotated automatically in accordance with the orientation of the face when they are displayed regardless of the settings E81 Rotate tall When set to...

Страница 150: ...egardless of the setting E85 Customize command dials Switch the functions that can be operated using the main command dial and sub command dial for shooting pictures The default setting is No swap E86 Multi selector right press When set to AF area mode default setting when the multi selector K G is pressed during shooting the AF area mode setting A50 is displayed In order not to display the AF are...

Страница 151: ...an subject may have closed the eyes immediately after recognizing the face while shooting with modes other than the smile timer A85 the Did someone blink screen is displayed on the monitor to check the picture taken The default setting is Off E92 Eye Fi upload Set whether or not to enable the function for sending images to a computer using a commercially available Eye Fi card The default setting i...

Страница 152: ...ing Still Images E9 Connecting the Camera to a TV Viewing Images on a TV E20 Connecting the Camera to a Printer Direct Print E22 Editing Movies E28 Menu Quick Menu E30 Shooting Menu A B C or D Mode E43 Specialized Menu for E F or N E58 The Playback Menu E60 The Movie Menu E69 The Setup Menu E70 Additional Information File and Folder Names E99 Speedlights External Flash Unit E101 Optional Accessori...

Страница 153: ...release button all the way to take the picture 3 Press the k button The set focus is locked You can continue shooting with the locked focus To readjust the focus press the k button again to display the screen in step 2 To change back to autofocus return to step 1 and choose any setting other than E C E Manual Focus The digits displayed for the gauge on the right of the monitor in step 2 serve as a...

Страница 154: ...ted panorama right I left J up K or down L The yellow icon II moves to the direction pressed so press the k button to choose the direction A white icon I is displayed in the chosen direction Apply flash mode A61 self timer A64 remote control E105 focus mode A67 and exposure compensation A71 settings with this step if necessary Press the k button again to reselect the direction 4 Frame the first po...

Страница 155: ...e size A77 be adjusted after shooting the first picture The panorama series is terminated if the auto off function E82 triggers the standby mode during shooting To prevent this setting a longer time for the auto off function is recommended C R exposure lock Indicator When using panorama assist mode all pictures in the panorama have the same exposure white balance and focus as the first picture of ...

Страница 156: ... a maximum speed of 1 2000 to 8 seconds In C mode the aperture value can be set in a range of f 2 8 to 8 wide angle position and f 5 6 to 8 telephoto zoom position 3 Frame the subject and shoot In the default setting the camera has nine focus areas and automatically selects the focus areas containing the subject closest to the camera When the subject is in focus the focus area active focus area li...

Страница 157: ... in ND filter E85 or ISO sensitivity E30 are changed the appropriate exposure may be obtained At shutter speeds of 1 4 second or slower noise may appear in the image In such situations the shutter speed indicator lights in red Setting Long exposure NR E53 to On is recommended C Shutter Speed The control range of the shutter speed differs depending on the ISO sensitivity setting Additionally the ra...

Страница 158: ...more information on exposure indicator 3 Rotate the sub command dial to choose an aperture value Repeat steps 2 to 3 to modify shutter speed and aperture value settings until the desired exposure is achieved 4 Focus and shoot In the default setting the camera has nine focus areas and automatically selects the focus areas containing the subject closest to the camera When the subject is in focus the...

Страница 159: ...ting High ISO sensitivity auto ISO 100 200 or ISO 100 400 ISO sensitivity is fixed at ISO 100 C Shutter Speed A shutter speed of 1 4000 second is available only when the zoom is at the wide angle position and the aperture value is set to f 8 minimum aperture The control range of the shutter speed differs depending on the ISO sensitivity setting Additionally the range is restricted during continuou...

Страница 160: ...the picture properly or transfer it to a computer Editing functions are not available when there is not enough free space in the internal memory or on the memory card Editing function Application Quick retouch E11 Easily create a copy with enhanced contrast and richer colors D Lighting E11 Create a copy of the current picture with enhanced brightness and contrast brightening dark portions of the p...

Страница 161: ...th editing functions are deleted Edited copies are stored with the same shooting date and time as the original Even if the pictures that are marked for Print order E60 or Protect E66 are used for editing these settings are not reflected on the edited copies Editing functions used Editing functions to add Quick retouch D Lighting Skin softening Small picture Black border or Crop can be used Quick r...

Страница 162: ...the setting level and press the k button The original version is displayed on the left and the edited version is displayed on the right To cancel press J D Lighting copies can be recognized by the c icon displayed in playback mode C More Information See File and Folder Names E99 for more information Select a picture A34 M d button M c tab A13 M k Quick retouch Select a picture A34 M d button M c t...

Страница 163: ...return to step 1 To create a copy edited with skin softening press the k button Copies created by editing with skin softening can be recognized by the E icon displayed in playback mode B Notes on Skin Softening Depending on conditions such as the direction the subject is facing or the brightness of the face the face may not be detected properly or the desired effect may not be achieved If no faces...

Страница 164: ... face detection A85 or pet detection A45 selected areas around faces will be blurred Selective color Keep only selected image colors and makes other colors black and white Cross screen Produce star like rays of light that radiate outward from bright objects such as sunlight reflections and city lights Suitable for night scenes Fisheye Create images that look like they were shot with a fisheye lens...

Страница 165: ...ilable size is 640 480 320 240 or 160 120 2 Choose Yes and press the k button A new smaller copy is created Image quality is saved as Basic compression ratio of about 1 16 To cancel choose No and press the k button The copy is displayed with a black frame C More Information See File and Folder Names E99 for more information Select a picture A34 M d button M c tab A13 M g Small picture Preview Save...

Страница 166: ... editing with black borders can be recognized by the J icon displayed in playback mode B Notes on Black Border A part of the picture equivalent to the thickness of the black border is cut off because the black border overlaps the picture When a picture with a black border is printed using a printer s borderless print function the black border may not be printed C More Information See File and Fold...

Страница 167: ... straighten can be recognized by the G icon displayed in playback mode B Notes on Straighten When straighten is performed the picture edges are cut The larger the slant for which compensation is performed the larger the area around the picture that is cut Straighten can be performed up to 15 degrees C More Information See File and Folder Names E99 for more information Select a picture A34 M d butt...

Страница 168: ...tings for finish of the image E38 Image quality Choose the image quality from Fine Normal or Basic A75 Image size Choose an image size A77 The image is cropped if I 3648 2432 z 3584 2016 or H 2736 2736 is selected Distortion control Set the distortion control E54 D Lighting Enhance brightness and contrast in dark portions of pictures E11 Press the l button to change back to the default settings Ch...

Страница 169: ...copies of NRW RAW images taken with the COOLPIX P7100 NRW RAW processing White balance Preset manual cannot be selected for photographs taken at a White balance setting other than Preset manual C More Information See Printing Images of Size 1 1 A79 for more information See File and Folder Names E99 for more information ...

Страница 170: ...tton C Image Size The narrower the cropping range the smaller the size amount of pixels of the cropped picture copy When the image size setting for a cropped copy is 320 240 or 160 120 a black frame appears around the picture during playback and the C small picture icon is displayed on the left side of the monitor C Cropping the Picture in its Current Tall Orientation Use the Rotate image option E...

Страница 171: ... with a commercially available HDMI cable to play back pictures 1 Turn off the camera 2 Connect the camera to the TV When connecting using the included audio video cable Connect the yellow plug to the video in jack on the TV and the red and white plugs to the audio in jacks When connecting using a commercially available HDMI cable Connect the plug to the HDMI jack on the TV White Yellow Red HDMI m...

Страница 172: ...onnecting the Audio Video Cable When connecting the cable be sure that the plug is oriented correctly Do not force the plug into the camera When disconnecting the cable do not pull the plug at an angle Do not connect cables to the HDMI mini connector and USB audio video connector simultaneously B When Nothing Appears on the TV Make sure that TV settings E84 in the setup menu is appropriate for you...

Страница 173: ...e EP 5A Failure to observe this precaution could result in overheating or damage to the camera C Printing Pictures In addition to printing pictures transferred to a computer and printing pictures with a direct camera to printer connection the following options are also available for printing pictures recorded on the memory card Insert a memory card into a DPOF compatible printer s card slot Take a...

Страница 174: ...ngs 3 Connect the camera to the printer using the included USB cable Be sure that the plug is oriented correctly When disconnecting the cable do not pull the plug at an angle 4 Turn on the camera When connected correctly the PictBridge startup screen 1 is displayed on the camera monitor Then the Print selection screen 2 is displayed 32 32 NO Print selection 15 11 2011 1 2 ...

Страница 175: ...rotating the main command dial Rotate the zoom control toward f h to display 12 thumbnails or toward g i to switch back to full frame playback mode 2 Choose Copies and press the k button 3 Choose the number of copies up to nine and press the k button 4 Choose Paper size and press the k button C More Information See Printing Images of Size 1 1 A79 for more information 32 32 NO Print selection 15 11...

Страница 176: ...press the k button Printing Multiple Images After connecting the camera to the printer correctly E23 print pictures by following the procedure below 1 When the Print selection screen is displayed press the d button The Print menu is displayed 2 Use the multi selector to choose Paper size and press the k button To exit the print menu press the d button Paper size Default 3 5 5 in 5 7 in 100 150 mm ...

Страница 177: ...d for printing can be recognized by the check mark icon and the numeral indicating the number of copies to be printed A check mark is not displayed with pictures for which no copies have been specified and these pictures are not printed Rotate the zoom control toward g i to switch to full frame playback mode or f h to switch to 12 thumbnails display Press the k button when setting is complete When...

Страница 178: ... one per each When the menu shown on the right is displayed choose Start print and press the k button to start printing Choose Cancel and press the k button to return to the print menu DPOF printing Pictures for which a print order was created in Print order option E60 can be printed When the menu shown on the right is displayed choose Start print and press the k button to start printing Choose Ca...

Страница 179: ...hoose L Back and press the k button 4 Press H or I to choose K Choose end point Rotate the multi selector or press J or K to move the end point at the right end to the end position of the required section To check the playback of the movie in the specified range before saving it choose c Preview and press the k button During preview playback the volume can be adjusted with the zoom control g f Use...

Страница 180: ...om a Movie as a Still Picture A screen from a recorded movie can be extracted and saved as a still picture Pause a movie and display the screen to be extracted A102 Choose H on the playback control with the multi selector J or K and press the k button When the confirmation dialog is displayed choose Yes and press the k button to save To cancel the saving choose No The still picture is saved with N...

Страница 181: ...shooting at the telephoto zoom position and similar situations but the pictures taken may be slightly grainy 1 Press the multi selector J or K to choose the ISO sensitivity setting Items can also be chosen by rotating the main command dial Press the multi selector I when the ISO sensitivity is set to Auto High ISO sensitivity auto ISO 100 200 or ISO 100 400 to proceed to step 2 If the ISO sensitiv...

Страница 182: ... a maximum of ISO 800 B High ISO sensitivity auto The ISO sensitivity is set automatically within the range of ISO 100 to 1600 according to the brightness of the subject x ISO 100 200 y ISO 100 400 fixed range auto Choose the range in which the camera automatically adjusts ISO sensitivity The camera does not raise sensitivity beyond the maximum value in the selected range Set the maximum value for...

Страница 183: ...re E34 using Choose color temp To perform fine adjustment of the white balance setting choose Fine tune and press the k button 2 After completing the settings press the quick menu button or the k button The monitor display reverts to shooting screen C Fine Adjustment of White Balance Press the multi selector H I J or K to set fine adjustment value The four directions are A amber B blue G green and...

Страница 184: ...set to Auto warm lighting the images are preserved with warm colors if they are shot under an incandescent light source When using the flash according to the brightness of the flash the images are adjusted to suitable white balance a2 Auto warm lighting c Daylight The white balance is adjusted for direct sunlight d Incandescent Use under incandescent lighting e Fluorescent FL1 to FL3 Use under mos...

Страница 185: ...pear white light sources with a lower color temperature such as incandescent light bulbs appear slightly yellow or red Light sources with a higher color temperature appear tinged with blue The camera white balance options are adapted to the following color temperatures 3000 4000 5000 6000 8000 10000 K 1 2 3 4 8 9 0 a 567 Red Blue 1 Sodium vapor lamps 2700K 2 Incandescent Warm white fluorescent 300...

Страница 186: ... object frame and press the k button The shutter is released and the new white balance preset value is set no picture is recorded B Notes on Preset Manual The camera cannot measure a white balance value for when the flash fires When shooting with the flash set White balance to Auto normal Auto warm lighting or Flash When a wide angle converter is mounted preset manual cannot be used Further the pr...

Страница 187: ... command dial 2 Choose the number of pictures to shoot and press I 3 or 5 pictures can be chosen 3 Choose the range of increment correction and press I For e exposure bracketing Tv or r exposure bracketing Sv choose 0 3 0 7 or 1 For s white balance bracketing choose 1 2 or 3 4 Choose the bracketing range and press the quick menu button or the k button The monitor display reverts to shooting screen...

Страница 188: ...ption Description k OFF default setting Bracketing is not performed e Exposure bracketing Tv Set the number of pictures to shoot continuously the range of exposure increments and the bracketing range When the shutter release button is pressed all the way pictures are shot continuously while the shutter speed is adjusted automatically Tv means Time value r Exposure bracketing Sv Set the number of p...

Страница 189: ... 2 Picture Control feature This feature may not be used in combination with certain features See Features That Cannot Be Used Simultaneously A80 for more information Rotate the mode dial to A B C or D M a Quick menu dial A72 Option Description b Standard default setting Standard processing for balanced results Recommended for most situations c Neutral Minimal processing for natural results Choose ...

Страница 190: ...e the values to the default setting select Reset and press the k button C View Grid of COOLPIX Picture Control When the zoom control is rotated toward g i while the screen in step 1 of the above procedure is displayed the contrast and saturation are displayed using a grid The vertical axis indicates the contrast level and the horizontal axis indicates the saturation Rotate the zoom control toward ...

Страница 191: ...pe of scene or choose from seven levels of adjustment between 3 and 3 makes it into an image with a softer appearance and gives it a harder appearance Choose lower values to prevent highlights in portrait subjects from being washed out in direct sunlight higher values to preserve detail in misty landscapes and other low contrast subjects The default setting is 0 Saturation 2 Control the vividness ...

Страница 192: ...nd A Auto Results for contrast and saturation vary with the exposure and the position and size of the subject in the frame The setting for the COOLPIX Picture Control which has A auto selected for either Contrast or Saturation is displayed in green in the COOLPIX Picture Control grid C Options that Can Be Adjusted in Custom 1 and Custom 2 The option of the original COOLPIX Picture Control can be a...

Страница 193: ...system has been adopted the movie recording rate varies automatically according to the subject so that more data is recorded per second for movies containing frequently moving subjects thus increasing movie file size The frame rates are approximately 24 frames per second fps for HD 720p 1280 720 and 30 frames per second fps for VGA 640 480 or QVGA 320 240 C More Information See Maximum Movie Lengt...

Страница 194: ...or K to choose a value E39 The options are the same as those for adjusting the COOLPIX Picture Control Press the k button to display the save as screen To change the values to the default setting select Reset and press the k button 4 Choose the registration destination and press the k button The COOLPIX Custom Picture Control is registered Custom 1 or Custom 2 can be selected from the Picture Cont...

Страница 195: ... is selected for Metering A8 Rotate the mode dial to A B C D or O M d button M A B C D or O tab A13 M Metering Option Description G Matrix default setting Use a wide area of the screen for metering This metering mode provides the appropriate exposure for a variety of shooting conditions Recommended for typical shooting q Center weighted The camera meters the entire frame but assigns greatest weigh...

Страница 196: ...d when image quality is set to Normal and image size is set to M 3648 2736 The camera charges the built in flash once continuous shooting ends No shooting can be performed until the charging ends Because the ISO sensitivity is raised during shooting pictures may be slightly grainy D BSS Best Shot Selector BSS is recommended for shooting under low lighting without the flash with the camera zoomed i...

Страница 197: ...lowered Raise the built in flash when using the continuous flash to shoot B Note on Best Shot Selector BSS is suited for shooting stationary subjects BSS may not produce the desired results if the subject moves or the composition changes B Note on Multi shot 16 Smear F3 visible in the monitor when shooting with Multi shot 16 enabled will be recorded with images Avoiding bright objects such as the ...

Страница 198: ... again to finish shooting Shooting finishes automatically if the internal memory or memory card becomes full or when the number of shot frames reaches the upper limit B Notes on Interval Timer Shooting To prevent the camera from turning off unexpectedly during shooting use a fully charged battery To power the camera continuously for extended periods use the AC Adapter EH 5b and the Power Connector...

Страница 199: ...which no face can be detected is framed AF area mode is set to Auto The camera automatically selects one or more of the nine focus areas containing the subject closest to the camera When the monitor is turned off the focus area is fixed at the Center normal w Auto default setting The camera automatically selects one or more of the nine focus areas containing the subject closest to the camera Press...

Страница 200: ... of 99 focus areas displayed on the monitor s focus area selection screen and shoot To adjust the following settings press the k button to temporarily cancel focus area selection and then adjust each setting Flash mode focus mode or self timer To return to the focus area selection screen press the k button again At an Image size setting A77 of H 2736 2736 81 focus areas are available p y u Center ...

Страница 201: ...Once the subject is registered it is framed by a yellow focus area display and subject tracking begins Press the k button to cancel the registration of the subject If the camera loses sight of the subject the focus area display disappears register the subject again 3 Press the shutter release button all the way to take the picture If the camera focuses on the focus area when the shutter release bu...

Страница 202: ...onally the subject may not be tracked properly depending on factors such as the subject s size and brightness In some rare cases of shooting subjects for which autofocus does not perform as expected A33 the subject may not be in focus despite the fact that the focus area lights in green If you cannot focus change the AF area mode setting to Manual Center spot Center normal or Center wide or try sh...

Страница 203: ...n shooting modes A B C and D Rotate the mode dial to A B C or D M d button M A B C or D tab A13 M Autofocus mode Option Description A Single AF default setting The camera focuses only when the shutter release button is pressed halfway B Full time AF The camera focuses continuously until the shutter release button is pressed down halfway Use with moving subjects A sound will be heard while the came...

Страница 204: ...Note on Long Exposure NR This feature may not be used in combination with certain features See Features That Cannot Be Used Simultaneously A80 for more information Rotate the mode dial to A B C or D M d button M A B C or D tab A13 M Noise reduction filter Option Description e High Perform noise reduction at a level higher than the standard strength M Normal default setting Perform noise reduction ...

Страница 205: ...verter Set when the Wide angle Converter WC E75A 0 75 available separately is mounted The Adapter Ring UR E22 available separately is also required for mounting When On is selected an icon for this setting is displayed on the monitor A8 Rotate the mode dial to A B C or D M d button M A B C or D tab A13 M Distortion control Rotate the mode dial to A B C or D M d button M A B C or D tab A13 M Wide a...

Страница 206: ...oving the lens ring be sure to turn off the camera While pressing the lens ring release button rotate the lens ring clockwise and remove it To attach the lens ring to the camera align the lens ring mounting index white dot with the lens ring release button and then rotate the lens ring counterclockwise When not using the wide angle converter be sure to attach the lens ring onto the camera For more...

Страница 207: ...mparison to shooting with Active D Lighting set to Off To ensure that the gradation is appropriate adjustments of the highlighted areas shadow areas and mid tones are made before recording This feature may not be used in combination with certain features See Features That Cannot Be Used Simultaneously A80 for more information B Active D Lighting Versus D Lighting The Active D Lighting option in th...

Страница 208: ...check box to on w or off Multiple focal lengths can be chosen The default setting is on w for all the check boxes To finish the setting press the multi selector J B Notes on Zoom Operation Operate the zoom control while pressing the w1 button to change the zoom position to focal length for which the zoom memory is set to on The changed focal length is the closest to that before the operation To ch...

Страница 209: ...th the multi selector A13 E F N tabs Display the specialized menus for E F and N A57 A B C D tabs Display the shooting menus A54 Display the quick menu by pressing the quick menu button A72 3 After changing the settings choose Save user settings in the specialized menu for E F or N and press the k button 4 Choose Yes and press the k button The current settings are saved Rotate the zoom control tow...

Страница 210: ...ocus mode focal length 35mm equiv distortion control wide angle converter 12 Photo info virtual horizon display 13 Initial monitor display 14 Image quality image size 15 ISO sensitivity 16 White balance 17 Auto bracketing 18 Picture Control C Resetting for E F and N If Reset user settings is selected in specialized menu for E F or N the settings that are saved in the user settings are reset as fol...

Страница 211: ...or the pictures stored on the internal memory 1 Use the multi selector to choose Select images and press the k button When list by date mode A88 is selected the menu shown on the right is not displayed Proceed to the step 2 2 Choose the pictures up to a maximum of 99 and number of copies up to nine per picture Rotate the multi selector or press J or K to choose the pictures and press H or I to set...

Страница 212: ...er menu shooting date and shooting information are printed on pictures when a DPOF compatible F16 printer which supports printing of shooting date and shooting information is used Shooting information cannot be printed when the camera is connected directly to a printer via the included USB cable for DPOF printing E27 Date and Info are reset each time the Print order menu is displayed The date and ...

Страница 213: ... NRW RAW pictures cannot be set for printing Create a JPEG picture using NRW RAW processing E17 and then set the JPEG picture for printing C Deleting All Print Orders In step 1 of the print order procedure E60 choose Delete print order and press the k button to delete the print orders for all pictures C Print Date The shooting date and time can be imprinted in pictures at the time of shooting by u...

Страница 214: ...when enabled 2 The slide show begins Press the multi selector K to display the next picture or J to display the previous picture Press and hold K to fast forward or J to rewind To exit partway or pause press the k button 3 Choose End or Restart When exiting or pausing the slide show the screen shown on the right is displayed Choose G and press the k button to return to the playback menu Choose F t...

Страница 215: ...e the pictures for deletion See The Image Selection Screen E65 for more information When images saved with an Image quality A75 setting of NRW RAW Fine NRW RAW Normal or NRW RAW Basic are chosen the NRW RAW and JPEG images are deleted at the same time Erase all images Delete all pictures Erase selected NRW images Only NRW RAW images are displayed in the picture selection screen Select and delete i...

Страница 216: ...lected proceed to step 3 2 Press H or I to select or deselect or the number of copies When an image is selected a check mark y is displayed with the image Repeat steps 1 and 2 to select additional images 3 Press the k button to apply the image selection With selections such as Erase selected images the confirmation dialog is displayed Follow the instructions on the screen Functions for which only ...

Страница 217: ...tation can be rotated up to 180 in either direction Select a picture in the picture selection screen E65 to display the rotate image screen Rotate the multi selector or press J or K to rotate the picture 90 Press the k button to set the orientation displayed and save the orientation data with the picture i Hide Image Hide pictures so that they cannot be played back on the camera monitor In the pic...

Страница 218: ...r f during playback to adjust playback volume Press the multi selector J before or after playing a voice memo to return to the playback menu Press the d button to exit the playback menu Deleting Voice Memos Press the l button on the voice memo playback screen Press the multi selector H or I to select Yes and press the k button to delete only the voice memo B Notes on Voice Memos When a picture wit...

Страница 219: ...rotect setting E66 are also copied with the pictures When images saved with an Image quality A75 setting of NRW RAW Fine NRW RAW Normal or NRW RAW Basic are chosen the NRW RAW and JPEG images are copied at the same time Pictures recorded with another make or model of camera or that have been modified on a computer cannot be copied The Print order E60 settings are not copied Pictures with Hide imag...

Страница 220: ...when the distance betweenthe camera and the subject remains fairly consistent B Full time AF The camera focuses continuously during movie recording Suitable for shooting when the distance between the camera and subject changes The operation sound when the camera focuses may be recorded Setting to Single AF is recommended if the sound is noticeable Rotate the mode dial to D M d button M D Movie tab...

Страница 221: ...n before displaying the shooting or playback screen Select an image Select a picture taken to display as the welcome screen Display the image selection screen choose an image E65 and press the k button to register it Because the selected image is stored in the camera the image appears in the welcome screen even if the original image is deleted NRW RAW images A75 pictures shot with an Image size A7...

Страница 222: ... I Date and time can also be set by rotating the main command dial Finish setting Choose minute and press the k button or K Date format Choose the order in which the day month and year are displayed Year Month Day Month Day Year or Day Month Year Time zone w Home time zone can be specified and daylight saving can be enabled or disabled When x travel destination is registered the time difference E7...

Страница 223: ...onitor and the clock advances by one hour To turn off press I Press the k button to register the travel destination time zone While the travel destination time zone is selected the Z icon is displayed on the monitor when the camera is in shooting mode C w Home Time Zone To switch to the home time zone choose w Home time zone in step 2 and press the k button To change the home time zone choose w Ho...

Страница 224: ...nki Ankara 9 Alaska Anchorage 3 Moscow Nairobi Riyadh Kuwait Manama 8 PST PDT Los Angeles Seattle Vancouver 4 Abu Dhabi Dubai 7 MST MDT Denver Phoenix 5 Islamabad Karachi 6 CST CDT Chicago Houston Mexico City 5 5 New Delhi 5 EST EDT New York Toronto Lima 6 Colombo Dhaka 4 5 Caracas 7 Bangkok Jakarta 4 Manaus 8 Beijing Hong Kong Singapore 3 Buenos Aires Sao Paulo 9 Tokyo Seoul 2 Fernando de Noronha...

Страница 225: ...on A15 is displayed on the monitor immediately after shooting Brightness Choose from five settings to select the monitor brightness The default setting is 3 Photo info Choose the display options that are displayed on the monitor during shooting Separate display options A15 can be selected for when the monitor display A8 is set to Show info and when it is set to Hide info In the default setting all...

Страница 226: ...sed in combination with certain features See Features That Cannot Be Used Simultaneously A80 for more information Dates imprinted with an Image size A77 setting of f 640 480 may be difficult to read Set the image size to J 1024 768 or higher The date is recorded using the format selected in the setup menu s Time zone and date option A26 E71 C Print date and Print order When printing from DPOF comp...

Страница 227: ...release Option Description Exit self timer mode default setting Cancel the self timer mode after shooting pictures The setting is not canceled in the quick response remote or smile timer mode A65 Stay in self timer mode Enable shooting continuously without canceling the setting after shooting pictures The setting applied in shooting modes A auto A B C D O low noise night or u special effects is no...

Страница 228: ...t or is too dark The pictures taken may become grainy This feature may not be used in combination with certain features See Features That Cannot Be Used Simultaneously A80 for more information Press the d button M z tab A13 M Motion detection Option Description U Auto If the camera detects the movement of the subject or camera shake the ISO sensitivity is raised and the shutter speed is increased ...

Страница 229: ...osition and about 7 0 m 22 ft at the maximum telephoto position For some focus areas and scene modes such as Museum A43 Pet portrait A45 AF assist illuminator does not turn on even if Auto is set Off AF assist illuminator does not light The camera may be unable to focus if lighting is dim Press the d button M z tab A13 M Red eye reduction Option Description Pre flash on default setting The flash r...

Страница 230: ...t magnifications of 2 0 to 4 0 it is set to Spot The digital zoom is not available for Zoom exposure A47 Press the d button M z tab A13 M Digital zoom Option Description On default setting When the camera is zoomed in to the maximum optical zoom position rotating and holding the zoom control toward g i triggers the digital zoom A31 Crop Limit zoom magnification up to the position of V during still...

Страница 231: ... in either direction adjusts the zoom quickly while rotating the control partially adjusts the zoom slowly Normal During both still picture shooting and movie recording operate the zoom at the standard speed During both still picture shooting and movie recording rotating the zoom control all the way in either direction adjusts the zoom quickly while rotating the control partially adjusts the zoom ...

Страница 232: ...tion data as the first picture Correct orientation data may not be obtained for pictures recorded with the camera facing up or down Press the d button M z tab A13 M Sound settings Option Description Button sound Set the following all sound settings to On default setting or Off Setting beep beep sounds once when the settings are completed Focus beep beep sounds twice when the camera focuses on the ...

Страница 233: ...setting 5 min and 30 min C Auto Off Setting In the following situations the time taken for the camera to enter standby mode is fixed When menus are displayed three minutes When tone level information is displayed shooting mode three minutes During slideshow playback maximum of 30 minutes When the AC Adapter EH 5b is connected 30 minutes The camera does not enter standby mode when transferring imag...

Страница 234: ...option is displayed on the setup menu B Formatting Internal Memory and Memory card Do not turn off the camera or open the battery chamber memory card slot cover during formatting The first time you insert a memory card that has been used in another device into this camera be sure to format it with this camera Language Choose one of 29 languages for displaying the camera menus and messages Press th...

Страница 235: ...on Description Video mode Select the analog video output system from NTSC or PAL in accordance with your TV HDMI Select a picture resolution for HDMI output from Auto default setting 480p 720p or 1080i When Auto is set the output resolution that is best suited to the connected TV is selected automatically from 480p 720p or 1080i HDMI device control Select whether or not the camera receives signals...

Страница 236: ...he monitor A8 No icon is displayed when the setting is A auto scene or movie mode C Effects of the Built in ND Filter Using the filter may enable the shooting of subjects that are too bright without overexposing the image It can also be used in situations such as when you want to slow down the shutter speed at a low aperture value For example at a shutter speed of 1 2000 second with the correct ex...

Страница 237: ...nd dial are not swapped Swap main and sub Swap the functions that can be operated using the main command dial and sub command dial when shooting pictures The functions are not swapped for the playback or menu screen Press the d button M z tab A13 M Multi selector right press Press the d button M z tab A13 M Delete button options Option Description Press twice to delete Press the l button once more...

Страница 238: ...k Button Setting The g AE L AF L button cannot be used when Scene auto selector is selected in scene mode AE L exposure locking cannot be used when the shooting mode is set to D AF L focus locking cannot be used when focus mode A67 is set to E manual focus C More Information See Focus Lock A33 for more information Press the d button M z tab A13 M AE AF lock button Option Description AE AF lock def...

Страница 239: ... Shoot without changing the setting NRW RAW Normal Image quality A75 When Fine Normal or Basic is set shoot with the NRW RAW setting When NRW RAW is set shoot with the Normal setting The image size is M 3648 2736 When NRW RAW Fine NRW RAW Normal or NRW RAW Basic is set shoot without changing the setting ISO sensitivity E30 Shoot with ISO sensitivity set to Auto White balance E32 Shoot with White b...

Страница 240: ...s E2 When the focus mode is set to manual focus the focus can be adjusted Metering E44 Change the setting for metering Continuous E45 Change the settings for continuous shooting Flash exp comp E52 Change the setting for Flash exp comp Active D Lighting E56 Change the setting for Active D Lighting Manual flash level A62 Change the flash output set for the built in flash when the flash mode is set t...

Страница 241: ... without the function Operation will be disabled Virtual horizon View hide histograms View hide framing grid Select whether to view or hide the virtual horizon histogram or framing grid displays E74 on the monitor during shooting Built in ND filter Change the built in ND filter E85 setting Press the d button M z tab A13 M Customize My Menu Custom Picture Control E43 Noise reduction filter E53 Vibr...

Страница 242: ...Reset file numbering cannot be used when scene mode is set to Panorama assist or if Intvl timer shooting is chosen for Continuous when A B C D E F or N shooting modes are used For Panorama assist or Intvl timer shooting a new folder is created and file numbers are assigned automatically starting with 0001 E99 100 Reset file numbering cannot be applied when the folder number reaches 999 and there a...

Страница 243: ...n subjects have closed their eyes press H I J or K during playback zoom to display other faces Other faces can also be displayed by rotating the main command dial Press the l button to delete the picture taken Press the k button to return to shooting screen B Note on Blink Warning This feature may not be used in combination with certain features See Features That Cannot Be Used Simultaneously A80 ...

Страница 244: ...r use only in the country of purchase Observe all local laws concerning wireless devices Leaving the setting as Enable will result in the battery being depleted in a shorter period of time C Eye Fi communication indicator The communication status of the Eye Fi card in the camera can be confirmed on the monitor A8 w Eye Fi upload is set to Disable x lights Eye Fi upload enabled waiting to begin upl...

Страница 245: ...e right in the default setting Reset All When Reset is selected the camera settings are restored to the default values Pop up Menu Shooting in the Scene Mode Press the d button M z tab A13 M MF distance indicator units Press the d button M z tab A13 M Reverse indicators Press the d button M z tab A13 M Reset all Option Default value Flash mode A61 Auto Self timer A64 Smile timer A65 Remote control...

Страница 246: ...Continuous A50 Single Flash exp comp A50 0 0 Metering A50 Matrix Option Default value Autofocus mode E69 Single AF Wind noise reduction E69 Off Option Default value Image quality A75 Normal Image size A77 M 3648 2736 Movie options E42 HD 720p 1280 720 ISO sensitivity E31 Auto Minimum shutter speed E31 None White balance E32 Auto normal Auto bracketing E36 Off Picture Control E38 Standard ...

Страница 247: ...control E55 Auto Active D Lighting E56 Off Zoom memory E57 All values are chosen Option Default value Welcome screen E70 None Image review E74 On Brightness E74 3 Photo info E74 Hide all items Virtual horizon display E74 Circle Print date E75 Off Self timer after release E76 Exit self timer mode Vibration reduction E76 On Motion detection E77 Off AF assist E78 Auto Red eye reduction E78 Pre flash ...

Страница 248: ... E86 Disable second press AE AF lock button E87 AE AF lock Fn1 shutter button E88 Off Fn1 command dial E89 Off Fn1 guide display E89 On Fn2 button E90 Off Customize My Menu E90 1 Custom Picture Control 2 Metering 3 Continuous 4 AF area mode 5 Autofocus mode Blink warning E92 Off Eye Fi upload E93 Disable MF distance indicator units E94 m Reverse indicators E94 0 Option Default value Paper size E24...

Страница 249: ...lowing settings remain unaffected even if Reset all is performed Quick menu Preset manual data for White balance E35 Shooting menu Custom Picture Control registration E43 Setup menu Time zone and date E71 Language E83 and Video mode E84 in TV settings User settings that were saved for mode dial E F and N are not reset to the default settings when Reset all is performed To change these settings bac...

Страница 250: ... RAW and JPEG images that are recorded at the same time are assigned the same file name The NRW RAW and JPEG images that are recorded at the same time are saved in the same folder If there are 199 files in a folder a new folder is created and the images are saved in the new folder Voice memo file names have the same identifier and file number as the picture to which the voice memo is attached DSCN...

Страница 251: ... memory or memory card E68 the file naming conventions are as follows Files copied using selected images are copied to the current folder or to the folder used for subsequent pictures where they are assigned file numbers in ascending order following the largest file number in memory Files copied using all images along with their folder are copied together Folder numbers are assigned in ascending o...

Страница 252: ...nitor the Speedlight flash mode is also displayed on the monitor and it can be set with the same procedure as the built in flash A61 How to Attach a Speedlight Remove the accessory shoe cover before attaching a Speedlight as shown on the right When the built in flash is raised gently push to lower the flash until it clicks shut Refer to the instruction manual of your Speedlight for more informatio...

Страница 253: ...he monitor pre flashes are fired when the SB 900 is set to commander The Wireless multiple flash group setting is only applicable to group A Change the setting for both the commander and the remote flash unit to group A Refer to the instruction manual of your Speedlight for more information When wireless multiple flash unit photography is performed if ISO sensitivity is set to Auto High ISO sensit...

Страница 254: ...he battery chamber memory card slot cover fully insert the cord of the power connector into the slot in the battery chamber If part of the cord runs out of the slot the cover or cord may be damaged when the cover is closed Insert the DC plug of the AC Adapter EH 5b into the DC plug connector of the Power Connector EP 5A USB cable USB Cable UC E61 Audio Video cable Audio Video Cable EG CP161 Conver...

Страница 255: ... accessories for the COOLPIX P7100 Remote control Remote Control ML L3 How to replace the battery 3 V CR2025 lithium battery in the remote control When changing the remote control battery be sure that the battery s positive and negative terminals are oriented correctly Be sure to read and follow the warnings for the battery on page vii and the section The Battery F3 B Notes on Converter and Adapte...

Страница 256: ...ti selector 2 Select remote control mode using the multi selector and press K to display the setting Select the remote control setting and press the k button Z quick response remote Press the transmission button on the remote control to shoot instantly Z 10s ten seconds remote Press the transmission button on the remote control to shoot with ten second delay Z 2s two seconds remote Press the trans...

Страница 257: ...o seconds remote mode the self timer lamp blinks when the subject is in focus and then about one second before the shutter is released the lamp stops blinking and remains lit To stop the timer before a picture is taken press the transmission button again When the shutter is released in ten seconds or two seconds remote mode the remote control mode turns to Off Rear Front B Note on the Remote Contr...

Страница 258: ...ss the power switch to turn it off manually 25 P The camera will turn off to prevent overheating Inside of the camera has become hot The camera turns off automatically Leave the camera off until the inside of the camera has cooled and then turn it on again P Please wait for the camera to finish recording Camera cannot perform other operations until recording is complete Wait until message clears f...

Страница 259: ... size Delete pictures and movies Replace memory card Remove memory card and use internal memory 75 77 36 102 E64 22 23 P Image cannot be saved Error occurred while recording picture Format the internal memory or memory card E83 Camera has run out of file numbers Replace the memory card or format the internal memory memory card 22 E83 Picture cannot be used for welcome screen The following pictures...

Страница 260: ...memory card is inserted To copy files from internal memory to memory card press the d button to display the copy screen then copy the files from internal memory to memory card 22 E68 N File contains no image data File not created with COOLPIX P7100 File cannot be viewed on this camera View file using the computer or any other devices which was used to create or edit this file N All images are hidd...

Страница 261: ...you do not wish to use it 40 61 P Speedlight setting error Group A has not been selected for group setting when shooting using wireless multiple flash unit photography Set the group setting of the master commander and remote flash unit to Group A E102 Lens error Q Lens is not operating properly Turn camera off and then on again If error persists contact retailer or Nikon authorized service represe...

Страница 262: ... Paper has jammed in the printer Remove the jammed paper select Resume and press the k button to resume printing PR Printer error out of paper No paper is loaded in the printer Load the specified size of paper select Resume and press the k button to resume printing PR Printer error check ink Ink error Check ink select Resume and press the k button to resume printing PR Printer error out of ink Ink...

Страница 263: ...E112 t ___ ...

Страница 264: ...al Notes and Index Caring for the Products F2 The Camera F2 The Battery F3 The Battery Charger F4 The Memory Cards F5 Caring for the Camera F6 Cleaning F6 Storage F6 Troubleshooting F7 Specifications F13 Supported Standards F16 Index F17 ...

Страница 265: ...ing the lens at the sun or other strong light sources for extended periods when using or storing the camera Intense light may cause deterioration of the CCD image sensor producing a white blur effect in photographs B Keep away from Strong Magnetic Fields Do not use or store this device in the vicinity of equipment that generates strong electromagnetic radiation or magnetic fields Strong static cha...

Страница 266: ...oughly before using the battery Check the battery level before using the camera and replace or charge the battery if necessary Do not continue charging once the battery is fully charged as this will result in reduced battery performance Whenever possible carry a fully charged spare battery when taking pictures on important occasions Do not use the battery at ambient temperatures below 0 C 32 F or ...

Страница 267: ... every six months and completely exhaust it before returning it to storage After removing the battery from the camera or battery charger attach the included terminal cover to the battery and store it in a cool place A marked drop in the time a fully charged battery retains its charge when used at room temperature indicates that the battery needs to be replaced Purchase a new EN EL14 battery Replac...

Страница 268: ...ll data in the memory card Be sure to transfer important pictures to a computer before formatting If the error message Card is not formatted Format card is displayed when you insert a memory card into this camera the memory card must be formatted If the memory card contains images you wish to keep select No and save those images on your computer before formatting the memory card To format the card...

Страница 269: ...ber bulb attached to one end that is pumped to produce a stream of air out the other end To remove fingerprints oily substances or other stains that cannot be removed with a blower carefully wipe the lens with a dry soft cloth or eyewear cleaning cloth using a spiral motion that starts at the center of the lens and working toward the edges Do not wipe the lens forcibly or with a hard material Fail...

Страница 270: ...e dial Monitor is turned off Press the x button to turn it on Camera and computer are connected via USB cable Camera and TV are connected via A V cable or HDMI cable Interval timer shooting in progress 25 24 25 15 91 91 54 Monitor is hard to see Ambient lighting too bright Use viewfinder or move to darker location Adjust monitor brightness Monitor is dirty Clean monitor Use monitor brightness boos...

Страница 271: ...ot be imprinted onto a movie 104 80 Camera settings reset Clock battery is exhausted all settings were restored to their default values 27 Reset file numbering cannot be done Reset file numbering cannot be applied when the folder number reaches 999 and there are images in the folder Change the memory card or format the internal memory memory card Reset file numbering cannot be set when the scene m...

Страница 272: ...mera Try shooting with D macro close up in the focus mode or Scene auto selector or Close up scene mode The intended subject is one with which autofocus does not perform well Set AF assist in the setup menu to Auto Subject not in focus area when shutter release button pressed halfway The focus mode is set to E manual focus Turn camera off and then on again 40 42 67 33 104 32 54 67 25 Pictures are ...

Страница 273: ... zoom is set 104 40 41 44 45 80 Image size not available Another function that is set now is restricting Image size 80 No sound when shutter is released Off is selected for Shutter sound under Sound settings in the setup menu Sports Museum Backlighting with HDR set to On or Pet portrait is selected in scene mode The movie mode is selected Other functions that restrict the use of the shutter sound ...

Страница 274: ...during shooting In Camera Red Eye Fix may in very rare cases be applied to areas not affected by red eye Set a flash mode other than V auto with red eye reduction select a scene mode other than Night portrait and resume shooting 41 61 Skin softening results are not as expected Skin softening may not produce the desired results depending on shooting conditions For pictures with four or more faces t...

Страница 275: ...res not displayed on television Video mode or HDMI is not correctly set in the TV settings setup menu Cables are connected to both the HDMI mini connector and USB audio video connector Memory card contains no pictures Replace memory card Remove memory card to play back pictures from internal memory 104 91 22 Nikon Transfer 2 does not start when camera is connected to a computer Camera is off Batte...

Страница 276: ...lection Face priority auto 9 area automatic selection center wide normal spot manual with 99 focus areas subject tracking Viewfinder Real image optical viewfinder with diopter adjustment function 3 to 1 m 1 Frame coverage Approx 80 horizontal and 80 vertical compared to actual picture Monitor 7 5 cm 3 in approx 921k dot wide viewing angle TFT LCD monitor with anti reflection coating and 5 level br...

Страница 277: ...charge coupled electronic shutter Speed 1 2000 8 s A B mode 1 4000 8 s C mode 1 4000 60 s D mode 4 s Fireworks show scene mode 1 2000 2 s in shooting modes other than the above Aperture Electronically controlled 6 blade iris diaphragm Range 10 steps of 1 3 EV f C D mode Self timer Durations of 2 or 10 seconds can be selected Built in flash Range approx ISO sensitivity Auto W 0 3 to 9 0 m 1 ft to 2...

Страница 278: ...I O USB HDMI Mini Connector Type C HDMI output external microphone connector stereo mini pin jack 3 5 mm diameter plug in power type Supported languages Arabic Brazilian Portuguese Chinese Simplified and Traditional Czech Danish Dutch English Finnish French German Greek Hindi Hungarian Indonesian Italian Japanese Korean Norwegian Polish Portuguese Romanian Russian Spanish Swedish Thai Turkish Ukra...

Страница 279: ...used for optimal color reproduction when images are output from Exif compliant printers See the instruction manual of the printer for further details PictBridge A standard developed cooperatively by the digital camera and printer industries allowing photographs to be output directly to a printer without connecting the camera to a computer Type Rechargeable lithium ion battery Rated capacity DC 7 4...

Страница 280: ...er Remotecontrol Smiletimer 64 65 E105 B Shutter priority auto mode 51 E5 u Special effects mode 46 g Tele 31 E F or N User settings mode 57 c White balance 72 73 E32 f Wide 31 JPG E99 MOV E99 NRW E99 WAV E99 A AC adapter 19 E103 Accessory shoe E101 Accessory Shoe Cover E101 Active D Lighting 55 E56 Adapter Ring E103 AE AF lock button 107 E87 AF area mode 48 50 55 E48 AF assist 105 E78 AF mode 55 ...

Страница 281: ...ion 71 Exposure compensation dial 71 Exposure mode 51 Extension E99 External mic sensitivity 107 E84 Extracting still pictures 102 Eye Fi upload 108 E93 Eyelet for camera strap 7 F Face detection 85 Face priority 55 E48 Features that cannot be used simultaneously 80 File name E99 Fill flash 62 Filter effects 89 E13 E40 Fireworks show m 43 Firmware version 108 E98 Fixed aperture 106 E80 Flash 61 Fl...

Страница 282: ...onitor brightness 104 E74 Monitor brightness boost indicator 16 Monitor settings 104 E74 Motion detection 105 E77 Movie length 100 Movie menu 101 Movie mode 98 Movie options 73 E42 Movie playback 102 Movie recording 98 Multi selector 4 6 12 60 Multi selector right press 107 E86 Multi shot 16 54 E45 Museum l 43 N Night landscape j 42 Night portrait e 41 Noise reduction filter 55 E53 NRW RAW Images ...

Страница 283: ...54 Shutter sound 106 E81 Shutter speed 51 Shutter priority auto mode 51 E5 Shutter release button 4 6 32 Single 54 E45 Skin softening 65 86 89 E12 Slide show 89 E63 Slow sync 62 Small picture 89 E14 Smile timer 65 Snow z 42 Sound settings 106 E81 Special effects menu 48 Special effects mode 46 Speedlight 84 E101 E103 Sports d 41 SSCN E99 Straighten 90 E16 Sub command dial 4 6 Subject tracking 55 E...

Страница 284: ...hnical Notes and Index F21 W Welcome screen 104 E70 White balance 73 E32 Wide 31 Wide angle converter 55 E54 E103 Wind noise reduction 101 E69 Z Zoom 31 Zoom control 4 6 31 Zoom memory 56 E57 Zoom speed 106 E80 ...

Страница 285: ... in any form of this manual in whole or in part except for brief quotation in critical articles or reviews may be made without written authorization from NIKON CORPORATION FX1I02 11 6MM09811 02 2011 Nikon Corporation ...

Страница 286: ...aptura de quadros sao aproximadamente 24 quadros por segundo qps para HD 720p 1280x 720 e 30 quadros por segundo qps para VGA 640x 480 ou QVGA 320x 240 f m Errata The COOLPIXP7100 Reference Manual User s Manual contains errors We apologize for any inconvenience this may cause Number of Exposures page 78 Memory card Image size Image 4GB quality approx Correction FINE 770 3648x2736 r l BASIC 3 650 3...

Страница 287: ...Quicklime ...

Страница 288: ...rlul ltJ I rruo mJ FX1G01 4N 6MM0984N 01 Duplicated in Indonesia COOLPIX P7100 ...

Страница 289: ...At the heart of the mage Collect Moments Connect People Smart photo storage and sharing service from Nikon my P1cturetown Imypicturetown ...

Страница 290: ...on my Picturetown offers free storage of up to 2GB to anyone for an easy to use and secure experience Save and organize photos easily Share photos with selected friends View photos on mobile phones my Picturetown http mypicturetown com Post photo URLs to blogs and social networking sites Available with selected mobile phones r ...

Страница 291: ...n being bumed and or their clothes igniting from thP hP H of the flash A Observe caution when operating cameras equipped with projectors or movie lights Do ncr look directly into the projector window or shine the projector or movie light into or close to another s eyes Failure to observe this precaut1on cou ld damage the eye or cause visua l impair rnent Do not project images or shine the movie li...

Страница 292: ...ENTIAL INCIDENTAL SPECIAL DIRECT INDIRECT EXEMPLARY OR PUNITIVE DAMAGES RELATING TO OR ARISING OUT OF ANY BREACH OF THIS WARRANTY OR ANY OTHER CLAIM REGARDING THIS PRODUCT INCLUDING BUT NOT LIMITED TO CLAIMS OF NEGLIGENCE STRICT LIABILITY OR BREACH OF CONTRACT SOME STATES DO NOT ALLOW A LIMITATIONS ON HOW LONG AN IMPLIED WARRANTY LASTS OR B THE EXCLUSION OR LIMITATION OF INCIDENTAL OR CONSEQUENTIA...

Отзывы: