background image

155

Camera Setup

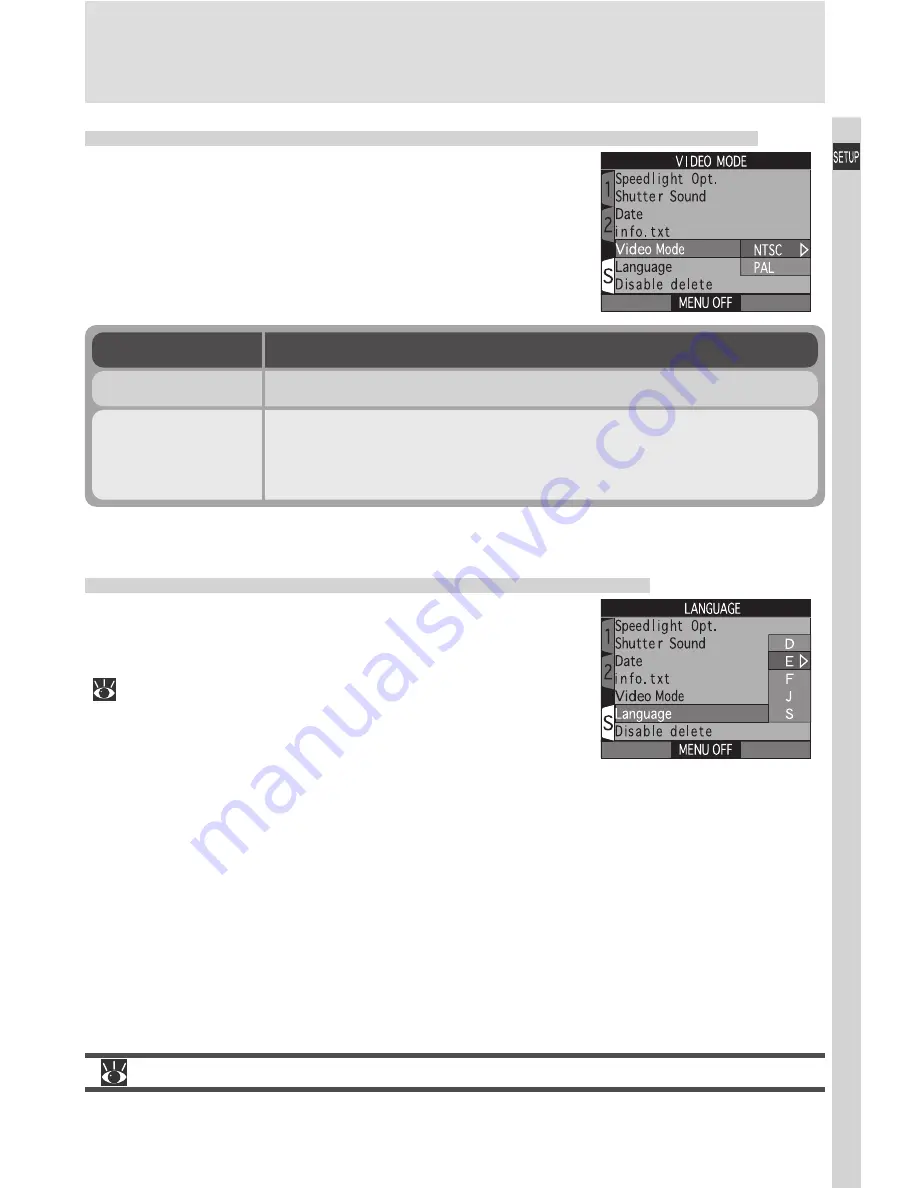
Choosing a Video Standard: 

The Video-Mode Menu

The 

Video Mode 

menu is used to select the stan-

dard used for video output.  Adjust this setting to
match the standard used in any video device to
which you connect the camera.

For more information on:

178 Connecting the camera to a TV or VCR

Choosing a Language: 

The Language Menu

This option is used to choose the language in which
camera menus and messages are displayed.  For
more information, see “Tutorial: First Steps”
(

 40).

Option

Description

NTSC

Use when connecting camera to NTSC devices.

PAL

Use when connecting camera to PAL devices.  If the vid-
eo cable is connected to the camera at this setting, the
camera monitor will turn off.

Содержание Coolpix 5000

Страница 1: ...on digital camera taking your first photographs and trans ferring them to your computer Guide to Digital Photography The Guide to Digital Photography this manual provides complete operat ing instructions for your camera Nikon View 4 Reference Manual The Nikon View 4 Reference Manual can be found in electronic format on the reference CD provided with your camera For information on viewing the Refer...

Страница 2: ... not place strap around neck Placing the camera strap around your neck could result in strangulation Special care should be taken to avoid placing the strap around the neck of an infant or child Do not disassemble Touching the product s internal parts could result in injury In the event of a malfunction the product should be repaired only by a qualified technician Should the product break open as ...

Страница 3: ... product regulations Keep out of reach of children Particular care should be taken to pre vent infants from putting the battery or other small parts into their mouths Removing memory cards Memory cards may become hot dur ing use Observe due caution when removing memory cards from the camera CD ROMs The CD ROMs on which the software and manuals are distributed should not be played back on audio CD ...

Страница 4: ... in the vicin ity of equipment that generates strong electromagnetic radiation or magnetic fields Strong static charges or the mag netic fields produced by equipment such as radio transmitters could interfere with the monitor damage data stored on the memory card or affect the product s inter nal circuitry Avoid sudden changes in temperature Sudden changes in temperature such as occur when enterin...

Страница 5: ...d Storage To prevent mold or mildew store the camera in a dry well ventilated area If you will not be using the product for long periods remove the battery to prevent leakage and store the camera in a plastic bag containing a desiccant Do not how ever store the camera case in a plastic bag as this may cause the material to de teriorate Note that desiccant gradually loses its capacity to absorb moi...

Страница 6: ... for any damages resulting from the use of this product While every effort has been made to ensure that the information in these manuals is accurate and complete we would appreciate it were you to bring any errors or omissions to the attention of the Nikon representative in your area address provided separately Notice for customers in Canada CAUTION This class B digital apparatus meets all require...

Страница 7: ...eption which can be determined by turning the equipment off and on the user is encouraged to try to correct the interference by one or more of the following measures Reorient or relocate the receiving antenna Increase the separation between the equipment and receiver Connect the equipment into an outlet on a circuit different from that to which the receiver is connected Consult the dealer or an ex...

Страница 8: ...rnment is prohibited The copying or reproduction of stamps issued by the government and of certified documents stipulated by law is prohibited Cautions on certain copies and reproductions The government has issued cautions on copies or reproductions of securi ties issued by private companies shares bills checks gift certificates etc commuter passes or coupon tickets except when a minimum of necess...

Страница 9: ...trademarks of Intel Corporation Internet is a trademark of Digital Equip ment Corporation Netscape and Netscape Navigator are registered trademarks of Netscape Communications Corporation CompactFlash is a trademark of SanDisk Corporation Lexar Media is a trademark of Lexar Media Corporation Adobe and Acrobat are registered trademarks of Adobe Systems Inc Zip is a registered trademark of Iomega Cor...

Страница 10: ...ex to Menu Options 26 Tutorial Getting Started 31 First Steps Getting Ready to Use Your Camera 32 Step 1 Attach the Camera Strap 33 Step 2 Insert the Battery 34 Step 3 Insert the Memory Card 36 Step 4 Check the Battery Level 39 Step 5 Choose a Language 40 Step 6 Set the Time and Date 42 Taking Photographs The Basics 44 Step 1 Ready the Camera 45 Step 2 Adjust Camera Settings Optional 48 Step 3 Fra...

Страница 11: ... Taking Photographs The Details 67 Beyond Point and Shoot Camera Controls 68 Framing Photographs Optical and Digital Zoom 69 Making Effective Use of Memory Image Quality and Size 71 Focusing Near and Far The Button 76 Delaying Shutter Release Self Timer Mode 80 Throwing Light on Your Subject The Button 82 Bright Dark and High Contrast Subjects The Button 85 Advanced Photography User Setting Option...

Страница 12: ... Photos Auto Bracketing 124 Avoiding Grainy Photographs Noise Reduction 128 Restoring Default Settings Reset All 130 Camera Setup The SET UP Menu 133 SET UP Menu Options 134 Organizing Your Photographs The Folders Menu 137 Audio Confirmation Shutter Sound 142 Conserving Battery Power The Auto Off Menu 143 Formatting Memory Cards CF Card Format 144 File Numbering The Seq Numbers Menu 144 Setting th...

Страница 13: ...g Images During Playback The Hide Image Menu 173 Ordering Prints The Print Set Menu 174 Selecting Images for Transfer The Auto Transfer Menu 176 Television Playback Connecting Your Camera to a Video Device 178 Connections Your Camera and Your Computer 179 Before You Begin Installing Nikon View 4 180 Getting Connected Connecting to Your Computer 182 Technical Notes Camera Care Options and Resources...

Страница 14: ...xiv ...

Страница 15: ...mark this section and refer to it as you read through the manual for information on the names and functions of camera parts Overview Read this section for a description of how this manual is organized and for an explanation of the symbols and conventions used This chapter is divided into the following sections Overview Getting to Know the COOLPIX5000 2 3 4 19 20 30 Menu Guide Introduction Before Y...

Страница 16: ...ge of the simplicity and immediacy of digital photography Once you have taken a few photographs Where Do I Go from Here out lines how to send copies to your friends and relatives by e mail and how to order prints using digital print orders that you create with the camera It also provides some tips on how to take photographs for electronic distribu tion and for printing on a personal color printer ...

Страница 17: ...it these sites to keep up to date with the latest product information tips answers to frequently asked questions FAQs and general advice on digital imaging and photography Additional information may be available from the Nikon representative in your area See the URL below for contact information http www nikon image com eng This icon marks cautions infor mation that you should read be fore use to ...

Страница 18: ...ast as 1 4000 s An advanced image processing algorithm capable of capturing fine details and brilliant colors Noise reduction for long time exposures with a clear image mode for re duced noise and smoother color gradations at sizes of 1 280 960 pixels or less A 3 Zoom Nikkor lens with three aspherical lens elements and a focal range of 7 1 21 4 mm equivalent to 28 85 mm in 35 mm 135 format Large d...

Страница 19: ...ies and is equipped with its own shutter release and zoom buttons for taking photo graphs in portrait orientation External Speedlights and flash accessories 192 The camera is equipped with an accessory shoe that allows direct attach ment of most Nikon Speedlights An optional sync cable attached to the shoe can be used for off camera flash photography Converter lenses 191 A variety of converter len...

Страница 20: ... moments to familiarize yourself with camera controls and displays You may find it helpful to bookmark this section and refer to it as you read through the rest of the manual The parts of the camera are identified below For more information on the function of each part refer to the page numbers listed ...

Страница 21: ...r 182 14 DC IN connector under cover 191 15 Memory card slot cover 36 16 Diopter adjustment slider 47 17 Green autofocus lamp 8 18 Red flash ready lamp 8 19 Speaker 164 20 Audio video A V out connector under cover 178 21 Eyelet for camera strap 33 A Viewfinder 8 B Monitor 9 C Control panel 11 D Power switch 12 E Shutter release button 12 F Mode selector 12 G Zoom button 13 H Command dial 13 I butt...

Страница 22: ...connect power source while green light is blinking Red flash ready lamp Green autofocus lamp Photographs can be framed in the viewfinder or in the monitor Note that when your subject is within 1 5 m 4 11 of the camera the final picture will differ slightly from the image seen in the viewfinder Use the smaller of the two frames in the viewfinder or frame photographs in the monitor when your sub jec...

Страница 23: ...s it possible to frame photographs in the monitor with the camera held at different angles The monitor can even be swivelled to point in the same direction as the lens allowing you to frame a quick arms length self portrait in this position the monitor shows a mirror image of what will appear in the final photograph When the monitor is pointing in the same direc tion as the lens it can be folded c...

Страница 24: ...s mode 76 10 Flash mode 82 11 Date not set icon 43 12 Aperture 89 13 Exposure compensation 85 14 Image size 74 15 Image quality 72 16 Number of exposures remaining 46 User Set A User Sets 1 2 and 3 17 Focus areas 120 18 User Setting no User Set 88 19 Lens converter setting 116 20 Exposure white balance lock 118 21 Continuous shooting mode 108 Best shot selector BSS 112 Noise reduction 128 22 Brack...

Страница 25: ...ay shows white bal ance mode selected 149 3 Battery level indicator 39 4 Image quality 72 5 Exposure mode 89 6 Shutter speed aperture display depending on control in use shows shutter speed 89 aper ture 89 exposure compensa tion value 85 manual focus distance 98 sensitivity 96 white balance setting 149 or image transfer status 183 7 Continuous shooting mode 108 8 Exposure compensation indicator 85...

Страница 26: ...cus brackets Focus will remain fixed while the button is held in this posi tion focus lock Press the shutter release button all the way down to take a picture 2 1 2 D The Power Switch The power switch turns the camera on and off When the power is turned on the camera will beep once and indicators will appear in the control panel F The Mode Selector The mode selector selects the operating mode Choo...

Страница 27: ... viewed simultaneously 60 160 During movie playback the zoom button controls playback volume 164 H The Command Dial The command dial is used for a variety of opera tions to select options in the shooting menu to page through photo information and thumbnail images in playback or quick review and to set shut ter speed and or aperture when shooting in User Set 1 2 or 3 In shooting mode the com mand d...

Страница 28: ... playback Thumbnail review Operation Function Situation User Set 88 In shooting mode the menus offer a choice of four User Sets User Sets A 1 2 and 3 User Set A is a fully automatic point and shoot mode in which the majority of settings are controlled by the camera User Sets 1 2 and 3 give you control of all camera settings Settings for each of User Sets 1 2 and 3 are stored separately in memory a...

Страница 29: ...on with the command dial to control white balance or metering without accessing the shooting menu or to select the focus or flash mode without using the buttons on the rear of the camera J The Button In shooting mode User Sets 1 2 and 3 the button is used in combination with the com mand dial to select the exposure mode 89 In User Set A the exposure mode is automatically set to programmed auto and...

Страница 30: ...Manual focus Button MF Situation Camera in mode Camera in mode User Set 1 2 3 82 96 58 158 60 160 Operation ISO Function Flash mode selection Sensitivity ISO equivalency Delete image currently displayed in monitor Delete highlighted image Button ISO Situation Camera in mode Camera in mode User Set 1 2 3 Full screen review Full frame playback Thumbnail review Thumbnail playback L The ISO Button The...

Страница 31: ...ure 106 Focus and exposure remain locked while the button is held down even if you remove your finger from the shutter release button The AE L AF L Button By default pressing the AE L AF L button when the camera is in focus locks both focus and exposure In User Sets 1 2 and 3 the Controls AE L AF L option in the setup menu 150 can be used to set the AE L AF L button to lock only one of focus or ex...

Страница 32: ...m era menus to page through images in quick review and playback and to highlight thumbnails in thumbnail review and playback Q The MONITOR Button The MONITOR button turns the monitor on and off and controls the display of indicators in the monitor Monitor off Monitor on indicators displayed Monitor on indicators hidden ...

Страница 33: ...ton again S The Button In shooting mode the quick review button is used to view the results of earlier photo graphs while setting up the next shot 56 The MONITOR MENU and Buttons The order of these three buttons from left to right changes with the orientation of the monitor MENU MONITOR when the but tons are above the monitor MONITOR MENU when the buttons are below the monitor Button names are dis...

Страница 34: ...ode for television playback and selecting the language in which menus and messages are displayed In User Sets 1 2 and 3 the SET UP menu is accessed from the SHOOTING menu and contains additional options for customiz ing camera controls 134 156 User Set 1 2 3 SHOOTING The SHOOTING menu contains advanced shooting options such as white balance and metering It is only available in User Sets 1 2 and 3 ...

Страница 35: ...21 Introduction Menu Guide Viewing the Menus When the camera is on the menu for the current operating mode can be dis played by pressing the MENU button Menu for current operating mode displayed Press ...

Страница 36: ...you want to go To go back one step press the multi selector to the left The selection for some options is made from a sub menu Repeat steps 3 and 4 to select the desired setting from the sub menu Display options Highlight menu item 1 2 Make selection changes to settings apply when selection is made Highlight option 3 4 ...

Страница 37: ...xt page of options When MENU OFF is displayed pressing the MENU button returns you to shooting or playback mode Taking Photographs while Menus Are Displayed The view through the lens is visible behind the SHOOTING menu To take a photograph while the menu is displayed press the shutter release button If the SET UP menu is displayed in shooting mode the monitor will show the view through the lens wh...

Страница 38: ...ng the multi selector up or down to scroll to the other page If PAGE 2 appears at the lower left corner of the menu you can display the second page by pressing the MENU button When MENU OFF is displayed press ing the MENU button returns you to shooting or playback mode Position cursor in main menu 1 Highlight page tab selected page tab highlighted in red 2 Display selected page Highlight page numb...

Страница 39: ... situ ations and recall them as desired To return to the SET UP menu for User Set A follow the steps above to select User Set A and position the cursor in the SET UP menu Display list of User Sets Highlight User Setting 1 2 The Button 149 By default the button can be used to change the User Set without ac cessing the camera menus Press the button while rotating the command dial The current User Se...

Страница 40: ...ensure that colors are reproduced accurately METERING Control how the camera sets exposure CONTINUOUS Take photos one at a time or in sequence make movies or create collages of sixteen consecutive photographs BEST SHOT SELECTOR Use the Best Shot Selector BSS when photographs could be blurred by inadvertent camera movement IMAGE ADJUSTMENT Raise or lower contrast and brightness for output on a prin...

Страница 41: ...area selection single or continuous autofo cus and focus confirmation IMAGE SHARPENING Heighten or reduce the sharpness of outlines in your photo graphs AUTO BRACKETING Automatically vary exposure or white balance over a series of photographs NOISE REDUCTION Reduce noise a mottling effect that appears in photographs taken at low shutter speeds or higher sensitivity settings RESET ALL Reset setting...

Страница 42: ...r turns on automatically and wheth er photos are displayed in the monitor after shooting adjust monitor brightness and hue Controls Specify the settings in effect when the camera is turned on control the functions performed by the and AE L AF L buttons Zoom Options Options for digital zoom and controlling aperture as the cam era is zoomed in and out Auto Off Specify how long the monitor will remai...

Страница 43: ...and date info txt Save photo information in text format Video Mode Choose the standard for video output from NTSC and PAL Language Choose the language in which camera messages and menus are displayed Disable Delete Disable all delete and format options to protect images from accidental deletion CF Card Format Format memory cards for use in your Nikon digital camera All Modes User Set 1 2 3 All Mod...

Страница 44: ... all images Folders Select the folder from which images will be played back cre ate rename and delete folders Slide Show Select this option to play back all images in the current folder one after the other in an automatic slide show Protect Protect selected images from accidental deletion Hide Image Hide images during playback Print Set Select images for printing on a DPOF compatible device Auto T...

Страница 45: ...n for a step by step guide to the basics of taking pictures with the COOLPIX5000 First Steps This section details the steps you will take before using your camera for the first time Tutorial Getting Started This chapter is divided into the following three sections First Steps Taking Photographs Review and Deletion 32 43 44 55 56 60 ...

Страница 46: ...for the first time you will need to complete the steps shown below STEP 33 40 41 36 38 34 35 39 Choose a Language Insert the Memory Card Format the Memory Card Insert the Battery Check the Battery Level 42 43 Set the Time and Date Attach the Camera Strap STEP 1 STEP 6 STEP 5 STEP 3 STEP 2 STEP 4 ...

Страница 47: ...cord provided to attach it to the camera strap as shown Removing and Replacing the Lens Cap When removing or replacing the lens cap press the tabs on either side of the cap to release the latch If you turn the camera on with the lens cap in place an error message will appear in the moni tor To clear the message from the screen turn the camera off and remove the lens cap ...

Страница 48: ... EN EL1 lithium ion battery provided or a non rechargeable 2CR5 DL245 lithium battery avail able separately 2 1 Charge the battery The rechargeable Nikon EN EL1 lithium ion battery supplied with your camera is not fully charged at shipment A battery charger is provided with the camera we recommend that you charge the battery before use Instructions for charging the battery may be found in the inst...

Страница 49: ...fter charging for about ten hours the clock s power source can provide roughly three days of back up power Removing the Battery The battery can be removed without affecting pictures stored on the memory card All settings other than date and language will however be reset Alternative Power Sources Although the COOLPIX5000 can be used with non rechargeable 2CR5 DL245 lithium batteries available at a...

Страница 50: ...en the camera is turned on Be sure the eject button is down be fore inserting memory cards For more information on 193 Approved memory cards Removing Memory Cards Memory cards can be removed without loss of data when the camera is off To remove memory cards turn the camera off and open the card slot cover Press the eject button to pop it up 1 then press it again to partially eject the card 2 You c...

Страница 51: ...P menu Highlight CF Card Format Formatting Memory Cards While the memory card provided with your camera is formatted at shipment other memory cards must be formatted before first use To format a memory card C D E F B Set mode selector to and turn camera on Press MENU button to display PLAY BACK menu A ...

Страница 52: ...ess MENU button or highlight No and press multi selector to right During Formatting Do not remove the memory card remove the battery or unplug the AC adapter available separately while formatting is in progress Before Formatting Formatting permanently deletes all data on the memory card Before format ting be sure to transfer to a computer any images you would like to keep CF Card Format The CF Car...

Страница 53: ...ns cap 4 2 Check the battery level in the control panel or monitor The battery level is shown by the battery level indicator in the control panel A battery level indicator also appears in the monitor when the battery is running low A icon in the control panel indicates that the battery is fully charged A icon in the control panel or monitor indicates that the battery is running low Re charge or re...

Страница 54: ...e Camera menus and messages can be displayed in your choice of German English French Japanese and Spanish Press MENU button to display PLAY BACK menu Set mode selector to and turn camera on Highlight page tab Position cursor in SET UP menu Highlight Language 5 1 5 2 5 3 5 4 5 5 5 6 ...

Страница 55: ... Deutsch German E English F Français French J Japanese S Español Spanish Display options Make selection and return to SET UP menu If you have yet to set the time and date proceed to Step 6 6 on the following page to set the time and date 5 7 5 8 5 9 ...

Страница 56: ...ographs and movies taken with your Nikon digital camera To set the camera s internal clock to the correct time and date Press MENU button to display PLAY BACK menu Set mode selector to and turn camera on 6 1 6 2 Highlight SET UP menu page tab S Highlight page tab 6 3 6 4 Position cursor in SET UP menu Highlight Date 6 5 6 6 ...

Страница 57: ...gs and return to SET UP menu 6 11 6 12 Any photographs taken before the time and date have been set will have a time stamp of 0000 00 00 00 00 If the time and date have not been set a flashing clock icon will be displayed in the top right corner of the monitor when the camera is in shooting mode Highlight Year Month Day hour or minute selected item blinks on and off in red Display DATE menu 6 7 6 ...

Страница 58: ...d shoot mode the majority of settings are con trolled by the camera in response to lighting conditions and focus distance producing the best possible results in most situations STEP 54 55 50 51 48 49 52 53 Check the Results Frame the Photograph Adjust Camera Settings Focus and Shoot 55 Put the Camera Away STEP 1 STEP 6 STEP 5 STEP 3 STEP 2 STEP 4 Ready the Camera 45 47 ...

Страница 59: ...p in place an error message will appear in the monitor To clear the message from the screen turn the camera off and remove the lens cap 1 2 Slide the mode selector to 1 3 Turn the camera on A beep will sound when the camera is turned on After a short pause current settings will be displayed in the control panel and moni tor and the monitor will show the view through the lens ...

Страница 60: ...ore images can be recorded It may be possible to record more pictures at a different image quality or size 71 1 4 Check indicators in the control panel or monitor Before taking photographs be sure that the battery is charged and that enough memory is available on the memory card If the battery is low a low battery icon will appear in the control panel and monitor indicating that the battery should...

Страница 61: ...when the subject is in focus viewfinder focus can be adjusted using the viewfinder diopter control To adjust viewfinder focus fold the monitor out from the camera A hold the camera with your eye to the viewfinder B and slide the diopter control C until the focus brackets in the viewfinder are clearly in focus Using the Diopter Control When operating the diopter control with your eye to the viewfin...

Страница 62: ...se settings are suited to most situations and the description in this section assumes that the defaults are used For information on making changes to the settings listed below refer to the page numbers in the rightmost column 74 75 SIZE Photographs are 2 560 1 920 pixels in size At this size and an image quality of NORMAL about 26 photographs can be stored on a 32 MB memory card 76 81 Camera focus...

Страница 63: ...OTING menu with USER SETTING option highlighted Display SET UP menu for User Set A Press MENU button to exit SET UP menu and return to shooting mode A D The Button 149 By default the button can be used to change the User Set without ac cessing the camera menus Press the button while rotating the command dial The current User Set will be displayed in the top left corner of the moni tor User Sets 1 ...

Страница 64: ...Frame your subject using the zoom button Press to zoom out from your subject in creasing the area visible in the frame Press to zoom in on your subject so that it fills a larger area of the frame When the camera is zoomed all the way in to the T Telephoto side of the zoom indi cator holding down for two seconds ac tivates digital zoom which can be used to magnify your subject even further 69 Indic...

Страница 65: ...time viewing an image that shows how the final picture will appear This is particu larly important when the image in the viewfinder does not accurately reflect what will appear in the final picture for example when you are using macro close up 77 at ranges of less than 50 cm 1 8 you are using digital zoom 70 an image size setting of 3 2 75 or an optional converter lens 191 When using the monitor y...

Страница 66: ... try again Off Flash not required or flash set to off Subject in focus On Flickers Camera unable to focus on subject in focus brack ets Use focus lock to focus on another subject at the same distance then recompose the photograph Lamp Meaning Red lamp Green lamp Custom Focus Settings User Sets 1 2 and 3 In User Sets 1 2 and 3 manual focus 98 can be used in situations in which the camera is unable ...

Страница 67: ...ck Depending on the effect you want to achieve your subject may not be at the center of the final composition If your subject is not at the center of the frame when the shutter release button is pressed halfway the camera will focus on the background and the main subject may not be in focus Focus lock al lows you to adjust the composition after focusing on your subject 1 Focus Position the subject...

Страница 68: ...card or cutting power in these circumstances could result in loss of data or in damage to the camera or the card To Use Description Save photo Shutter release Press shutter release button halfway to record photo graph and return to shooting mode Delete photo A confirmation dialog will be displayed Press multi selector up or down to highlight option press to right to select Select No to save photo ...

Страница 69: ... Shutter release Press shutter release button all the way down to take new photograph while saving photo displayed in mon itor to memory card Any additional shots you take while earlier pictures are being saved will be stored in temporary memory buffer before being saved to mem ory card Pictures can be taken until buffer is full buffer can hold about ten full sized normal quality images When buffe...

Страница 70: ... that close up shot blurred Turn on the Best Shot Selector BSS 112 and try again Once you have the shot you want you can delete your failures instantly to make room for more shots on the memory card To use quick review the camera must be in shooting mode Press the button once to display images at the top left corner of the monitor twice to display pictures full screen Pressing the button a third t...

Страница 71: ... will be displayed at the top left cor ner of the monitor The following operations can be performed All other camera controls function as they do in shooting mode To Use Description View other photos Press the multi selector up or left to view images re corded before the current photo down or right to view images recorded after the current photo Keep multi selector pressed to scroll rapidly to the...

Страница 72: ...mation dialog will be displayed Press multi selector up or down to highlight option press to right to select Select No to exit without deleting photo Select Yes to delete photo View multiple images Press the button to display up to nine im ages at a time as small thumbnail previews 60 To Full Screen Review From quick review press the button to en ter full screen review The picture displayed in qui...

Страница 73: ...he way down to return to shooting mode and take a photograph Use Description Playback Mode 157 The review function described in this section allows you to view photos with out leaving shooting mode Your Nikon digital camera is also equipped with a full playback mode which can be accessed by setting the mode selector to In addition to the full screen and thumbnail review functions described in this...

Страница 74: ...view and return to shooting mode To return to shooting mode and focus press the shutter release button halfway Press the shutter release button all the way down to return to shooting mode and take a photograph Change number of images displayed With four thumbnails displayed press the but ton once to view nine thumbnail images Press to zoom in from nine thumbnails to a four thumb nail view or when ...

Страница 75: ...w to take photographs for printing on a color printer or for delivery to a photofinisher As the name indicates digital cameras produce digi tal images As digital data digital images can be readily transferred to a computer where they can be stored viewed printed sent to your acquaintan ces via e mail or saved to removable media for ex ample a Zip disk or CD for delivery to a photo finisher This ch...

Страница 76: ...he photo pixels will be visible to the naked eye giving the picture a rough uneven appearance Many household ink jet printers have a target resolution for printing color images of around 300 dots per inch At this resolution a VGA photograph 640 480 pixels in size will print at a size of roughly 5 5 4 cm 2 1 1 6 while a full size image will print at about 21 5 16 cm 8 5 6 4 The higher the image qua...

Страница 77: ...nual Image Database Software Once you have transferred large numbers of photos to your computer you may have trouble finding the pictures you want to print or send by e mail The im age database software included with your camera can make it easier for you to find the photo you want by organizing pictures into categories Image da tabase software can also be used to preview the pictures stored in yo...

Страница 78: ...on on pricing and the types of disks and file formats supported Pictures can be copied to disk using Nikon View 4 For information on the operations that can be performed while the camera is connected to your computer see the Nikon View 4 Reference Manual FULL 3 2 UXGA Image size 21 5 16 cm 8 5 6 4 21 5 14 5 cm 8 5 5 7 13 10 cm 5 3 4 Approximate dimen sions at 300 dpi Image size Approximate dimen s...

Страница 79: ...t photos destined for electronic distri bution should be small both in terms of their physical dimensions so that they will fit in the window of a web browser or e mail software and in terms of the amount of data they contain so that they don t take too long to upload or download over an Internet connection Taking Photos for E Mail and the Web When taking photographs for electronic distribution we...

Страница 80: ...face you can install Nikon View 4 and transfer images directly from the camera The images to be copied can be selected beforehand using the Auto Transfer option in the playback menu 165 If your computer does not have a USB interface you can copy images directly from the memory card as described in Connections 179 Once copied to your computer im ages can be appended to e mail messages see the docum...

Страница 81: ...t A This chapter details the options avail able for recording photographs and movies in all User Sets It is divided into the following sections Advanced Photography This section details the options available in User Sets 1 2 and 3 Beyond Point and Shoot Read this section for information on the most fre quently used camera controls zoom image quality and size focus flash and exposure compensation ...

Страница 82: ...never the camera is in shooting mode These operations are performed by means of the con trols in the following table Control Framing Photographs 69 70 Making Effective Use of Memory 71 75 Focusing Near and Far 76 79 Delaying Shutter Release 80 81 Throwing Light on Your Subject 82 84 Bright Dark and High Contrast Subjects 85 86 Described in ...

Страница 83: ... out Zoom in Indicator in monitor displays amount of zoom while either button is pressed Optical vs Digital Zoom In digital zoom data from the camera s image sensor are processed digitally enlarging the center portion of the image to fill the frame Unlike optical zoom digital zoom does not increase the amount of detail visible in the photograph Instead details visible at maximum zoom are enlarged ...

Страница 84: ...me is pressed to a maximum of 4 Pressing decreases the zoom factor To cancel digital zoom press until the zoom factor is no longer displayed Restrictions on Digital Zoom Digital zoom can only be used when the monitor is on Digital zoom is not available when Image quality is set to HI 72 Black White is selected in the SATURATION CONTROL sub menu 115 Multi Shot 16 or Ultra HS is selected in the CONT...

Страница 85: ...and 96 MB cards at different combinations of image quality and size 32 MB Card 51 55 118 173 243 459 BASIC 26 28 62 95 139 289 NORMAL 13 14 32 50 75 173 FINE 2 2 HI 64 MB Card 103 111 236 347 488 918 BASIC 52 57 125 278 578 NORMAL 26 29 65 100 151 347 FINE 4 4 HI 96 MB Card 155 167 354 520 731 1377 BASIC 78 86 188 285 418 867 NORMAL 39 43 97 150 227 520 FINE 6 7 HI Card Image Quality Image Size FU...

Страница 86: ...occupies on the memory card Compressing the image to make a very small file however may cause the block pattern to become visible and there may be noticeable loss of detail The actual effect depends on the size of the image when printed or displayed and on the type of subject To select an image quality setting press the button repeatedly until the desired setting is displayed in the control panel ...

Страница 87: ...uality Image stored as TIFF Tagged Image File Format file with no compres sion Use when fidelity is of paramount impor tance Not available in User Set A or at image siz es of UXGA SXGA XGA or VGA The following options are available FINE JPEG Fine image quality suitable for enlargements or high quality prints File size reduced to roughly 1 4 of original NORMAL JPEG Normal image quality suited to mo...

Страница 88: ...ely the larger the image the larger the size at which it can be printed without becoming noticeably grainy Choose an image size according to the space available on the memory card and the task at hand To choose an image size rotate the command dial while pressing the button Image size displayed in monitor While dial is rotated con trol panel shutter speed aperture dis play shows width of image in ...

Страница 89: ...4 768 XGA Suited to printing at smaller sizes for example as an illustration in a letter or report or to display on monitors 17 or larger 640 480 VGA Can be displayed full screen on 13 monitors Suited to distribution by e mail or the web Restrictions on Image Size Image sizes of FULL UXGA and 3 2 are not available when NOISE REDUC TION is set to Clear Image Mode 128 Print Size The size of images w...

Страница 90: ...gital camera offers focus modes for both situa tions In addition a self timer mode is available for delaying shutter release either to keep the camera from shaking or to allow you to appear in your own photographs To select the focus mode press the button repeatedly until the desired set ting is displayed in the control panel or monitor Macro Close Up We recommend that you frame photographs in the...

Страница 91: ...w it works When to use it Infinity Use when photographing dis tant scenes through fore ground objects such as a win dow Focus is fixed at infinity Flash is disabled Macro Close Up Continued When the camera is zoomed out to or past the middle optical zoom position the macro close up icon in the monitor will turn yellow indicating that macro close up can be used to focus on objects as little as 2 cm...

Страница 92: ...is contrast between the subject and the background For example autofocus may not perform well on subjects that are the same color as the background The subject is evenly lit Autofocus does not perform well when You attempt to focus simultaneously on two or more objects at different distances from the camera For example autofocus may not perform well when photographing an object inside a cage becau...

Страница 93: ... the shutter release button 3 Recompose the photograph and shoot With the AE L AF L button held down recom pose your photograph and press the shutter release button all the way down to shoot To take a series of photographs without pausing between shots to refocus the camera keep the AE L AF L button pressed between shots Fo cus will also remain locked if you keep the shut ter release button presse...

Страница 94: ...f in front of the camera after press ing the shutter release button The three second timer prevents photographs from being blurred by camera movement that occurs when the shutter release button is pressed This feature is most useful when taking low light or close up shots with the flash turned off To use the self timer 1 Position the camera Mount the camera on a tripod recommended or rest it on a ...

Страница 95: ...lit during the final sec ond to warn that the shutter is about to be re leased Focusing in Self Timer Mode If your subject is not in the center of the frame when the shutter is released in self timer mode the camera will focus on the background and the photograph may not be in focus To prevent this choose User Set 1 2 or 3 88 select Manual from the FOCUS OPTIONS AF Area Mode sub menu in the SHOOT ...

Страница 96: ...on repeatedly until the desired setting is displayed in the control panel or monitor Flash setting displayed in control panel and monitor Press Sensitivity ISO Equivalency The built in Speedlight is able to adjust output for correct flash exposure at sensitivity settings equivalent to ISO 400 or less We recommend that you set sensitivity ISO equivalency to AUTO or to a fixed value of 400 or less w...

Страница 97: ...pture both subject and back ground at night or under dim light Use of a tripod is recommended to prevent blurring Auto with red eye reduction Pre flash fires be fore main flash This causes subjects pupils to contract before photo is tak en minimizing red eye effect caused by flash re flecting from retina Use for portraits works best when sub jects are well within range of flash and looking at pre ...

Страница 98: ...1 4 s the shutter speed indicator in the monitor will turn yellow Mottling noise may appear in photographs taken at this speed or slower To reduce noise turn noise reduction on 128 Shutter speeds can also be increased by zooming the camera out 69 rais ing sensitivity ISO equivalency 96 selecting an exposure mode of aper ture priority auto and choosing a larger aperture smaller f number 93 or selec...

Страница 99: ...e necessary to alter exposure from the value suggested by the camera This can be done using exposure compensation Exposure compensation can be set to values between 2 0 EV underexposure and 2 0 EV overexposure in increments of 1 3 EV Rotate the command dial while pressing the button Exposure com pensation dis played in control panel and moni tor At values other than 0 0 icon is dis played in contr...

Страница 100: ...ves or when the background is much darker than the main subject This is because the camera in order to avoid extreme over or under exposure tends to lower exposure when the frame is very bright and raise exposure when the frame is very dark which can make naturally bright subjects look dim and naturally dark subjects appear over bright or washed out The easiest way to choose an exposure compensati...

Страница 101: ...r 3 is selected from the menu for shooting mode In addition to the set tings described in the previous section in User Sets 1 2 and 3 the user has access to the following controls SHOOTING menu Shooting Menu Options 100 131 Control Controlling Shutter Speed and Aperture 89 95 ISO Reacting Faster to Light 96 97 MF Focusing at a Preset Distance 98 99 Described in ...

Страница 102: ...in monitor Menu settings for User Sets 1 2 and 3 are stored separately from one another If there is a particular combination of settings you use frequently you can se lect User Set 1 and set the camera to these settings The camera will remem ber this combination of settings even when turned off and will automatically restore these settings the next time User Set 1 is selected You can create furthe...

Страница 103: ...d and aperture To choose the exposure mode rotate the command dial while pressing the button Exposure mode displayed in con trol panel and monitor Press while rotating command dial The Button 149 By default the button can be used to choose a User Set without access ing the camera menus Press the button while rotating the command dial The selected User Set will be displayed in the top left corner o...

Страница 104: ...d auto Camera sets shutter speed and aperture for best expo sure Flexible program can be used to select additional com binations of shutter speed and aperture that will produce the same exposure Best choice in most circum stances Option How it works When to use it Aperture priority auto User chooses aperture cam era sets shutter speed for best exposure Large apertures small f num bers soften backg...

Страница 105: ...yed in monitor As terisk appears next to expo sure mode indicator in control panel and monitor to indicate that flexible program is in effect Rotate Flexible Program Flexible program is only available when the monitor is on The Control Panel Shutter Speed Aperture Display The shutter speed aperture display in the control panel shows either shutter speed or aperture To switch from one to the other ...

Страница 106: ... of 1 4 s or slower the shutter speed indicator in the monitor will turn yellow to show that mottling noise may appear in the final photograph We recommend that you either choose a faster shutter speed or turn noise reduction on 128 Shutter Speed Limitations At CONTINUOUS settings of Ultra HS and Movie 109 the camera takes a fixed number of frames per second Shutter speed can not be set to values ...

Страница 107: ...n Aperture and Zoom The maximum and minimum values for aperture are the maximum and mini mum values for the camera lens adjusted for the current zoom setting Higher f numbers smaller apertures can be achieved by zooming the camera in lower f numbers larger apertures by zooming the camera out Unless On is cho sen for Fixed Aperture in the ZOOM OPTIONS sub menu accessible from the SET UP menu for Us...

Страница 108: ...he button is pressed 3 Rotate the command dial to set the selected item aperture or shutter speed to the desired value The amount the photograph would be under or over exposed at the selected setting is displayed in the control panel exposure count display and in the exposure display in the monitor Control panel display is in EVs rounded to nearest EV Value is dis played for 8 s before being repla...

Страница 109: ... can be used to set shutter speed and vice versa Long Time Exposures BULB When manual exposure mode is selected and CONTINOUS set to Single 108 shutter speed can be set to BULB for long time exposures of up to five minutes With shutter speed selected in the control panel shutter speed aperture display or the monitor rotate the command dial until the shutter speed display shows BULB At this setting...

Страница 110: ...ain to appear in the final photograph In a digital camera increased sen sitivity has a similar effect higher sensitivities allow higher shutter speeds at the expense of mottling or noise the digital equivalent of film grain appearing in the final image Adjusting Sensitivity In User Set A the camera sets sensitivity automatically in response to lighting conditions When User Set 1 2 or 3 is selected...

Страница 111: ...an ISO rating of 400 Approximately equivalent to an ISO rating of 800 Value is displayed in red in monitor to indicate that photographs tak en at this setting will likely contain an appreciable amount of noise Use only to capture natural lighting under low light conditions or when a fast shutter speed is required to avoid blurring We recommend that image sharpening 123 be turned off at this settin...

Страница 112: ...his will be the distance you will select for manual focus 2 Choose the focus distance Rotate the command dial while pressing the MF button Press while rotating command dial Focus distance is dis played in monitor and in control panel while MF but ton is pressed After command dial is re leased M F icon in control panel shows that manual focus is in effect Close ups and Optical Zoom At short focus d...

Страница 113: ... Timer When using the self timer be sure that the self timer is selected 80 be fore selecting a focus distance Changing the focus mode after setting the focus distance will cancel manual focus Meters or Feet The units used for manual focus can be chosen from meters or feet using the FOCUS OPTIONS Distance Units option in the SHOOTING menu 122 3 Take the photograph Press the shutter release button ...

Страница 114: ...em the next time User Set 1 is selected You can create different combinations of settings for User Sets 2 and 3 and switch instantly from one combination to the other by selecting the desired User Set from the User Settings menu The SHOOTING menu is not available in User Set A in which the majority of settings are controlled automatically by the camera To display menu settings for User Set 1 2 or ...

Страница 115: ...he User Set is selected The SHOOTING menu contains two pages of options Option USER SETTING WHITE BALANCE METERING CONTINUOUS BEST SHOT SELECTOR IMAGE ADJUSTMENT SATURATION CONTROL 88 102 104 105 107 108 111 112 113 114 115 Option LENS EXPOSURE OPTIONS FOCUS OPTIONS IMAGE SHARPENING AUTO BRACKETING NOISE REDUCTION RESET ALL 116 117 118 119 120 122 123 124 127 128 129 130 131 ...

Страница 116: ...the whites produced by these dif ferent sources of light vary in color some being slightly blue and others yellow or red A digital camera can adjust colors according to lighting so that colors that appear white to the human eye also appear white when viewed in the final photograph This adjustment is called white balance Choosing a White Balance Setting In User Sets 1 2 and 3 white balance can be c...

Страница 117: ...nder overcast skies Speedlight White balance adjusted to match light produced by Nikon Speedlights The following options are available Fine Tuning White Balance At settings other than Auto and White Bal Preset white balance can be fine tuned by highlighting the desired setting and rotating the command dial to select an option from a sub menu Adjustments range from 3 to 3 in incre ments of one rais...

Страница 118: ...nu shown at right will be displayed in the monitor Option Description Cancel Recalls the most recent setting for preset white balance from memory and sets white balance to this value Measure To measure a new value for white balance place a white object such as a piece of paper under the lighting that will be used in the final photograph Frame this object so that it fills the square in the center o...

Страница 119: ...wn by square in center of monitor Only about 1 32 of entire frame is metered Ensures that subject in metering target will be correctly exposed even when background is much brighter or darker Can be used with autoexposure lock 106 to meter off center subjects Measuring Light The Metering Menu In User Sets 1 2 and 3 the metering menu offers a choice of four metering methods that determine how the ca...

Страница 120: ... the composition before taking the photograph 1Set focus and exposure After positioning your subject in the center of the frame press the shutter release button halfway and check that the green lamp next to the viewfinder lights indicating that the subject is in focus Options for the AE L AF L Button By default pressing the AE L AF L button when the camera is in focus locks both focus and exposure...

Страница 121: ...electing either option when spot AF area metering is in effect links me tering to the active focus area If Off is selected matrix metering will be used Note that focus area selection is only available when the monitor is on if the monitor is off when spot AF area metering is in effect the center focus area will be used to determine exposure When spot AF area metering is selected a spot metering ic...

Страница 122: ...lease button is held down A movie option is also included for recording short video clips with audio Option Description Single Camera records one shot each time the shutter release button is pressed all the way down Continuous High Camera records photographs at about three frames per second while shutter release button is held down to a maximum of three shots Monitor turns off automatically during...

Страница 123: ... be recorded HS Sequence Camera takes photos at sizes of SXGA or smaller as long as the shutter release button is held down Image quality is set to NORMAL allowing photos to be taken at approximately three frames per second Option Description Movie This option is used to make QVGA movies 320 240 pixels in size with sound recorded via the camera s built in microphone Recording begins when the shutt...

Страница 124: ... to the camera s accessory shoe can be used at settings other than Movie and Ultra HS 108 Focus Exposure and White Balance At settings other than Single and Movie focus exposure and white balance are determined by the first photograph in each series The Memory Buffer The camera is equipped with a memory buffer for temporary storage of pho tos during shooting allowing you to take several photograph...

Страница 125: ...r will be inverted Using Zoom while Recording Movies In Movie mode optical zoom can only be adjusted before recording begins Digital zoom can also be adjusted before recording in the range 1 2 to 2 0 values of more than 2 0 are not available in Movie mode Once recording has started pressing the zoom button triggers digital zoom even if Off has been selected in the setup Zoom Options Digital Tele m...

Страница 126: ... capture natu ral lighting under low light conditions The BSS function may not produce the desired results with a moving subject or if you change the composition while the shutter release button is pressed all the way down The best shot selector menu contains the following options On Camera takes photos as long as the shutter release button is held down to a maximum of ten These images are then co...

Страница 127: ...or BSS is not available at continuous settings other than Single 108 or when NOISE REDUCTION is on or set to Clear Image Mode 128 Select ing these settings automatically cancels BSS Viewing the Current BSS Setting When the best shot selector is on a BSS icon ap pears in the monitor ...

Страница 128: ...ory card In User Sets 1 2 and 3 the image adjustment sub menu gives you control over this image compensation operation Option Description Auto Camera automatically adjusts brightness and con trast according to shooting conditions More Contrast Image processed to emphasize difference between light and dark areas enhancing contrast This is useful when shooting under overcast skies or shoot ing lands...

Страница 129: ...best choice in most other circumstances The color saturation menu also includes a Black White option for taking photographs in black and white When this option is in effect photographs will be recorded as monochrome images Black and white images require the same amount of memory as color images but show a higher level of detail Black and White At a setting of Black White the monitor shows the view...

Страница 130: ...s of film Each of these lenses is suited to a particular combination of settings including focus mode zoom position and metering method Using the lens sub menu you can select combinations of settings suited to particular converter lenses For complete information on use and handling see the documentation provided with your converter lens Option Description Normal No modifications are made to settin...

Страница 131: ...e Inverse Color option requires a bright light source If lighting is insuffi cient the image in the monitor will be too bright Should you notice exces sive noise in the form of randomly spaced bright pixels set the IMAGE SHARPENING option in the SHOOTING menu to Off or Low 123 Inverse Color is intended for use only when examining film negatives in the monitor and the quality of the image produced ...

Страница 132: ...ame Exposure AE Lock When taking a series of photographs that will later be joined to form a single image for example when taking shots for a panorama or 360 virtual reality image you may wish to use the same ex posure sensitivity and white balance settings for all images in the series This task can be performed using AE lock Option Description Off Restores normal exposure sensitivity and white ba...

Страница 133: ... BULB allows the shutter to remain open as long as the shutter release button is pressed 95 When Maximum Bulb Duration is set to 1 min the default setting the maximum for such long time exposures is sixty seconds You can extend this limit to five minutes by choosing 5 min Note that longer exposure times increase the amount of noise visible in the final photograph ...

Страница 134: ...t at the center of the frame Off Center focus area shown by focus brackets in viewfinder is used No focus area indicators are shown in monitor This op tion can be used in combination with focus lock to focus on an off center subject Option Description Controlling Focus The Focus Options Menu The focus options sub menu provides control over focus settings Focus Area Selection AF Area Mode In User S...

Страница 135: ...in combination with spot AF area metering to meter exposure only in the selected focus area Auto Focus Mode In User Sets 1 2 and 3 you can choose the auto focus mode that takes effect when the monitor is on when the monitor is off single autofocus is used regardless of the setting chosen in the auto focus mode sub menu For more information on autofocus see page 78 Continuous AF Camera adjusts focu...

Страница 136: ...indicators of focus appear in the final pho tograph Distance Units Use this sub menu to select the units in which dis tances for manual focus will be displayed 98 You can choose from meters m or feet ft Option Description MF Areas of the image that are in focus will be sharply outlined in the monitor when manual focus is used 98 On Areas of the image that are in focus will be sharply outlined in t...

Страница 137: ...ptions are available The effects of sharpening are not visible in the monitor when the camera is in shooting mode Viewing the Current Image Sharpening Setting At settings other than Auto and Off the current image sharpening setting is shown by an icon in the monitor Option Description Auto Camera sharpens edges for optimal results adjust ment performed differs from image to image High Image proces...

Страница 138: ...f Restores normal exposure and white balance On Camera varies exposure with each shot the num ber of shots and the amount of exposure compen sation performed can be selected from a sub menu see below Values are added to the exposure compensation value selected with the button 85 Bracketing is performed by varying shut ter speed in programmed auto aperture priority auto and manual exposure modes an...

Страница 139: ... of shots using bracketing you can view the results in quick review 57 or playback 158 and select the image with the desired ex posure discarding the remaining shots if so desired Restrictions on Autoexposure Bracketing Autoexposure bracketing can not be used when BSS 112 or AE lock 118 is on noise reduction is on or set to Clear Image Mode 128 or Multi shot 16 Ultra HS or Movie is selected for CO...

Страница 140: ... Settings If auto flash is used 83 the flash setting for the first photograph in each bracketing cycle applies to the remaining photographs If the flash fires for the first photograph in a three shot cycle it will also fire for the remaining two If the flash is not required for the first photograph it will not fire for the re maining two If sensitivity ISO equivalency is set to AUTO 97 the sensiti...

Страница 141: ...the selected white bal ance value one image with a reddish cast and one image with a bluish cast Recording Time Because the camera takes three shots each time the shutter release button is pressed the time required to save images to the memory card is approximately tripled when white balance bracketing is used Restrictions on White Balance Bracketing White balance bracketing can not be used when B...

Страница 142: ...Off This option which only takes effect at shutter speeds of 1 15 s or slower is used to reduce noise in long time exposures This setting can be used with the flash and is available at all image sizes Time required to save images to memory card more than doubles On This option is used to minimize noise and improve color gradation in photos SXGA or smaller Each time the shutter release button is pr...

Страница 143: ...effect when Clear Image Mode is chosen image size will be set to SXGA while Clear Image Mode is in effect reverting to the original size when Clear Image Mode is turned off Clear Image Mode Clear Image Mode may not produce the desired results with moving subjects or if the camera is shaken or moved during shooting Using the Flash When Clear Image Mode is on both the built in Speedlight and any ext...

Страница 144: ...ing options for the current User Set to their default values Settings in other User Sets are unaffected Fine tuning reset to 0 Option Description No Exit menu leaving settings unchanged Reset Restore settings to default values Default Setting Auto White balance Matrix Metering Single Continuous Off BSS Auto Image adjustment Normal Saturation control Normal Lens Default Setting Auto Image sharpenin...

Страница 145: ...no effect on settings made with the camera buttons and command dial Folders option for playback reset to All Folders Default Setting NIKON Folders On Shutter sound 30 s Auto off Off info txt Default Setting Monitor options 3 Brightness On Display mode 6 Hue All options on AE AF Controls Memorize AE L AF L Zoom options On Digital tele Off Fixed aperture Speedlight options Auto Speedlight control 0 ...

Страница 146: ...132 ...

Страница 147: ...he SET UP Menu This chapter details the options available in the SET UP menu where you can adjust basic camera set tings and perform such tasks as formatting memory cards and choosing a folder to store your photo graphs ...

Страница 148: ...he operating mode and in shooting mode the User Set selected Shooting Mode User Set A The SET UP menu for User Set A contains six options for basic camera setup To display the SET UP menu for User Set A slide the mode selector to shoot ing mode and Press MENU button to display menu for current User Set USER SETTING will be highlighted Highlight A 1 2 4 3 If SET UP menu is not displayed press multi...

Страница 149: ... 2 and 3 contains all the options available in the SET UP menus for playback and User Set A as well as advanced setup options and options for customizing camera controls The SET UP menu for User Sets 1 2 and 3 is accessed from the SHOOTING menu 100 the playback SET UP menu from the PLAY BACK menu 165 Highlight page tab selected page tab highlighted in red Highlight S Display SET UP menu for curren...

Страница 150: ...Shutter Sound Auto Off CF Card Format Seq Numbers Date Monitor Options Controls Zoom Options Speedlight Opt info txt Video Mode Language Disable Delete User Set A User Set 1 2 3 137 141 142 143 144 144 145 145 146 147 148 150 151 152 153 154 155 155 156 Playback Folders option accessible from main PLAY BACK menu 169 ...

Страница 151: ...ile system conforms to the Design Rule for Camera File Systems DCF Under this system folder names consist of a three digit folder number followed by the folder name e g 100NIKON Each folder can hold a maximum of two hundred images it may hold less depending on the size of the memory card and other factors Should a folder fill up another folder will automatically be created with the same name but a...

Страница 152: ... to create new folder Until a different folder is selected from Folders menu all new images will be stored in new folder Press MENU button to exit without creating folder Highlight letter Edit selected letter Folder name can in clude uppercase letters A Z num bers and spaces Repeat steps 3 and 4 to create new five letter folder name 1 2 3 4 5 ...

Страница 153: ...isplay list of existing folders folder NIKON can not be renamed Highlight Rename Renaming Existing Folders Highlight folder name Display menu Edit name as described in steps 3 5 of Creating New Folders opposite 1 2 3 4 5 ...

Страница 154: ...deleted Disable Delete Folders can not be deleted when Disable Delete 156 is on Display list of folders folder NIKON not available for deletion Highlight Delete Highlight folder name Confirmation dialog displayed Press multi selector up or down to highlight option press to right to select Select No or press MENU button to exit without deleting folder Select Yes to delete selected folder 1 2 3 4 De...

Страница 155: ... series of one hundred photographs taken at a setting of Ultra HS 109 is stored in a separate folder with a name consisting of N_ followed by a three digit number assigned by the camera The Folders menu can be used to select these folders for playback or to delete the entire folder and all im ages it contains Note however that no additional images can be stored in folders created at a setting of U...

Страница 156: ...been pressed all the way down to release the shutter manual focus has been activated or a lens con verter option selected in the LENS menu images have been deleted or the memory card formatted changes have been made to image status with the Hide Protect Print Set or Auto Transfer items in the playback menu Shutter Sound has been set to On The camera beeps twice to warn that the camera is not in fo...

Страница 157: ... Battery When powered by a six volt 2CR5 DL245 lithium battery the camera may become hot if left on for an extended period We recommend that you set Auto Off to five minutes or less when using a 2CR5 DL245 lithium battery Sleep Mode In sleep mode all camera functions are deactivated and the camera itself is effectively off consuming almost no power The camera can be reactivated by pressing the MON...

Страница 158: ...s beginning with a three digit num ber between 100 and 999 e g 100NIKON When sequential numbering is off the same file name may be assigned to im ages in different folders or on different memory cards causing confusion when the files are copied to the same location on a computer This can be prevented by turning sequential file numbering on File Numbering When sequential file numbering is off file ...

Страница 159: ... folder numbers from memory Sequential numbering begins again from the lowest numbers available on the memory card The following file numbering options are available Setting the Time and Date The Date Menu This option is used to set the camera to the current date and time For more information see Tuto rial First Steps 42 File Names Files created by the camera have names of the form DSCNnnnn xxx wh...

Страница 160: ... only in User Sets 1 2 and 3 in User Set A and playback the monitor functions normally Review Only Monitor turns on only to display photographs im mediately after shooting Choose this option to save batteries Option Description Monitor On Monitor turns on automatically at start up photo graphs are displayed in monitor after shooting Preview Only Monitor turns on automatically at start up but photo...

Страница 161: ...or Brightness Increasing monitor brightness also increases the brightness of images dis played on a television set when the camera is connected to a television or VCR 178 Adjusting Monitor Tone The Hue Menu This option controls the hue tone of the monitor Press the multi selector up or down to alter hue by moving the arrow to the right of the display up or down Moving the arrow up gives the displa...

Страница 162: ...es what settings made with the camera buttons in User Set 1 2 or 3 remain in memory when the camera is turned off Any items that are not checked will be restored to default values settings when the camera is turned off Exposure compensation 0 MODE Exposure mode Programmed auto Option Setting affected Default Focus mode Autofocus To check an option or to remove the check from an option that has alr...

Страница 163: ...Func In User Sets 1 2 and 3 you can choose the func tion assigned to the button making it possible to select the User Set or adjust white balance and metering without accessing the camera menus or to adjust flash and focus mode without using the buttons on the back of the camera The follow ing options are available Flash mode can be set by pressing the button Focus mode can be set by pressing the ...

Страница 164: ...used to set the button to lock only one of focus or exposure Option Description AE L AF L Pressing the AE L AF L button locks both focus and ex posure AE L Pressing the AE L AF L button locks exposure only Focus is locked when shutter release button is pressed halfway AF L Pressing the AE L AF L button locks focus only Exposure is locked when shutter release button is pressed halfway ...

Страница 165: ...optical zoom position has no effect digital zoom can still be used while re cording movies 111 Fixed Aperture Normally aperture changes with the zoom posi tion If desired you can set the camera to main tain the f number selected in aperture priority or manual exposure modes as you zoom in or out Option Description Off Aperture changes as you zoom in or out On In aperture priority and manual exposu...

Страница 166: ...oe 192 Auto Built in Speedlight functions normally when no external flash accessories are attached When external flash acces sory is attached built in Speedlight emits low intensity pre flash immediately before main flash to help ensure correct exposure but flash lighting for photograph is pro vided by external flash only Flash mode for flash acces sory is set by pressing button 82 Flash mode se l...

Страница 167: ...ll fire to confirm shutter release even when the flash has been turned off We recommend that you turn shot confirmation off where use of a flash is prohibited for example in aquariums or museums To turn shot confirmation on select On in the Shot Confirm sub menu The default setting is Off Control panel Monitor Flash mode A Auto Flash Cancel off Auto with red eye reduction Anytime Flash fill flash ...

Страница 168: ...rding of photo information to the info txt file information about each image can still be viewed in the photo information display 162 info txt The info txt file gives the following information for each image recorded while On is selected in the info txt sub menu File number and type Camera type and firmware version Metering method Exposure mode Shutter speed Aperture Exposure compensation Focal le...

Страница 169: ...e information on 178 Connecting the camera to a TV or VCR Choosing a Language The Language Menu This option is used to choose the language in which camera menus and messages are displayed For more information see Tutorial First Steps 40 Option Description NTSC Use when connecting camera to NTSC devices PAL Use when connecting camera to PAL devices If the vid eo cable is connected to the camera at ...

Страница 170: ...ages from accidental deletion Select On to dis able all operations or menu options that delete or erase images including deletion with the button the Delete option in the playback menu and the CF Card Format option in the setup menus When Off is selected images can be de leted and memory cards formatted normally ...

Страница 171: ...back Menu Read this section for a description of the operations that can be performed in the playback menu Basic Playback This section covers playback operations that can be performed using the buttons on the back of the camera the multi selector and the command dial This section details the operations that can be performed when the mode selector is set to It is divided into the following three se...

Страница 172: ...nt photo A confirmation dialog will be displayed Press multi selector up or down to highlight option press to right to select Select No to exit without deleting photo Select Yes to delete photo When the mode selector is set to the camera enters playback mode with the most recent pho tograph displayed in the monitor This section cov ers the operations that can be performed in play back mode using t...

Страница 173: ...re displayed briefly at low resolution while being read from the memory card This makes it possible to scroll rap idly through the photographs in memory without waiting for each image to be displayed at full resolution To scroll quickly to a particular frame number without viewing the intervening photos press and hold the multi selector The photograph displayed will not change but the frame number...

Страница 174: ...ails a page at a time Delete selected image A confirmation dialog will be displayed Press multi selector up or down to highlight option press to right to select Select No to exit without deleting photo Select Yes to delete photo Viewing Multiple Images Thumbnail Playback Pressing the button in single image play back displays a menu of four thumbnail images where you can select photos or movies for...

Страница 175: ...mages dis played in single image playback Description To Use Press the multi selector to scroll to areas of the image not visible in the monitor View other areas of image Zoom increases each time button is pressed to a maximum of 6 0 While image is zoomed in icon and zoom ratio are displayed in up per left corner of monitor Zoom photo in ...

Страница 176: ...Page 3 Page 4 Page 5 Page 1 Page 1 1 Date of recording 2 Time of recording 3 Image size 4 Image quality 5 Folder 6 File number and type 7 Battery level indicator 8 Transfer icon 9 Print order icon 10 Protect icon 11 Current frame number total number of frames visible in current folder 1 Camera type 2 Firmware version 3 Metering method 4 Exposure mode 5 Shutter speed 6 Aperture 7 Exposure compensat...

Страница 177: ...zontal axis gives pixel brightness with dark tones to left and bright tones to right while vertical axis shows number of pixels of each brightness in image 3 File number and type 4 Exposure information metering method shutter speed aperture exposure compensation sensitivity Page 4 Exposure Information 1 File number and type 2 Focus information focal length aperture shutter speed focus mode or manu...

Страница 178: ...ayback When movie ends final frame is displayed for one second followed by a still image of the first frame Start resume playback When movie is paused pressing the multi se lector up or left rewinds the movie one frame Rewind movie one frame When movie is paused pressing the multi se lector down or right advances the movie one frame If the last frame of the movie is dis played pressing the multi s...

Страница 179: ...g images back one after the other in automatic slide shows You can also create a digital print order for printing photographs on any device compatible with the Digital Print Order Format DPOF and select images for transfer to a computer To view the playback menu Press MENU button to display playback menu Select 1 2 The playback menu contains the following options Option Delete Folders Slide Show P...

Страница 180: ...set transfer marking for all images 177 Before Deletion Once deleted images can not be recovered Be sure that any images you would like to keep have been transferred to your computer Hidden and Protected Images Images marked with a icon are protected and can not be selected for deletion Images hidden with the Hide Image 173 option are not dis played in the Delete Selected Images menu and can not b...

Страница 181: ...on Selected im ages are marked by icon Repeat steps 3 and 4 to select additional im ages for deletion To deselect image highlight and press multi selector up or down To exit without deleting im ages press MENU button Press to display a confirmation dialog Press multi selector up or down to high light option press to right to put choice into effect Select No to return to playback menu without delet...

Страница 182: ...ard Highlight All Images Confirmation dialog displayed Press multi selector up or down to highlight option press to right to put choice into effect Select No to return to playback menu without deleting images Select Yes to delete all images on memory card images that are pro tected or hidden will not be deleted 1 2 ...

Страница 183: ...folder To view images in all folders select All Folders Display most recent image in selected folder 1 2 Ultra HS Each series of one hundred photographs taken at a setting of Ultra HS 109 is stored in a separate folder with a name consisting of N_ followed by a three digit number assigned by the camera The Folders menu can be used to select the folder containing the images in each series for playb...

Страница 184: ...e Show Highlight Start Press multi selector to right to start slide show Images are displayed one by one in order recorded starting from oldest photo on card Movies will be played back as still images showing first frame of movie Auto Off If no operation is performed for more than half an hour during a slide show the monitor will turn off automatically to save power After the Slide Show Ends When ...

Страница 185: ...the desired setting and press the multi se lector to the right Frame Interval Owing to differences in the file size of the images in the slide show and the speed at which they can be read from the memory card the actual interval may differ from the value shown in the menu To Description Use Pause slide show Press the button to pause the slide show The dialog shown at right will be displayed To res...

Страница 186: ...view single image playback or from the delete sub menu Note however that protected images will be de leted when a memory card is formatted Highlight image Press multi selector up or down to se lect image Selected images are marked by icon Repeat steps 1 and 2 to select additional images To deselect image highlight and press multi selector up or down Press to complete operation To exit Protect menu...

Страница 187: ...ti selector up or down to se lect image Selected images are marked by icon Repeat steps 1 and 2 to select additional images To dese lect image highlight and press multi selector up or down Press to complete operation To exit Hide Image menu without changing hid den status of images press MENU button 1 2 3 ALL IMAGES ARE HIDDEN If all the images in the folder currently selected for playback are hid...

Страница 188: ...ry card in Digital Print Order Format DPOF Once a print order has been created the memory card can be removed from the camera and inserted in any DPOF compatible device be it your personal photo printer or a photofinisher s print system and images printed directly from the card Highlight image Press multi selector up to select image Selected images are marked by icon Cancelling the Print Order To ...

Страница 189: ... To highlight option press multi selector up or down To print shutter speed and aperture on all selected photographs highlight Info and press multi selector to right Check will appear in box next to item To print date of recording on all selected photographs highlight Date and press multi selector to right Check will appear in box next to item To deselect a checked item highlight and press multi s...

Страница 190: ...up or down to se lect image Selected images are marked by icon Repeat steps 1 and 2 to select additional images To deselect image highlight and press multi selector up or down Press to complete operation To exit Auto Transfer menu without changing transfer status of images press MENU but ton Selecting Images for Transfer Highlight Selected Photos in the Auto Transfer menu and press the multi selec...

Страница 191: ...ove transfer marking using the Delete Reset Transfer option see below mark a new batch of images for transfer and re peat the process until all images have been transferred Removing Transfer Marking from All Images To remove transfer marking from all images on the memory card select Reset Transfer from the Delete menu 166 Marking All Images for Transfer To mark all images for later transfer to a c...

Страница 192: ...is rotated to face the same direction as the lens or stowed face out on the camera body the image in the monitor will be inverted Television playback will not be affected Use an AC Adapter To prevent the display in the television from turning off whenever the camera enters sleep mode connect the camera to an EH 21 AC adapter battery charger available separately Note that camera settings and photo ...

Страница 193: ...a directly from the camera s memory card then delivered to a photofinisher or you can save copies to your hard disk and use your favorite imaging software to retouch images or print copies on a color printer This section describes how to connect your cam era to a computer running Nikon View 4 using the UC E1 Universal Serial Bus USB cable supplied with your camera Users whose computers are not equ...

Страница 194: ...g on where you purchased your camera the COOLPIX5000 comes with Canto Cumulus iView Media Pro or FotoStation Easy image database software See the reference CD for information on installing these applications If you will be using Cumulus or iView Media Pro remember to install the im age database software before installing Nikon View 4 If you will be using FotoStation Easy install Nikon View 4 first...

Страница 195: ...the installation instructions and install Nikon View 4 Once installation is complete double click the INDEX pdf icon in the root directory of the reference CD to view a clickable index of the documenta tion available for Nikon View 4 Follow the links to display the installation instructions for your computer system If desired you can print the instal lation instructions using the Print command in ...

Страница 196: ...y card from the camera and inserting it in a card reader or PC card slot Direct Connection Connecting Your Camera by Cable If your computer is equipped with a built in USB interface you can connect the camera and computer using the UC E1 USB cable provided with your cam era If your computer does not have a built in USB connection you can trans fer images using a card reader or PC card slot see fol...

Страница 197: ...Register the Camera with the System Windows The first time the camera is connected to a Windows computer the camera must be registered with the system so that the computer will know how to communicate with the camera If you are using Windows Millennium Edition Me or Windows 2000 Professional the computer will register the camera au tomatically the first time the camera is connected The files neede...

Страница 198: ...er Hot Plug The USB interface supports hot plug connection of peripheral devices This means that the camera can be on or off when you connect it to the computer If the camera is off when connected Nikon View 4 will not start until the cam era is turned on 5 Begin transfer Once the camera is connected and turned on Nikon View 4 will automati cally detect the camera and the Image Transfer window wil...

Страница 199: ...Click the Unplug or Eject Hardware icon in the taskbar and select Stop USB Disk from the menu that appears If this step is not per formed before the camera is disconnected or turned off a warning will be displayed Click OK to clear the warning from the screen Windows 98 Windows 98 Second Edition SE Double click the My Computer icon and select the removable disk corre sponding to the camera Open th...

Страница 200: ...f and reconnect the cable or replace the memory card When you turn the camera on Nikon View 4 will automatically detect the camera and restart Use a Reliable Power Source When transferring data between the camera and the computer we recommend that you use an EH 21 AC adapter battery charger available separately to ensure a reliable power supply If the camera is running on battery power be sure tha...

Страница 201: ...ory card into the card reader If Nikon View 4 is installed it will automatically detect cards from Nikon digital cameras See the Nikon View 4 Reference Manual 180 for in formation on transferring images to your computer CompactFlash Card Reader A CompactFlash CF card reader is a device that allows your computer to read memory cards of the type used in your camera CF card readers come in many varie...

Страница 202: ...e dis played Click OK to clear the warning from the screen Windows 98 Windows 98 Second Edition SE Double click the My Computer icon and select the removable disk correspond ing to the memory card Open the File menu and select Eject Macintosh Drag the untitled volume that represents the memory card into the Trash Using a PC Card Slot 1 Insert the memory card into a PC card adapter Insert the memor...

Страница 203: ...ptions and Resources This chapter provides tips on cleaning and storing your camera a list of optional accessories available for the COOLPIX5000 information on where to get help on line troubleshooting advice and cam era specifications ...

Страница 204: ...ass parts is to not touch them with your fingers Use a blower typically a small device with a rubber bulb attached to one end that you pump to produce a stream of air out the other to remove dust or lint To re move fingerprints or other stains that can not be removed with a blower wipe the lens or viewfinder with a soft cloth using a spiral motion that starts in the center of the lens and works ou...

Страница 205: ...ngle converter 0 68 TC E2 telephoto converter 2 TC E3ED telephoto converter 3 ES E28 slide copy adapter Battery pack MB E5000 battery pack Lens adapter rings UR E5 step down ring lens adapter for WC E68 wide angle converter UR E6 step down ring lens adapter for FC E8 TC E2 TC E3ED and ES E28 WC E24 and WC E63 Wide Angle Converters WC E24 and WC E63 wide angle converter lenses can not be used with ...

Страница 206: ... the monitor if the results are not satisfactory try zooming the camera in or adjusting the illuminating angle When a WC E68 wide angle converter lens is used with the camera zoomed all the way out the combined focal length is 19 mm 35 mm format equiva lent Use a wide panel for an illuminating angle wider than 19 mm Set the Speedlight flash mode to TTL At this setting the external Speedlight will ...

Страница 207: ...uitry of the camera or flash Before using a Nikon Speedlight not included in the list on the opposite page contact a Nikon authorized service representative for more information Approved Memory Cards In addition to CompactFlash memory cards in the EC CF series the follow ing memory cards have been tested and approved for use in the COOLPIX5000 CompactFlash memory cards SanDisk SDCFB series 16 MB 3...

Страница 208: ...1 AC adapter battery charger available separately is not properly connected Camera is in sleep mode Press shutter release button halfway 12 34 39 143 Monitor is blank Monitor is off Press MONITOR button to turn monitor on PAL is selected in Video Mode menu and audio video cable is connected 18 178 No indicators appear in monitor Indicators are hidden Press MONITOR button until indicators are displ...

Страница 209: ... too bright overexposed Exposure compensation is too high Shutter speed indicator in monitor blinks shut ter speed too slow Aperture indicator in monitor blinks f num ber too low 85 92 93 Photos are too dark underexposed Flash is off Flash window is blocked Subject is outside range of flash Exposure compensation is too low Shutter speed indicator in monitor blinks shut ter speed too fast Aperture ...

Страница 210: ...e 100 Shutter speed too slow If making a long time exposure of 1 15 s or longer turn noise reduc tion on Clear Image Mode is not selected select Clear Image Mode 96 128 128 Flash does not fire Flash is off Note that built in Speedlight turns off automatically when Focus is set to infinity A setting other than Single is selected for CONTINUOUS User Set 1 2 3 The Best Shot Selector BSS is on User Se...

Страница 211: ...w 4 does not start when camera connected or memory card insert ed in card reader or card slot Camera is off EH 21 AC adapter battery charger available separately is not properly connected or bat tery is dead Interface cable not correctly connected or card not properly inserted in card reader card adapter or card slot See Nikon View 4 Reference Manual for further information on troubleshooting Niko...

Страница 212: ...irm that memory card is correctly insert ed 193 THIS CARD CANNOT BE USED Error accessing memory card Use approved memo ry card Check that connec tors are clean If card is damaged contact retailer or Nikon repre sentative 37 CARD IS NOT FORMATTED FORMAT NO Memory card has not been formatted for use in COOLPIX5000 Press multi selector up to highlight FORMAT and press to right to format card or turn ...

Страница 213: ...ew contains no images To play images back select folder containing images from Folders menu 141 169 173 ALL IMAGES ARE HIDDEN All images in current folder are hidden Select another folder or use Hide Image to change hidden status of images in current folder Display Problem Solution 37 166 FILE CONTAINS NO IMAGE DATA File created by comput er or different make of camera Delete file or reformat memo...

Страница 214: ...f unplug optional AC adapter if using remove and re insert battery and turn camera on If error per sists contact retailer or Nikon representative The letters appear in the control panel when a system error has occurred PRINT Image Matching The COOLPIX5000 supports PRINT Image Matching PIM technology devel oped by Epson Photographs taken with the COOLPIX5000 include additional information which ens...

Страница 215: ...lection Five area multi AF and spot AF available Frame coverage Approximately 97 through freeze image 1 8 110 000 dot low temperature polysilicon TFT LCD with brightness and hue adjustment Monitor 2 3 high density CCD total pixels 5 24 million Image size pixels 2560 1920 Full 2560 1704 3 2 1600 1200 UXGA 1280 960 SXGA 1024 768 XGA 640 480 VGA CCD 3 Zoom Nikkor f number f 2 8 f 4 8 Lens Focal lengt...

Страница 216: ...osure compensation 2 0 2 0 EV in steps of 1 3 EV autoexposure bracketing Metering Four mode through the lens TTL metering 256 segment matrix Center weighted Spot AF spot Range ISO 100 equivalent W 2 0 18 0 EV T 0 5 17 0 EV Speed 1 1 4000 s programmed auto 8 1 2000 s shutter priority auto 8 1 4000 s aperture priority auto Bulb up to 5 min and 8 1 2000 s manual expo sure mode Mechanical and charge c...

Страница 217: ... USB Power sources One rechargeable Nikon EN EL1 lithium ion battery supplied or six volt 2CR5 DL245 lith ium battery available separately MB E5000 battery pack available separately with six LR6 AA alkaline lithium NiCad or NiMH batteries EH 21 AC adapter battery charger available separately Operating Environment Temperature 0 40 C 32 104 F Humidity Less than 85 no condensation Dimensions W H D 10...

Страница 218: ... 15 MB required for installation with additional amount equivalent to twice the capacity of the camera memory card required when Nikon View 4 is running System requirements Nikon View 4 Windows CPU MMX Pentium or better RAM 64 MB 128 MB or more recommended Video resolution 640 480 with High Color 800 600 with True Color recommended Miscellaneous CD ROM drive required for installation Hard disk spa...

Страница 219: ...ovies Audio Visual See television playback AUTO See flash mode sensitivity AUTO BRACKETING 124 126 Autoexposure bracketing 125 lock 118 See also AE Lock Autofocus 78 continuous 121 single 121 Autofocus lamp See lamp green Auto Focus Mode 121 Auto Off 143 Auto Transfer 176 177 A V OUT See television playback B BASIC 73 Battery v 34 35 39 life 203 improving 51 146 MB E5000 5 35 191 203 storing v BES...

Страница 220: ...ay Mode 146 Distance Units 122 DPOF 64 E E mail taking photographs for 65 200 Error messages 198 200 Exposure compensation 85 86 118 119 Exposure count display 46 Exposure information See photo informa tion Exposure metering See METERING Exposure mode 89 95 aperture priority auto 92 manual 94 95 programmed auto 91 flexible program 91 shutter priority auto 93 EXPOSURE OPTIONS 118 119 F Files See im...

Страница 221: ...71 and transfer time 65 INF See focus mode manual focus Infinity See focus mode manual focus info txt 154 Information See photo information ISO See sensitivity ISO button 16 iView Media Pro 63 180 J JPG See image files JPEG See image quality L Lamp green 8 52 Lamp red 8 52 Language 40 41 LENS 116 Lens cap 33 Lens converter 191 Lens adapter ring 191 Long time exposure 95 M See exposure mode manual ...

Страница 222: ...2 64 Print Set 174 175 Programmed auto exposure See exposure mode Protect 172 Q Quality See image quality button 19 Quick review 57 60 full screen 58 thumbnail 60 QuickTime See movies QVGA See CONTINUOUS R Red eye reduction See flash mode RESET ALL 130 131 Reset Print 166 174 Reset Transfer 166 177 Retouch photo 62 See also IMAGE AD JUSTMENT IMAGE SHARPENING SATURATION CONTROL S See exposure mode ...

Страница 223: ... for 176 Troubleshooting 194 197 U Ultra HS See CONTINUOUS folders USB 182 186 See also transfer User Set 14 88 1 2 3 88 135 A 14 49 134 saving user settings 88 selecting 88 USER SETTING 26 28 UXGA 75 V Variable Power 152 VCR See television playback VGA 75 Video Mode 155 178 Viewfinder 8 47 focusing 52 framing photographs in 51 W W See zoom indicator See zoom button WB BKT See white balance bracke...

Отзывы: