background image

156

CUST

OM SETTINGS 

AND O

THER MENUS—CUST

OM SETTINGS

A

200

NORM

OFF
OFF

White Bal
ISO

Image Quality

Assign FUNC
AF Area Mode
File No. Seq.
Command Lock

SHOOTING MENU

0
1
2
3
4

A

ON
OFF
OFF

OFF

5
6

N

Bank Select
Image Review
EV Step
BKT Order
AF Activation
Anti-mirror
Focus Area

CSM MENU

Custom Settings

Your Nikon digital camera is equipped with a menu of custom settings (Custom
Settings 0–35), which can be used to customize many aspects of camera operation.
The Custom Settings Menu can be used when the camera is in single-frame, continu-
ous, self-timer or PC mode.

Choosing a Custom Settings Bank

Before adjusting custom settings, choose the settings bank that will be used to store
the changes.  The camera can store settings in “banks” that can be recalled at any
time, allowing you to create up to four combinations of settings for common tasks or
shooting situations and recall them quickly as desired.

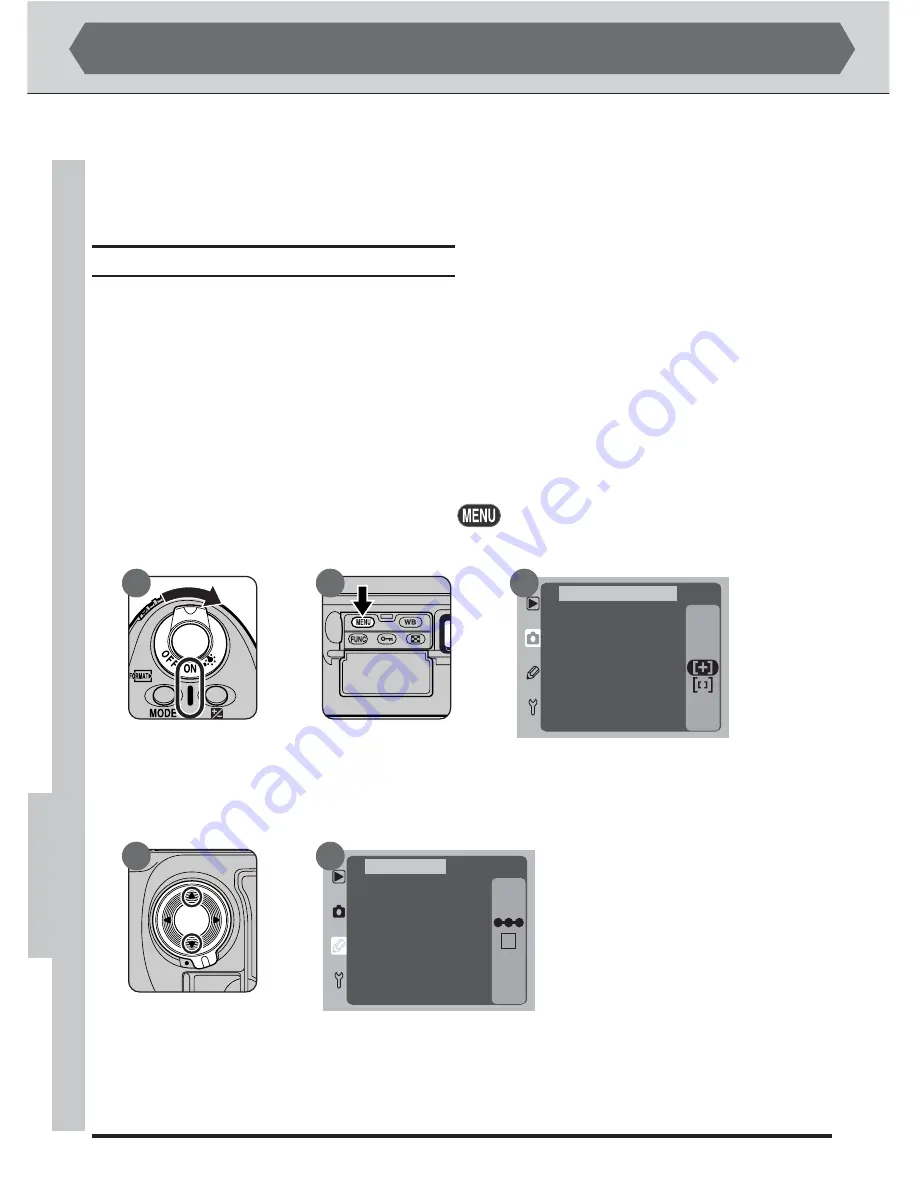
By default, any changes to custom settings are saved in Bank A.  To select another
settings bank:

1

Display the camera menus

Turn the camera on (A) and press the 

 button (B).  The menu for the current

operating mode will be displayed in the monitor (C).

A

B

C

A

B

2

Display the CSM MENU

Unlock the multi selector and press it up or down (A) until the custom settings
menu is displayed (B).

Содержание 25203 - D1H Digital Camera SLR

Страница 1: ...En User s Manual ...

Страница 2: ...l pp 19 50 This section provides sufficient information to master simple point and shoot photography After reading this section you should know enough about your camera to enjoy the simplicity and immediacy of digital photography Reference pp 51 154 Like the tutorial the reference section covers the steps involved in shooting and playback in the order most commonly followed when taking photographs...

Страница 3: ...ccessories pp 198 207 Troubleshooting pp 208 211 Specifications pp 212 219 Index pp 220 223 Custom Settings pp 156 185 Other Camera Menus pp 186 191 Advanced Photography pp 52 119 ConnectingYour Camera to a Computer pp 148 154 ForYour Safety iv v Caring for the Camera and Battery vi vii Notices iii xi Table of Contents xii xiv Playback pp 120 147 ...

Страница 4: ...ment or from the AC adapter available separately unplug the AC adapter and remove the batteries immediately taking care to avoid burns Continued operation could result in injury After removing the batteries take the equipment to a Nikon authorized service center for inspection Do not use in the presence of flammable gas Do not use electronic equipment in the presence of flammable gas as this could...

Страница 5: ... use only the cables provided or sold by Nikon for the purpose to maintain compliance with product regulations Keep out of reach of children Particular care should be taken to prevent infants from putting batteries or other small parts into their mouths Removing memory cards Memory cards may become hot during use Observe due caution when removing memory cards from the camera CD ROMs The CD ROMs on...

Страница 6: ...tch deform or tear the curtain Cleaning When cleaning the camera body use a blower to remove dust and lint then wipe gently with a soft dry cloth After using your camera at the beach or seaside wipe off any sand or salt using a cloth lightly dampened with pure water and then dry your camera thoroughly In rare instances static electricity produced by a brush or cloth may cause the LCD displays to l...

Страница 7: ...hould the monitor break care should be taken to avoid injury due to broken glass and to prevent the liquid crystal from the monitor touching the skin or entering the eyes or mouth Replace the monitor cover when transporting the camera or leaving it unattended Do not touch the battery terminals with other metal objects Keep the battery terminals clean Turn the product off before removing the batter...

Страница 8: ...ld liable for any damages resulting from the use of this prod uct While every effort has been made to ensure that the information in these manu als is accurate and complete we would appreciate it were you to bring any errors or omissions to the attention of the Nikon representative in your area address provided separately Notice for customers in Canada CAUTION This class B digital apparatus meets ...

Страница 9: ...nce to radio or televi sion reception which can be determined by turning the equipment off and on the user is encouraged to try to correct the interference by one or more of the follow ing measures Reorient or relocate the receiving antenna Increase the separation between the equipment and receiver Connect the equipment into an outlet on a circuit different from that to which the receiver is conne...

Страница 10: ...or reproduction of stamps issued by the government and of certi fied documents stipulated by law is prohibited Cautions on certain copies and reproductions The government has issued cautions on copies or reproductions of securities issued by private companies shares bills checks gift certificates etc commuter passes or coupon tickets except when a minimum of necessary copies are to be provided for...

Страница 11: ...of Interna tional Business Machines Corporation PowerPC is a trademark of International Business Machines Corporation used under license Microsoft is a registered trade mark and Windows MS Windows and Windows NT trademarks of Microsoft Cor poration Pentium is a trademark of Intel Corporation CompactFlash is a trade mark of SanDisk corporation All other trade names mentioned in this manual or the o...

Страница 12: ...s 24 Step 3 Inserting a Memory Card 26 Step 4 Choosing a Language 28 Step 5 Setting theTime and Date 30 Taking Photographs 32 Step 0 BeforeYou Begin 34 Step 1 Adjusting Camera Settings 36 Step 2 Framing a Photograph 43 Step 3 Focusing 44 Step 4 Checking Exposure 46 Step 5 Shooting 47 Step 6 Checking the Results 48 Reference 51 Advanced Photography 52 Shooting Modes 52 Image Quality 56 Sensitivity ...

Страница 13: ...Depth of Field Preview 106 Focal Plane Position 107 Through the Lens Flash Photography 108 Flash Contacts and Indicators 109 Flash Sync Modes 110 Compatible Speedlights 112 The FUNC Button 116 Sequential File Numbering 117 Taking Photographs with GPS 118 Playback 120 Playback Options 120 Basic Playback 122 Playback Menu Options 134 Setup Menu Options 143 Television Playback 146 Connecting to a Com...

Страница 14: ...tings and Other Menus 155 Custom Settings 156 Other Camera Menus 186 Technical Notes 193 Caring forYour Camera 194 Optional Accessories 198 Troubleshooting 208 Specifications 212 Index 220 Table of Contents continued ...

Страница 15: ...D AboutThis Section This section describes the symbols and conventions used in this manual and provides a guide to the names and functions of camera controls and icons Overview pp 2 3 Getting to Know the Camera pp 4 18 ...

Страница 16: ...ficing image quality ServicingYour Camera and Accessories Your camera is a precision machine and requires regular servicing We recommend that you have your camera inspected by your retailer or Nikon service representative once every one to two years and that you have it serviced once every three to five years note that fees are charged for these services Frequent inspection and servicing are parti...

Страница 17: ...ns for example at weddings or before taking the camera on a trip take a test shot to ensure that the camera is functioning normally Nikon will not be held liable for costs or lost profits that may result from product malfunction Life Long Learning As part of Nikon s Life Long Learning commitment to ongoing product support and educa tion continually updated information is available on line at the f...

Страница 18: ...ING STARTED GETTING TO KNOW THE CAMERA Getting to Know the Camera Take a few moments to familiarize yourself with camera controls Camera Body 1 2 3 4 5 6 7 8 9 10 11 12 13 25 24 23 22 21 20 19 18 17 16 15 14 ...

Страница 19: ...Auto bracketing button pg 100 217 11 Flash sync mode button pg 110 12 Sensitivity button pg 62 13 Accessory shoe pg 109 14 Depth of field preview button pg 106 15 Sub command dial pg 14 16 Power switch pg 23 17 Shutter release button pp 44 47 78 18 Exposure mode button pp 84 93 Format button pg 27 19 Exposure compensation button pg 98 217 20 Eyelet for camera strap pg 12 21 Top control panel pg 8 ...

Страница 20: ...6 GETTING STARTED GETTING TO KNOW THE CAMERA Getting to Know the Camera continued Camera Body continued FUNC MENU 38 39 40 41 42 37 43 36 35 34 33 32 31 30 29 28 27 26 47 48 49 50 51 46 45 44 ...

Страница 21: ... vertical shooting pg 43 49 Main command dial vertical shooting pg 14 50 AF start AF ON button vertical shooting pg 72 51 Tripod socket 26 Eyepiece shutter lever pg 103 27 Delete Format button pg 27 129 28 Monitor button pg 120 123 29 LCD monitor pg vii 17 120 30 Battery pack latch pg 22 31 MENU button pg 17 32 FUNC button pg 18 116 33 Protect button pg 132 34 Thumbnail button pg 122 35 White bala...

Страница 22: ...8 GETTING STARTED GETTING TO KNOW THE CAMERA Getting to Know the Camera continued The Rear Control Panel TheTop Control Panel 1 5 6 7 8 2 3 4 1 2 3 4 5 6 7 8 9 10 11 12 13 14 15 16 17 18 ...

Страница 23: ...indicator pg 217 3 Clock battery indicator pg 31 4 Exposure compensation indicator pg 98 5 Bracketing indicator pg 100 6 Exposure mode pp 84 93 7 Flexible program indicator pg 85 8 Flash sync mode pg 110 9 Electronic analog exposure display pg 92 Exposure compensation pg 98 10 Day indicator pg 217 GPS signal indicator pg 118 5 Sensitivity indicator pg 62 6 Memory card indicator pg 34 7 White balan...

Страница 24: ...10 GETTING STARTED GETTING TO KNOW THE CAMERA Getting to Know the Camera continued TheViewfinder Display 1 2 3 4 5 6 7 8 14 13 12 11 10 9 ...

Страница 25: ...xposure compensation pg 98 14 Frame counter pg 34 Exposures remaining in buffer pg 53 Exposure compensation value pg 98 1 12 mm 0 47 reference circle for center weighted metering pg 83 2 Focus brackets focus areas pg 73 Spot metering targets pg 83 3 Focus indicator pg 45 4 Shutter speed lock pg 94 5 Aperture lock pg 94 6 Exposure mode pp 84 93 7 Exposure compensation indicator pg 98 8 Flash ready ...

Страница 26: ...securely to the two eyelets on the camera body as shown below Getting to Know the Camera continued The camera strap contains leather which may fade if abraded or left in contact with a damp object for an extended period NikonView 5 CD Reference CD contains NikonView 5 Reference Manual D1H User s Manual this manual CD ROM C D R O M C D R O M C D R O M C D R O M CD ROM C D R O M C D R O M C D R O M ...

Страница 27: ...a shake or to appear in photographs you take yourself pg 52 C Continuous Photographs are taken one after the other while the shutter release button is held down pg 52 S Single frame The camera takes one photograph each time the shutter release button is pressed pg 120 PLAY Playback This mode is used when viewing and deleting photographs stored on the camera s memory card pg 148 PC PC mode This mod...

Страница 28: ...of the camera to adjust a variety of settings For ease of access when taking photographs in tall portrait orientation a dial that duplicates the functions of the main command dial has been placed close to the shutter release button for portrait orientation photographs WHITE BALANCE SENSITIVITY Getting to Know the Camera continued ISO button Auto bracketing button Flash sync mode button FUNC button...

Страница 29: ...ose an aperture aperture priority auto or manual expo sure mode Set or cancel auto bracketing Choose the number of expo sures and exposure compensa tion for auto bracketing Choose the exposure mode Choose a value for exposure compensation rotate and view EXPOSURE Set the flash sync mode when using optional Nikon Speedlight FLASH press MODE pp 84 93 pg 85 pg 86 pg 90 pg 88 pg 90 pg 100 pg 100 pg 98...

Страница 30: ...lay a new sub menu of options Operation Using the Multi Selector Press the multi selector up down left or right to perform the following operations Choose the focus area To select any of the five focus areas press the multi selector up down left or right Highlight thumbnails To highlight a thumbnail in the thumbnail display or in a thumbnail menu press the multi selector up down left or right Retu...

Страница 31: ... Exiting from the Menu In single frame continuous self timer and PC modes pressing the shutter release button halfway clears the menu from the screen and focuses the camera readying it for the next shot The menu can be cleared from the screen in all modes by pressing the button or turning the camera off and then on again When the camera is in playback mode the menu can also be cleared from the scr...

Страница 32: ...ENU Format Language Video Output Date GPS Input LCD Brightness Monitor Off If you have already highlighted an item in the menu press the multi selector to the left so that no item is highlighted and then select another menu as described above Making a Selection Press the multi selector up or down to highlight a menu item then press the selector to the right If more options are available for the se...

Страница 33: ...9 TUTORIAL AboutThis Section In this section you will learn how to set up your camera for use and master the basics of simple point and shoot photography First Steps pp 20 31 Taking Photographs pp 32 50 ...

Страница 34: ...ormation on the topics covered in this section may be found in the chapters Custom Settings and Other Menus and Technical Notes TUTORIAL FIRST STEPS Inserting a Battery pp 22 23 STEP 1 Attaching a Lens pp 24 25 STEP 2 Inserting a Memory Card pp 26 27 STEP 3 Choosing a Language pp 28 29 STEP 4 Setting the Time and Date pp 30 31 STEP 5 ...

Страница 35: ...pecifications pp 212 219 Custom Settings and Other Menus pp 155 191 Technical Notes Optional Accessories pp 198 207 Technical Notes Optional Accessories pp 198 207 Caring for the Camera and Battery vi vii Technical Notes Optional Accessories pp 198 207 ...

Страница 36: ...t ninety minutes using the MH 16 Quick Charger available separately 1 2 Insert the battery pack Turn the camera off before inserting or removing the battery pack A Open the battery pack latch B and insert the battery pack into the camera C Removing Battery Packs To remove the battery pack from the camera unlatch the battery pack and slide it out Do not remove the battery without first turning the ...

Страница 37: ...tery performance has dropped due to repeated use and recharging No photographs can be taken until the battery has been replaced with a fully charged spare battery pack A B Auto Power Off If no operations are performed for about six seconds all indicators in the viewfinder and rear control panel will turn off together with the shutter speed and aperture displays in the control panel on top of the c...

Страница 38: ...lenses STEP 2 A B 2 1 Attach a lens to the camera body Turn the camera off before attaching or removing lenses A Keeping the mounting mark on the lens aligned with the mounting mark on the cam era body position the lens in the camera s bayonet mount and then being careful not to press the lens release button rotate the lens counter clock wise until it locks into place B If no lens is attached or i...

Страница 39: ...ou will not need to perform this step if you are using a type G lens type G lenses are not equipped with an aperture ring If you are using another type of lens set the lens aperture to the highest f number minimum aperture If you do not intend to set aperture manually with the lens aperture ring lock aperture at this setting B If the lens is not set to the minimum aperture when the camera is turne...

Страница 40: ...cover release button B1 and press the card slot cover release button B2 to open the card slot B3 Do not attempt to insert the memory card upside down or back to front or use force when inserting the card Failure to observe these precautions could damage the camera or card For more information on pg 203 Approved memory cards STEP 3 A 3 2 Insert the memory card Slide the memory card into the card sl...

Страница 41: ...eep STEP 3 A B B C When formatting is complete the frame number display in the control panel on top of the camera will show 1 and the maximum number of shots that can be stored on the card at current settings will be shown in both control panels if more than a hundred exposures can be stored on the card the display will show FL Removing the Memory Card Memory cards can be removed without loss of d...

Страница 42: ...splayed in the monitor C 4 2 Display the SETUP menu Unlock the multi selector and press it up or down A until the SETUP menu is displayed B 4 3 Highlight Language Press the multi selector to the right to enter the SETUP menu then press the multi selector down until the second item from the top is highlighted de pending on the language currently selected the second item from the top will include th...

Страница 43: ...to display the Language menu then press the multi selector up or down until the desired language is highlighted Press the multi selector to the right to put your choice into effect and return to the SETUP menu STEP 4 OK De En Fr Es Language English Deutsch Français Español SET UP MENU ...

Страница 44: ...SC En OFF 2 Format Language Video Output GPS Input LCD Brightness Monitor Off SET UP MENU Date 5 2 Display the SETUP menu Unlock the multi selector and press it up or down A until the setup menu is displayed B 5 3 Display the Date menu Press the multi selector to the right to enter the setup menu then press the multi selector up or down to highlight Date Press the multi selector to the right to di...

Страница 45: ... by an independent battery with a life of about ten years When no charge remains the clock battery indicator will appear in the control panel on top of the camera This will not affect camera operation but the correct time and date will no longer be displayed Take the camera to a Nikon authorized service center where the battery can be replaced for a fee The time and date can also be set using the ...

Страница 46: ...ady to take photographs This section describes how to take photographs using autofocus and programmed auto exposure for point and shoot photography that produces optimal results in most situations with no delay between shots to adjust camera settings Additional infor mation is available in the Reference section as shown in the following chart TUTORIAL TAKING PHOTOGRAPHS Checking the Results pp 48 ...

Страница 47: ...70 81 Metering pp 82 83 Exposure pp 84 102 Depth of Field Preview pg 106 Technical Notes Optional Accessories pp 198 207 Focus pp 70 81 Depth of Field Preview pg 106 Focal Plane Position pg 107 Metering pp 82 83 Exposure pp 84 102 Self Timer Modes pg 103 Playback Options pp 120 121 Basic Playback pp 122 133 Playback Menu Options pp 134 142 ...

Страница 48: ...d in Step 1 of First Steps pg 36 A B STEP 0 0 2 Check the number of exposures remaining The number of photographs that can be stored on the memory card at cur rent settings is shown in the top When this number reaches zero the Cd card indicator in the viewfinder and the CARD icons in the top and rear control panels will blink Before you will be able to take more photographs you will need to delete...

Страница 49: ... memory card The frame count returns to 1 when a new folder is created 35 Rear Control Panel Display pg 183 When Frame Count is selected for Custom Setting 35 the number of exposures remaining will also be shown in the rear control panel STEP 0 0 3 Adjust viewfinder diopter Your Nikon camera is equipped with diopter ad justment to accommodate individual differences in vision To adjust viewfinder d...

Страница 50: ...is mode the camera will take a single photograph each time the shutter release button is pressed STEP 1 1 2 Choose an image quality and format pp 56 61 This section describes how to take color photographs at an image quality of JPEG Normal which provides the best trade off between file size and im age quality The Assign FUNC Menu pg 116 When Qual is selected in the Assign FUNC menu image quality c...

Страница 51: ...he multi selector to the right to display the Image Quality menu E Highlight JPEG Normal H and press the multi selector to the right to put your choice into effect and return to the Image Quality menu I D E F H I Color Quality Image Quality NORM SHOOTING MENU White Bal ISO Image Quality Assign FUNC AF Area Mode File No Seq Command Lock A 200 NORM OFF OFF SHOOTING MENU Color Quality Image Quality N...

Страница 52: ...ent to ISO 200 A B Highlight Color L and press the multi selector to the right to put your choice into effect and return to the Image Quality menu M Press the button to return to the shooting menu Repeat C D to display the Image Quality menu then highlight Color J and press the multi selector to the right to display the Color menu K Color Quality Image Quality NORM SHOOTING MENU Color Quality Imag...

Страница 53: ...te balance to produce good results for most common light sources A B C 1 5 Choose a focus mode pp 70 71 Turn the focus mode selector until it clicks into place pointing to S single servo autofocus The camera will automatically focus on the subject in the se lected focus area when the shutter release button is pressed halfway Photographs can only be taken when the camera is in focus Do not attempt ...

Страница 54: ... Area Mode Dynamic Area AF Single Area AF SHOOTING MENU A 200 NORM OFF OFF White Bal ISO Image Quality Assign FUNC AF Area Mode File No Seq Command Lock SHOOTING MENU A A 200 NORM OFF OFF White Bal ISO Image Quality Assign FUNC AF Area Mode File No Seq Command Lock SHOOTING MENU B D E A 200 NORM OFF OFF White Bal ISO Image Quality Assign FUNC AF Area Mode File No Seq Command Lock SHOOTING MENU OK ...

Страница 55: ...e a metering method pp 82 83 Keeping the metering selector lock release held down A 1 turn the meter ing selector to matrix metering A 2 The matrix metering indicator will appear in the viewfinder B Matrix metering uses information from all areas of the frame to determine exposure producing the best possible exposure for the entire frame A B The Assign FUNC Menu pg 116 When AFArea is selected in t...

Страница 56: ... Exposure is set according to the camera s exposure program A B C Non CPU Lenses Programmed auto exposure is only available when a CPU lens is used When a non CPU lens is mounted on the camera the exposure mode will automatically be set to aperture priority auto The exposure mode indicator in the top control panel will show a flashing the expo sure mode indicator in the viewfinder Aperture will be...

Страница 57: ... other and your upper body in a stable position A B Avoid taking photographs with the camera focused on the sun or other strong light source Intense light may cause deterioration in the charge coupled device CCD that the camera uses in place of film It may also produce a white blur effect in the final photograph Shutter Speed and Camera Shake To prevent blurring caused by camera shake the shutter ...

Страница 58: ...using In single servo AF the camera focuses on the subject in the selected focus area when the shutter release button is pressed halfway Center the focus brackets on your subject A and press the shutter release button halfway B A B STEP 3 ...

Страница 59: ...larger than the scene visible through the viewfinder For more information on pg 73 Focus area selection pg 78 Focus lock pg 104 Viewfinder diopter STEP 3 Meaning The camera is focused on an area between camera and subject The subject is in focus The camera is focused on an area behind the subject The focus indicator flashes to warn that the camera is unable to focus using autofocus For more inform...

Страница 60: ...under exposed one of the following indicators will appear in the viewfinder and in the control panel on top of the camera 2 EV Steps for Exposure Control pg 161 By default aperture and shutter speed are shown in the smallest possible increments Use Custom Setting 2 to change the size of the increments used when displaying aperture shutter speed and exposure compensation Indicator Lo HI STEP 4 Mean...

Страница 61: ... in these circumstances could result in loss of data Your camera is equipped with a combined electronic CCD and mechanical shutter This shutter operates on a different principle from the mechanical shutters found in film cameras As a result the interval between the sounds made by the shutter and mirror will not decrease past a certain point even at high shutter speeds 1 Image Review pg 161 Using t...

Страница 62: ...ed when you next turn the monitor on 18 Monitor Off Delay pg 170 By default the monitor will turn off automatically to save power if no operations are performed for twenty seconds Custom Setting 18 can be used to adjust the length of time before the monitor turns off automatically If the memory card contains no photographs the message No image in cur rent folder will be displayed Press the button ...

Страница 63: ...card contains multiple images you may find it convenient to select the image you wish to view from a menu of thumbnail images rather than scroll ing through the photos one frame at a time Turn the main command dial while holding down the button to cycle through views as follows single frame four thumbnail display nine thumbnail display single frame A B For approximately two seconds after you press...

Страница 64: ...ted photograph untouched A Delete Images YES B 6 6 Return to shooting mode Pressing the button at any time during review turns the monitor off and returns the camera to shooting mode Pressing the shutter release button halfway also turns the monitor off and readying it for the next shot STEP 6 6 Checking the Results continued 6 4 View photo information on the selected photograph To view photo info...

Страница 65: ...FERENCE AboutThis Section This section covers details of photography playback and connecting your camera to a com puter Advanced Photography pp 52 119 Playback pp 120 147 Connecting to a Computer pp 148 154 ...

Страница 66: ...a temporary memory buffer which can hold a maximum of forty photographs Additional photographs can be taken as soon as suf ficient memory is available in the buffer A maximum of forty photo graphs or twenty seven images at an image quality setting of RAW can be taken before the buffer fills Self timer Use this mode to reduce blurring caused by camera shake or to appear in photographs you take your...

Страница 67: ...fer fills is displayed in the control panel on top of the camera This indicator shows forty when the buffer is empty and is reduced by one for each photograph in the buffer Note that depending on the amount of memory remaining on the memory card the maximum number of photographs that can be taken in a single sequence may be less than forty In single frame mode this indicator shows the number of ex...

Страница 68: ...e lost If the battery is exhausted while photo graphs are being shot in continuous mode the shutter release will be disabled and all photo graphs in the buffer will be recorded to the memory card The length of time required to record photographs to a Nikon EC 96CF 96 MB CompactFlash card is shown in the following table Shooting Modes continued The rate at which images are recorded varies with the ...

Страница 69: ...be adjusted using Custom Setting 25 26 C Mode Max Shots pg 176 Using Custom Setting 26 the maximum number of shots that can be taken in a single sequence in continuous mode can be set to any value between one and forty or between one and twenty seven in RAW mode ADVANCED PHOTOGRAPHY SHOOTING MODES ...

Страница 70: ...the amount photographs will be compressed Four options are available High JPEG Fine JPEG Normal and JPEG Basic Selecting High gives you a further choice of two or depending on the option selected in Custom Setting 28 three file formats YCbCr TIFF RGB TIFF and RAW Choosing the Compression Ratio Highlighting Quality in the image quality menu and pressing the multi selector to the right displays a me...

Страница 71: ...tion than RGB and has the same quality but occupies less space Use YCbCr if seeking the best combination of high quality and lowest file size in an uncompressed finished file This file type can be viewed using NikonView 5 or Nikon Capture 3 JPEG Fine Images are JPEG compressed at a ratio of approximately 1 4 JPEG Normal Images are JPEG compressed at a ratio of approximately 1 8 JPEG Basic Images a...

Страница 72: ...mages that can be recorded to the memory card The Color menu is not available at a setting of High NEF RAW Once you have chosen the image type pressing the multi selector to the right will return you to the Image Quality menu Understanding the Image Quality Display The current image quality setting is displayed in the rear control panel as shown at right An image qual ity setting of JPEG Normal is...

Страница 73: ... and hence number of images that can be stored on the memory card JPEG compressed image will depend on the particular subject and composition In general the more detail present in an image the larger the resulting JPEG file Compressed fifty to sixty percent over RAW uncompressed Although the number of exposures remaining shown in the control panels is the same as for RAW uncompressed images are co...

Страница 74: ...e rear control panel C A ADVANCED PHOTOGRAPHY IMAGE QUALITY For more information on pg 116 The Assign FUNC sub menu pg 8 The rear control panel display image quality B C A B C 2Pressing the button rotate the sub command dial until the desired combi nation of file format High image quality only and image type is shown in the rear control panel As the main command dial is rotated settings will chang...

Страница 75: ... with cameras in the D1 series are saved as image files with a file name of the form DSC_nnnn xxx where nnnn is a four digit number from 0001 to 9999 assigned auto matically by the camera and xxx is a three letter extension NEF for RAW images TIF for RGB TIFF or YCbCr TIFF and JPG for JPEG images created at settings of JPEG Fine JPEG Normal or JPEG Basic 28 NEF RAW Image Save pg 178 A setting of R...

Страница 76: ... PHOTOGRAPHY SENSITIVITY ISO EQUIVALENCY OK ISO 200 250 320 400 500 SHOOTING MENU A B As the main command dial is rotated settings will change in the order shown below For more information on pg 188 The shooting menu Adjusting Sensitivity from the Shooting Menu Sensitivity can also be set to ISO equivalents of approximately ISO 200 to ISO 1600 using the ISO option in the shooting menu In the shoot...

Страница 77: ...aised by roughly one step 1 EV over ISO 1600 If possible the current value for sensitivity is maintained when a new ISO step value is selected If the value currently selected for sensitivity is not available at the new ISO step value sensitivity will be rounded up to the nearest available setting 31 ISO Boost pg 180 Sensitivity can be raised by roughly one or two steps over ISO 1600 equivalent If ...

Страница 78: ...in command dial is rotated settings will change in the order shown below A PRE A Auto Incandescent Fluorescent Direct sunlight Flash Cloudy Shade PRE Preset Setting 4 200 7 000 K approx 3 000 K approx 4 200 K approx 5 200 K approx 5 400 K approx 6 000 K approx 8 000 K approx Color temp White balance adjustment based on color tempera ture information from a 1 005 pixel CCD sensor Use when taking ph...

Страница 79: ...the light source White Balance Measurements White balance measurements are performed using a through the lens metering system Even if the subject and camera are under different lighting the camera will be able to adjust white balance to suit the subject when auto or preset white balance is used ColorTemperature The perceived color of a light source varies with the viewer and other conditions Color...

Страница 80: ...trol panel display AdjustingWhite Balance from the Shooting Menu White balance can adjusted using the White Bal option in the shooting menu In the shooting menu highlight White Bal and press the multi selector to the right to display the white balance menu Press the multi selector up or down to highlight the desired setting Except in the case of WB Preset preset white balance highlighting a white ...

Страница 81: ...es and under other unusual lighting conditions Recording a PresetWhite Balance Setting 1In the shooting menu highlight White Bal and press the multi selector to the right to display the white balance menu 3Highlight Set and press the multi selector to the right The message Please release the shutter will be displayed Please release the shutter SHOOTING MENU White Bal WB Preset 2Highlight WB Preset...

Страница 82: ...xtreme over or under expo sure that could interfere with an optimal white balance measurement White balance can also be set using manual exposure exposure mode M note how ever that exposure settings that would produce extreme over or under expo sure can prevent the camera from setting white balance 5The menu shown at right will be displayed in the monitor The measured value for preset white balanc...

Страница 83: ...b command dial B until the desired setting is displayed in the rear control panel C A B C A setting of is equivalent to Preset 1 to Preset 2 and to Pre set 3 Recalling preset white balance from the shooting menu Highlight WB Preset in the white balance menu and press the multi selector to the right The menu shown at right will be displayed highlight the desired setting and press the multi selector...

Страница 84: ...sed at the distance of the original subject as long as the shutter release button is pressed halfway or either or the AF ON buttons held down even if you re frame the photograph so that the subject is no longer in the selected focus area To ensure a sharp image the shutter can only be released when the camera is in focus Continuous servo AF can be used with moving subjects to allow the camera to c...

Страница 85: ...ther or not the camera is in focus release priority Focus is not locked when the in focus indicator is displayed S Single servo AF focus priority If the subject is stationary the camera focuses when the shutter release button is pressed halfway Focus remains locked while the shutter release button is held in this position focus lock The shutter can only be released when the in focus indicator is d...

Страница 86: ...d the AF ON button for vertical shooting B Either operation has the same effect as pressing the shut ter release button halfway 4 AF Activation pg 162 Using this setting the camera can be programmed so that an autofocus operation can only be performed using the AF ON buttons to avoid accidental shutter release Autofocus continued ADVANCED PHOTOGRAPHY AUTOFOCUS A B ...

Страница 87: ...has no effect This can be changed so that focus area selection wraps around allowing you to shift the focus area from top to bottom or from right to left without changing the position of your finger on the multi selector For more information on pg 78 Focus lock Focus Area Selection Your Nikon digital camera is equipped with five focus areas that together cover a wide area of the frame By choosing ...

Страница 88: ...his combination is useful when your subject is always positioned closest to the camera but you are trying out a number of different camera positions to find the best composition When dynamic AF is used in combination with continuous servo autofocus the camera measures the distance to the subject in the selected focus area when the shutter release button is pressed halfway to initiate autofocus It ...

Страница 89: ...the autofocus system is initiated by pressing the shutter release button halfway or by pressing ei ther of the AF ON buttons the camera focuses on the subject in the active focus area The camera then continuously scans all five focus areas to maintain fo cus as the subject moves into other focus areas This mode is useful when it is difficult to predict where the subject will be at the moment of ex...

Страница 90: ... camera Advanced Options for Dynamic AF If desired closest subject priority can be deactivated when using dynamic AF with single servo autofocus allowing the multi selector to be used to select the focus area Closest subject priority can be activated when using dynamic AF with continuous servo autofocus causing the camera to re focus on the closest subject should it lose track of the original subj...

Страница 91: ...tionship between AF area mode and the focus area display is shown in the following table Focus area selection Focus mode AF area mode Closest subject priority Control panel display Focus area shown in viewfinder Manual S AF Single Area AF Yes Dynamic Area AF No Yes Manual C AF Single Area AF Yes Manual Dynamic Area AF Off default Yes Automatic On Custom Setting 10 set to Closest Subject No On defa...

Страница 92: ... B 2Lock focus when the in focus indicator appears in the viewfinder In single servo autofocus Once the in focus indicator has appeared in the viewfinder focus will lock when the shutter re lease button is pressed halfway and remain locked while the button is held in this position Focus can also be locked by pressing the AE L AF L but ton see below In continuous servo autofocus After the in focus ...

Страница 93: ...etting by keeping the shut ter release button lightly pressed between each shot Focus will also remain locked between shots as long as you continue to press the AE L AF L button Do not change the distance between the camera and the subject while focus lock is in effect If your subject moves focus again at the new distance 21 AE L AF L Button pg 172 The AE L AF L button can be set to lock only focu...

Страница 94: ... the shade Use manual focus pg 81 The subject is dominated by regular geometrical patterns Regular geometrical patterns for example a row of win dows in a skyscraper can interfere with autofocus Use manual focus pg 81 The focus area contains objects at different distances from the camera For example autofocus may not perform well when the subject is inside a cage Use focus lock pg 78 to focus on a...

Страница 95: ...finder Using the Electronic Range Finder When a lens with a maximum aperture of f 5 6 or faster is used in manual focus mode the in focus indi cator can be used to confirm focus in any of the five focus areas With the focus mode selector set to M press the shutter release button halfway Before the focus indicator in the viewfinder disappears rotate the lens focusing ring A until the in focus indic...

Страница 96: ... metering method press the metering selector lock release 1 while rotating the metering selector to the desired setting 2 ADVANCED PHOTOGRAPHY METERING 14 Center Weight Area pg 168 This option is used to set the size of the area assigned the greatest weight in center weighted metering to 6 mm 0 24 10 mm 0 39 13 mm 0 51 or to the average of the entire frame For more information on pg 198 Compatible...

Страница 97: ...era measures light over the entire frame but assigns the greatest weight to a circular area in the center of the frame 8 mm 0 31 in diameter use the 12 mm 0 47 circle in the center of the viewfinder as a reference for center weighted metering Spot The camera measures light in a circle 3 mm 0 12 in diameter cen tered on the current focus area occupying approximately two per cent of the frame Spot m...

Страница 98: ...Frame a photograph and shoot Lens Aperture Ring If the lens aperture ring has not been set to the minimum aperture the viewfinder and control panel on top of the camera will show a blinking and the shutter release will be disabled This does not apply in the case of type G lenses which do not have an aperture ring Non CPU Lenses If programmed auto is selected when a non CPU lens is attached the exp...

Страница 99: ...ger displayed Flexible program is also cancelled when the camera is turned off or a two button reset pg 184 is performed Exposure Program The following graph shows the exposure program for programmed auto A B ISO 200 lens with maximum aperture of f 1 4 and minimum aperture of f 16 e g AF 50 mm f 1 4D The maximum and minimum values for EV vary with sensitivity ISO equivalency Matrix metering reduce...

Страница 100: ...rture Ring If the lens aperture ring has not been set to the minimum aperture the viewfinder and control panel on top of the camera will show a blinking and the shutter release will be disabled This does not apply in the case of type G lenses which do not have an aperture ring Non CPU Lenses If shutter priority auto is selected when a non CPU lens is attached the exposure mode will automatically b...

Страница 101: ...will flash and one of the following indicators will appear in the viewfinder and the control panel on top of the camera Shutter Speed Lock Shutter speed can be locked at the selected setting pg 94 2 EV Steps for Exposure Control pg 161 By default adjustments to shutter speed are made in increments equivalent to 1 3 EV 1 3 step If desired the size of the increments can be increased to 1 2 or 1 step...

Страница 102: ...essing the MODE button rotate the main command dial until is displayed in the control panel on top of the camera Lens Aperture Ring If the lens aperture ring has not been set to the minimum aperture the viewfinder and control panel on top of the camera will show a blinking and the shutter release will be disabled This does not apply in the case of type G lenses which do not have an aperture ring N...

Страница 103: ...ected setting pg 94 2 EV Steps for Exposure Control pg 161 By default adjustments to aperture are made in increments equivalent to 1 3 EV 1 3 step If desired the size of the increments can be increased to 1 2 or 1 step 12 Assign Command Dial pg 166 This setting can be used to reverse the roles of the command dials so that the main command dial controls aperture while shutter speed is assigned to t...

Страница 104: ...til is displayed in the control panel on top of the camera Lens Aperture Ring If the lens aperture ring has not been set to the minimum aperture the viewfinder and control panel on top of the camera will show a blinking and the shutter release will be disabled This does not apply in the case of type G lenses which do not have an aperture ring Non CPU Lenses If aperture priority auto is selected wh...

Страница 105: ...tter speed A Aperture is set by rotating the sub command dial B A B 2 EV Steps for Exposure Control pg 161 By default adjustments to aperture and shutter speed are made in increments equivalent to 1 3 EV 1 3 step If desired the size of the increments can be increased to 1 2 or 1 step ...

Страница 106: ...perture until the desired exposure is achieved If the limits of the camera s metering system are exceeded the electronic analog exposure dis plays will flash Optimal exposure Optimal exposure Optimal exposure Underexposed by 1 3 EV Underexposed by 1 2 EV Underexposed by 1 EV Overexposed by more than 2 EV Overexposed by more than 3 EV Overexposed by more than 3 EV Custom Setting 2 EV steps for expo...

Страница 107: ...Speed and Aperture Lock Shutter speed and aperture can be locked at the selected setting pg 94 12 Assign Command Dial pg 166 This setting can be used to reverse the roles of the command dials so that the main command dial controls aperture while shutter speed is assigned to the sub command dial 22 Aperture Setting pg 173 Use this setting when you want to adjust aperture using the lens aperture rin...

Страница 108: ... speed can be locked at the selected value by pressing the button A and rotating the main command dial B until the shutter speed lock icons appear in the viewfinder and the control panel on top of the camera C To unlock shutter speed press the button and rotate the main command dial until the lock icons disappear from the displays Aperture Lock If lock has been assigned to the button aperture can ...

Страница 109: ...oice into effect and return to the shooting menu The following options are available Option Description Shutter Speed Only shutter speed is locked This option is not available in aper ture priority auto and programmed auto exposure modes Aperture Only aperture is locked This option is not available in shutter priority auto and programmed auto exposure modes Both Both shutter speed and aperture are...

Страница 110: ...k 2After positioning the subject in the focus area select the center focus area when using center weighted metering press the shutter release button halfway and confirm that the in focus indicator appears in the viewfinder A Keeping the shutter release button pressed halfway press and hold the AE L AF L button B When spot metering is in effect the camera measures exposure in the selected focus are...

Страница 111: ...ol panel on top of the camera Metering can not be adjusted while auto exposure lock is in effect Any changes to metering will only take effect after the AE L AF L button is released 7 AE Lock pg 164 This setting can be used to assign auto exposure lock to the shutter release button 14 CenterWeight Area pg 168 This option is used to set the size of the area assigned the greatest weight in center we...

Страница 112: ...sure compensation can be set to any value between 5 EV and 5 EV in increments of 1 3 EV 1 3 step As a rule of thumb use a positive value for exposure compensation when the background is brighter than the main subject a negative value when the background is darker than the main subject Viewfinder display 0 3 EV 2 EV At values other than 0 a indicator appears in the viewfinder and in the control pan...

Страница 113: ...ation to 1 2 or 1 step 13 Easy Exposure Compensation pg 167 This setting can be used to allow exposure to be set with the command dials alone 2Frame the photograph focus and shoot Normal exposure can be restored by setting exposure compensation to zero or by performing a two button reset Exposure compensation is not reset when the cam era is turned off ...

Страница 114: ... the sub command dial B to choose a brack eting program C The exposure settings affected by auto bracketing depend on the exposure mode Exposure mode Camera sets exposure by varying Aperture priority auto Shutter speed Programmed auto Shutter speed and aperture Shutter priority auto Aperture Manual Shutter speed A B C 2 EV Steps for Exposure Control pg 161 This setting controls the size of the inc...

Страница 115: ...Setting 2 Set to 1 2 Step Option 2F1 0 2F0 5 2F1 0 2F0 5 3F1 0 3F0 5 3F1 0 3F0 5 3F1 0 3F0 5 Exposure display Bracketing order 0 1 0 0 0 5 0 1 0 0 0 5 1 0 2 0 0 0 5 1 0 0 1 0 0 2 0 0 5 0 1 0 0 1 0 1 0 0 0 5 0 5 Bracketing order 0 1 0 0 0 7 0 0 3 0 1 0 0 0 7 0 0 3 1 0 2 0 0 0 7 1 3 0 0 3 0 7 0 1 0 0 2 0 0 7 0 1 3 0 3 0 0 7 0 1 0 1 0 0 0 7 0 7 0 0 3 0 3 Custom Setting 2 Set to 1 Step Option 2F1 0 2F...

Страница 116: ...d will be restored the next time auto bracketing is used During shooting the camera shows the modified values for shutter speed and aperture Bracketing can be combined with exposure compensation to produce compensation values greater than 2 0 or less than 2 0 while bracketing is in effect If the camera is turned off before all photographs in the sequence have been taken bracketing will resume from...

Страница 117: ...that covers the viewfinder eyepiece A to prevent light entering through the eyepiece from affecting auto exposure After focusing the camera press the shutter release button all the way down to start the self timer B The self timer lamp on the front of the camera will start to blink C stopping ap proximately two seconds before the shutter is released automatically to take the photograph A B C Do no...

Страница 118: ...ocus brackets in the viewfinder are in sharp focus Diopter can be adjusted in the range between 3 m 1 and 1 m 1 Corrective lenses avail able separately allow diopters of 3 m 1 to 2 m 1 Once you have adjusted diopter to your satisfaction push the diopter knob back into the body of the camera When operating the diopter knob be careful to avoid injuring your eye with your finger or fingernail For mor...

Страница 119: ...lluminators control panel backlights you can illuminate the control panels to view camera settings in the dark To turn the illuminators on rotate the power switch to the position The illuminators will remain on while the switch is held in this position After the switch is released the illuminators will remain on while exposure indicators are displayed or until the shutter is released ...

Страница 120: ... field preview button The lens will be stopped down to the aperture selected by the camera in programmed auto or shutter priority auto exposure modes or to the value selected by the user in aperture priority or manual modes The view through the viewfinder provides an approximation of the depth of field that can be obtained at the current aperture setting ...

Страница 121: ...f the focal plane inside the camera is indicated by a mark on the camera body The distance between the camera and the subject should be measured from this mark whenever distance is mea sured manually The distance between the lens mount ing flange and the focal plane is 46 5 mm 1 83 ...

Страница 122: ...ts of this analysis are used to balance flash output with ambient light When a type G or D lens is used distance informa tion is included in the calculation for still more precise flash control 3D multi sensor balanced fill flash Center Weighted Fill Flash for Digital SLR This mode is used with non CPU lenses When a non CPU lens is attached the camera automatically chooses center weighted metering...

Страница 123: ... SB 26 SB 25 SB 22s SB 29s and SB 29 in place SyncTerminal A sync cable can be connected to the sync terminal as required Do not attach another Speedlight via a sync cable when performing rear curtain sync flash photog raphy with an SB 80DX SB 50DX SB 28DX SB 28 SB 27 SB 26 SB 25 SB 24 SB 23 SB 22s SB 29s or SB 29 Speedlight attached to the accessory shoe Flash Ready Indicator When an SB 80DX SB 5...

Страница 124: ...hin the range of the flash and is fully turned to face the camera To prevent blurring caused by camera shake use of a tripod is recommended with slow sync or red eye reduction with slow sync Rear curtain sync can not be used with a studio flash system Flash Sync Modes Five sync modes are available To set the flash sync mode press the flash mode button A while turning the main command dial B B A AD...

Страница 125: ...r to REAR Rear curtain sync This mode combines red eye reduction with slow sync avail able only with SB 80DX SB 28DX SB 28 SB 27 and SB 26 Set the exposure mode to programmed auto or aperture pri ority auto Red eye reduction with slow sync This mode is recommended in most situations When using the SB 26 SB 25 or SB 24 set the sync mode selector on the Speedlight to NORMAL Front curtain sync The fo...

Страница 126: ...ypes SB 23 SB 21B11 SB 29s SB 29 All types SB 1112 SB 14 All types SB 22s SB 22 SB 20 SB 16B SB 15 1 Can only be used when an SB 80DX SB 50DX or SB 28DX is attached When other Speedlights are attached and set to TTL the shutter release button will lock and no photographs can be taken 2 When spot metering is used this setting is treated as standard D TTL flash control see above 3 IX Nikkor excluded...

Страница 127: ...a value under 1 200 sec 11 Autofocus can only be used with the SB 21B SB 29s or SB 29 when a AF Micro lens 60 mm 105 mm 200 mm is attached 12 When using the SB 11 or SB 14 in A or M mode connect the SC 13 using the SU 2 While the SB 11 and SB 14 can be connected using the SC 11 or SC 15 the flash ready indicator will not appear in the viewfinder display and shutter speed will not be adjusted autom...

Страница 128: ...nts on the Speedlight exposure display Therefore when the display on the camera body is set to 1 2 increments using Custom Setting 20 the Speedlight exposure display will not show the correct ISO value This does not affect the actual exposure value which will be set as displayed on the camera body Sensitivity settings available for D TTL flash photography are ISO 200 250 320 400 500 640 800 1000 1...

Страница 129: ...ed auto Shutter priority auto Exposure mode Aperture priority auto Manual When flash exposure compensation is used appears in the viewfinder display but the amount of compensation is not displayed If the Speedlight is set at a distance from the camera using the SC 17 sync cord correct exposure may not be achieved at D TTL settings other than standard D TTL We recommend that you use standard D TTL ...

Страница 130: ...w function to the button highlight As sign FUNC in the shooting menu and press the multi selec tor to the right to display the controls menu Highlight the desired setting and press the multi selector to the right to return to the shooting menu The following options are available ADVANCED PHOTOGRAPHY THE FUNC BUTTON Option Description OK Assign FUNC Qual CSM AF Area Lock SHOOTING MENU For more info...

Страница 131: ...s tom Setting 29 File Number Sequence pg 179 To choose a file numbering option highlight File No Seq in the shooting menu and press the multi selector to the right The menu shown at right will be displayed Highlight the desired setting and press the multi selector to the right to return to the shooting menu The following options are available OFF ON Reset Option Continuous sequential file numberin...

Страница 132: ... established with the GPS device the letter D will appear in the control panel on top of the camera remaining until the exposure indicators in the control panel turn off automatically or the camera is turned off Once the letter D is displayed information on the camera s current position received while the camera is in communication with the GPS device will be stored with the image data for each ph...

Страница 133: ... been confirmed with the following GPS devices GARMIN GPS III MAGELLAN COLORTRAK Because cables for connecting GPS devices to the camera are not available from Nikon the user must supply a suitable cable The RS 232 terminal on the camera is designed to fit a 2 5 mm stereo mini jack To connect the camera and the GPS device a GND line and Data Out line Data Out here refers to the GPS device are requ...

Страница 134: ...e played back by turning the mode dial to PLAY playback mode by pressing the monitor button in single frame continuous self timer or PC mode quick review or using image review to view photographs in the monitor auto matically as they are recorded to the memory card Playback Mode Playback mode is used only for playing images back not for taking photographs Playback mode can be selected by pressing ...

Страница 135: ...he memory card the monitor will turn on automatically and the photograph you have just taken will be displayed In single frame and self timer modes one photograph will be displayed each time the shutter is released In continuous mode the photographs in each sequence will be displayed in order when shooting is complete Review begins when you re lease the shutter button If additional photographs are...

Страница 136: ... viewed one at a time or in contact sheets of four or nine thumbnail images To choose the number of images displayed press the button A while rotating the main command dial B PLAYBACK BASIC PLAYBACK If card contains fewer than the selected number of images in thumbnail playback thumbnails will be displayed at the top left corner of the monitor Single frame Four thumbnails Nine thumbnails B A ...

Страница 137: ...cord and review modes Turning the Monitor Off The monitor turns off if No operations are performed in the time specified in Custom Setting 18 Moni tor Off Delay The button is pressed The shutter release button is pressed halfway in single frame continuous self timer mode or in PC mode if the camera is not connected to a computer run ning Nikon Capture 3 Camera Control ...

Страница 138: ...ector to the right or left to cycle through photo information as shown below For more information on pg 142 The Display Mode sub menu pg 118 Connecting a GPS device Page 6 image histogram and Page 7 image highlights are only shown if the appro priate option has been selected in the Display Mode sub menu of the playback menu Page 5 is only shown if a GPS unit was connected when the photograph was t...

Страница 139: ...e 5 File format 6 Date of recording 7 Time of recording 8 Image quality Page 3 1 Camera type 2 Camera firmware version 3 Metering method 4 Shutter speed 5 Aperture 6 Exposure mode 7 Exposure compensation Page 4 1 Sensitivity ISO equivalency 2 White balance 3 White balance adjustment 4 Tone compensation 5 Sharpening 6 Focal length 7 Color mode PLAYBACK BASIC PLAYBACK 2 1 1 2 4 6 3 5 7 1 2 4 6 3 5 7...

Страница 140: ...m The histogram takes the form of a bar graph with pixel brightness on the horizontal axis and the vertical axis showing the number of pixels of each brightness in the image Only shown when histogram display is selected in the playback Display Mode menu Page 7 Image Highlights The brightest portions of the image image highlights blinking on and off Only shown when highlight display is se lected in...

Страница 141: ...umbnail Playback When thumbnails are displayed the desired frame can be highlighted using the multi selector To scroll through thumbnails a page at a time press the button while rotating the sub command dial PLAYBACK BASIC PLAYBACK ...

Страница 142: ...n the image currently displayed in single frame playback or on the image currently selected in the thumbnail display press the button For approximately two seconds after you press the button to zoom in on the image or after you press the multi selector to scroll the image a thumbnail showing your current position in the image will appear in the bottom right corner of the display RAW Images Playbac...

Страница 143: ...in the playback menu Once deleted images can not be recov ered 1Display the image you want to delete single frame playback or highlight the image in the thumbnail display thumbnail playback 2Press the button A A confirmation dialog will be displayed B B A 3Press the button a second time to delete the photograph and return to playback or review mode To exit without deleting the photograph press the...

Страница 144: ...into effect The Delete sub menu contains the following options Delete PLAYBACK MENU Selected All Print Set Selected Option All Print Set Select the photo or photos to be deleted from a menu of thumb nail images Description Delete all images on the memory card Images that have been hidden or protected are not affected Cancel the print order delete the print order file created with the Print Set opt...

Страница 145: ... 10 0 0 00 00 0 00 0 00 0 0 00 00 00 0 0 0 0 SET OK PLAYBACK MENU FUNC FUNC OK NO YES PLAYBACK MENU Selected Delete 5 images To select an image for deletion highlight it and press the button The image will be marked with a icon to deselect an image highlight it and press the button a second time Repeat until all the images you wish to delete have been selected then press the button The confirmatio...

Страница 146: ...eral images at once use the Protect option in the playback menu 1Display the image you want to protect single frame playback or highlight the image in the thumbnail display thumbnail playback 2Press the button A The selected image or thumbnail will be marked by a icon B B A Protected status can be removed at any time to allow an image to be deleted To remove protected status from an image display ...

Страница 147: ...images press the but ton To protect an image highlight it and press the button The image will be marked with a icon to deselect an image highlight it and press the button a second time Repeat until all the images you wish to protect have been selected then press the button to put any changes into effect and exit the thumbnail menu 00 1 10 0 1 1 10 1 1 10 10 100 4 100 4 00 00 0 4 10 00 0 0 4 4 0 00...

Страница 148: ...ide show to return to the playback menu Playback Menu Options In addition to the delete and protect items described above the playback menu contains options for automated playback hiding images during playback creating digital print orders creating new folders and specifying the folders from which images will be played back and controlling the information included in the photo information display ...

Страница 149: ...ame Intvl 2 3 5 10 s s s s Option Description For more information on pg 186 The playback menu OK Restart Frame Intvl Changing the Display Interval Selecting Frame Intvl from the slide show menu or while the slide show is paused will display the menu of interval settings shown at right To change the length of time each image is displayed highlight the desired option and press the multi selector to...

Страница 150: ... to put changes into effect and exit the thumbnail menu To return to the playback menu at any time without changing the hidden status of images press the button To hide an image highlight it and press the button The image will be marked with and icons to deselect an image highlight it and press the button a second time Repeat until all the images you wish to hide have been selected then press the ...

Страница 151: ...tatus File Numbering for Hidden Images Although hidden images are only displayed in the Hide Image menu they are assigned file numbers allowing the presence of hidden images to be ascertained from discontinuities in the file numbering sequence during playback PLAYBACK PLAYBACK MENU OPTIONS ...

Страница 152: ... 00 1 10 0 1 1 10 1 1 10 10 100 4 100 4 00 00 0 4 10 00 0 0 4 4 0 00 00 2 00 2 100 100 10 0 00 10 10 100 5 100 3 00 00 0 3 0 10 1 10 100 10 00 100 6 100 10 0 0 00 00 0 00 0 00 0 0 00 00 0 00 0 0 0 0 SET OK PLAYBACK MENU After Creating a Print Order Do not use a another device such as a computer to delete images from the memory card after creating a print order Do not change the hidden status of im...

Страница 153: ...nd return to the print options menu Print Set PLAYBACK MENU Copies 1 OK Imprint Date If this box is checked the date will of recording will be printed on all the selected photographs To select or deselect this op tion highlight it and press the multi selector to the right Digital Print Order Format Digital Print Order Format DPOF is an industry wide standard that allows photographs taken with a di...

Страница 154: ...lect Selecting this option displays the menu shown on the opposite page New When this option is selected a dialog will appear prompting you to select a folder number Press the multi selec tor up or down to select a folder num ber then press the multi selector to the right to create a new folder name beginning with the specified number and ending in NCD1H Subsequent photographs will be stored in th...

Страница 155: ...der for playback when using a camera in the D1H For example suppose you create three folders in succession 101NCD1H 102NCD1H and 103NCD1H If you then choose Current only photographs in 103NCD1H will be displayed To view photographs in the other folders you would need to choose NCD1H or ALL in the Folder Select menu Creating a New Folder at Startup If you turn the camera on while pressing the butto...

Страница 156: ... Mode PLAYBACK MENU The following options are available Option Description Image only Histogram and highlights information are not included in the photo information display Histogram A page including a histogram showing the distribution of tones in the image is added to the photo information display Highlights A page showing image highlights is added to the photo infor mation display Highlights br...

Страница 157: ...ght the desired option and press the but ton to put your choice into effect The following options are available FUNC FUNC OK Format NO YES Warning All images will be deleted SET UP MENU Option Description NO Select this option to return to the setup menu without format ting the memory card YES Formatting begins as soon as the button is pressed to select this option the operation can not be cancell...

Страница 158: ... the result that images displayed on any PAL compliant video device to which the camera is connected will show a drop in resolution For more information on pg 190 The setup menu The following options are available Option Description PAL NTSC Select this option when connecting the camera to NTSC de vices Adjusting Monitor Brightness The LCD Brightness Menu This option controls monitor brightness In...

Страница 159: ...f automatically can also be adjusted using this setting The Monitor Off Menu When the camera is operated on battery power the monitor turns off automatically if no operations are performed for twenty seconds This time limit can be changed using the Monitor Off menu In the setup menu highlight Monitor Off and press the multi selector to the right The menu shown at right will be dis played Highlight...

Страница 160: ...r VCR using the video cable provided allowing the monitor display to be viewed on a television screen or recorded on video tape Open the cover protecting the camera s VIDEO OUT and DC IN connectors PLAYBACK TELEVISION PLAYBACK Video out connector DC in connector Connect the camera to the video device as shown below Connect this end of the cable to the camera ...

Страница 161: ...are peformed for ten minutes regardless of the setting in the Moni tor Off Delay Custom Setting 18 pg 170 or Monitor Off pg 145 menus The default setting is NTSC When connecting the camera to PAL device the setting must be changed Connecting and Disconnecting theVideo Cable Be sure the camera is off before connecting or disconnecting the video cable At a video mode setting of PAL the number of pix...

Страница 162: ...nuals Turn the camera off and ensure that a battery is inserted or the camera con nected to an AC adapter To ensure a continuous supply of power while the camera is connected we recom mend that you use an AC adapter available separately Connecting the Camera to a Computer 1When connecting the camera to a computer via the IEEE 1394 interface use an IEEE 1394 cable available separately Open the cove...

Страница 163: ...er release button is held down the rate at which photographs are taken may slow If neither NikonView 5 NikonTransfer nor Nikon Capture 3 Camera Control is running when the camera is connected the camera will function normally The only exception is that if the mode dial is set to PC the shooting mode single frame or continuous must be set using Custom Setting 30 pg 180 3To terminate the connection ...

Страница 164: ... expected when connected to an IEEE 1394 hub For information on IEEE 1394 expansion boards or cards that have been tested and approved for use with your Nikon digital camera see the web sites listed below OS Pre installed versions of Windows XP Home Edition Windows XP Professional Windows 2000 Professional Windows Millennium Edi tion Me Windows 98 Second Edition SE CPU 300 MHz Pentium or better RA...

Страница 165: ...ernet connection required when uploading pictures to the Web 800 600 pixels or more with 16 bit color thousands of colors 24 bit color millions of colors recommended RAM 64 MB 128 MB or more recommended Hard disk space 25 MB required for installation with additional free disk space of 10 MB plus an amount equal to double the capacity of camera memory card available on system disk when NikonView 5 ...

Страница 166: ...n as expected when connected to an IEEE 1394 hub For information on IEEE 1394 expansion boards or cards that have been tested and approved for use with your Nikon digital camera see the web sites listed at right OS Pre installed versions of Windows XP Home Edition Windows XP Professional Windows 2000 Professional Windows Millennium Edi tion Me Windows 98 Second Edition SE CPU 300 MHz Pentium or be...

Страница 167: ...c tion as expected when connected to an IEEE 1394 hub 4 Depending on the number of images captured more may be required Miscellaneous Video resolution CD ROM drive required for installation Internet connection required when uploading pictures to the Web 800 600 pixels or more with 16 bit color thousands of colors 24 bit color millions of colors recommended Model iMac iMac DV Power Mac G3 Blue Whit...

Страница 168: ...reader 3The card will function as a disk Photographs recorded at settings of FINE NOR MAL or BASIC can be viewed using any application that supports JPEG Images recorded at a setting of HIGH RGB TIFF can be opened in applications that sup port the TIFF format Nikon Capture 3 or Nikon View 5 is required to view photographs taken at settings of HIGH RAW or HIGH YCbCr TIFF CompactFlash Card TM EC 64C...

Страница 169: ...D OTHER MENUS AboutThis Section This section describes the options available in the custom settings menu and provides an index to the shooting playback and setup menus Custom Settings pp 156 185 Other Camera Menus pp 186 191 ...

Страница 170: ...inu ous self timer or PC mode Choosing a Custom Settings Bank Before adjusting custom settings choose the settings bank that will be used to store the changes The camera can store settings in banks that can be recalled at any time allowing you to create up to four combinations of settings for common tasks or shooting situations and recall them quickly as desired By default any changes to custom se...

Страница 171: ...ting Bank menu Press the multi selector to the right to enter the custom settings menu then press the multi selector up or down to highlight F0 Custom Setting Bank Press the multi selector to the right to display the menu shown below OK Custom Setting Bank Bank A Bank B Bank C Bank D F0 CSM MENU 4Choose a custom settings bank Press the multi selector up or down to highlight the desired settings ba...

Страница 172: ...selector up or down A to highlight the desired setting B A B C A B 2Display the CSM MENU Unlock the multi selector and press it up or down A until the custom settings menu is displayed B Adjusting Custom Settings Changes to custom settings in the current settings bank are made from the custom settings menu 1Display the camera menus Turn the camera on A and press the button B The menu for the curre...

Страница 173: ...ffect 4Choose an option for the selected setting Press the multi selector to the right A to display a menu of options for the selected setting B For more information on pg 116 The Assign FUNC sub menu OK F1 Image Review OFF ON CSM MENU A B Press the multi selector up or down to highlight the desired option then press the selector to the right to put your choice into effect and return to the custom...

Страница 174: ...Bank The camera can store up to four banks of custom settings Bank A Bank B Bank C and Bank D To activate the settings in a settings bank select the desired bank from the Custom Setting Bank menu Any changes to settings are stored in the currently selected bank Custom Settings continued OK Custom Setting Bank Bank A Bank B Bank C Bank D F0 CSM MENU For more information on pg 159 Using the button t...

Страница 175: ... equivalent to 1 3 EV 1 3 step This setting can be used to set the size of the increments used to 1 2 or 1 step Changes to EV steps for exposure control are reflected in the exposure display in the viewfinder and in the control panel on top of the camera OK EV Steps for Exposure Control 1 3 Step 1 Step 1 2 Step F2 CSM MENU Description Adjustments to exposure settings are made in in crements equiva...

Страница 176: ... be used activate autofocus If you prefer you can set the camera so that an autofocus operation is only per formed when one of the AF ON buttons is pressed OK F4 AF Activation Shutter AF ON OFF ON AF ON only CSM MENU Description Autofocus can only be performed using the AF ON buttons Custom Settings continued Autofocus can be performed using theAF ON but tons or by pressing the shutter release but...

Страница 177: ...hat focus area selection wraps around from top to bottom and right to left In this case pressing the multi selector up when the top focus area is highlighted selects the bottom focus area while pressing it down when the bottom focus area is highlighted selects the top focus area Similarly pressing the multi selec tor to the right when the right area is highlighted selects the left focus area OK F6...

Страница 178: ...CCD Cleaning This option is used to lock the mirror in the up position while inspecting or cleaning the low pass filter that covers the CCD See Technical Notes Caring forYour Camera pg 196 OK F8 Mirror Lock up for CCD Cleaning OFF ON OFF CCD Cleaning CSM MENU Description Custom Settings continued No No Option AE L AF L Button default Shutter Button Option Mirror not locked in up position OFF defau...

Страница 179: ... option is used to disable or enable closest subject prior ity when dynamic AF is used with single servo autofocus F9 Dynamic AF Single Servo Closest Subject OFF ON Select AF Area CSM MENU OK Description No Option Option Select AF Area default Closest Subject No Camera assesses distance to subjects in each focus area and selects the subject closest to the camera Closest Subject default Camera focu...

Страница 180: ... Custom Setting 12 Assign Command Dial By default the main command dial controls shutter speed shutter priority auto and manual exposure modes while the sub command dial controls aperture aperture priority and manual exposure modes This relationship can be reversed using this option F12 Assign Command Dial Main S Sub A ON OFF Main A Sub S CSM MENU OK Description No No Option AE Flash default AE On...

Страница 181: ...D Dial default 2 EV Steps for Exposure Control pg 161 By default adjustments to aperture and shutter speed are made in increments equivalent to 1 3 EV 1 3 step If desired the size of the increments can be increased to 1 2 or 1 step For more information on pg 98 Exposure compensation Exposure compensation is set using one of the com mand dials The command dial used to set exposure compensation vari...

Страница 182: ...era after the camera is turned on or after the shutter release button is pressed halfway Note that increasing the time for auto meter off delay reduces battery performance OK Auto Meter Off Delay F15 6 4 8 16 s s s s CSM MENU Time indicators remain active approx No No Option Option For more information on pg 82 Metering Greatest weight assigned to a 10 mm 0 39 circle φ10 mm Custom Settings continu...

Страница 183: ...nated only when power switch is turned to Control panels are illuminated when any button is pressed Custom Setting 16 Self timer Delay This setting is used to specify the length of the delay from the time the shutter release button is pressed to the time the shutter is released in self timer mode OK Self timer Delay CSM MENU F16 2 5 10 20 s s s s Shutter release delayed by approx No Option Option ...

Страница 184: ...or remains on when no operations are performed Note that increasing the monitor off delay reduces battery life OK F18 Monitor Off Delay CSM MENU 20 10 1 5 10 s s min min min Monitor stays on for approx No Option One minute 1 min Custom Settings continued Ten seconds 10 s Twenty seconds 20 s default Five minutes 5 min Ten minutes 10 min ...

Страница 185: ...s a fixed number of steps from the maximum setting Suppose for example that a 70 210 mm f 4 5 6 AF Zoom Nikkor lens is mounted on the camera and an aperture of f 8 is selected when the lens is zoomed out to 70 mm At this zoom position f 8 is two steps from the maximum aperture of f 4 Now imagine that the lens is zoomed in to 210 mm If fixed aperture is selected aperture will remain constant at f 8...

Страница 186: ...om Settings continued Option No Description Adjustments to sensitivity are made in increments equivalent to 1 3 EV 1 3 step Adjustments to sensitivity are made in increments equivalent to 1 2 EV 1 2 step Option 1 3 Step default 1 2 Step No Adjustments to sensitivity are made in increments equivalent to 1 EV 1 step 1 Step Both focus and exposure are locked while theAE L AF L button is pressed AE AF...

Страница 187: ...OFF Aperture Ring CSM MENU OK Description Aperture can only be adjusted using the sub com mand dial No Option Sub Command Dial default For more information on pg 96 Auto exposure lock pg 88 Aperture selection pg 166 Custom Setting 12 Aperture can only be adjusted using the lens aper ture ring When this option is in effect the aperture display in the control panel shows aperture in incre ments of o...

Страница 188: ...controls the amount of sharpening performed Image Sharpening Low High None Normal F23 CSM MENU OK Description Image is processed to increase sharpness making edges in the image more distinct No Option Normal default Image is still processed to increase sharpness but the amount of sharpening is less than default level Low Image is processed to increase sharpness beyond default level High No sharpen...

Страница 189: ...curve under Mac OS X version 10 1 4 or earlier as these versions of Mac OS X do not support Camera Control when used with the D1H For more information on pg 152 Nikon Capture 3 When matrix metering is selected the camera au tomatically optimizes contrast by selecting a curve equivalent to Normal Less Contrast or More Contrast When another metering method is se lected this option is equivalent to N...

Страница 190: ...using this setting is twenty seven or higher 0 4 OK C Mode Max Shots F26 CSM MENU Custom Setting 25 C Mode Shooting Speed This item sets the rate at which photographs are taken in continuous mode OK C Mode Shooting Speed 3 fps 5 fps 4 fps 2 fps 1 fps F25 CSM MENU Description No Option Photographs are taken at a rate of three frames per second 3 fps Photographs are taken at a rate of two frames per...

Страница 191: ...Image only Histogram Highlights Both F27 CSM MENU Description Only photograph and standard photo information displayed No Option Image only default For more information on pg 126 Histogram and highlights displays pg 142 The Display Mode sub menu A page showing image highlights is included in the photo information display Highlights Two pages are added to the photo information dis play one showing ...

Страница 192: ...wing RAW images on a computer OK NEF RAW Image Save OFF Uncompressed Compressed F28 CSM MENU Description No Option RAW images are saved without compression Uncompressed default For more information on pg 56 Image quality pg 152 Nikon Capture 3 pg 150 NikonView 5 pg 140 The Folder Designate menu pg 117 The File No Seq menu RAW images are compressed using a lossless al gorithm that reduces file size...

Страница 193: ...ver the camera creates a new folder automatically whether or not continuous file numbering is selected New folders are created automatically when The number of images in the current folder reaches 999 The current folder contains a file numbered 9999 Custom Setting 29 File Number Sequence When saving photographs the camera assigns each image a file name consisting of DSC_ followed by a four digit n...

Страница 194: ...600 2 steps over 1600 F31 CSM MENU Description No Option Sensitivity boost can not be used OFF default For more information on pg 148 Connecting the camera to a computer pg 62 Sensitivity ISO equivalency Sensitivity raised roughly one step 1 EV over ISO 1600 equivalent Rear control panel shows HI 1 1 step over 1600 Sensitivity raised roughly two steps 2 EV over ISO 1600 equivalent Rear control pan...

Страница 195: ...referred choice in studio settings and commercial production work flows II Adobe RGB Color Mode II Photographs taken in Mode II include an embedded ICC profile ensuring that the correct color space settings can be selected automatically when the images are opened in Adobe Photoshop or in other applications that support color management see the documentation provided with the application for detail...

Страница 196: ...e increasingly purple as the value is lowered Custom Setting 34 Disable Shutter if no CF Card By default the shutter release is disabled when no memory card is inserted in the camera This option can be used to enable shutter release when no memory card is inserted Note that when the camera is connected to a computer running Nikon Capture 3 Camera Control photographs are recorded to the computer ha...

Страница 197: ...cates the current sensitivity ISO equivalency setting or the number of exposures remaining OK ISO F35 Rear Control Panel Display ISO Frame Count CSM MENU Description Option No Rear control panel shows the number of exposures remaining Sensitivity is displayed only while the ISO button is pressed Frame Count Rear control panel shows current sensitivity setting ISO default ...

Страница 198: ...efault Auto bracketing Off Flash sync mode Front curtain sync Exposure compensation 0 0 Auto exposure lock Off Aperture lock Off Shutter speed lock Off Flexible program Off Exposure mode Programmed auto Focus area Center AF area mode Single Area AF Sensitivity ISO 200 equivalent Image type Color Image quality JPEG Normal White balance Auto White balance adjustment 0 Restoring Camera Settings to De...

Страница 199: ...the and buttons down together for more than two seconds The CUSTOM indicator in the rear control panel will start to blink Release both buttons while the indicator is blinking and then press both buttons again All settings in the current settings bank together with the camera settings listed above will be reset to default values Settings in other banks are not affected ...

Страница 200: ... Hide Image Print Set Folder Designate Display Mode D1H PLAYBACK MENU The pages that follow provide an index to the options available in the shooting playback and setup menus The Playback Menu The playback menu which can be accessed in all operating modes contains the playback options shown opposite ...

Страница 201: ... 4 4 0 00 00 2 00 2 100 100 10 0 00 10 10 100 5 100 3 00 00 0 3 0 10 1 10 100 10 00 100 6 100 10 0 0 00 00 0 00 0 00 0 0 00 00 0 00 0 0 0 0 SET OK PLAYBACK MENU Print Set Create digital print order files 00 1 10 0 1 1 10 1 1 10 10 100 4 100 4 00 00 0 4 10 00 0 0 4 4 0 00 00 2 00 2 100 100 10 0 00 10 10 100 5 100 3 00 00 0 3 0 10 1 10 100 10 00 100 6 100 10 0 0 00 00 0 00 0 00 0 0 00 00 0 00 0 0 0 ...

Страница 202: ... White Bal ISO Image Quality Assign FUNC AF Area Mode File No Seq Command Lock SHOOTING MENU The Shooting Menu The shooting menu controls shooting settings in single frame continuous self timer and PC modes Many of the options in the shooting menu can also be accessed using the buttons and command dials ...

Страница 203: ... 400 500 SHOOTING MENU Assign FUNC Select the function assigned to the button in shooting mode OK Assign FUNC Qual CSM AF Area Lock SHOOTING MENU AF Area Mode Set the camera to focus on the subject in a single focus area single area AF or to track the subject as it moves from one focus area to the next dynamic AF This operation can also be performed using the button and the main command dial OK AF...

Страница 204: ...MENUS Format Language Video Output Date GPS Input LCD Brightness Monitor Off NTSC En OFF 2 SET UP MENU The Setup Menu The setup menu is used to adjust basic camera settings and perform such tasks as formatting memory cards Other Camera Menus continued ...

Страница 205: ...e language in which menus and messages are displayed OK De En Fr Es Language English Deutsch Français Español SET UP MENU Video Output Select the standard used for video output when the camera is con nected to a television orVCR OK NTSC PAL Video Output SET UP MENU Date Set the date and time The date and time can also be set using the BKT and buttons pg 217 2001 01 00 00 01 00 Date Y M H M D S SET...

Страница 206: ...192 ...

Страница 207: ...remains in good working order and explains what to do if the camera does not function as expected It also lists the accessories available for your camera and details camera specifications Caring forYour Camera pp 194 197 Optional Accessories pp 198 207 Troubleshooting pp 208 211 Specifications pp 212 219 Index pp 220 223 ...

Страница 208: ...Using the tweezers supplied with the focusing screen pull the focusing screen latch towards you B The screen holder will spring open 2Remove the existing screen using the tweezers supplied and being careful to handle the screen by the tab to avoid scratches A Using the tweezers to hold the screen by the tab set the replacement screen in the holder B Push the front edge of the holder upward until i...

Страница 209: ...may cause the control panels to brighten or darken This does not indicate a malfunction the display will shortly return to normal Cleaning When cleaning the camera body lens mirror viewfinder and monitor follow the precautions listed in the table below Camera Body Use a blower to remove dust and lint then wipe gently with a soft dry cloth After using the camera at the beach or seaside wipe off any...

Страница 210: ...ect the custom settings menu 0 1 2 3 4 A ON OFF OFF OFF 5 6 N Bank Select Image Review EV Step BKT Order AF Activation Anti mirror Focus Area CSM MENU OK F8 Mirror Lock up for CCD Cleaning OFF ON OFF CCD Cleaning CSM MENU 4After pressing the multi selector to the right to enter the custom settings menu press the multi selector up or down to highlight Custom Setting 8 Mirror Lock up for CCD Cleanin...

Страница 211: ...er is available you will need to take the camera to a Nikon authorized service center for cleaning 2Remove dirt and dust from the filter with a blower Do not use a blower brush as the bristles could dam age the filter Dirt that can not be removed with a blower can only be removed by Nikon authorized per sonnel Under no circumstances should you touch or wipe the filter 3Display the Mirror Lock up f...

Страница 212: ...flash control system do not work properly when shifting and or tilting the lens or when an aperture other than the maximum aperture is used 4 Without shifting and or tilting 5 Compatible with all AF S and AF I Nikkor lenses except the AF S 17 35 mm f 2 8D IF ED and AF S 28 70 mm f 2 8D IF ED 6 With maximum effective aperture of f 5 6 or faster 7 With maximum aperture of f 5 6 or faster 8 Some lens...

Страница 213: ...es refer to instruction manual provided with teleconverter 12 Auto Extension Ring PK 11A 12 or 13 required 13 Exposure determined by presetting lens aperture on bellows Release shutter after ex posure metering A variety of AF Nikkor lenses including wide angle telephoto zoom micro defocus image control DC and regular lenses with focal lengths of 16 600 mm are cur rently available for use with came...

Страница 214: ...ter PC 28 mm f 4 serial number 180900 or earlier PC 35 mm f 2 8 serial numbers 851001 906200 PC 35 mm f3 5 old type 1000 mm f 6 3 Reflex old type 1000 mm f 11 Reflex serial numbers 142361 143000 2000 mm f 11 Reflex serial numbers 200111 200310 IdentifyingType G or D Nikkor Lenses with Built in CPUs CPU lenses A can be identified by the CPU contacts In addition type G AF Nikkor lenses have a G mark...

Страница 215: ...n the case of the D1H however it is 15 6 23 7 mm Consequently the picture angle of photo graphs taken with the D1H will differ from the picture angle for 35 mm cameras even when the focal length of the lens and the distance to the subject are the same 25 5 D1H 30 36 42 52 5 75 90 127 5 17 35 mm film camera 20 24 28 35 50 60 85 Picture angle Approximate Focal length mm in 35 mm format modified for ...

Страница 216: ...20 240 V and 50 60 Hz Separate power cables are available for use in North America the United Kingdom Europe Australia and Japan Focusing Screens In addition to the type B BriteView focusing screen supplied with your camera you can use the type E clear matte Fresnel focusing screen for cameras in the D1 series The type E screen is etched with a grid see right making it suitable for copying and arc...

Страница 217: ...1 PC Card Adapter Using the PC card adapter CompactFlash memory cards can be read by computers equipped with PCMCIA card slots configured for ATA memory cards Memory Cards Memory cards may be hot after use Observe due caution when removing cards from the camera Format memory cards before first use Do not remove memory cards from the camera during formatting Failure to observe this precaution could...

Страница 218: ...iece Magnifier to cameras in the D1 series Filters Nikon filters can be divided into three types screw in drop in and rear interchange With the exception of the R60 exposure compensation need not be adjusted when a Nikon filter is attached in the case of the R60 set exposure compensation to 1 Filters manufactured by other makers may interfere with autofocus or electronic range finding Cameras in t...

Страница 219: ...uto Manual Repeating and FP High Speed Sync flash modes Speedlight Accessories for the SB 28DX When using the following Speedlight accessories with the SB 28DX be aware that these acces sories exist in two varieties old and new each with a different type of connector SD 6 battery stack SD 7 C cell battery pack The SC 16 power cable supplied with older models of these products can not be con nected...

Страница 220: ... Speedlight This Speedlight has a guide number of 32 manual mode 35 mm zoom head posi tion ISO 200 m 20 C 68 F and is powered with two CR123A or DL123A type 3V lithium batteries When attached to cameras in the D1 series it supports D 3D multi sensor balanced fill flash for natural balanced light even when the scene con tains highly reflective objects or the background is very far from the camera T...

Страница 221: ...00 m 328 Remote control over greater distances can be achieved with multiple units Requires MC 25Adapter Cord Allows infrared remote control with a range of up to 8 m 26 2 Remote shutter release can be used to reduce camera shake Can be used to lock the shutter release button during a time exposure 20 cm 0 7 80 cm 2 6 Accessory MC 21 Extension Cord MC 22 Remote Cord MC 23 Connecting Cord MC 20 Rem...

Страница 222: ... pg 88 pg 90 pg 198 Camera can not focus us ing autofocus Focus manually pg 81 Battery exhausted Replace battery pg 23 Low battery Ready fully charged spare battery pg 23 Lens aperture ring is not set to minimum aperture Set ring to minimum ap erture largest f number pg 25 blinking blinking Subject too bright photo will be overexposed In exposure mode P use ND filter S increase shutter speed if in...

Страница 223: ...in place Use CPU Nikkor lens or select exposure mode A or M pg 24 pg 88 pg 90 pg 198 or blinking Shutter speed faster than lens sync speed exposure mode S and M Shutter speed automati cally set to 1 500 s pg 114 Shutter speed blinks 500 If indicator blinks for 3 s after flash fires photo may be underexposed Check photo in monitor if underexposed adjust exposure and try again pg 115 Camera malfunct...

Страница 224: ...lace memory card with Nikon ap proved card This card cannot be used pg 143 Memory card has not been formatted for use in camera Format memory card Card is not formatted pg 26 pp 56 61 pp 129 131 Card is full or num ber of files has ex ceeded maximum that can be handled by camera or all file num bers have been used Delete photos or choose a lower im age quality setting or smaller image size or repl...

Страница 225: ...he battery pack and turn the camera on again pp 148 154 File format no longer conforms to DCF standard be cause image has been edited in an imaging application o r o t h e r w i s e modifying using a computer File corrupted When saving images after editing in a computer applica tion do not over write original file on memory card File does not contain image data pg 136 All photos in current folder ...

Страница 226: ...GB TIFF 12 JPEG Fine 1 4 66 JPEG Normal 1 8 132 JPEG Basic 1 16 265 Image sensor 23 7 15 6 mm 12 bit RGB CCD total pixels 2 74 million pixels Operating modes Single frame image preview mode available Continuous approx 5 fps max 40 consecutive shots Self timer mode delay can be specified by user Playback mode with playback menu PC mode data transfer to computer S C PLAY PC Image size 2 000 1 312 pi...

Страница 227: ...ith center weighted or spot metering electronic range finder can be used with lenses with a maximum aperture of f 5 6 or faster Lens mount Nikon F mount with AF coupling and AF contacts Picture angle Equivalent in 35 mm 135 format is approximately 1 5 times lens focal length Viewfinder Focusing screen Type B BriteView clear matte screen Mark III optional type E screen for D1 series cameras with gr...

Страница 228: ...d with other lenses color matrix metering using 1 005 pixel CCD is supported Center weighted Greatest weight 75 of total given to a circle in the center of the frame 8 mm in diameter Spot Exposure determined by 3 mm 0 12 circle in center of frame approximately 2 of frame when a CPU Nikkor lens is attached any of the five focus areas can be used for spot metering Exposure range At ISO 100 room temp...

Страница 229: ...0 pin remote terminal or IEEE 1394 inter face designed for speeds of up to 400 Mbps Monitor 2 130 000 dot low temperature polysilicon TFT LCD with ad justable white LED backlight and brightness adjustment Power source EN 4 Ni MH Battery Pack 7 2 V DC can be recharged with op tional MH 17 MH 16 or MH 15 Quick Chargers EH 4AC adapter sold separately 100 240 V AC Tripod socket 1 4 JIS Dimensions W H ...

Страница 230: ...eries Keep the battery contacts clean Soiled battery contacts can reduce battery performance Use batteries immediately after charging Batteries will lose their charge if left unused Memory effects can result in reduced battery performance Should this occur use the refresh button on the battery charger to discharge and recharge the battery Nikon reserves the right to change the specifications of th...

Страница 231: ... BKT and buttons are pressed simultaneously A the year will be shown in the control panel on top of the camera B Press the button once to display the month and day and a second time to view the hour and minute Pressing the button a third time will clear the time and date from the display A B To set the time and date hold the BKT and buttons down together for more than two seconds The year indicato...

Страница 232: ...800 K 4 900 K 3 000 K 1 2 900 K 5 000 K 3 700 K 0 3 000 K 5 200 K 4 200 K 1 3 100 K 5 300 K 5 000 K 2 3 150 K 5 400 K 6 500 K 3 3 250 K 5 600 K 7 200 K Fluorescent white balance can be fine tuned to accommodate a wide variety of artificial lighting from stadium lighting with low color temperatures to mercury vapor lighting with high color temperatures Users of the D1 should note that the color tem...

Страница 233: ...ash Cloudy Shade Adjustment Approximate color temperature 4 800 K 5 400 K 6 700 K 3 5 000 K 5 600 K 7 100 K 2 5 200 K 5 800 K 7 500 K 1 5 400 K 6 000 K 8 000 K 0 5 600 K 6 200 K 8 400 K 1 5 800 K 6 400 K 8 800 K 2 6 000K 6 600 K 9 200 K 3 ...

Страница 234: ...lock 31 installing 22 23 Body cap 25 Bulb 90 C C continuous servo autofocus See Autofocus C continuous shooting mode See Continuous shooting mode Card slot 26 27 Center weighted fill flash for digital SLR See Flash photography Center weighted metering See Metering Clock calendar 30 31 217 Closest subject priority 76 77 Color mode 181 Color temperature See White balance Continuous servo AF See Focu...

Страница 235: ... flash control 108 112 113 Flash ready indicator 109 Flexible program 85 Focus area 73 77 Focus lock 78 79 Focus mode 70 71 81 continuous servo AF 70 71 manual 81 single servo AF 70 71 Focus tracking 71 Focusing screen 194 202 Folder Select 140 Format See Memory card Frame Interval 134 135 G GPS 118 119 H High See Image quality Hide Image 136 137 Highlights 126 142 Histogram 126 142 I IEEE1394 int...

Страница 236: ...r digital SLR See Flash photography N NEF See Raw data Nikon Capture 3 152 153 Nikon View 5 150 151 NTSC See Video Output Normal See Image quality P PAL See Video Output PC mode 149 Picture angle 201 Playback 120 147 Playback menu 17 134 142 PRE See White balance Pre flash 108 111 Print Set 138 139 Programmed auto exposure mode See Exposure mode Protect 132 133 Q Quick review 120 R RAW data 56 61 ...

Страница 237: ...exposure mode See Exposure mode Single frame shooting mode 13 52 120 121 Single frame playback 49 122 124 126 Single servo AF See Autofocus Slide Show 134 135 Slow sync See Flash photography Speedlight 108 115 205 206 See also Flash photography Spot metering See metering Standard TTL flash for digital SLR See Flash photography Sync terminal 109 T Thumbnail 49 122 123 Time exposure See Long time ex...

Страница 238: ...Printed in Japan S2J00200401 11 6MEA0911 04 En ...

Отзывы: