background image

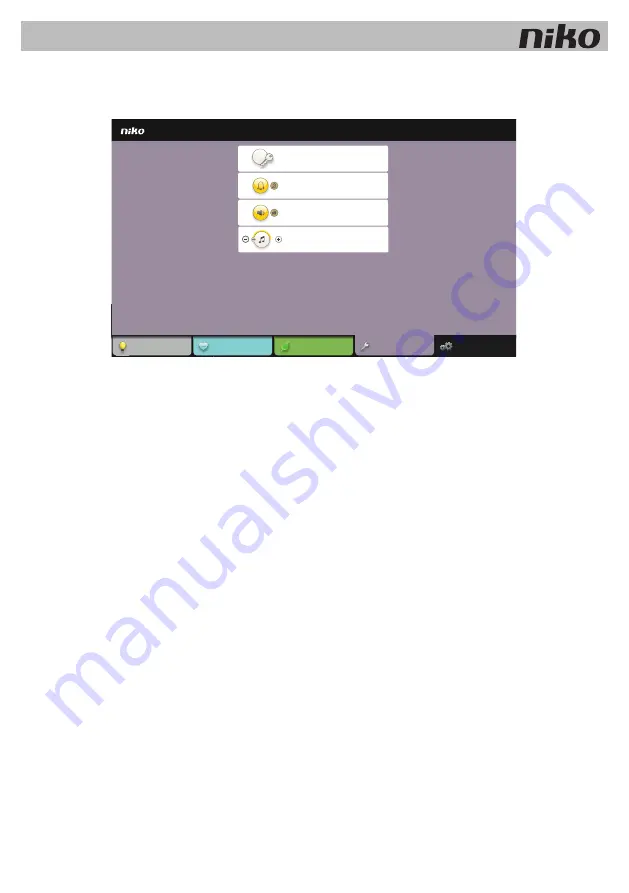
Používanie záložky „prístup“

Vyberte záložku „prístup“.

Môžete vykonať jedno z nasledovných:
•  Vyberte „posledné hovory“, aby ste si pozreli posledné hovory na všetkých tlačidlách/ovládačoch. Takisto si môžete 

pozrieť video záznamy pre každý hovor.

•  Vyberte „zvuk zvončeka“, aby ste vypli zvuk zvončeka (ak je obsiahnuté v danej inštalácii).
•  Vyberte „zvuk vyzváňacieho tónu“, aby ste vypli vyzváňací tón.
•  Vyberte „vyzváňací tón“, aby ste nastavili hlasitosť vyzváňacieho tónu.

vstup

nastavenia

ovládanie

oblu’úbené

energie

vstup

posledné hovory

prídavný zvonček

zvonenie zap/vyp

hlasitost’ 40%

2

2

2

2

2

2

2

2

2

2

2

2

2

2

2

2

2

20

2

2

2

2

2

2

2

2

2

2

0

0

0

0

0

0

0

0

0

0

0

Dotyková obrazovka 2

61

Содержание Touchscreen 2

Страница 1: ...it touchscreen een gedetailleerde weergave van het elektriciteits gas en waterverbruik als deze functies in de installatie aanwezig zijn Overzicht 550 20101 A Startscherm Toont de datum de tijd de meting van het globale elektriciteitsverbruik als deze functie aanwezig is twee symbolen voor een gedempt gong en beltoongeluid het aantal gemiste oproepen de aanwezigheid van meldingen in het logboek al...

Страница 2: ...én minuut niet aanraakt wordt het verduisterd om energie te besparen 2 Raak het tabblad bediening favorieten energie toegang of instellingen aan om het te selecteren Werken met het tabblad bediening 1 Selecteer het tabblad bediening 2 Selecteer links de gewenste locatie 3 Selecteer rechts de functie die je wilt activeren of deactiveren bediening favorieten bediening energie toegang instellingen li...

Страница 3: ...rieten kunt gebruiken moet je ze per actie instellen via het tabblad bediening 1 Selecteer het tabblad favorieten 2 Selecteer de functie die je wilt bedienen favorieten bediening energie toegang instellingen favorieten start stop salon Touchscreen 2 3 ...

Страница 4: ... het tabblad energie 2 Selecteer de meting die je wilt zien elektriciteit gas of water 3 Selecteer een periode live dag week maand of jaar 4 Selecteer de weergave voor de gekozen periode verbruik of kost je kunt niet kiezen voor een weergave in euro bij een livemeting 5 Vergelijk twee verbruiksperioden van een energiemeting met elkaar via de knop venster splitsen rechtsboven energie venster splits...

Страница 5: ...lecteer gonggeluid om het geluid van de gong uit te schakelen indien aanwezig in de installatie Selecteer beltoongeluid om het geluid van de beltoon uit te schakelen Selecteer beltoon om het volume van de beltoon te regelen toegang instellingen bediening favorieten energie toegang recente oproepen gonggeluid beltoongeluid beltoon 40 2 2 2 2 2 2 2 2 2 2 2 2 2 2 2 2 2 20 2 2 2 2 2 2 2 2 2 20 0 0 0 0...

Страница 6: ...r aangebeld wordt Selecteer info om de systeeminformatie te raadplegen Selecteer algemene voorwaarden om de gebruiksvoorwaarden te raadplegen Selecteer reset om alle instellingen van de videobuitenpost en terug te zetten op hun fabrieksinstellingen Ook alle ingestelde favoriete acties de symbolen die de bewoner geselecteerd heeft voor elke locatie en de volgorde van de acties per locatie verdwijne...

Страница 7: ...r te verbinden en aan de andere kant met het touchscreen 2 Het touchscreen 2 kan via Power over Ethernet PoE over dezelfde twisted pair kabel van voeding worden voorzien waarbij je gebruikmaakt van de Niko PoE voeding 550 00501 Je kunt ook een aparte voedingskabel leggen die je verbindt met een aparte 24Vdc voeding in de schakelkast In dat geval heb je naast de twisted pair kabel ook een 24V voedi...

Страница 8: ... de montagebeugel en het touchscreen 2 in volgende afbeeldingen om te bepalen waar op de muur het touchscreen 2 moet komen Horizontaal moet het midden van de inbouwdoos minstens 130 mm verwijderd zijn van muren deuren etc 24V DC L N Min 130 57 57 76 76 52 49 32 32 Min 53 8 Touchscreen 2 ...

Страница 9: ...s Het touchscreen 2 is niet geschikt voor inbouw Monteer het tegen de muur op een standaard inbouwdoos van minimaal 40 mm diep Per installatie zijn in totaal tien touchscreens smartphone of pc applicaties toegelaten Voor de connectoren boor je 40 mm diep met een boor met een diameter van 6 mm In hout heb je de connectoren niet nodig en is het boorgat maar 20 mm diep met een diameter van 3 mm Min 1...

Страница 10: ...rde groene schroefconnector aan op de 24V voedingskabel Respecteer hierbij de polariteit zoals aangeduid op de achterzijde van het touchscreen 2 Als je met een PoE voeding werkt heb je geen aparte 24V voedingskabel nodig Gebruik enkel een PoE voeding van het type IEEE802 3af De bijgeleverde groene schroefconnector 24V voeding is geschikt voor een koperdoorsnede van maximaal 1 5 mm 3 Bevestig een R...

Страница 11: ...e 24V voedingskabel in het touchscreen 2 5 Hang het touchscreen 2 aan de montageplaat en duw het in één vloeiende beweging tot tegen de muur 6 Bevestig het touchscreen 2 met bijgeleverde inbussleutel en verwijder alle beschermfolie Touchscreen 2 11 ...

Страница 12: ...s je een actie niet aan een locatie linkt linkt de software ze aan een virtuele locatie Als alle acties gelinkt zijn klik je op het touchsymbool om de overzichtslijst te openen Hier kun je de acties verwijderen die je niet wilt zien op het touchscreen Het touchscreen 2 onderhouden Gebruik een zachte droge of licht vochtige doek om het touchscreen 2 te reinigen Gebruik geen detergenten of reiniging...

Страница 13: ...schermresolutie 1024 x 600 gewicht 720 g exclusief connectoren en schroeven PoE voeding geschikt voor touchscreen 550 20100 touchscreen 2 550 20101 en videobuitenpost 550 22001 550 22002 550 21001 550 21002 en 550 21004 type IEEE 802 3af ingangsspanning 96 264 Vac uitgangsspanning 48 V uitgangsvermogen 15 4 W gegevens in via RJ45 poort gegevens en voeding uit via RJ45 poort indicatieleds led 1 ON ...

Страница 14: ...14 Touchscreen 2 ...

Страница 15: ... aperçu détaillé de la consommation d eau de gaz et d électricité si ces fonctions sont disponibles dans l installation Synthèse 550 20101 A Écran de démarrage Affiche la date l heure la mesure de la consommation globale d électricité si cette fonction est présente deux symboles pour un son de tonalité de sonnerie et de carillon assourdi le nombre d appels manqués la présence de notifications dans...

Страница 16: ... ne touchez pas l écran tactile 2 pendant une minute il se met en veille afin d économiser de l énergie 2 Touchez l onglet commande favoris énergie accès ou réglages pour le sélectionner Utilisation de l onglet commande 1 Sélectionnez l onglet commande 2 Sélectionnez à gauche le lieu de votre choix 3 Sélectionnez à droite la fonction que vous souhaitez activer ou désactiver commande favoris comman...

Страница 17: ...liser les favoris vous devez les paramétrer par action via l onglet commande 1 Sélectionnez l onglet réglages 2 Sélectionnez la fonction que vous souhaitez commander favoris commande énergie accès réglages favoris démarrage arrêt salon Écran tactile 2 17 ...

Страница 18: ... 2 Sélectionnez la mesure que vous souhaitez consulter électricité gaz eau 3 Sélectionnez une période temps réel jour semaine mois ou année 4 Sélectionnez l affichage pour la période choisie consommation ou coût vous ne pouvez pas choisir un affichage en euro pour une mesure en temps réel 5 Comparez deux périodes de consommation d une mesure de l électricité entre elles à l aide du bouton vue frac...

Страница 19: ...fin de désactiver le son du carillon si l installation est équipée de cette fonction Sélectionnez son de la tonalité de sonnerie pour désactiver le son de la tonalité de sonnerie Sélectionnez tonalité de sonnerie pour régler le volume de la tonalité de sonnerie accès réglages commande favoris énergie accès appels récents son du carillon son de la tonalité de sonnerie tonalité de sonnerie 40 2 2 2 ...

Страница 20: ... d un appel Sélectionnez info pour consulter les informations relatives au système Sélectionnez conditions générales pour consulter les conditions d utilisation Sélectionnez réinitialisation afin de rétablir tous les réglages d usine du des poste s extérieur s vidéo Toutes les actions favorites paramétrées les symboles sélectionnés par le résident pour chaque lieu et la suite des actions par lieu ...

Страница 21: ...e connecté et de l autre côté à l écran tactile 2 L écran tactile 2 peut être alimenté par Power over Ethernet PoE sur le même câble à paire torsadée Utilisez alors l alimentation PoE Niko 550 00501 Vous pouvez aussi utiliser un câble d alimentation distinct que vous connectez à une alimentation 24 Vdc distincte dans l armoire Dans ce cas vous avez besoin du câble à paire torsadée et d un câble d ...

Страница 22: ...uées sur les schémas suivants afin de déterminer l endroit du mur où l écran tactile 2 doit être installé Horizontalement le centre de la boîte d encastrement doit se trouver à une distance d au moins 130 mm par rapport aux murs portes etc Dimensions de la plaque de montage 24V DC L N Min 130 57 57 76 76 52 49 32 32 Min 53 22 Écran tactile 2 ...

Страница 23: ...nçu pour être encastré Montez le sur le mur sur une boîte d encastrement standard d au moins 40 mm de profondeur Par installation jusqu à dix écrans tactiles applications pour smartphone ou applications pour PC sont autorisés Percez des trous de 40 mm de profondeur à l aide d une perceuse mèche de 6 mm de diamètre afin d installer les connecteurs Dans le bois les connecteurs ne sont pas nécessaire...

Страница 24: ...vert fourni au câble d alimentation 24 V en veillant à respecter la polarité indiquée au dos de l écran tactile 2 Si vous utilisez une alimentation PoE vous n avez pas besoin d un câble d alimentation 24 V distinct Utilisez uniquement une alimentation PoE du type IEEE802 3af Le connecteur à vis vert fourni alimentation 24 V convient pour un câble d une section maximale de 1 5 mm 3 Fixez un connect...

Страница 25: ...le d alimentation 24 V à l écran tactile 2 5 Accrochez l écran tactile 2 à la plaque de montage et d un mouvement souple poussez le contre le mur 6 Fixez l écran tactile 2 à l aide de la clé Allen fournie et ôtez le film de protection Écran tactile 2 25 ...

Страница 26: ... la liera à un lieu virtuel Lorsque toutes les actions sont liées cliquez sur l icône de l écran tactile pour ouvrir la liste d ensemble Vous pouvez y supprimer les actions que vous ne voulez pas voir apparaître à l écran tactile Entretien de l écran tactile 2 Pour nettoyer l écran tactile 2 utilisez un chiffon doux sec ou légèrement humide N utilisez pas de détergents ni de produits de nettoyage ...

Страница 27: ... écran 7 résolution de l écran 1024 x 600 poids 720 g hors connecteurs et vis Alimentation PoE adaptée à l écran tactile 550 20100 0 l écran tactile 2 550 20101 et au poste extérieur vidéo 550 22001 550 22002 550 21001 550 21002 et 550 21004 type IEEE 802 3af tension d entrée de 96 à 264 Vac tension de sortie 48 V puissance de sortie 15 4 W entrée des données via port RJ45 sortie de données et ali...

Страница 28: ...28 Écran tactile 2 ...

Страница 29: ...bietet auch dieser Touchscreen eine detaillierte Anzeige des Elektrizitäts Gas und Wasserverbrauchs wenn diese Funktionen Bestandteil der Installationsanlage sind Übersicht 550 20101 A Startbildschirm Zeigt Datum Uhrzeit Messung des Gesamtstromverbrauchs wenn diese Funktion vorhanden ist zwei Symbole für einen gedämpften Gong und Rufton eine Reihe verpasster Anrufe das Vorhandensein von Meldungen ...

Страница 30: ...cht berühren verdunkelt sich dieser wieder um dadurch Energie zu sparen 2 Berühren Sie für eine Auswahl eine der Registerkarten Bedienung Favoriten Energie oder Einstellungen Registerkarte Bedienung 1 Wählen Sie die Registerkarte Bedienung 2 Wählen Sie links den gewünschten Wohnbereich aus 3 Wählen Sie rechts die Funktion aus die Sie aktivieren bzw deaktivieren möchten Bedienung Favoriten Bedienun...

Страница 31: ...riten müssen Sie diese erst in der Registerkarte Bedienung einstellen 1 Wählen Sie die Registerkarte Favoriten 2 Wählen Sie die zu bedienende Funktion aus Favoriten Bedienung Energie Zugang Einstellungen Favoriten Start Stopp Wohnzimmer Touchscreen 2 31 ...

Страница 32: ...ie Registerkarte Energie 2 Wählen Sie dann die zu betrachtende Verbrauchsmessung Elektrizität Gas Wasser aus 3 Wählen Sie einen Zeitraum Aktuell Tag Woche Monat Jahr aus 4 Wählen Sie die Anzeige für den gewählten Zeitraum Verbrauch oder Kosten bei einer Live Messung können Sie keine Anzeige in Euro wählen 5 Über die Taste Geteilte Ansicht rechts oben können Sie zwei Verbrauchsperioden eine Energie...

Страница 33: ...auch die Videoaufnahme ansehen Wählen Sie Gongton um den Ton des Gongs sofern in der Installationsanlage vorhanden auszuschalten Wählen Sie Rufton um den Rufton auszuschalten Wählen Sie Rufton um die Lautstärke des Ruftons zu regeln Zugang Einstellungen Bedienung Favoriten Energie Zugang zuletzt geführte Anrufe Gonton Rufton Rufton 40 2 2 2 2 2 2 2 2 2 2 2 2 2 2 2 2 2 20 2 2 2 2 2 2 2 2 2 20 0 0 0...

Страница 34: ...erufen wird Wählen Sie Info um die Systeminformationen anzuzeigen Wählen Sie allgemeine Bedingungen um die Nutzungsbedingungen anzuzeigen Wählen Sie Reset um alle Einstellungen der Video Außensprechstelle n auf die Werkseinstellungen zurückzusetzen Auch alle eingestellten Favoriten die Symbole die der Bewohner für jeden Wohnort gewählt hat und die Reihenfolge der Aktionen für jeden Wohnort verschw...

Страница 35: ... und auf der anderen Seite mit dem Touchscreen 2 Der Touchscreen 2 kann mittels PoE Power over Ethernet über dasselbe Kabel mit verdrillter Leitung mit Spannung versorgt werden wobei Sie das Niko PoE Netzteil 550 00501 benötigen Sie können natürlich auch eine gesonderte Versorgungsleitung verlegen die Sie an ein separates 24 Vdc Netzteil im Schaltschrank anschließen In dem Fall benötigen Sie neben...

Страница 36: ...ts des Touchscreen 2 an der Wand die in den folgenden Abbildungen dargestellten Abmessungen von Befestigungshalter und Touchscreen 2 Auf horizontaler Ebene muss die Mitte der Unterputzdose mindestens 130 mm von Wänden Türen etc entfernt sein 24V DC L N Min 130 57 57 76 76 52 49 32 32 Min 53 36 Touchscreen 2 ...

Страница 37: ...en 2 ist nicht für einen Einbau geeignet Befestigen Sie den Touchscreen mittels einer standardmäßigen Unterputzdose mit mindestens 40 mm Einbautiefe an der Wand Pro Installationsanlage können insgesamt zehn Touchscreens bzw Smartphone oder PC Anwendungen angeschlossen werden Für die Dübel bohren Sie 40 mm tief mit einem 6 mm Bohrer Bei einer Befestigung auf Holz benötigen Sie keine Dübel In dem Fa...

Страница 38: ...en Schraubanschluss an der 24 V Versorgungsleitung an Beachten Sie dabei unbedingt die auf der Rückseite des Touchscreen 2 angegebene Polarität Wenn Sie ein PoE Netzteil einsetzen benötigen Sie keine gesonderte 24 V Versorgungsleitung Verwenden Sie ausschließlich ein PoE Netzteil vom Typ IEEE802 3af Der mitgelieferte grüne Schraubanschluss 24 V Spannungsversorgung eignet sich für einen Leiterquers...

Страница 39: ...am Touchscreen 2 an 5 Hängen Sie den Touchscreen 2 an der Montageplatte ein und drücken Sie diesen in einer einzigen durchgehenden Bewegung bis gegen die Wand 6 Befestigen Sie den Touchscreen 2 mit dem mitgelieferten Inbusschlüssel und entfernen Sie die Schutzfolie Touchscreen 2 39 ...

Страница 40: ... einem Wohnbereich verknüpfen dann wird diese von der Software mit einem virtuellen Wohnbereich verknüpft Wenn alle Aktionen verknüpft sind dann klicken Sie zum Öffnen der Übersichtsliste auf das Touch Symbol Hier können Sie alle Aktionen entfernen die Sie nicht auf dem Touchscreen sehen möchten Touchscreen 2 pflegen Verwenden Sie für die Reinigung des Touchscreen 2 ein weiches trockenes bzw leich...

Страница 41: ...dschirmauflösung 1024 x 600 Gewicht 720 g ohne Dübel und Schrauben PoE Netzteil geeignet für Touchscreen 550 20100 Touchscreen 2 550 20101 und Video Außensprechstelle 550 22001 550 22002 550 21001 550 21002 und 550 21004 Typ IEEE 802 3af Eingangsspannung 96 264 Vac Ausgangsspannung 48 V Ausgangsleistung 15 4 W Dateneingang über RJ45 Port Dateneingang und Spannungsversorgung über RJ45 Port Anzeige ...

Страница 42: ...42 Touchscreen 2 ...

Страница 43: ...ovides a detailed overview of the electricity gas and water consumption in the home provided that these functions have been included in the installation Overview 550 20101 A Start screen Displays the date the time the measurement of the global electricity consumption if this function is present two symbols for a muted chime and ringtone sound the number of missed calls the presence of notification...

Страница 44: ...you do not touch the screen during 1 minute the display will be dimmed to reduce energy consumption 2 Touch the corresponding tab to select control favourites energy access or settings Using the control tab 1 Select the control tab 2 Select the location of your choice on the left hand side 3 Select the function you wish to activate or deactivate on the right hand side bediening favorieten bedienin...

Страница 45: ... each of these favourites must have been entered first for each action via the control tab 1 Select the favourites tab 2 Select the function you wish to control favorieten bediening energie toegang instellingen favorieten start stop salon Touchscreen 2 45 ...

Страница 46: ...lable 1 Select the energy tab 2 Select the measurement you wish to see electricity gas or water 3 Select a period live day week month or year 4 Select the display for the chosen period consumption or cost you cannot choose a display in EUR for a live measurement 5 Compare two consumption periods of an energy measurement using the button split view at the top right energie venster splitsen instelli...

Страница 47: ...chime sound to switch off the sound of the chime if present in the installation Select ringtone sound to switch off the ringtone sound Select ringtone to adjust the volume of the ringtone toegang instellingen bediening favorieten energie toegang recente oproepen gonggeluid beltoongeluid beltoon 40 2 2 2 2 2 2 2 2 2 2 2 2 2 2 2 2 2 20 2 2 2 2 2 2 2 2 2 20 0 0 0 0 0 0 0 0 0 0 Touchscreen 2 47 ...

Страница 48: ...en someone rings the bell Select info to view the system information Select terms and conditions to view the usage conditions Select reset to reset all external video unit settings to their factory settings All set favourite actions the symbols selected by the resident for each location and the order of the actions per location disappear instellingen bediening favorieten energie toegang instelling...

Страница 49: ...en 2 on the other The touchscreen 2 can be supplied with power using Power over Ethernet PoE via the same twisted pair cable for which you use the Niko PoE power supply 550 00501 Alternatively you can provide a separate power supply cable which you connect to a separate 24 Vdc power supply module in the electrical cabinet In that case you will need a 24 V power supply cable such as an SVV JYSTY TP...

Страница 50: ... bracket and the touchscreen in the images below to determine the exact location of the touchscreen 2 on the wall Horizontally the centre of the flush mounting box must be at a distance of at least 130 mm from other walls doors etc 24V DC L N Min 130 57 57 76 76 52 49 32 32 Min 53 50 Touchscreen 2 ...

Страница 51: ... itself is not suitable for flush mounting Mount the touchscreen onto the wall using a standard flush mounting box with a depth of at least 40 mm A total of ten touchscreens smartphone or PC applications can be used per installation Use a drill with a 6 mm diameter to drill a hole of 40 mm for each connector If you are drilling in wood you will not need to use the connectors and only a drill hole ...

Страница 52: ...Connect the green screw connector supplied to the 24V power supply cable while observing the polarity as indicated on the back of the touchscreen 2 If you are using a PoE power supply you do not need a separate 24V power supply cable Only use the Niko PoE power supply type IEEE802 3af The green screw connector supplied 24V power supply is suitable for a maximum copper diameter of 1 5 mm 3 Mount a ...

Страница 53: ...V power supply cable to the touchscreen 2 5 Hang the touchscreen 2 onto the mounting plate and press it down against the wall in one smooth motion 6 Tighten the touchscreen 2 using the hexagon key supplied and remove the protective foil Touchscreen 2 53 ...

Страница 54: ...action is not linked to a location the software will link the action to a virtual location When all actions have been linked click the touch icon to open the overview In this overview you can remove any actions that you do not want to be displayed on the touchscreen Touchscreen 2 maintenance Use a soft dry or slightly damp cloth to clean the touchscreen 2 Do not use detergents or other cleaning ag...

Страница 55: ...en size 7 screen resolution 1024 x 600 weight 720 g excluding connectors and screws PoE power supply suitable for touchscreen 550 20100 touchscreen 2 550 20101 and external video unit 550 21001 550 21002 550 21004 type IEEE 802 3af input voltage 96 264 Vac output voltage 48 V output power 15 4 W data in via RJ45 port data and power supply out via RJ45 port indication LEDs LED 1 ON green if correct...

Страница 56: ...56 Touchscreen 2 ...

Страница 57: ... aj predošlý model dotyková obrazovka poskytuje podrobný prehľad o spotrebe elektriny plynu a vody v domácnosti za predpokladu že tieto funkcie boli aktivované v inštalácii Prehľad 550 20101 A Úvodná obrazovka Zobrazuje dátum čas namerané globálne hodnoty pre spotrebu elektriny ak obsahuje túto funkciu dva symboly pre vypnutý zvonček a vypnutý vyzváňací tón počet zmeškaných hovorov nové notifikáci...

Страница 58: ...minúty nedotknete dotykovej obrazovky 2 obrazovka za účelom šetrenia stmavne 2 Dotknite sa príslušnej záložky aby ste vybrali ovládanie obľúbené energie prístup alebo nastavenia Používanie záložky ovládanie 1 Vyberte záložku ovládanie 2 Na ľavej strane vyberte miesto pre umiestnenie 3 Vyberte funkciu na pravej strane ktorú chcete aktivovať alebo deaktivovať ovládanie obľúbené ovládanie energie vst...

Страница 59: ...bľúbené akcie musíte najprv každú jednu zadať medzi obľúbené pomocou záložky ovládanie 1 Vyberte záložku obľúbené 2 Vyberte funkciu ktorú chcete ovládať oblu úbené ovládanie energie vstup nastavenia oblu úbené štart stop obývačka Dotyková obrazovka 2 59 ...

Страница 60: ...áložku energie 2 Vyberte merania ktoré chcete zobraziť elektrina plyn alebo voda 3 Vyberte časové obdobie aktuálne deň týždeň mesiac rok 4 Vyberte čo chcete pre dané časové obdobie zobraziť spotrebu alebo náklady pre aktuálne merania nemôže vybrať zobrazenie v eurách 5 Porovnajte spotrebu počas dvoch nameraných časových období pomocou tlačidla rozdeliť zobrazenie nachádzajúcom sa vpravo hore energ...

Страница 61: ...hovor Vyberte zvuk zvončeka aby ste vypli zvuk zvončeka ak je obsiahnuté v danej inštalácii Vyberte zvuk vyzváňacieho tónu aby ste vypli vyzváňací tón Vyberte vyzváňací tón aby ste nastavili hlasitosť vyzváňacieho tónu vstup nastavenia ovládanie oblu úbené energie vstup posledné hovory prídavný zvonček zvonenie zap vyp hlasitost 40 2 2 2 2 2 2 2 2 2 2 2 2 2 2 2 2 2 20 2 2 2 2 2 2 2 2 2 20 0 0 0 0 ...

Страница 62: ...2 keď niekto zazvoní na zvončeku Vyberte info ak si chcete pozrieť systémové informácie Vyberte všeobecné podmienky ak si chcete pozrieť podmienky používania Vyberte reštartovať ak chcete na všetkých vonkajších video jednotkách obnoviť továrenské nastavenia Tým odstránite všetky akcie ktoré ste nastavili ako obľúbené symboly ktoré používateľ vybral pre každú lokalitu a poradie akcií pre každú loka...

Страница 63: ...5 Dotyková obrazovka 2 môže byť napájaná cez Power over Ethernet PoE pomocou rovnakej krútenej dvojlinky pre ktorú použijete Niko PoE zdroj napájania 550 00501 Prípadne môžete použiť samostatný napájací kábel ktorý pripojíte k samostatnému napájaciemu 24 Vdc modulu v rozvádzači V takom prípade budete okrem krútenej dvojlinky potrebovať aj 24 V napájací kábel ako je napríklad SVV JYSTY TPVF alebo U...

Страница 64: ...tykovej obrazovky 2 na nižšie uvedených obrázkoch aby ste mohli určiť presné umiestnenie dotykovej obrazovky na stene Horizontálne musí byť stred zapustenej montážnej krabice vzdialený minimálne 130 mm od iných stien dverí atď 24V DC L N Min 130 57 57 76 76 52 49 32 32 Min 53 64 Dotyková obrazovka 2 ...

Страница 65: ...ta Samotná dotyková obrazovka 2 nie je vhodná na zapustenú montáž Dotykovú obrazovku namontujte na stenu pomocou štandardnej zapustenej montážnej krabice s hĺbkou minimálne 40 mm V každej inštalácii môže byť použitých max desať aplikácií pre dotykové obrazovky smartfóny alebo počítače Použite vrták s priemerom 6 mm ktorým vyvŕtate 40 mm otvory pre každý konektor Ak vŕtate do dreva nebude musieť po...

Страница 66: ...yť väčšie ako 2 mm 2 Pribalený zelený skrutkový konektor pripojte na 24 V napájací kábel ale dbajte pritom na polaritu ktorá je uvedená na zadnej časti dotykovej obrazovky 2 Ak používate zdroj napájania typu PoE nepotrebujete samostatný 24 V napájací kábel Používajte len napájací zdroj Niko PoE typu IEEE802 3af Pribalený zelený skrutkový konektor 24 V napájanie vhodný pre vhodný pre medený vodič s...

Страница 67: ...pade potreby aj 24 V napájací kábel 5 Dotykovú obrazovku 2 namontujte na montážnu svorku a jedným plynulým pohybom ju zatlačte na stenu 6 Dotykovú obrazovku 2 upevnite pomocou pribaleného šesťhranného kľúča a odstráňte ochrannú fóliu Dotyková obrazovka 2 67 ...

Страница 68: ...s danou lokalitou softvér túto akciu prepojí s virtuálnou lokalitou Po prepojení všetkých akcií kliknite na dotykovú ikonu čím otvoríte prehľad Z tohto prehľadu môžete odstrániť všetky akcie ktoré nechcete aby sa zobrazovali na dotykovej obrazovke Údržba dotykovej obrazovky 2 Na čistenie dotykovej obrazovky 2 použite mäkkú a suchú alebo mierne navlhčenú handričku Nepoužívajte detergenty alebo iné ...

Страница 69: ...720 g bez konektorov a skrutiek Napájací zdroj pre dotykový displej vhodný pre dotykovú obrazovku 550 20100 dotykovú obrazovku 2 550 20101 a vonkajšie video jednotky 550 22001 550 22002 550 21001 550 21002 a 550 21004 typ IEEE 802 3af vstupné napätie 96 264 Vac Výstupné napätie 48 V výstupný výkon 15 4 W vstup pre údaje cez port RJ45 výstup pre údaje a zdroj napájania cez port RJ45 LED indikátory ...

Страница 70: ...70 Dotyková obrazovka 2 ...

Отзывы: