background image

39

Make sure all the screws are done up tightly.

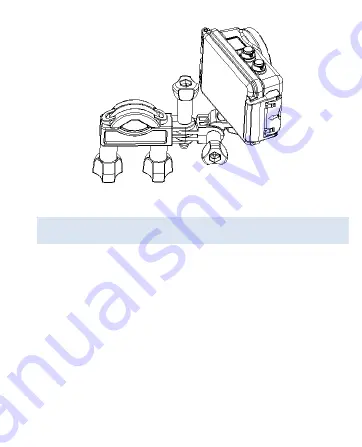
FIXING  T H E  ACTION C AM E R A  T O   A H ELMET

1. Find the 

Helmet Mount B

2. This mount is separated into 3 parts. 

Main Section (3)

Mounting Bracket (2)

Connectors 

3. You can either connect the mounting bracket directly to the 

main section or choose some of the connectors from the three 

Содержание EXTREME X5

Страница 1: ......

Страница 2: ...ons 2 Important Safety Precautions 4 Product Specification 5 Contents 6 Getting to know your Camera 7 Using the Action Camera 9 Action Camera Operation 10 WIFI Mode 30 Connections 33 Using the Remote...

Страница 3: ...nd keep it for future reference Follow these important safety and operation instructions SAFETY INSTRUCTIONS The Action camera without underwater casing shall not be exposed to dripping or splashing a...

Страница 4: ...subject the camera to harsh impacts to avoid damage do not drop the unit Do not attempt to dismantle or repair this camera yourself Qualified personnel should perform repairs Disconnect the camera fro...

Страница 5: ...gram failure never disconnect the product suddenly from a PC while file transferring is in progress Disconnect the appliance from PC when cleaning Use a dry soft cloth to clean this appliance Do not d...

Страница 6: ...720P 1280x720 30 fps 720P 1280x720 60 fps Still Image Resolution 12MP 8MP 5MP 3MP 2MP VGA Wide angle lens Waterproof to 45m with Case 1 5 Preview Screen Expandable Micro SD Slot up to 32GB High speed...

Страница 7: ...items shown below are included in the package Should an item be missing please contact the local retailer from which you purchased this product Action Camera 1 piece 45m Waterproof Case 1 piece Bike M...

Страница 8: ...TING TO KNOW YOUR CAMERA DEVICE OVERVIEW 1 Menu button 2 OK button 3 LCD screen 4 Down button 5 Up Wifi button 6 LED indicator light 7 Shutter Power button 8 Mode button 9 Microphone 10 Micro SD card...

Страница 9: ...8 11 HDMI socket 12 USB socket 13 Speaker 14 Reset 15 Tripod hole 16 Lens...

Страница 10: ...ble provided to a computer or a 1Amp wall charger 3 The led indicator will light up red when charging 4 The battery will become fully charged after 4 hours 5 Once fully charged the charging indictor w...

Страница 11: ...icro SD TF card Class 10 and above must be inserted for this action camera to operate and record 1 Turn off the action camera 2 Find the Micro SD card slot and then insert the Micro SD card ACTION CAM...

Страница 12: ...utomatically turn itself off after 5mins of inactivity to save power MODES The camera has four modes for the action camera video mode capture mode car mode playback mode Press the Mode button to switc...

Страница 13: ...the Mode button to access the settings menu as below Use the Up Down and OK buttons to make your selections also the Mode button to toggle the selections MENU FUNCTION Sounds Allows you to change the...

Страница 14: ...omatically after a period of time After you select the off that means the power save function is switched off 1min 3min 5min off Date and Time Sets the date and time for the camera Language Set the on...

Страница 15: ...andard password is set as 1234567890 Format Format your SD card including protected files removing the SD card during formatting may damage the card YES NO Reset All Restores the action camera to defa...

Страница 16: ...to stop recording 7 The action camera will stop recording automatically when the memory capacity is full While under the loop recording setting once memory capacity is reached it will erase files take...

Страница 17: ...16 When in Video mode the below screen will show 7 6 5 4 3 2 01 58 1...

Страница 18: ...in video mode press the Menu button and the below settings will appear MENU FUNCTION Size Changing the video resolution for the recording Select small movie size to record longer time There are four i...

Страница 19: ...Rec Record voice when recording movie clips On Off Loop recording While under the loop recording setting once memory capacity is reached it will erase files taken from the beginning Set the loop reco...

Страница 20: ...e lapse Duration Choose the duration of your time lapse recording Unlimited 3min 5min 10min 15min 20min 30min 60min Date Stamp This function can be used to add a date and time to your pictures Off Dat...

Страница 21: ...emory capacity in the top right of screen will decrease as each image is taken SETTINGS IN PHOTO MODE While in photo mode press the Menu button to access the photo settings MENU FUNCTION Resolution Al...

Страница 22: ...ng Changes the metering method which enables to change the brightness of the picture Centre Multi Spot Sharpness You can set the level of sharpness in the images taken with your camera The sharpness l...

Страница 23: ...ditions 2 1 7 1 3 1 0 7 0 3 0 0 3 0 7 1 1 3 1 7 2 Stabilizer Helps to keep the recording stable On Off Auto Review After taking photo the will be displayed on the LCD screen for the below amount of ti...

Страница 24: ...time lapse photography it will take one photo per the below timing Off 3sec 5sec 10sec 30sec 1min 3min Time lapse Duration Choose the duration of your time lapse photographing Unlimited 3min 5min 10mi...

Страница 25: ...24 When in Photo mode the below screen will show 99 7 6 4 3 2 1 5...

Страница 26: ...s This is for when your camera is connected to a windshield windscreen mount Not included it will record the correct the way and not be upside down The Process for recording and changing the settings...

Страница 27: ...ect the files you want to review 4 To review the Video or Car File press the Ok button to start playing the video file to pause the video press the Up button Press the Menu button to stop playing the...

Страница 28: ...27 1 Playback mode 2 The time 3 Exit 4 Pause 5 Video car protect File 6 Lock 5 1 2 0 300 3 4 6...

Страница 29: ...28 PLAYBACK JPG FILE 1 Playback mode 2 Sequence of File 3 Date and Time 4 Image File 5 Lock 4 1 5 5 2015 4 22 15 30 2 3 5...

Страница 30: ...ack mode press the Menu button to access the settings MENU FUNCTION Lock Use this function to protect the files from being deleted by accident Single Lock All Unlock All Delete Use this function to de...

Страница 31: ...ate Save Back Resize Resize images to a smaller resolution 5M 3M 2M VGA Functions only available when viewing photos WIFI MODE The action camera comes with Wi Fi function so you can wirelessly stream...

Страница 32: ...nnection 3 Now with your mobile phone disconnect from any current wireless networks and search for a WIFI connection called EXTREME X5 and connect using password 1234567890 the LCD screen on the camer...

Страница 33: ...tion camera with the App to take photos videos and change different settings 6 To watch the recorded videos you will need to download these from the APP to your phone then watch the video as per you n...

Страница 34: ...33 CONNECTIONS CONNECTING TO HDTV The action camera can be connected to a HDTV via a Mini...

Страница 35: ...he action camera to a TV via a Mini HDMI cable not supplied 2 Turn on the TV and the action camera and then set the TV to HDMI mode 3 When HDTV is connected the action camera screen will go black and...

Страница 36: ...he driver will automatically install Now you can view the photos or videos taken by action camera on the PC Mac Note when watching the videos on your computer please ensure you are using the latest ve...

Страница 37: ...r 2 Use this button to record video on Video Car Mode When in Standby mode use this button to wake camera up and start recording 3 Use this button to stop recording 4 Enters standby mode while in Vide...

Страница 38: ...elmet mounts can be attached to either the action camera directly or waterproof case with the camera inside FIXING THE ACTION CAMERA TO A BIKE 1 Find the Bike Mount A 2 This mount is separated into 3...

Страница 39: ...nting Bracket 2 Connectors 3 Choose the connectors from the three given below depending on how you want to mount your camera and then fix them to the part 1 of the main mount and part 2 the mounting b...

Страница 40: ...ACTION CAMERA TO A HELMET 1 Find the Helmet Mount B 2 This mount is separated into 3 parts Main Section 3 Mounting Bracket 2 Connectors 3 You can either connect the mounting bracket directly to the ma...

Страница 41: ...40 given below depending on how you want to mount your camera and then fix them to the part 3 of the main section and part 2 the mounting bracket...

Страница 42: ...connect to the action camera or the underwater case via the tripod Socket Then the Mount can be used with any GoPro Accessory which can be bought from the local retailer The GoPro Accessory will attac...

Страница 43: ...r After every use in salt water you will need to rinse the outside of the housing with non salt water and dry Not doing this can eventually cause corrosion of the hinge pin and salt buildup in the sea...

Страница 44: ...I press the shutter button but no response Wait for data process to complete and then take your next image Or Delete some images in SD MMC card if the memory is full The product does not respond Rese...

Страница 45: ...deo to your phone Ensure your phone has the latest video player otherwise try to download another video player for your phone Cannot connect to mobile App Check to make sure you have connected to the...

Страница 46: ...omputer Please also ensure you are using a class10 or higher Micro SD Card Also ensure there is spare memory inside the card There is no sound on my recording If recording while in the waterproof case...

Отзывы: