background image

61

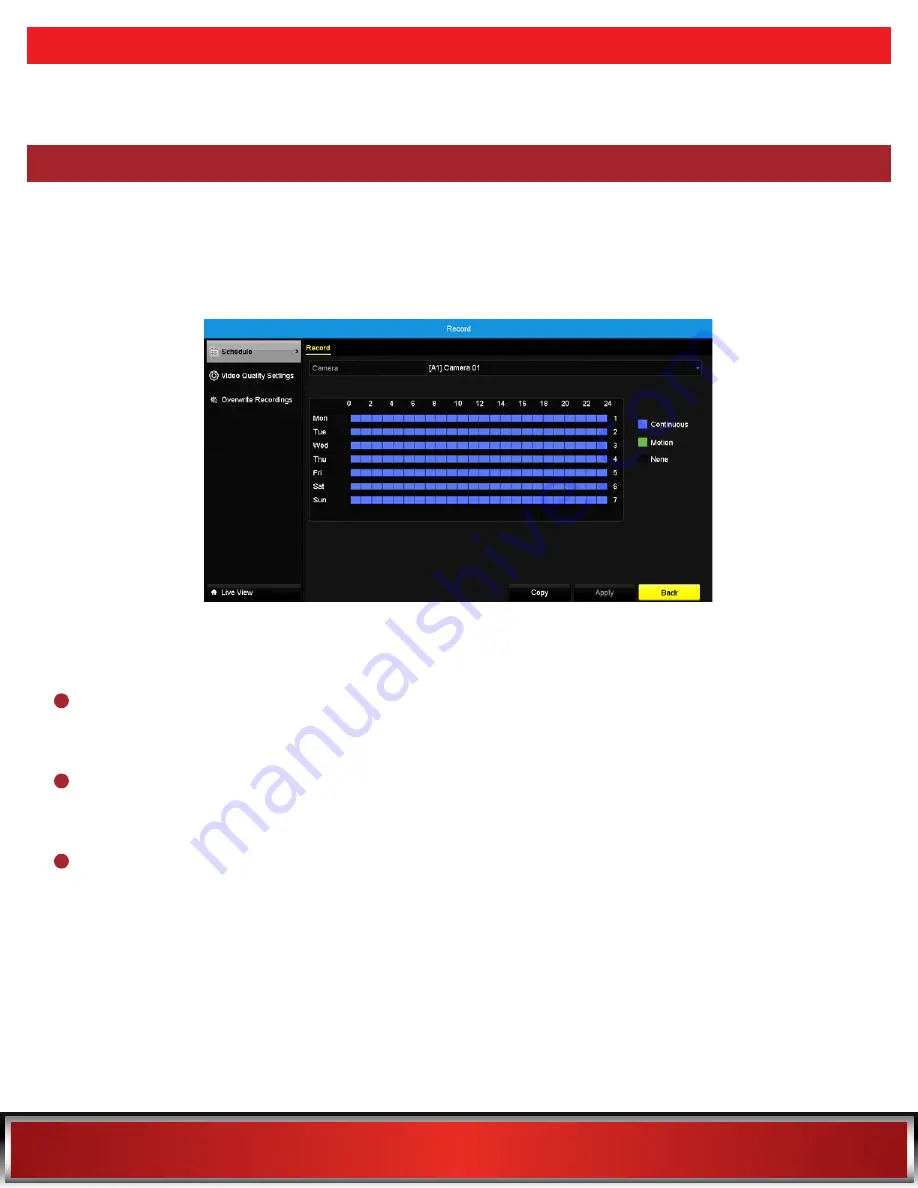
This menu allows you to edit DVR record scheduling, video quality settings and set overwrite preferences.

Within this menu, you can specify when the DVR records video and under what mode for each channel. 
By default, all channels are armed to use Motion Detection as their recording mode. 
The schedule presented on-screen applies to one camera over one entire week. There is a 24-hour timeline 
for each day of the week. Each square in the timeline represents an hour in the 24-hour period.

8.4 Record

8.4.1 Schedule

When defining a recording schedule, there are 3 types of recording to choose from:

Continuous  (Blue):

  The  DVR  will  constantly  record  for  any  period.  You  won’t  miss  anything,  but 

constant recording will fill your hard drive very quickly. Typically, we suggest Motion as a better 
recording mode for most users.

Motion (Green):

 The default and recommended recording setting. The DVR will only record when it 

detects something moving in front of a camera, and will then only record footage from the camera(s) 
that do detect motion. 

None (Black):

 The DVR will not record anything. 

Содержание THD Series

Страница 1: ...1 Specifically Designed for Smartphones Specifically Designed for Tablets THD SERIES www NightOwlSP com USER S MANUAL...

Страница 2: ...will begin Follow the steps within the Startup Wizard to upgrade your system s firmware Before setting up your system you MUST update your DVR s firmware Please follow these steps NOTE Your DVR must...

Страница 3: ...3 TABLE OF CONTENTS...

Страница 4: ...to a TV via HDMI 23 6 2 Power 24 Chapter 7 Getting Started 26 7 1 Startup Wizard 26 7 1 1 Camera Test 27 7 1 2 Network Check 27 7 1 3 Firmware Check 29 7 1 4 Password Creation 30 7 1 5 Date and Time...

Страница 5: ...8 4 3 Overwrite Recordings 64 8 5 Hard Drive 64 8 6 Configuration 65 8 6 1 General 65 8 6 1 a General 65 8 6 1 b DST Daylight Savings Time 66 8 6 1 c More Settings 66 8 6 2 Network 67 8 6 2 a General...

Страница 6: ...ted without having enhanced knowledge regarding the menu In most cases the default settings allow for optimal functionality The menus that should maintain the default settings are indicated with this...

Страница 7: ...7 CHAPTER 1 FCC WARNINGS...

Страница 8: ...dio communication However there is no guarantee that interference will not occur in television reception which can be determined by turning the equipment off and on The user is encouraged to try and c...

Страница 9: ...9 CHAPTER 2 SAFETY INSTRUCTIONS...

Страница 10: ...lugged before you move it When moving this device be sure to handle it with care MAKE SURE THERE IS GOOD AIR CIRCULATION AROUND THE DVR This DVR uses an internal hard drive which generates heat during...

Страница 11: ...11 CHAPTER 3 APP OVERVIEW...

Страница 12: ...Owl X For remote viewing on an iOS or Android phone make sure you download Night Owl X SMARTPHONES For remote viewing on an iOS or Android tablet make sure you download Night Owl X HD TABLETS NOTE To...

Страница 13: ...13 CHAPTER 4 SPECIFICATIONS...

Страница 14: ...for PC Browser are for on line viewing only MAC Operating System MAC OS X 10 9 and above MAC Browser N A Android 4 2 and above iOS 9 and above 4 2 Package Contents Items Not Included NOTE Monitor is...

Страница 15: ...ophone and speaker not included USB Ports Allows for the connections of a USB mouse and or a USB flash drive You will connect the included USB mouse to assist you in navigating the DVRs menu interface...

Страница 16: ...again to return to split screen mode Right click to show the Right Click Menu at the bottom of the screen Left clicking hides the Right Click Menu In Setup Left click to make a selection Right click...

Страница 17: ...17 CHAPTER 5 CAMERA INSTALLATION...

Страница 18: ...ort on the back of your DVR Repeat for each camera noting the channel number each camera is plugged into Connect a camera to one end of the cable by matching the BNC connectors and DC power connectors...

Страница 19: ...et or UPS Keep in mind Night Owl always recommends utilizing a surge protector to minimize the risk of damage caused to your DVR in the event of a power surge Plug into surge protector Cameras Camera...

Страница 20: ...ly should be located as near to the camera as possible when the distance exceeds 200 ft as the power level will drop over extended distances resulting in video degradation Avoid direct exposure to wea...

Страница 21: ...screw anchors drill into the mounting surface using the guide marks you placed in the previous step Line up the camera base holes with the screw anchors Holding the base in place insert screws and ti...

Страница 22: ...22 CHAPTER 6 DVR INSTALLATION...

Страница 23: ...Connect the other end of the cable to an available HDMI input on your TV or monitor Select the appropriate video input channel on your TV or monitor to view the DVR If your TV does not have an HDMI p...

Страница 24: ...pter cable into an available wall outlet If you are using an uninterruptible power supply UPS plug the adapter cable into one of its output sockets Keep in mind Night Owl always recommends utilizing a...

Страница 25: ...25 CHAPTER 7 GETTING STARTED...

Страница 26: ...lizing After initialization you will be prompted to use the Startup Wizard Follow the on screen instructions to Complete the basic setup of your DVR Test your cameras locally Upgrade the firmware Crea...

Страница 27: ...P com and click on the Support tab The Network Check screen of the Startup Wizard displays instructions for how to connect your DVR to the Internet You will need the included Ethernet cable to establi...

Страница 28: ...ce the internet connection has been established the Startup Wizard will display a successful connection screen If you wish to proceed with the DVR setup without a network connection you may do so by c...

Страница 29: ...e update is complete This may take up to 10 minutes please be patient If you have chosen to complete the DVR setup without Internet connection the screen below will not appear The Startup Wizard will...

Страница 30: ...less a recovery email address is established To change your recovery email address you MUST rerun the Startup Wizard NOTE Forgot the admin password Click the Forgot PWD tab in the Startup Wizard and a...

Страница 31: ...u information on where to find the Night Owl X app and how it can be used to remotely view your DVR recordings and live stream NOTE You must be connected to the Internet to use NTP 7 1 5 Date and Time...

Страница 32: ...e installed the Night Owl X or Night Owl X HD app on your smart device and created an account you can scan the QR code on the Startup Wizard to configure your DVR with the Night Owl X or Night Owl X H...

Страница 33: ...nfo created for the DVR this login is unique to the Night Owl X and Night Owl X HD apps The DVR login should be stored on page 5 step 2 of the Quick Setup Guide included in your DVR kit To confirm you...

Страница 34: ...our DVR QR Code Setup Ethernet Cable Wi Fi NOTE When adding a new device it may take 5 10 minutes before you begin receiving notifications To begin adding a new device first select the yellow plus sig...

Страница 35: ...p Guide included in your DVR kit If you are a user it will be the password you use to login to the DVR Login to your App On the Device Login screen enter the login information for the DVR Remember the...

Страница 36: ...ve View Displays real time footage of your system Playback View recordings images and save them to your phone s album Settings Display connected devices change view layout view favorites manage accoun...

Страница 37: ...Admin password Night Owl strongly recommends writing down your password within the Quick Setup Guide of your DVR The Camera Channel Settings screen of the Startup Wizard serves as a reminder to mount...

Страница 38: ...hows how you can use the Live View feature of the Night Owl X or Night Owl X HD app to easily adjust your cameras position and viewing angle 7 1 10 Channel Settings The Channel Settings screen of the...

Страница 39: ...s in detail how you will configure your Channel Settings 7 1 11 Default View The Default View screen of the Startup Wizard allows you to select the default view of the monitor connected to your DVR Yo...

Страница 40: ...tab at the top of the page DVR Troubleshooting Guide PC MAC software download page DVR Support page Remote Viewing Support page NOTE Please scan these QR Codes directly from your TV Monitor NOT direc...

Страница 41: ...41 7 1 13 Wizard Complete Once you have successfully completed the Startup Wizard click Finish to begin using your Night Owl DVR...

Страница 42: ...ing Icon Indicates that your DVR is currently recording video from this camera This icon will be the same whether the recording was scheduled initiated manually or triggered by motion Camera Name OSD...

Страница 43: ...Camera Name Settings Open the Camera Management Section to configure various camera settings such as on screen display information motion detection privacy mask and more Recording Schedule Open the r...

Страница 44: ...recorded video Digital Zoom Enter Digital Zoom mode Use the PIP Picture in Picture screen at the bottom right corner to zoom in on a different selected area You can also click and drag to draw a speci...

Страница 45: ...d in the Startup Wizard or User Menu Password Enter the Password you created in the Startup Wizard or User Menu If the password is incorrect you will be prompted to try again Keep in mind the password...

Страница 46: ...46 CHAPTER 8 MENUS AND SETTINGS...

Страница 47: ...pdown box Copy then select the channel you would like to copy the information to from the second dropdown box To Click Copy when the proper channels have been chosen Be sure to click Apply to save all...

Страница 48: ...ection privacy mask and more Record Set up recording schedules for the cameras and customize how the DVR records footage and encodes the files Hard Drive Check on the status of your DVR s installed ha...

Страница 49: ...able video recording and the end time of the last video recording made Camera Selection Search for recordings from one or more cameras Video Timeline Click any point of the video timeline to quickly s...

Страница 50: ...ment Allows you to manage or export blocked and tagged video clips Zoom In Enter Digital Zoom mode Use the PIP Picture in Picture screen at the bottom right corner to select a different area to zoom Y...

Страница 51: ...he previous motion detection recording For Tag playback start playing the previous tagged event Play Next Recording For Normal playback start playing the next day s recordings For Event playback start...

Страница 52: ...port on the back of the DVR Specify the channel s record type file type and time period to search for recordings Click Search The DVR shows you all of your recordings matching your search criteria whe...

Страница 53: ...R displays the image coming from your cameras Click Export Select Video and Log then click OK to begin copying the selected recordings to your USB storage device Wait until the Export finished message...

Страница 54: ...hen you want to protect personal privacy or sensitive areas Video Tampering Can be used in scenarios where someone may cover up the camera s field of view or if they are attempting to tamper with the...

Страница 55: ...the date to be displayed The default format is MM DD YYYY Time Format Select how you want the time to be displayed The default format is 24 hour Font Select the information text size that appears on...

Страница 56: ...et to high the camera will require less light change to switch to Night Vision thereby extending Night Vision Night to Day Sensitivity Change the camera sensitivity to switch from Night Vision B W Ima...

Страница 57: ...matically move the camera according to the preset positions that have been created You can increase or decrease the duration before moving to the next preset position Pattern No function on this model...

Страница 58: ...heduled time or event occurs For example setting this to 30 seconds will enable recording for a motion event that occurred at 12 00 00 to contain footage from 11 59 30 Post record The number of second...

Страница 59: ...ivacy or sensitive areas You can place up to four zones per camera to hide from view Click and drag on the preview window to select the area you want to hide To remove an existing privacy mask click o...

Страница 60: ...arning message is sent to the Night Owl X or Night Owl X HD client software Send Email If you have configured your email account details an alert is sent to your email address Settings Specify the DVR...

Страница 61: ...e timeline represents an hour in the 24 hour period 8 4 Record 8 4 1 Schedule When defining a recording schedule there are 3 types of recording to choose from Continuous Blue The DVR will constantly r...

Страница 62: ...ou can simply click and drag the mouse over the squares corresponding to your desired days and times In this section of the menu you can customize how the DVR records footage and encodes the files Enc...

Страница 63: ...maximum compression rate that H264 can reach while retaining optimal video quality It is enabled by default and doubles the recording space capacity on your DVR s HDD The Substream Menu within the Vi...

Страница 64: ...e hard drive The DVR will always record over the oldest files on your hard drive first This menu allows you to format the hard drive s in the DVR Do not format a drive that already has data on it as t...

Страница 65: ...ench and Spanish Resolution DVR Output Resolution Time Zone Time Zone is particularly important if you have enabled NTP set this to your time zone Date Format On screen display of the Date System Date...

Страница 66: ...he menu screen and displays Live View screen Menu Output Mode If you have multiple displays connected to your DVR you can select which display the Menu Bar and Menu will be displayed on either HDMI or...

Страница 67: ...the recommended way for the DVR to receive an IP address from your router If you require the DVR to have a static IP address you will need to disable this option Static networks require all devices t...

Страница 68: ...Owl X app with your DVR Enable or Disable DDNS service to view your DVR from a computer Device Domain Name Set to the domain name you created when registering your DDNS User The username created durin...

Страница 69: ...of 60 minutes is recommended NTP Server The default server used to obtain accurate date and time NTP Port The default is 123 you should only change this if you re using a different NTP server and you...

Страница 70: ...ail server For example username gmail com or similar Select Receiver Select an e mail recipient to configure The DVR can send email notifications to up to three receivers Receivers Address The email a...

Страница 71: ...umber of seconds to dwell on a video channel before switching to the next channel when enabling Start Auto switch via the Mouse Menu in Live View Enable Audio Output As the cameras supplied with the D...

Страница 72: ...ll automatically delete old footage to ensure it can continue to record HDD Error Occurs when the DVR has trouble accessing its hard drives or when it cannot detect one at all IP Conflicted Occurs whe...

Страница 73: ...ame from the table and then click the Delete icon button Push Notification A warning message is sent to the Night Owl X client softwarewhen an exception occurs Send Email If you ve have configured you...

Страница 74: ...ailable the system will suggest upgrading to the most current firmware version In this section of the menu you can check on the status of each camera connected to the DVR You can easily find out which...

Страница 75: ...can check on the recording settings for each camera connected to the DVR You can also find out if any camera has a recording in progress In this section of the menu you can view your current network...

Страница 76: ...e status of hard drives connected to the DVR The DVR continuously creates information logs for every alarm event operation and exception as they happen These logs are stored in the DVR s hard drive an...

Страница 77: ...have customized including your recording settings schedule and so on using a USB storage device This will come in handy as it will save you time if you need to reset the DVR back to factory default s...

Страница 78: ...ult settings of your DVR system 8 7 5 Default How to upgrade DVR firmware using a USB device NOTE DO NOT power off the DVR during firmware update process as it will cause damage to your unit Connect a...

Страница 79: ...t settings There are two options available The DVR will reboot after you click Yes Factory Default Will reset all the parameters including network and user settings Restore Defaults Will do the same b...

Страница 80: ...80 CHAPTER 9 GLOSSARY...

Страница 81: ...allows for PTZ functions to be sent back and forth between the DVR and camera using a standard BNC Video Power cable without the need for a separate port ISP Internet Service Provider An organization...

Страница 82: ...82 CHAPTER 10 WARRANTY...

Страница 83: ...cause beyond its control This warranty shall not apply to installation or the removal and re installation of products after repair Night Owl does not make any claims or warranties of any kind whatsoe...

Страница 84: ...or distribution of video audio recordings from security cameras and or audio devices are prohibited or restricted by federal state and local laws When enabling and or using audio recording features wi...

Страница 85: ...85 CHAPTER 11 TROUBLESHOOTING...

Страница 86: ...power bar or surge protector try bypassing the bar and connecting the power directly to the wall outlet 3 Confirm that there is power at the outlet 4 Connecting the power cable to another outlet 5 Tes...

Страница 87: ...another channel or use another cable The image on the DVR appears but does not have sound Audio cables are loose or have been disconnected Check the AUDIO connection to the DVR Audio channels are dis...

Страница 88: ...88 CHAPTER 12 USER INFORMATION...

Страница 89: ...ress Component Model Number General DVR Information Internet Login Information NOTE The Mac Address can be found within the Network tab of your DVR s Maintenance Menu The Component Model Number can be...

Страница 90: ...r countries EMAIL Sales Support Sales NightOwlSP com Technical Support Support NightOwlSP com PHONE English Spanish French Sales Technical Support 1 866 390 1303 Live Chat 24 7 365 days a year WEBSITE...

Отзывы: