


9
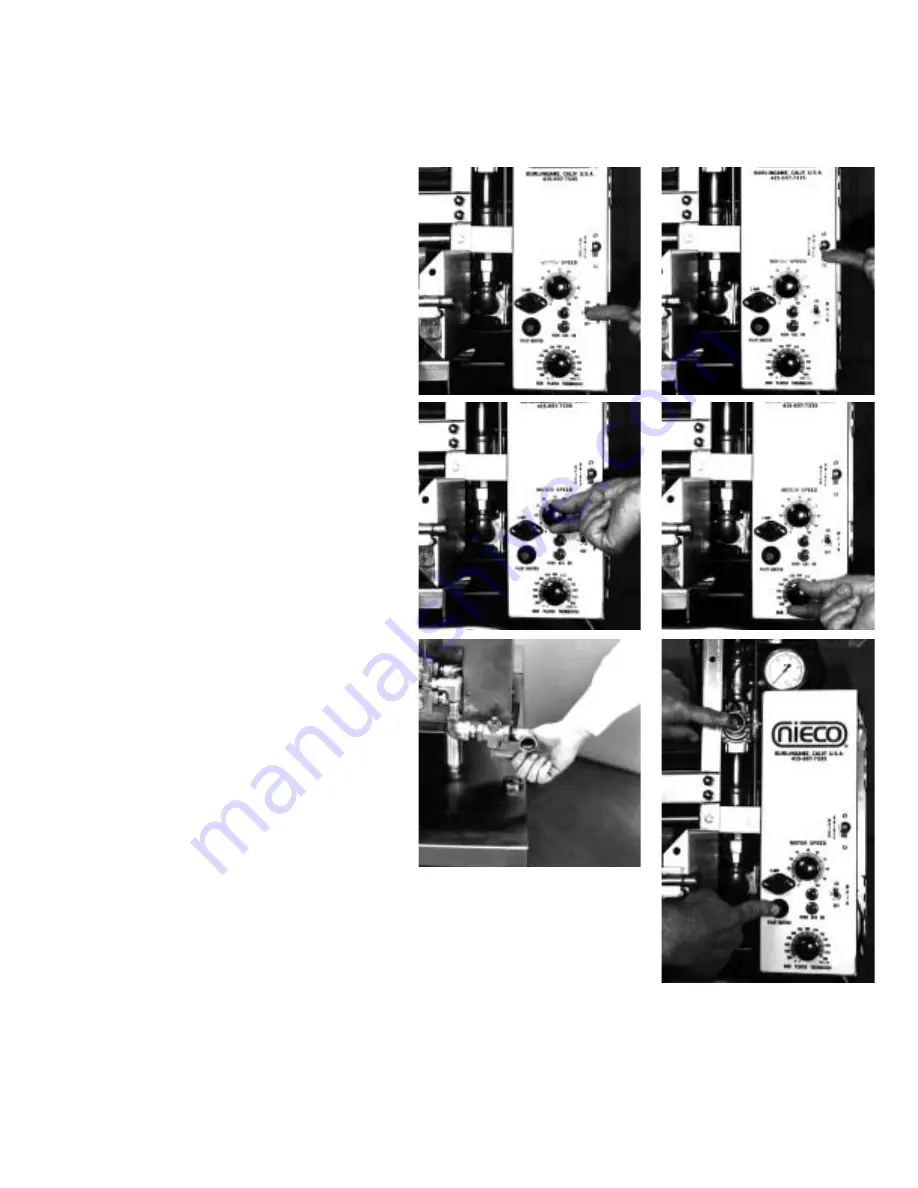
STEP-BY-STEP LIGHTING PROCEDURE
Before lighting, make sure that all parts are installed in the proper location, all controls are turned off,
and the ventilation hood fan is turned on.
1. Turn on Main Power Switch.
1
2
2. Turn on Motor Switch.
3. Set Motor Speed Control knob to
3
4
desired setting. (BK Spec = 26 Links per
Minute).
4. Set the Bun Platen Thermostat to
the desired setting. (Use a setting of
450° F to start.)
5. Open the Manual Gas Valve. The valve is
5
6
open when the handle is in-line with the pipe.
6. Push and hold the Red Push Button Valve.
This will start the flow of gas to the pilot lights.
While holding in the Red Button, push the Ignitor
button on the front of the control box. After the
pilot lights, hold the Red Valve in for 30 seconds
to allow the thermocouple to heat. When you
release the Red Push Button, the burners
should ignite.
If the ignitor is not working, use a long-stem
lighter to manually light the pilot.
7. After lighting the broiler, check the gas pressure
to be sure it is adjusted to the levels stated on the
machine rating plate. Allow the broiler at least
30 minutes to warm up.
SHUTDOWN PROCEDURE
For EMERGENCY shutdown, turn off the Main Power switch and shut off the manual gas valve.
For PLANNED shutdowns - clear machine of all food products, turn the motor and main switches off.
CAUTION: Turn all appliance switches off before disconnecting cord from power supply.
Содержание 930 GAS
Страница 2: ......
Страница 16: ...16 G PARTS AND LOCATION Model 980 Gas Feed End View ...
Страница 17: ...17 G PARTS AND LOCATION Model 980 Gas Left Side View ...
Страница 18: ...18 G PARTS AND LOCATION Model 980 Gas Right Side View ...
Страница 19: ...19 G PARTS AND LOCATION Model 950 Gas Feed End View ...
Страница 20: ...20 G PARTS AND LOCATION Model 950 Gas Left Side View ...
Страница 21: ...21 G PARTS AND LOCATION Model 950 Gas Right Side View ...
Страница 22: ...22 G PARTS AND LOCATION Model 930 Gas Feed End View ...
Страница 23: ...23 G PARTS AND LOCATION Model 930 Gas Left Side View ...
Страница 24: ...24 G PARTS AND LOCATION Model 930 Gas Right Side View ...
Страница 30: ...30 J WIRING DIAGRAM 930 950 980 Gas Domestic U S A ...
Страница 31: ...31 J WIRING DIAGRAM 930 950 980 Gas Export ...