Nicol Scales & Measurement RoughDeck Скачать руководство пользователя страница 16

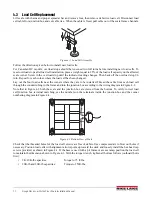
2K – 10K models:  1.625"

20K models:           2.16"

30K models:           1.66"

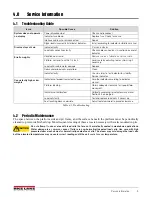
Service Information

11

Figure 4-3. Foot Pad - Side View

Route the load cell cables near each corner so that the cable is free from possible contact with each foot. Hold the 

cable in position with the adhesive-backed cable ties supplied in the hardware kit.

Do not cut load cell cables

. Coil extra cable before it enters the junction box, tie with cable ties, and insert the 

coils into the channel.
After coiling excess cable, pass each individual end of load cell cable through its cord grip in the NEMA Type 4X 

junction box.
Corner correction trimming and calibration is necessary after load cell replacement. Follow instruction in 

Section 3.2 and Section 3.3 on page 8.

4.3.1

Load Cell Wiring to Junction Box

The four load cells are each wired to their respective terminals in the junction box according to the corner 

numbering system shown in Figure 4-4, and the coloring code in Table 4-2.
Pull excess cable out of the junction box enclosure and tighten the cord grip dome nuts with a wrench. To be 

watertight, the nuts must be tightened to the point where the rubber sleeving begins to protrude out of the nut. 

Finally, pull on each of the four cables to make sure that they do not slip.

1

4

2

3

Figure 4-4. Corner Numbering - Top View

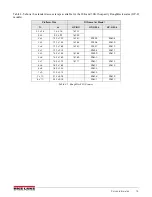
Table 4-2. Load Cell Wiring

Color Cable Code

J-Box Terminal

Red

+ Excitation

Black

- Excitation

Green

+ Signal

White 

- Signal

Bare or Clear

Shield

Содержание RoughDeck

Страница 1: ...ustin Ft Worth NicolScales com 800 225 8181 Contact Us Nicol Scales Measurement is an ISO Accredited Calibration Company that has provided calibration repair and sales of all types of weighing and mea...

Страница 2: ...RoughDeck Low Profile Floor Scale HP HP H HC and ROUGH N READY Installation Manual PN 66662 Rev F...

Страница 3: ......

Страница 4: ...e 8 4 0 Service Information 9 4 1 Troubleshooting Guide 9 4 2 Periodic Maintenance 9 4 3 Load Cell Replacement 10 4 3 1 Load Cell Wiring to Junction Box 11 4 4 Replacement Parts List and Accessories 1...

Страница 5: ...i RoughDeck Low Profile Floor Scale Installation Manual Rice Lake continually offers web based video training on a growing selection of product related topics at no cost Visit www ricelake com webinar...

Страница 6: ...stom frames for pit installations and access ramps for all sizes and models of the RoughDeck Decks designed for use in pits can be ordered with holes drilled in the deck directly above each foot for a...

Страница 7: ...use this product if any of the components are cracked DO NOT exceed the rated load limit of the unit DO NOT make alterations or modifications to the unit DO NOT remove or obscure warning labels DO NO...

Страница 8: ...In operation the scale must be level within 1 4 inch Either choose a site where the floor is close to this standard to avoid excessive shimming or modify the floor at the chosen site to meet this stan...

Страница 9: ...oor check the deck with the spirit level to be sure the scale is within 1 4 inch of level 2 4 2 Mounting Plate Installation For permanent applications the scale should be secured to the floor to preve...

Страница 10: ...SI SHD EX I S G A L T SI M S I N L T R EX EX SI SHD SI EX SI EX SI SHD EX SHD SE SE EX Figure 2 3 Junction Box Indicator Terminal 2 5 1 Electrical Interface to Indicator Twenty feet of 6 wire cable to...

Страница 11: ...itable poured concrete foundation according to standard construction practices COVER PLATE 1 24 SLOPE LOAD CELL CUP FOOT ASSEMBL Y GROUT Figure 2 5 Section Showing Installed Heavy Capacity HP H Model...

Страница 12: ...cessary Access ramps can only be attached to the scale on one of the two scale sides that are perpendicular to the longitudinal axis of the load cells For example the scale shown in Figure 2 5 could h...

Страница 13: ...page 11 for scale deck corner numbering The indicator must be connected and calibrated approximately but it need not indicate the exact weight value A test weight will be required The recommended test...

Страница 14: ...Consistently high or low weights Indicator not properly adjusted to zero Zero the indicator according to indicator manual Platform binding Obtain adequate clearance for free platform movement Indicato...

Страница 15: ...where they are to be installed Thread the cable from each load cell through the conduit tubing in the frame and into the junction box according to the wiring diagram in Figure 4 2 Note that in Figure...

Страница 16: ...ation is necessary after load cell replacement Follow instruction in Section 3 2 and Section 3 3 on page 8 4 3 1 Load Cell Wiring to Junction Box The four load cells are each wired to their respective...

Страница 17: ...8765 39596 39609 4 x 6 1 22 x 1 83 18767 39597 39610 4 x 7 1 22 x 2 13 39598 39611 5 x 5 1 53 x 1 53 18763 39599 39612 5 x 6 1 53 x 1 83 18769 39600 5 x 7 1 53 x 2 13 18771 39601 39614 6 x 6 1 83 x 1...

Страница 18: ...0k 2 5 x 2 5 76 x 76 18757 3 x 3 92 x 92 18759 4 x 4 1 22 x 1 22 18761 39595 39608 4 x 5 1 22 x 1 53 18765 39596 39609 4 x 6 1 22 x 1 83 18767 39597 39610 4 x 7 1 22 x 2 13 39598 39611 5 x 5 1 53 x 1...

Страница 19: ...confirms that the nonconformity actually exists and was not caused by accident misuse neglect alteration improper installation improper repair or improper testing RLWS shall be the sole judge of all...

Страница 20: ......
Страница 21: ...USA U S 800 472 6703 Canada Mexico 800 321 6703 International 715 234 9171 Europe 31 0 26 472 1319 www ricelake com www ricelake mx www ricelake eu www ricelake co in m ricelake com Rice Lake Weighing...

Отзывы: