NI PXIe-4138 Скачать руководство пользователя страница 2

Verifying the System Requirements

To use the NI-DCPower instrument driver, your system must meet certain requirements.

Refer to the product readme, which is available on the driver software media or online at 

ni.com/manuals

, for more information about minimum system requirements, recommended

system, and supported application development environments (ADEs).

Unpacking the Kit

Notice


To prevent electrostatic discharge (ESD) from damaging the module,

ground yourself using a grounding strap or by holding a grounded object, such as
your computer chassis.

1.

Touch the antistatic package to a metal part of the computer chassis.

2.

Remove the module from the package and inspect it for loose components or other signs
of damage.

Notice


Never touch the exposed pins of connectors.

Note


Do not install a module if it appears damaged in any way.

3.

Unpack any other items and documentation from the kit.

Store the module in the antistatic package when the module is not in use.
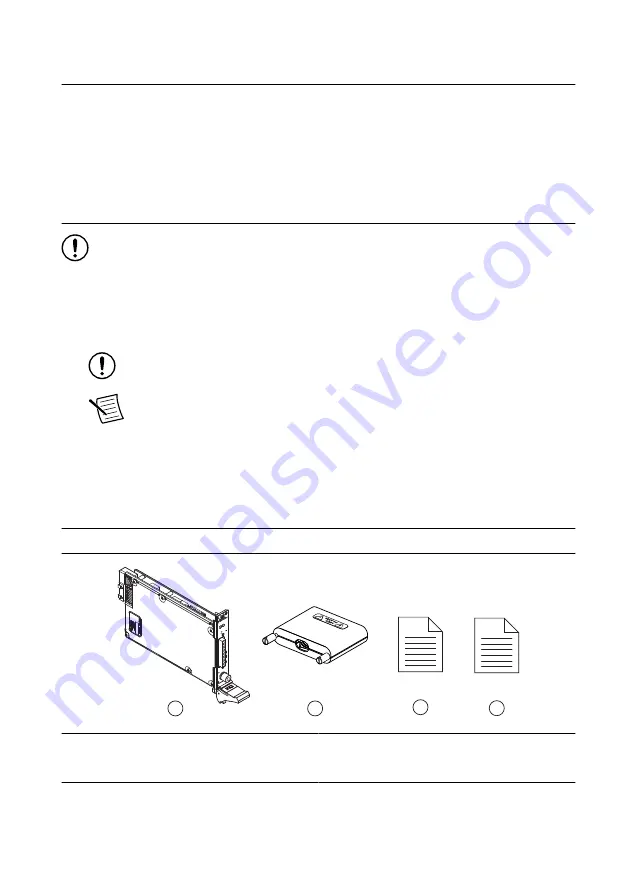
Kit Contents

Figure 1. NI 4138/4139 Kit Contents

3

1

2

OUTPUT CA

T I

ACCESS

ACTIVE

LO

NSE

LO

ARD

HI

ARD

NSE

HI

System SMU

NI PXI

e-4138

OUTPUT

±60 V      , 3 A MAX
150 V        MAX to

4

1. NI PXIe-4138/4139 System SMU Device
2. Output Connector Assembly

3. Safety, Environmental, and Regulatory

Information

4. Product documentation

2

  | 

ni.com

  | 

NI PXIe-4138/4139 Getting Started Guide

Содержание PXIe-4138

Страница 1: ...one of the following places In MAX The PXIe 4139 40W shows NI PXIe 4139 40W and the PXIe 4139 20W shows as NI PXIe 4139 Device front panel The PXIe 4139 40W shows PXIe 4139 40W System SMU and the PXIe...

Страница 2: ...atic package to a metal part of the computer chassis 2 Remove the module from the package and inspect it for loose components or other signs of damage Notice Never touch the exposed pins of connectors...

Страница 3: ...t number 199198 01 NI screwdriver NI part number 781015 01 Visit ni com for more information about these additional items Preparing the Environment Ensure that the environment you are using the PXIe 4...

Страница 4: ...installing the PXIe 4138 4139 The AC power cord grounds the chassis and protects it from electrical damage while you install the PXIe 4138 4139 2 Power off the chassis 3 Inspect the slot pins on the c...

Страница 5: ...Note Tightening the top and bottom mounting screws increases mechanical stability and also electrically connects the front panel to the chassis which can improve the signal quality and electromagnetic...

Страница 6: ...O SENSE LO SENSE HI HI GUARD GUARD ACCESS ACTIVE OUTPUT OUTPUT CAT I C D E F G H I J A B K Table 1 Signal Descriptions Item Description A Access Status LED B Active Status LED C Output LO D Sense LO E...

Страница 7: ...ff Not Powered Green Powered Amber Device is being accessed Table 3 LED Active Status Indicator Status Indicator Output Channel State Off Channel not operating in a programmed state Green Channel oper...

Страница 8: ...CTIVE OUTPUT OUTPUT CAT I C D E F G H I J K A B PXIe 4139 40W System SMU 60 V 3 A 10 A Pulse MAX 150 V MAX to LO SENSE LO SENSE HI HI GUARD GUARD ACCESS ACTIVE OUTPUT OUTPUT CAT I K A B Table 4 Signal...

Страница 9: ...in a programmed state Red Channel disabled because of error such as an overcurrent condition Configuring the PXIe 4138 4139 in MAX Use Measurement Automation Explorer MAX to configure your NI hardwar...

Страница 10: ...he first time you install the PXIe 4138 4139 1 Install the PXIe 4138 4139 and let it warm up for 30 minutes Note Warm up begins when the PXI Express chassis has been powered on and the operating syste...

Страница 11: ...generate signals interactively using InstrumentStudio or you can use the NI DCPower instrument driver to program your device in the supported ADE of your choice NI PXIe 4138 4139 Getting Started Guid...

Страница 12: ...tudio year This launches InstrumentStudio and runs a soft front panel populated with devices detected on your system From Measurement Automation Explorer MAX select a device and then click Test Panels...

Страница 13: ...Files IVI Foundation IVI Refer to the Creating an Application with NI DCPower in Microsoft Visual C and C topic of the NI DC Power Supplies and SMUs Help installed with the NI DCPower driver software...

Страница 14: ...ernal signals only while the PXIe 4138 4139 is powered on Applying external signals while the module is powered off may cause damage 1 Disconnect any signals from the module front panels 2 Power off t...

Страница 15: ...m support Power Supplies Solutions ni com powersupplies Services ni com services NI Community ni com community NI PXIe 4138 Getting Started with LabWindows CVI Getting Started with LabVIEW NI DCPower...

Страница 16: ...and third party legal notices in the readme file for your NI product Refer to the Export Compliance Information at ni com legal export compliance for the NI global trade compliance policy and how to...

Отзывы: