background image

© National Instruments

|

A-9

NI PXIe-1082DC User Manual

Finish ................................................................ Conductive Clear Iridite on Aluminum Clear 

Chromate Zinc Plating on Cold Rolled Steel 
Polyurethane Enamel

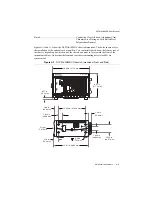
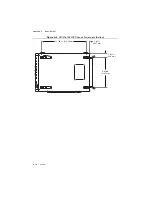
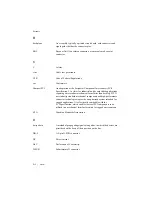
Figures A-1 and A-2 show the NI PXIe-1082DC chassis dimensions. The holes shown are for 
the installation of the optional rack mount kits. You can install those kits on the front or rear of 
the chassis, depending on which end of the chassis you want to face toward the front of the 
instrument cabinet. Notice that the front and rear chassis mounting holes (size M4) are 
symmetrical.

Figure A-1.  

NI PXIe-1082DC Chassis Dimensions (Front and Side)

10.6

8

 in. (271.4 mm)

15.61 in. (

3

96.5 mm)

6.97 in.

(177.1 mm)

0.57 in.

(14.5 mm)

3

.542 in.

(

8

9.97 mm)

1.

8

44 in

(46.

8

4 mm)

PXI C

a

rd

2.1

3

 in.

(54.2 mm)

12.

33

4 in. (

3

1

3

.2

8

 mm)

1.40 in.

(

3

5.6 mm)

1.

8

2

3

 in.

(46.

3

0 mm)

1.6

8

 in.

(42.6 mm)

0.

3

0 in.

(7.25 mm)

Front of

NI PXIe-1082DC

Содержание PXIe-1082DC
Страница 1: ...PXI Express TM NI PXIe 1082DC User Manual NI PXIe 1082DC User Manual July 2014 373876C 01...

Страница 2: ...email addresses and current events National Instruments Corporate Headquarters 11500 North Mopac Expressway Austin Texas 78759 3504 USA Tel 512 683 0100 For further support information refer to the N...

Страница 3: ...ESS FOR A PARTICULAR PURPOSE TITLE OR NON INFRINGEMENT AND ANY WARRANTIES THAT MAY ARISE FROM USAGE OF TRADE OR COURSE OF DEALING NI DOES NOT WARRANT GUARANTEE OR MAKE ANY REPRESENTATIONS REGARDING TH...

Страница 4: ...es independent from National Instruments and have no agency partnership or joint venture relationship with National Instruments Patents For patents covering National Instruments products technology re...

Страница 5: ...se interference with licensed radio communications services or other nearby electronics which can be determined by turning the hardware off and on you are encouraged to try to correct the interference...

Страница 6: ...m Reference Clock 1 9 PXIe_SYNC_CTRL 1 11 Chapter 2 Installation and Configuration Safety Information 2 1 Chassis Cooling Considerations 2 2 Providing Adequate Clearance 2 2 Chassis Ambient Temperatur...

Страница 7: ...2 Resetting the DC Mains Circuit Breaker 3 2 Replacing the Modular Power Supply 3 3 Removal 3 3 Installation 3 3 Configuration 3 3 Connecting to Power Source 3 3 Appendix A Specifications Appendix B P...

Страница 8: ...ind helpful as you read this manual IEEE 1101 1 1991 IEEE Standard for Mechanical Core Specifications for Microcomputers Using IEC 603 2 Connectors IEEE 1101 10 IEEE Standard for Additional Mechanical...

Страница 9: ...u Need to Get Started The NI PXIe 1082DC chassis kit contains the following items NI PXIe 1082DC chassis Filler panels DC power cable Tyco Electronics 9 ft 60 A Part Number 60DBPL NI PXIe 1082DC User...

Страница 10: ...peration for 0 to 30 C at 48 7 dBA Variable speed fan controller optimizes cooling and acoustic emissions Remote power inhibit control Complies with PXI and CompactPCI Specifications High Reliability...

Страница 11: ...the rear view of the NI PXIe 1082DC Figure 1 1 Front View of the NI PXIe 1082DC Chassis 1 Power Inhibit Switch 2 Power Inhibit Switch LED 3 Removable Feet 4 Chassis Carry Handle 5 Chassis Model Name 6...

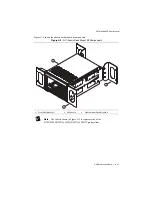
Страница 12: ...it The rear rack mount kit differs from the front kit to allow for easier installation into the rack For more information refer to Figure A 3 NI Chassis Rack Mount Kit Components 1 Chassis Ground Scre...

Страница 13: ...ess chassis PXI Express compatible products CompactPCI Express compatible 4 Link system controller products CompactPCI Express compatible Type 2 peripheral products PXI peripheral products Standard Co...

Страница 14: ...bit Mode Switch section of Chapter 2 Installation and Configuration for details about the Inhibit Mode switch Hybrid Peripheral Slots The chassis provides four hybrid peripheral slots as defined by th...

Страница 15: ...as well as routed back to the XP3 connector of the system timing slot as shown in Figure 1 4 The PXIe_DSTAR pairs can be used for high speed triggering synchronization and clocking Refer to the PXI E...

Страница 16: ...from slot 1 is not routed anywhere The right Local Bus 6 from slot 8 is also not routed anywhere Local bus signals may range from high speed TTL signals to analog signals as high as 42 V Initializati...

Страница 17: ...impedance matched to the backplane and a skew of less than 500 ps between slots drives PXI_CLK10 to each peripheral slot You can use this common reference clock signal to synchronize multiple modules...

Страница 18: ...tor When a 10 MHz clock is detected on this connector the backplane automatically phase locks the PXI_CLK10 PXIe_CLK100 and PXIe_SYNC100 signals to this external clock and distributes these signals to...

Страница 19: ...led PXIe_SYNC_CTRL for use when n 1 Refer to Table B 6 XP3 Connector Pinout for the System Timing Slot for system timing slot pinout Refer to Appendix A Specifications for the PXIe_SYNC_CTRL input spe...

Страница 20: ...perating personnel and service personnel must not remove protective covers when operating or servicing the chassis Adjustments and service to internal components must be undertaken by qualified servic...

Страница 21: ...is The primary intake vent is on the rear of the chassis where the air is filtered as it enters the power supply shuttle The secondary intake and exhaust vents are located along the sides of the chass...

Страница 22: ...If the temperature exceeds the stated spec the power switch LED will blink green as discussed in the Power Inhibit Switch LED Indicator section of this chapter Setting Fan Speed The fan speed selecto...

Страница 23: ...ode switch allows you to power on the chassis or place it in standby mode Set the Inhibit Mode switch on the back of the chassis to the Manual position Observe that all fans become operational and the...

Страница 24: ...nectors Connect devices to ports as required by your system configuration 7 Power on the chassis Verify that the system controller boots If the system controller does not boot refer to your system con...

Страница 25: ...tion of the various slot types This section contains general installation instructions for installing a peripheral module in a NI PXIe 1082DC chassis Refer to your peripheral module user manual for sp...

Страница 26: ...s pushed down as shown in Figure 2 5 6 When you begin to feel resistance push up on the injector ejector handle to fully seat the module into the chassis frame Secure the module front panel to the cha...

Страница 27: ...ents If the inhibit switch LED is steady red the system fans or power supply fan has failed The remaining fans will automatically be driven high Note If both system fans or the power supply fan fails...

Страница 28: ...age monitoring connector Connect the reference lead of the voltmeter to one of the ground pins Compare each voltage reading to the values listed in Table 2 2 Note Use the rear panel 9 pin D SUB connec...

Страница 29: ...ndby state of the chassis the Inhibit Mode switch must be in the Manual position PXI_CLK10 Rear Connectors There are two BNC connectors on the rear of the NI PXIe 1082DC chassis for PXI_CLK10 The conn...

Страница 30: ...chassis model through the Identify As submenu Further expanding the PXI System branch shows all devices in the system that can be recognized by NI VISA When your system controller and all your chassi...

Страница 31: ...CII text System integrators configuration utilities and device drivers can use these ini files The capability documentation for the NI PXIe 1082DC chassis is contained in the chassis ini file on the s...

Страница 32: ...procedures in this chapter Caution Many components within the chassis are susceptible to static discharge damage Service the chassis only in a static free environment Observe standard handling precau...

Страница 33: ...unters an over current condition the circuit breaker on the rear panel will trip to prevent damage to the chassis Complete the following steps to reset the circuit breaker 1 Turn off the chassis 2 Dis...

Страница 34: ...r supply shuttle on the back of the chassis Identify the eight mounting screws for the NI PXIe 1082DC that attach the power supply shuttle to the chassis Refer to Figure 1 2 Rear View of the NI PXIe 1...

Страница 35: ...egulation 3 3 V 0 2 5 V 0 1 12 V 0 1 Efficiency 65 typical Power disconnect The DC power cable provides main power disconnect Do not position the equipment so that it is difficult to disconnect the po...

Страница 36: ...should not exceed 38 25 W Backplane pin current capacity Load regulation Voltage Maximum Current 3 3 V 32 A 5 V 19 A 12 V 32 A 12 V 1 5 A 5 VAUX 2 0 A Slot 5 V V I O 3 3 V 12 V 12 V 5 VAUX System Cont...

Страница 37: ...on Bottom of module to top of module Module cooling intake Bottom rear of chassis Module cooling exhaust Along both sides and top of chassis Power supply cooling system Forced air circulation through...

Страница 38: ...to 95 noncondensing Tested in accordance with IEC 60068 2 56 Shock and Vibration Operational shock 30 g peak half sine 11 ms pulse Tested in accordance with IEC 60068 2 27 Meets MIL PRF 28800F Class...

Страница 39: ...roup 1 Class A emissions AS NZS CISPR 11 Group 1 Class A emissions FCC 47 CFR Part 15B Class A emissions ICES 001 Class A emissions Note For the standards applied to assess the EMC of this product ref...

Страница 40: ...tion about WEEE recycling centers and National Instruments WEEE initiatives visit ni com environment weee htm Backplane Size 3U sized one system slot with three system expansion slots and seven periph...

Страница 41: ...rminated with a 50 load to 1 30 V or Th venin equivalent 400 to 1000 mV Note For other specifications refer to the PXI 5 PXI Express Hardware Specification External 10 MHz Reference Out BNC on rear pa...

Страница 42: ...dance 100 10 Notes For PXIe slot to PXI_DSTAR mapping refer to the System Timing Slot section of Chapter 1 Getting Started For other specifications the NI PXIe 1082DC complies with the PXI 5 PXI Expre...

Страница 43: ...ose kits on the front or rear of the chassis depending on which end of the chassis you want to face toward the front of the instrument cabinet Notice that the front and rear chassis mounting holes siz...

Страница 44: ...A 10 ni com Appendix A Specifications Figure A 2 NI PXIe 1082DC Chassis Dimensions Bottom 12 700 in 322 58 mm 1 01 in 25 7 mm 1 02 in 25 8 mm 8 650 in 219 7 mm...

Страница 45: ...e chassis rack mount kit components Figure A 3 NI Chassis Rack Mount Kit Components Note The chassis shown in Figure A 3 is representative of the NI PXI 1042 NI PXIe 1062Q NI PXIe 1082DC product lines...

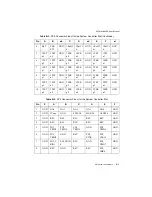
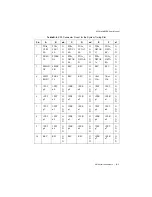
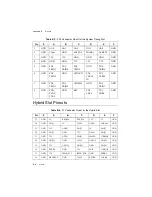
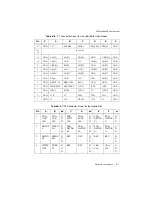
Страница 46: ...Timing slot Table B 6 shows the XP3 Connector Pinout for the System Timing slot Table B 7 shows the XP4 Connector Pinout for the System Timing slot Table B 8 shows the P1 Connector Pinout for the Hyb...

Страница 47: ...1 GND 5 4PET p3 4PET n3 GND 4PER p3 4PER n3 GND RSV RSV GND 6 RSV RSV GND RSV RSV GND RSV RSV GND 7 RSV RSV GND RSV RSV GND RSV RSV GND 8 RSV RSV GND RSV RSV GND RSV RSV GND 9 RSV RSV GND RSV RSV GND...

Страница 48: ...PER n2 GND 2PET p3 2PET n3 GND 10 3PET p0 3PET n0 GND 3PER p0 3PER n0 GND 2PER p3 2PER n3 GND Table B 4 XP4 Connector Pinout for the System Controller Slot Pin Z A B C D E F 1 GND GA4 GA3 GA2 GA1 GA0...

Страница 49: ...A9 PXIe_ DSTAR A9 G N D 4 PXIe_ DSTAR B1 PXIe_ DSTAR B1 G N D PXI_ STAR0 PXI_ STAR1 G N D PXIe_ DSTAR B9 PXIe_ DSTAR B9 G N D 5 PXIe_ DSTAR A1 PXIe_ DSTAR A1 G N D PXI_ STAR2 PXI_ STAR3 G N D PXIe_ DS...

Страница 50: ...STA RA G N D 3 SMBD AT SMBC LK G N D RSV RSV G N D RSV RSV G N D 4 MPW RGD PERS T G N D RSV RSV G N D 1Ref Clk 1Ref Clk G N D 5 1PET p0 1PET n0 G N D 1PER p0 1PER n0 G N D 1PET p1 1PET n1 G N D 6 1PET...

Страница 51: ...I_ CLK10 GND 7 GND PXI_ TRIG1 PXI_ TRIG0 ATNSW GND PXI_ TRIG7 GND 8 GND PXIe_ SYNC_ CTRL GND RSV PXI_ LBL6 PXI_ LBR6 GND Table B 8 P1 Connector Pinout for the Hybrid Slot Pin Z A B C D E F 25 GND 5V R...

Страница 52: ...PWR HEALTHY V I O INTP INTS GND 3 GND INTA INTB INTC 5V INTD GND 2 GND TCK 5V TMS TDO TDI GND 1 GND 5V 12V TRST 12V 5V GND Table B 9 XP3 Connector Pinout for the Hybrid Slot Pin A B ab C D cd E F ef 1...

Страница 53: ...T n6 G N D 1PERp6 1PERn6 G N D 1PETp7 1PETn7 G N D 10 RSV RSV G N D RSV RSV G N D 1PERp7 1PERn7 G N D Table B 10 XP4 Connector Pinout for the Hybrid Slot Pin Z A B C D E F 1 GND GA4 GA3 GA2 GA1 GA0 GN...

Страница 54: ...ruments B 9 NI PXIe 1082DC User Manual 7 GND PXI_ TRIG1 PXI_ TRIG0 ATNSW GND PXI_ TRIG7 GND 8 GND RSV GND RSV PXI_ LBL6 PXI_ LBR6 GND Table B 10 XP4 Connector Pinout for the Hybrid Slot Continued Pin...

Страница 55: ...you identify your systems accuracy and reliability requirements and provides warranty sparing and calibration services to help you maintain accuracy and minimize downtime over the life of your system...

Страница 56: ...tions Engineers make sure every question submitted online receives an answer Software Support Service Membership The Standard Service Program SSP is a renewable one year subscription included with alm...

Страница 57: ...10 9 micro 10 6 m milli 10 3 k kilo 103 M mega 106 G giga 109 T tera 1012 Symbols Degrees Equal or greater than Equal or less than Percent A A Amperes AC Alternating current ANSI American National St...

Страница 58: ...robust mechanical form factor than desktop PCI It uses industry standard mechanical components and high performance connector technologies to provide an optimized system intended for rugged applicati...

Страница 59: ...panel used to fill empty slots in the chassis G g 1 grams 2 a measure of acceleration equal to 9 8 m s2 GPIB General Purpose Interface Bus IEEE 488 gRMS A measure of random vibration The root mean squ...

Страница 60: ...y state percentage that a DC voltage output will change as a result of a specified change in input AC voltage step change from 90 to 132 VAC or 180 to 264 VAC load regulation The maximum steady state...

Страница 61: ...in signal transmission times slot blocker An assembly installed into an empty slot to improve the airflow in adjacent slots standby The backplane is unpowered off but the chassis is still connected t...

Страница 62: ...s in a measurement or control system The 10 MHz REF IN and OUT BNC connectors on the rear of the chassis can be used to synchronize multiple chassis to one reference clock The PXI backplane specificat...

Страница 63: ...2 11 configuration See installation configuration and operation connector pinouts See pinouts cooling setting fan speed 2 3 D DB 9 connector pinout table 2 8 power supply voltages table 2 9 dimensions...

Страница 64: ...4 safety ground connecting 2 4 unpacking 1 1 NI PXIe 1082DC backplane interoperability with CompactPCI 1 5 local bus 1 8 overview 1 5 peripheral slots hybrid 1 6 PXI Express 1 6 PXIe_SYNC_CTRL 1 11 s...

Страница 65: ...ce clock PXIe_CLK100 and PXIe_SYNC100 A 7 CE compliance A 5 chassis cooling A 3 dimensions figure A 9 A 10 electrical DC input A 1 DC output A 2 electromagnetic compatibility A 5 environmental operati...

Страница 66: ...Index I 4 ni com V voltage monitoring connector See DB 9 connector voltages at voltage monitoring connector DB 9 table 2 9 W WEEE information A 6...

Отзывы: