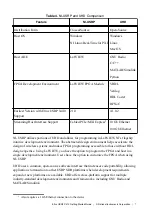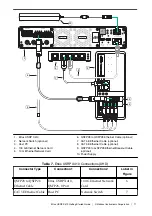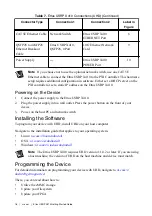
Table 6. Ettus USRP X410 Connections (NI-USRP)
Connector Type
Connection 1
Connection 2
Label in
Figure
PCIe/MXI Express
Cable
Ettus USRP X410,
iPass+ zHD Ports
PXI Bus Extension
Module, MXI-Express
Gen-3 x16 Ports
6
CAT 5E Ethernet
Cable
PXI Controller,
10/100/1000 LAN Port
Network Switch
7
CAT 5E Ethernet
Cable
Network Switch
Ettus USRP X410
ETHERNET Port
7
Power Supply
―
Ettus USRP X410
POWER Port
8
Note
If you choose not to use the optional network switch, use one CAT 5E
Ethernet cable to connect the Ettus USRP X410 to the PXI Controller. This hardware
setup requires additional configuration in software. Either set a DHCP server on the
PXI controller or set a static IP address on the Ettus USRP X410.
Powering on the Device
1.
Connect the power supply to the Ettus USRP X410.
2.
Plug the power supply into a wall outlet. Press the power button on the front of your
device.
3.
Power on the chassis and network switch.
Installing the Software
You must be an Administrator to install NI software on your computer.
1.
Install your ADE, LabVIEW.
2.
Download the driver software installer from
.
NI Package Manager downloads with the driver software to handle the installation. Refer
to the
NI Package Manager Manual
for more information about installing, removing, and
upgrading NI software using NI Package Manager.
3.
Follow the instructions in the installation prompts.
Note
Windows users may see access and security messages during
installation. Accept the prompts to complete the installation.
4.
When the installer completes, select
Restart
in the dialog box that prompts you to restart,
shut down, or restart later.
Programming the Device
You can use the NI-USRP instrument driver to create communications applications for the
Ettus USRP X410.
Ettus USRP X410 Getting Started Guide
|
© National Instruments Corporation
|
11

