NI Climbing Frames Rocky's Climber Скачать руководство пользователя страница 1

The Rocky’s Climber

 Instruction Manual 


Содержание Rocky's Climber

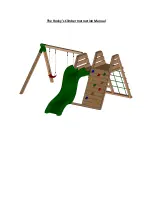
Страница 1: ...The Rocky s Climber Instruction Manual...

Страница 2: ...umber Description Image Quantity 1 2 3m post with 25 cut at bottom and 32 5 cut at top 4 with pre drilled 32mm holes 2 2m post with 25 cut at bottom and 32 5 cut at top 2 with pre drilled 32mm holes 3...

Страница 3: ...4 300mm post cut at angles of 32 5 2 5 558mm post cut at angles of 32 5 1 6 1 8m x 3 x 1 5 doubled up 2 7 1 8m x 3 x 1 5 2 8 7ft Slide 1...

Страница 4: ...9 1230mm x 3 x 1 5 cut at 25 2 10 960mm x 3 x 1 5 cut at 25 2 11 900mm x 3 x 1 5 4 12 932mm x 3 x 1 5 1 13 730mm x 3 x 1 5 1 14 795mm x 6 x 1 board 14...

Страница 5: ...15 932mm x 6 x 1 board for rock wall 11 16 1190mm x 6 x 1 board for railings 10 17 Screw Covers 10 18 100mm index screws 16 19 Decking screws 100 20 Rock holds 10...

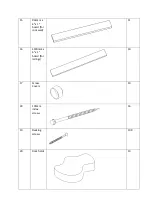
Страница 6: ...21 Swing varies depending on customers choice 2 22 M10 Swing Hooks 4 23 U Nails 1 bag...

Страница 7: ...24 Rope for Cargo Net 10m 25 Corner bracket 1 26 2 6m post for swing module legs with 30 cut at bottom 2 27 120mm screws 2 Other components included Grab Handles Steering Wheel Telescope...

Страница 8: ...Tools needed Cordless drill Handsaw Spirit Level Hammer Shovel Stepladder Pencil Measuring tape 10mm Hex bit PZ 2 Drill Bit...

Страница 9: ...ng the correct components for each step Step 1 Large A Frame Assembly Lay out two 2 3m posts on a flat surface ensuring the 32 5 angled cut and the pre drilled hole are at the top of the post Place th...

Страница 10: ...ber across both posts and secure these into place with decking screws The 960mm timber should be flush to the outside of each post and measuring the same down each post from the top Step 3 Repeat step...

Страница 11: ...rface ensuring the 32 5 angled cut and the pre drilled hole are at the top of the post Place the ends together so that it forms an A shape with the angled 558mm post in between Using the 100mm index s...

Страница 12: ...Step 5 Place one of the 1230mm x 3 x 1 5 timber across both posts and secure these into place with decking screws The 1230mm timber should be flush to the outside of each post...

Страница 13: ...ure the other 1230mm x 3 x 1 5 timber on the opposite side to which the 960mm x 3 x 1 5 timber is attached Place this across both posts and secure these into place with decking screws The 1230mm timbe...

Страница 14: ...g decking screws The A frame posts should fit in between the cut outs in the doubled up 3 x 1 5 Ensure that the A frames are all in the correct position and orientation The large A frame with two piec...

Страница 15: ...Step 8 Use the other two single 1 8m timbers to temporarily secure the top of the A frames ensure these pieces of timber are level across all three posts...

Страница 16: ...o pieces of 1230mm 3 x 1 5 before securing the decking boards The next step is to use the 795mm x 6 x 1 boards for your platforms These should be screwed down into the horizontal 3 x 1 5 with both sid...

Страница 17: ......

Страница 18: ...cure 3 x 1 5 timber braces to the tongue and groove on the inside of the enclosed bottom There are different ways to make the enclosed bottom it is up to you which way to install it however you should...

Страница 19: ...to both posts making sure it is flush to the platform and to the outside of the outside upright post For the rest of the timbers measure out equal distances between each step and secure using the deck...

Страница 20: ...find that when you put these in place they are flush to the outsides of both 3 x 3 posts Starting with the top board ensure that it is flush to the platform then you can start working your way up fro...

Страница 21: ...e positioned trying to keep them evenly spaced out Using a 10mm drill bit drill through where each rock is to be positioned To help avoid the boards splitting we recommend to slightly countersink each...

Страница 22: ...Step 13 Installing Cargo Net Using the piece of 932mm x 3 x 1 5 timber screw this on flush to the platform using decking screws...

Страница 23: ...hen divide this measurement by five This will give you the position as to where you need to nail the rope on each side pulling the rope tight across the horizontal each time Use the u nails to secure...

Страница 24: ...Step 15 Slide Assembly The slide just needs set into place and fixed down to the platform using decking screws You may need to install a piece of 3 x 1 5 timber under the platform to catch the screws...

Страница 25: ...along with the 100mm index screws The end without the 32mm hole pre drilled is fitted into the bracket Also ensure the 32mm hole is on the top face when the post is secured into the bracket Ensure th...

Страница 26: ...Step 17 Use 120mm screws to secure the swing bar to the top of the tall A frame To level the swing bar cut whatever is needed of the bottom of each leg...

Страница 27: ...Step 18 To finish the swings fit the o hooks into the predrilled holes Step 19 Clip on your swings which are all height adjustable to the swing hooks...

Страница 28: ...Step 20 Screw Cover Assembly Press the screw covers into the 32mm holes on the A frames Step 21 Remove the 1 8m temporary supports that were added during step 8...

Страница 29: ...s to form your railings on top of your platform These can be screwed on using the decking screws You will need to cut these flush with the outside of the 3 x 3 posts Ensure that the gaps between each...

Страница 30: ......

Страница 31: ...used on your climbing frame has been pressure treated This essentially means that it has been put into a pressurised vessel and has been impregnated with wood preserve With time and due exposure to w...

Отзывы: