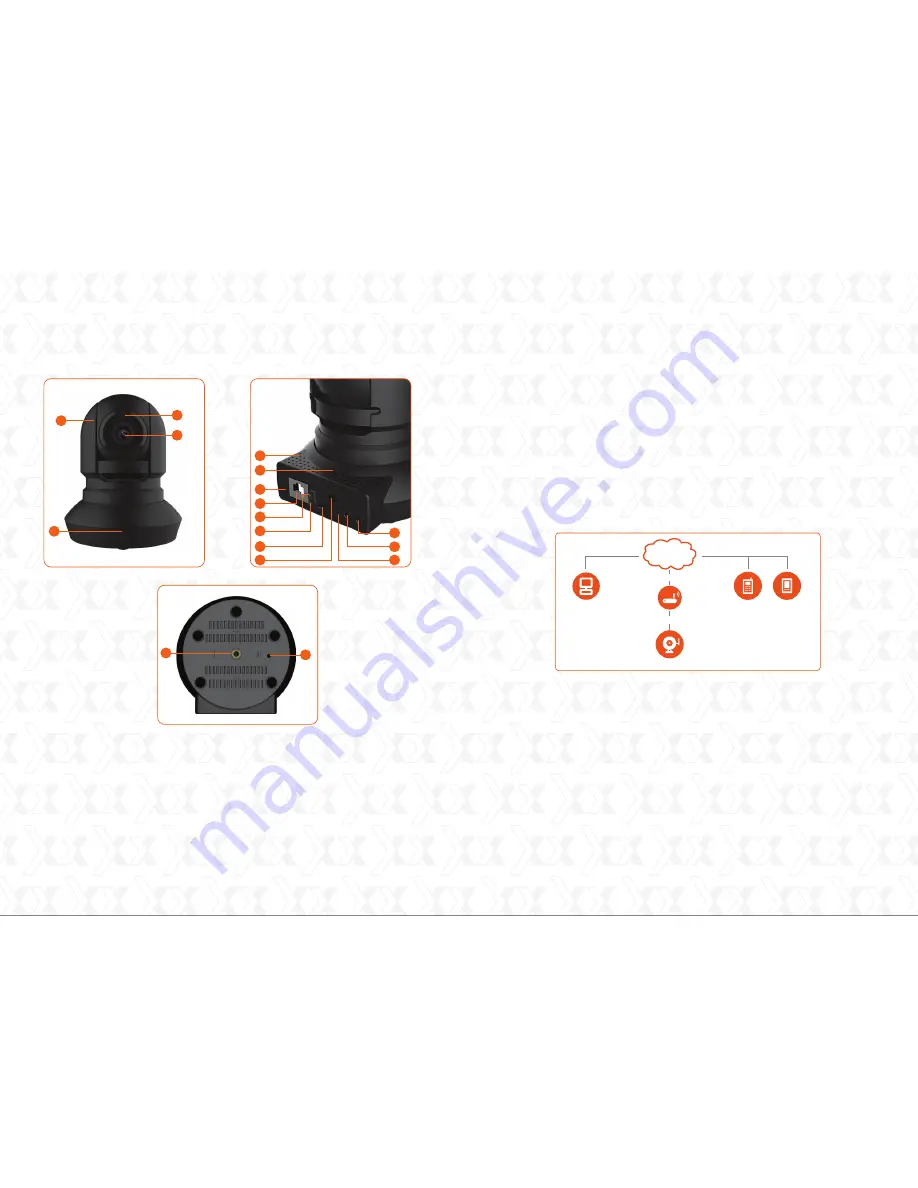
1. Light sensor
2. Night vision LEDs
3. Lens
4. Built-in microphone
5. Speakers
6. Heat sink
7. DC input
8. Network port (RJ45)
Wireless indicator light (green)
Power indicator light (red)
SD card slot
Wireless antenna jack
WPS button
Audio output
Audio input
Threaded mounting socket
Reset button
9.
10.
11.
12.
13.
14.
15.
16.
17.
Xpy 1230
Front panel
Basic setup
Back panel
Begin by attaching the mounting bracket and the antenna
(if applicable) to the device.
Select the mounting location for the camera, either on a wall,
ceiling, or on a desktop.
Insert the Ethernet cable to the RJ45 port of the IP camera.
Connect the other end of the network cable to your Ethernet
switch, hub, router or IP sharing device.
Plug the camera to a wall outlet using the supplied AC
adaptor to power it on.
Warning:
Make sure to use the supplied power adapter to
make the connections to the AC mains. The use of a different
adaptor may cause damage to the camera, heat up or catch
fire. Any damage caused to the camera by using the incorrect
power adaptor will void the warranty.
Verify that the mains voltage (110V or 220V) and frequency
(50Hz or 60Hz) of your location match those specified on
the label.
Connection of the IP camera to a router
Nexxt Solutions - Xpy1200/Xpy1230 Wireless IP camera
3
4
1
5
6
7
8
9
10
11
3
2
4
12
13
14
15
•
•
•
•
•
Nexxt Solutions - Xpy1200/Xpy1230 Wireless IP camera
INTERNET
Computer
Modem
PDA
Cellular
Phone
IP Camera
Intranet
Internet connection
Bottom view
16
17


