background image

EN-8

EN-9

Duo Cinema Instruction Manual

Getting Started

Installing Duo Cinema in Vehicle

This device is specifically designed to be mounted behind the driver and 

passenger seats.

1

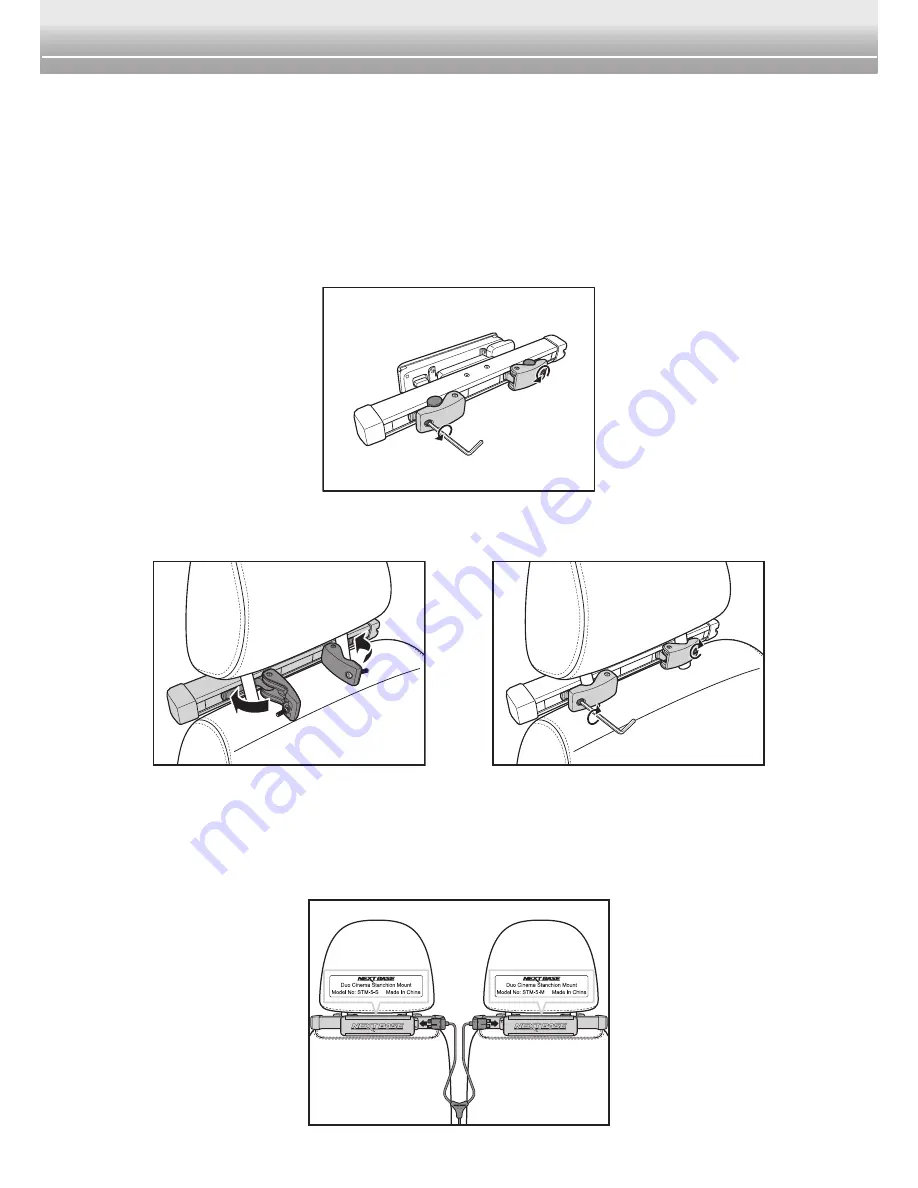
 Remove the screws to release both locking latches on the stanchion mount.

2

 Position the bracket on the bars of the headrest. Fasten the screws on both 

locking latches to fix the bracket firmly on the bars.


Note:


♦ Make sure the stanchion mount of the player is installed on the RIGHT headrest.

3

 Connect the player and the monitor with the AV/Power cable (one end of the 

car power cable) as shown in the following illustration.

Содержание Duo Cinema

Страница 1: ...Instruction Manual Duo Cinema Professional Automotive Rear Seat Entertainment System...

Страница 2: ...off and on the user is encouraged to try to correct the interference by one of the following measures Reorient or relocate the receiving antenna Increase the separation between the equipment and recei...

Страница 3: ...th dry cloth Always disconnect this device from the power source before cleaning Refer all servicing to authorized NEXTBASE repair centres only Do not attempt to repair this device yourself Doing so m...

Страница 4: ...ed 9 Installing Duo Cinema in Vehicle 9 Turning the Power On Off 11 Turn the Power On 11 Turn the Power Off 11 Making Connection 12 Insert the DVD Disc 12 Connect to HDMI Input Source 13 Insert USB Fl...

Страница 5: ...send videos pictures and music from their portable device or USB flash drive to Duo Cinema to watch what they want Package Contents The following items come with your package If any of them is missing...

Страница 6: ...ruction Manual Product Overview Player Speakers Open button HDMI1 port HDMI2 port USB port Headphone jack DC IN jack Volume Up key Volume Down key Stop key Mount slot Power key Source key Play Pause k...

Страница 7: ...nual Monitor Stanchion Mounts Speakers Headphone jack Volume Up key Volume Down key Backlight Up key Mount slot Power key Backlight Down key DC IN jack AV IN port AV IN port DC IN jack Locking latches...

Страница 8: ...rn this device on off Source button Switch the input source IR Headphones button Switch the IR headphones channel Function button Access the Function menu Navigation buttons Navigate through menus and...

Страница 9: ...elease both locking latches on the stanchion mount 2 Position the bracket on the bars of the headrest Fasten the screws on both locking latches to fix the bracket firmly on the bars Note Make sure the...

Страница 10: ...until it clicks into place Repeat the same procedure to install the monitor on the LEFT headrest 5 Adjust the player monitor to the desired viewing angle Note To remove the player monitor from the st...

Страница 11: ...or damage could result due to electrical surges during engine start Turn the Power On Plug the other end of the car power cable to the cigarette lighter socket of your vehicle This device automaticall...

Страница 12: ...ot unplug the USB flash drive or disconnect the cable connection during the file playback Insert the DVD Disc 1 On the player press the Open button and carefully open the disc cover 2 Place the disc i...

Страница 13: ...e HDMI1 HDMI2 port of the player 2 Connect the other end of the HDMI cable to the HDMI port of the portable device Insert USB Flash Drive You can also use this device to play your files stored in the...

Страница 14: ...s channel Channel A Channel B Off Note When the headphones are connected the speakers of Duo Cinema will be muted When the IR headphones are connected the built in speakers are not muted To adjust the...

Страница 15: ...uch the key repeatedly to toggle the input source If there is no signal detected a No Signal message will appear on the screen Media Playback Selecting File USB input only Make sure you have plugged i...

Страница 16: ...if there is no operation Search Locate the chapter to play Subtitle Change the subtitle language Repeat Select the repeat mode Audio Change the audio language Menu Display the DVD menu Title Display...

Страница 17: ...ss perform the following 1 Press the button to bring up the main menu Note For HDMI input source skip Step 2 2 Press the or button to select Screen Menu Then press the button to enter Screen Menu 3 Pr...

Страница 18: ...aver Resume Function PS On Off Off General Audio Video Preference Downmix Stereo General Audio General Audio Video Preference Video Setup Page Resolution General Audio Video Preference Preference Page...

Страница 19: ...discs contain scenes recorded at different angles Set the setting to On to view a scene at one of those angles Screen Saver Enable Disable the screen saver function Resume Function Enable Disable the...

Страница 20: ...ltisync TV NTSC TV TV Type Select the TV type based on your local region Audio Select your preferred audio language from those included on the DVD disc Subtitle Select your preferred subtitle language...

Страница 21: ...guage Press the or button to select the desired setting and press the button to confirm Reset Press the button to reset all the settings Note The OSD menu will disappear within 3 seconds if there is n...

Отзывы: