background image


Important Safety Precautions 

Always follow these basic safety precautions when using your player. This will reduce the risk of product damage and personal injury. 

y


Do not disassemble, repair or modify the player by yourself. Refer servicing to qualified personnel. 

y


Do not dispose of the player in fire to avoid explosion because the player has built-in battery. 

y


Do not touch the player with bare hands if the built-in battery is leaking. In this case, contact service center for help since the liquid may remain in 
the player. If your body or clothes has contacted with the battery liquid, wash it off thoroughly with water. Also, if some of liquid gets into your eyes, 
do not rub your eyes but immediately wash them with clean water, and consult a doctor. 

y


Keep the player away from direct sunlight and heat source.   

y


Do not expose the unit to rain or moisture to avoid any malfunction. 

y


Do not use the player in rather dry environment to avoid static. 

y


Never apply heavy impact on the player like dropping it or placing it on the magnet. 

y


Route USB cable so that people and pets are not likely to trip over or accidentally pull on them as they move around or walk through the area. 

y


Disconnect the USB cable from the computer when you do not use the player for a long time. 

y


Clean only with dry cloth. Make sure the player is turned off before cleaning. Do not use liquid cleanser. 

y


Be sure to back up your files. We will not be liable for the loss of data due to improper operation, repair or other causes. 

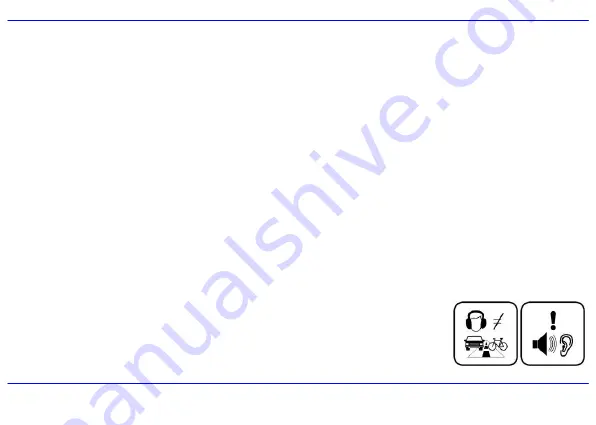
Precautions in using the earphone 

y


Do not use the earphone while driving an automobile or riding a bicycle. It is not only dangerous, but also 
against the law. To avoid an accident, do not turn up the volume of the earphones too high while walking. 

y


It’s not recommended that you use the earphones at a high volume for an extended time as this may cause 
hearing damage. 

Содержание MA794

Страница 1: ......

Страница 2: ...driver for windows 98 SE 6 Connecting player to computer 6 Loading files to the player 8 Disconnecting the USB cable 9 Charging the battery 10 Basic Operation 11 Turning on off the player 11 Adjusting...

Страница 3: ...20 Manually searching and storing stations 21 Listening to preset stations 21 Deleting preset stations 22 Selecting FM region 22 FM recording 23 Voice Recording and Playing 24 Listening to the recordi...

Страница 4: ...0 Navigating the settings menu 30 Setting USB mode 31 Setting time 31 Setting power 32 Setting language 32 Setting display 33 System tools 33 Hold time 34 Converting Video to MTV Format 35 Troubleshoo...

Страница 5: ...any confusion We have done our best to produce a complete and accurate manual however we cannot ensure there are no errors or omissions We have no responsibility for damages or loss of data caused by...

Страница 6: ...it to rain or moisture to avoid any malfunction y Do not use the player in rather dry environment to avoid static y Never apply heavy impact on the player like dropping it or placing it on the magnet...

Страница 7: ...ction repeat file repeat folder repeat and random y Supports the basic information of titles artists and albums of music files ID3 tag or lyrics synchronization show while music is playing y Supports...

Страница 8: ...ate leftwards Return to previous screen 6 Start Pause playback Enter main menu Confirm selection in the main menu 7 X Next track Fast forward search Navigate rightwards Confirm and enter next screen 8...

Страница 9: ...tium II 200MHz or AMD K6 or above 128 MB RAM Mac OSX V10 0 or later version Power PC G5 800MHz or above 512 MB RAM Linux OS Kernel V2 4 0 or later version Intel Pentium II 200MHz or above 128 MB RAM D...

Страница 10: ...e player is disconnected from the computer when installing the driver Connecting player to computer Files can be transferred directly into the player using the USB data cable Make sure that your compu...

Страница 11: ...a Transport Protocol mode MTP mode is available The player is recognized as an Audio Player and following is displayed To switch from the MTP mode to MSC mode press the button on the player The Player...

Страница 12: ...ayer directly The file will not play unless it is transferred using the following procedures 1 Make sure the MP3 player is in MTP mode 2 Launch Windows Media Player 10 or above 3 Select the Sync tab i...

Страница 13: ...e green arrow Safety Remove Hardware in the taskbar on the bottom right of the window 2 Select USB Device and click Stop 3 When the Stop a Hardware device appears click OK to disconnect the USB mass s...

Страница 14: ...Recommended temperature for battery charging is 0 to 35 y Fully charge it before you use the player for the first time or when you haven t used it for a long time y Charge the player right now when t...

Страница 15: ...pin e g the end of a paper clip and press it into the RESET hole to re initialize the system of your player Selecting main menu or mode The MP3 player has different modes Press and hold the button fo...

Страница 16: ...ys on Yes No Language English German Italian Spanish French Dutch Portuguese Russian Display Backlight 15 seconds 30 seconds 1 Minute Always on Record Quality Long time Normal quality High quality Del...

Страница 17: ...enter the Music mode By default the player will be in STOP mode 4 Press the button to start playing the music Display 1 Play mode indicator 2 Volume level 3 Playing file name ID3 tag Lyrics 4 Spectrum...

Страница 18: ...ss the W button to skip to the previous track y Press the X button to skip to the next track Searching backward or forward within a track y Press and hold the W button to search backward within a trac...

Страница 19: ...elect Repeat and press the X button The play mode menu appears on the screen 3 Press the S or T button to select the desired mode as below and press the X button to confirm and return to the previous...

Страница 20: ...appears on the screen 3 Use the S or T button to select the desired equalizer from Normal Pop Rock Classic Jazz Bass and Custom EQ Press the X button to confirm and return to the previous screen To c...

Страница 21: ...On or Off Press the X button to confirm and return to the previous screen To set play rate 1 Press the MENU button while listening to the music The music menu appears on the screen 2 Use the S or T bu...

Страница 22: ...ayer supports lyrics display while playing the music Only the lyrics in LRC format can be displayed To add lyrics to the music perform the following steps 1 Choose an MP3 WMA file for example love mus...

Страница 23: ...r automatically searches for all radio stations with the strongest reception and save up to 20 radio stations in the memory if you use the FM Radio function for the first time or restore all default s...

Страница 24: ...frequencies You can store and preset up to 20 received stations in the player s memory automatically by using Auto scan function 1 Press the MENU button to open the FM Radio sub menu while listening...

Страница 25: ...eption 2 To save the station manual searched press the MENU button The FM sub menu appears 3 Use the S or T button to select Saving and press the X button The current frequency will be saved in next p...

Страница 26: ...M Radio screen Note If you don t want to continue deleting press the W button to return to FM Radio screen Selecting FM region When you travel overseas change the FM region to search the local radio s...

Страница 27: ...n 4 To stop and finish the recording press the MENU button The player will return to the FM radio playback mode The recorded files are saved in the FMIN DIR folder of the MP3 player as WAV files forma...

Страница 28: ...ce mode and will be in stop mode 3 Press the button to play the recording files File selected file searched and playback function in the Voice mode correspond to the functions in the Music mode Record...

Страница 29: ...the recording you can set the recording quality 1 Press and hold the button to open the main menu 2 Use the W or X button to select Settings and press the button The Settings menu appears 3 Use the S...

Страница 30: ...urn to the previous screen press the W button Using the picture menu The picture menu allows you to select a manner to view the pictures such as slide show manual scan To watch a slide show 1 Press th...

Страница 31: ...to the previous screen in the video list press the W or MENU button Pausing playback While a video is playing press the button to pause the playback To resume the playback press the button once again...

Страница 32: ...utton The file list appears on the screen 3 Press the S or T button to navigate between files or folder 4 To delete a file select the file and press the MENU button The Delete menu appears on the scre...

Страница 33: ...nd press the X button to open the folder or view the selected file Note To return to the previous screen in the E book list press the W button Moving to previous next line y Press the S button to move...

Страница 34: ...scribes how to access and change various features through the MP3 player settings menu 1 Press and hold the button to open the main menu 2 Select Settings using the W or X button and press the button...

Страница 35: ...Windows Media Player 10 or above Note The MSC and MTP mode can also be exchanged by pressing the button when the player is connected to the computer Setting time y Adjust To change the current time Pr...

Страница 36: ...utes 120 minutes and Disable y Always on Yes The player will be always on while playing However it will turn off automatically in any other mode if no button is pressed for the set time No The player...

Страница 37: ...lete To delete a file in the file list y Format To format the player quickly or completely After formatting all the data on the player will be erased y Reset To restore all settings of the player to f...

Страница 38: ...keys will be locked after the set time if no button is pressed If the key lock function is activated the Key locked message will be displayed on the screen when any button is pressed To deactivate th...

Страница 39: ...must be converted to MTV format The MTVVideo Converter is supplied on the CD to enable you to convert the other formats to MTV format 1 Insert the provided CD to the CD ROM driver of your computer 2 D...

Страница 40: ...t Format box 6 Click Start Conversion For detailed operations click Help Note y To make your video playable on the player you must select 160x128 or less in the Output Frame Size box Advanced Setting...

Страница 41: ...is supported by the player Recording cannot be done y Check if there is enough memory and battery capacity The words of LCD display abnormality y Please ensure you select the correct language The but...

Страница 42: ...te 5Kbps 320Kbps Power off current 0 30mA S N rate 85dB Storage condition Humidity 90 Normal temperature Dynamic range 80dB Working condition Humidity 85 10 40 Distortion 0 2 Power out 2 1mW 16 ohm lo...

Страница 43: ...ones or earphones are the open air type designed to let you hear outside sounds don t turn up the volume so high that you can t hear what s around you Sound can be deceiving Over time your hearing com...

Страница 44: ...d internal physical damage to the player 5 Charge the battery if a The battery level icon displays An empty battery b The player powers off automatically and off again when restarted c No response whe...

Страница 45: ...ich can be determined by turning the equipment off and on the user is encouraged to try to correct the interference by one or more of the following measures Reorient or relocate the receiving antenna...

Страница 46: ...aused by mobile telephones or other products during operation If such interference is apparent please increase separation between the product and the mobile telephone or other product Industry Canada...

Страница 47: ...Nextar Hong Kong Limited All other brand names trademarks and service marks are properly of their owners Nextar may find it necessary to modify amend or otherwise change or update this manual We reser...

Отзывы: