


© 2020 Nexmosphere. All rights reserved. v1.0 / 05-20
All content contained herein is subject to change without prior notice.
N ex m o s p h e re
H i g h Te c h C a m p u s 1 0 ( M μ b u i l d i n g )
5 6 5 6 A E E i n d h ove n • T h e N e t h e r l a n d s
T
+ 3 1 4 0 2 4 0 7 0 7 0
E
s u p p o r t @ n ex m o s p h e re.c o m
4
QUICK START GUIDE | XC-741 XPERIENCE CONTROLLER
Example 5 | Button LED control
To set all button LEDs of a (touch) button interface
connected to X-talk interface 007 to “on”, send the
following API commands from the 3rd party device to the
XC-741 controller:
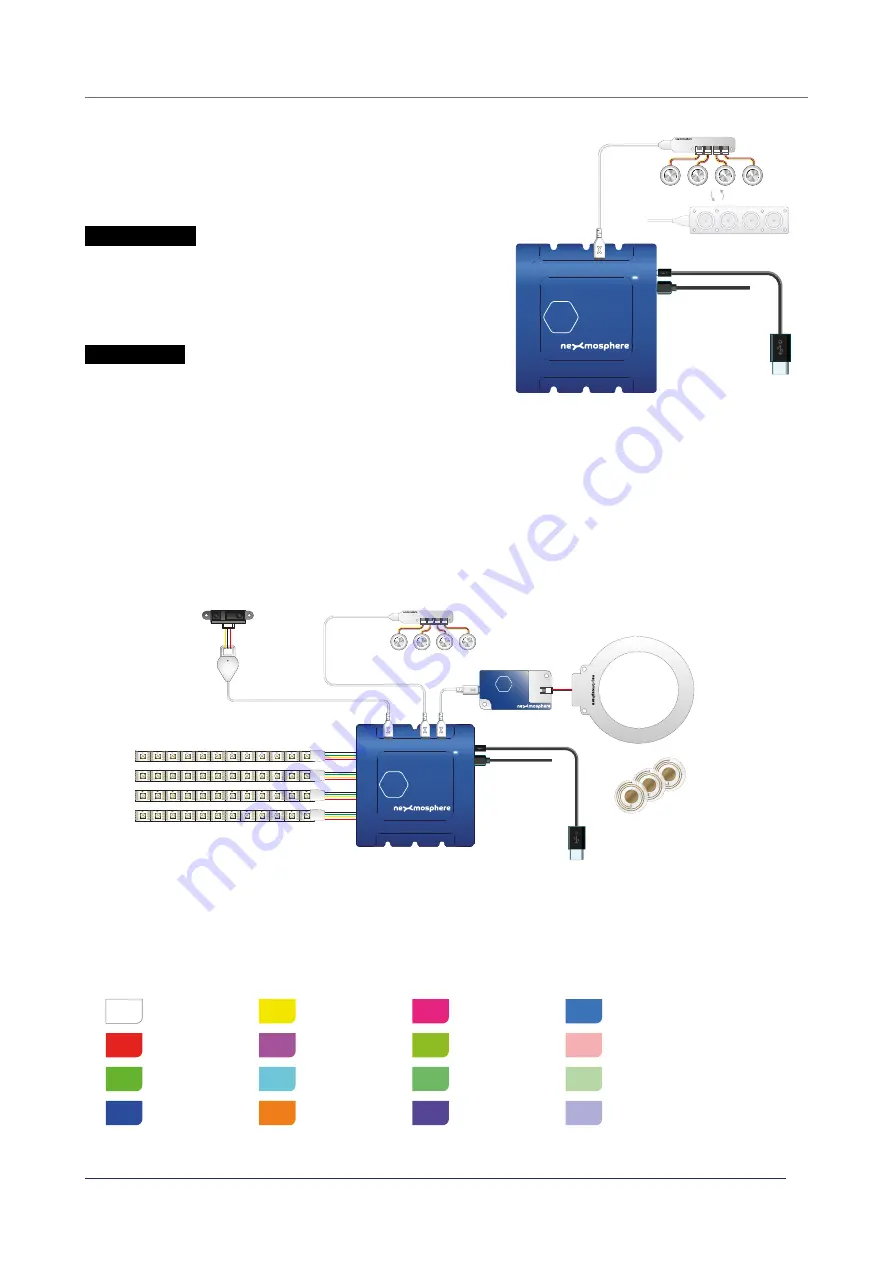
Combining Elements
The XC-741 Xperience controller has 4 RGBW LED outputs and 8 X-talk interfaces to which any combination of Elements
can be connected. For example, all examples in this Quick Start Guide can be combined on a single XC-741. The API
commands and operation will remain the same. When connecting multiple Elements that require a high amount of current
(LEDs or push buttons with LED ring), calculate the total required current of the Elements and check if this is within the
specification of the controller and its power supply source.
Default X-Wave LED colors
The XC-741 controller is pre-programmed with 16 default colors:
Please refer to the API Manual to learn how to overwrite the default colors with your own preferred X-Wave colors.
To set all button LEDs of a (touch) button interface
connected to X-talk interface 007 to “off”, send the
following API commands from the 3rd party device to the
XC-741 controller:
X007A[255]
X007A[0]
XT-B4N
(4x button interface)
XT-4F
(Touch buttons)
Push buttons
(with LED, 4x)
XT-B4
1
2
3
4
XC-741
(Xperience controller)
USB-A to Micro-USB cable
(connect to 3rd party device)
DC Power supply
(24V)
XC
XC-741
(Xperience controller)
USB-A to Micro-USB cable
(connect to 3rd party device)
DC Power supply
(24V)
XC
XY-146
(presence sensor)
XR
XR-C10
(RFID antenna)
XR-C10
RFID Tags
(number 1-3)
XR-DR1
(RFID antenna driver
XT-B4N
(4x button interface)
Push buttons
(with LED, 4x)
XT-B4
1
2
3
4
VCC
CI
DI
GND
VCC
CO
DO
GND
VCC
CI
DI
GND
VCC
CO
DO
GND
VCC
CI
DI
GND
VCC
CO
DO
GND
VCC
CI
DI
GND
VCC
CO
DO
GND
VCC
CI
DI
GND
VCC
CO
DO
GND
VCC
CI
DI
GND
VCC
CO
DO
GND
VCC
CI
DI
GND
VCC
CO
DO
GND
VCC
CI
DI
GND
VCC
CO
DO
GND
VCC
CI
DI
GND
VCC
CO
DO
GND
VCC
CI
DI
GND
VCC
CO
DO
GND
VCC
CI
DI
GND
VCC
CO
DO
GND
VCC
CI
DI
GND
VCC
CO
DO
GND
VCC
CI
DI
GND
VCC
CO
DO
GND
VCC
CI
DI
GND
VCC
CO
DO
GND
VCC
CI
DI
GND
VCC
CO
DO
GND
VCC
CI
DI
GND
VCC
CO
DO
GND
VCC
CI
DI
GND
VCC
CO
DO
GND
VCC
CI
DI
GND
VCC
CO
DO
GND
VCC
CI
DI
GND
VCC
CO
DO
GND
VCC
CI
DI
GND
VCC
CO
DO
GND
VCC
CI
DI
GND
VCC
CO
DO
GND
VCC
CI
DI
GND
VCC
CO
DO
GND
VCC
CI
DI
GND
VCC
CO
DO
GND
VCC
CI
DI
GND
VCC
CO
DO
GND
VCC
CI
DI
GND
VCC
CO
DO
GND
VCC
CI
DI
GND
VCC
CO
DO
GND
VCC
CI
DI
GND
VCC
CO
DO
GND
VCC
CI
DI
GND
VCC
CO
DO
GND
VCC
CI
DI
GND
VCC
CO
DO
GND
VCC
CI
DI
GND
VCC
CO
DO
GND
VCC
CI
DI
GND
VCC
CO
DO
GND
VCC
CI
DI
GND
VCC
CO
DO
GND
VCC
CI
DI
GND
VCC
CO
DO
GND
VCC
CI
DI
GND
VCC
CO
DO
GND
VCC
CI
DI
GND
VCC
CO
DO
GND
VCC
CI
DI
GND
VCC
CO
DO
GND
VCC
CI
DI
GND
VCC
CO
DO
GND
VCC
CI
DI
GND
VCC
CO
DO
GND
VCC
CI
DI
GND
VCC
CO
DO
GND
VCC
CI
DI
GND
VCC
CO
DO
GND
VCC
CI
DI
GND
VCC
CO
DO
GND
VCC
CI
DI
GND
VCC
CO
DO
GND
VCC
CI
DI
GND
VCC
CO
DO
GND
VCC
CI
DI
GND
VCC
CO
DO
GND
VCC
CI
DI
GND
VCC
CO
DO
GND
VCC
CI
DI
GND
VCC
CO
DO
GND
VCC
CI
DI
GND
VCC
CO
DO
GND
VCC
CI
DI
GND
VCC
CO
DO
GND
0
1
2
3
4
5
6
7
8
9
A
B
C
D
E
F
R
G
B
FF
FF
FF
FF
00
00
00
FF
00
00
00
FF
R
G
B
R
G
B
R
G
B
R
G
B
FF
FF
00
FF
00
FF
00
FF
FF
FF
80
00
R
G
B
R
G
B
R
G
B
R
G
B
FF
00
80
80
FF
00
00
FF
80
80
00
FF
R
G
B
R
G
B
R
G
B
R
G
B
00
80
FF
FF
B3
B3
B3
FF
B3
B3
B3
FF
R
G
B
R
G
B
R
G
B


